parking CADILLAC XT5 2020 User Guide
[x] Cancel search | Manufacturer: CADILLAC, Model Year: 2020, Model line: XT5, Model: CADILLAC XT5 2020Pages: 384, PDF Size: 6.52 MB
Page 143 of 384
142 LIGHTING
Exterior Lamps Off
Reminder
A warning chime sounds if the driver
door is opened while the ignition is off
and the exterior lamps are on.
Headlamp High/Low-Beam
Changer
3:Push the turn signal lever away
from you and release, to turn the high
beams on. To return to low beams,
push the lever again or pull it toward
you and release.
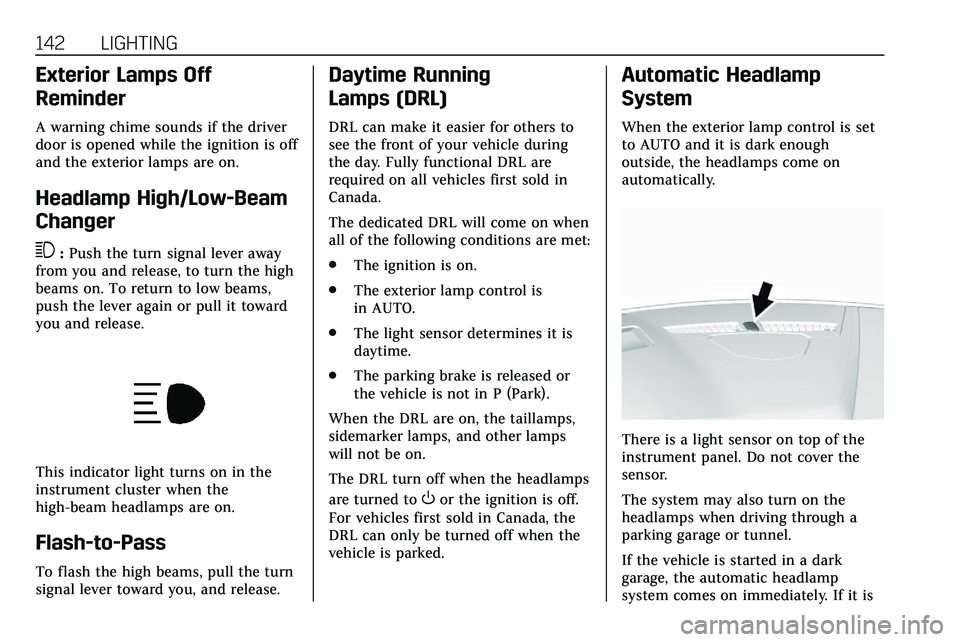
This indicator light turns on in the
instrument cluster when the
high-beam headlamps are on.
Flash-to-Pass
To flash the high beams, pull the turn
signal lever toward you, and release.
Daytime Running
Lamps (DRL)
DRL can make it easier for others to
see the front of your vehicle during
the day. Fully functional DRL are
required on all vehicles first sold in
Canada.
The dedicated DRL will come on when
all of the following conditions are met:
. The ignition is on.
. The exterior lamp control is
in AUTO.
. The light sensor determines it is
daytime.
. The parking brake is released or
the vehicle is not in P (Park).
When the DRL are on, the taillamps,
sidemarker lamps, and other lamps
will not be on.
The DRL turn off when the headlamps
are turned to
Oor the ignition is off.
For vehicles first sold in Canada, the
DRL can only be turned off when the
vehicle is parked.
Automatic Headlamp
System
When the exterior lamp control is set
to AUTO and it is dark enough
outside, the headlamps come on
automatically.
There is a light sensor on top of the
instrument panel. Do not cover the
sensor.
The system may also turn on the
headlamps when driving through a
parking garage or tunnel.
If the vehicle is started in a dark
garage, the automatic headlamp
system comes on immediately. If it is
Page 144 of 384

LIGHTING 143
light outside when the vehicle leaves
the garage, there is a slight delay
before the automatic headlamp
system changes to the Daytime
Running Lamps (DRL). During that
delay, the instrument cluster may not
be as bright as usual. Make sure the
instrument panel brightness control is
in the full bright position. See
Instrument Panel Illumination Control
0144.
When it is bright enough outside, the
headlamps will turn off or may change
to DRL.
The automatic headlamp system turns
off when the exterior lamp control is
turned to
Oor the ignition is off.
For vehicles sold in Canada, this
control only works when the
transmission is in P (Park).
Lights On with Wipers
If the windshield wipers are activated
in daylight with the engine on, and
the exterior lamp control is in AUTO,
the headlamps, parking lamps, and
other exterior lamps come on. The
transition time for the lamps coming
on varies based on wiper speed. When the wipers are not operating, these
lamps turn off. Move the exterior
lamp control to
Oor;to disable
this feature.
Hazard Warning Flashers
|: Touch|on the center stack to
make the front and rear turn signal
lamps flash on and off. Touch again to
turn the flashers off.
The hazard warning flashers turn on
automatically if the airbags deploy.
Turn and Lane-Change
Signals
Move the lever all the way up or down
to signal a turn.
An arrow on the instrument cluster
flashes in the direction of the turn or
lane change.
Raise or lower the lever until the
arrow starts to flash to signal a lane
change. Hold it there until the lane
change is completed. If the lever is
briefly pressed and released, the turn
signal flashes three times.
The turn and lane-change signal can
be turned off manually by moving the
lever back to its original position.
Page 147 of 384

146 LIGHTING
turned off. The dome lamp comes on
after the ignition is turned off. The
exterior lamps and dome lamp remain
on for a set amount of time, then
automatically turn off.
The exterior lamps turn off
immediately by turning the exterior
lamp control off.
This feature can be changed. See
Vehicle Personalization0131.
Battery Power Protection
The battery saver feature is designed
to protect the vehicle's battery.
If some interior lamps are left on and
the ignition is turned off, the battery
rundown protection system
automatically turns the lamp off after
some time.
Exterior Lighting Battery
Saver
The exterior lamps turn off about
10 minutes after the ignition is turned
off, if the parking lamps or headlamps
have been manually left on. This
protects against draining the battery. To restart the 10-minute timer, turn
the exterior lamp control to the off
position and then back to the parking
lamp or headlamp position.
To keep the lamps on for more than
10 minutes, the ignition must be on or
in ACC/ACCESSORY.
Page 159 of 384
158 DRIVING AND OPERATING
Driving and
Operating
Driving Information
Driving for Better FuelEconomy . . . . . . . . . . . . . . . . . . . . . . . . 159
Distracted Driving . . . . . . . . . . . . . . . . 159
Defensive Driving . . . . . . . . . . . . . . . . 160
Drunk Driving . . . . . . . . . . . . . . . . . . . . 160
Control of a Vehicle . . . . . . . . . . . . . . 160
Braking . . . . . . . . . . . . . . . . . . . . . . . . . . . . 161
Steering . . . . . . . . . . . . . . . . . . . . . . . . . . . 161
Off-Road Recovery . . . . . . . . . . . . . . . . 162
Loss of Control . . . . . . . . . . . . . . . . . . . 162
Off-Road Driving . . . . . . . . . . . . . . . . . 163
Driving on Wet Roads . . . . . . . . . . . 167
Hill and Mountain Roads . . . . . . . . 168
Winter Driving . . . . . . . . . . . . . . . . . . . . 168
If the Vehicle Is Stuck . . . . . . . . . . . 170
Vehicle Load Limits . . . . . . . . . . . . . . 170
Starting and Operating
New Vehicle Break-In . . . . . . . . . . . . 174
Ignition Positions . . . . . . . . . . . . . . . . 174
Starting the Engine . . . . . . . . . . . . . . 176
Stop/Start System . . . . . . . . . . . . . . . . 177
Engine Heater . . . . . . . . . . . . . . . . . . . . 178 Retained Accessory
Power (RAP) . . . . . . . . . . . . . . . . . . . . 180
Shifting Into Park . . . . . . . . . . . . . . . . 180
Shifting out of Park . . . . . . . . . . . . . . 180
Parking over Things That Burn . . . . . . . . . . . . . . . . . . . . . . . 182
Active Fuel Management . . . . . . . . 182
Extended Parking . . . . . . . . . . . . . . . . . 183
Engine Exhaust
Engine Exhaust . . . . . . . . . . . . . . . . . . . 183
Running the Vehicle While Parked . . . . . . . . . . . . . . . . . . . . . . . . . . . 183
Automatic Transmission
Automatic Transmission . . . . . . . . . 184
Manual Mode . . . . . . . . . . . . . . . . . . . . . 188
Drive Systems
All-Wheel Drive . . . . . . . . . . . . . . . . . . 190
Brakes
Electric Brake Boost . . . . . . . . . . . . . . 190
Antilock Brake System (ABS) . . . . 190
Electric Parking Brake . . . . . . . . . . . . 191
Brake Assist . . . . . . . . . . . . . . . . . . . . . . . 192
Hill Start Assist (HSA) . . . . . . . . . . . 193
Ride Control Systems
Traction Control/ElectronicStability Control . . . . . . . . . . . . . . . . 193
Driver Mode Control . . . . . . . . . . . . . 195
Cruise Control
Cruise Control . . . . . . . . . . . . . . . . . . . . 196
Adaptive Cruise Control . . . . . . . . . 198
Driver Assistance Systems
Driver Assistance Systems . . . . . . . 207
Assistance Systems for Parking
or Backing . . . . . . . . . . . . . . . . . . . . . . . 208
Rear Pedestrian Alert . . . . . . . . . . . . 216
Assistance Systems for Driving . . . . . . . . . . . . . . . . . . . . . . . . . . 217
Forward Collision Alert (FCA) System . . . . . . . . . . . . . . . . . . . . . . . . . . 217
Automatic Emergency Braking (AEB) . . . . . . . . . . . . . . . . . . . 220
Front Pedestrian Braking (FPB) System . . . . . . . . . . . . . . . . . . . . . . . . . . 221
Night Vision System . . . . . . . . . . . . . 223
Side Blind Zone Alert (SBZA) . . . . 226
Lane Change Alert (LCA) . . . . . . . . 226
Lane Keep Assist (LKA) . . . . . . . . . . 228
Fuel
Top Tier Fuel . . . . . . . . . . . . . . . . . . . . . 230
Recommended Fuel (2.0L L4
Engine) . . . . . . . . . . . . . . . . . . . . . . . . . . 230
Recommended Fuel (3.6L V6 Engine) . . . . . . . . . . . . . . . . . . . . . . 230
Prohibited Fuels . . . . . . . . . . . . . . . . . . 231
Fuels in Foreign Countries . . . . . . . 231
Fuel Additives . . . . . . . . . . . . . . . . . . . . 231
Page 162 of 384
DRIVING AND OPERATING 161
Braking
Braking action involves perception
time and reaction time. Deciding to
push the brake pedal is perception
time. Actually doing it is
reaction time.
Average driver reaction time is about
three-quarters of a second. In that
time, a vehicle moving at 100 km/h
(60 mph) travels 20 m (66 ft), which
could be a lot of distance in an
emergency.
Helpful braking tips to keep in mind
include:
.Keep enough distance between
you and the vehicle in front
of you.
. Avoid needless heavy braking.
. Keep pace with traffic.
If the engine ever stops while the
vehicle is being driven, brake normally
but do not pump the brakes. Doing so
could make the pedal harder to push
down. If the engine stops, there will
be some power brake assist but it will
be used when the brake is applied. Once the power assist is used up, it
can take longer to stop and the brake
pedal will be harder to push.
Steering
Electric Power Steering
Caution
To avoid damage to the steering
system, do not drive over curbs,
parking barriers, or similar objects
at speeds greater than 3 km/h
(1 mph). Use care when driving over
other objects such as lane dividers
and speed bumps. Damage caused
by misuse of the vehicle is not
covered by the vehicle warranty.
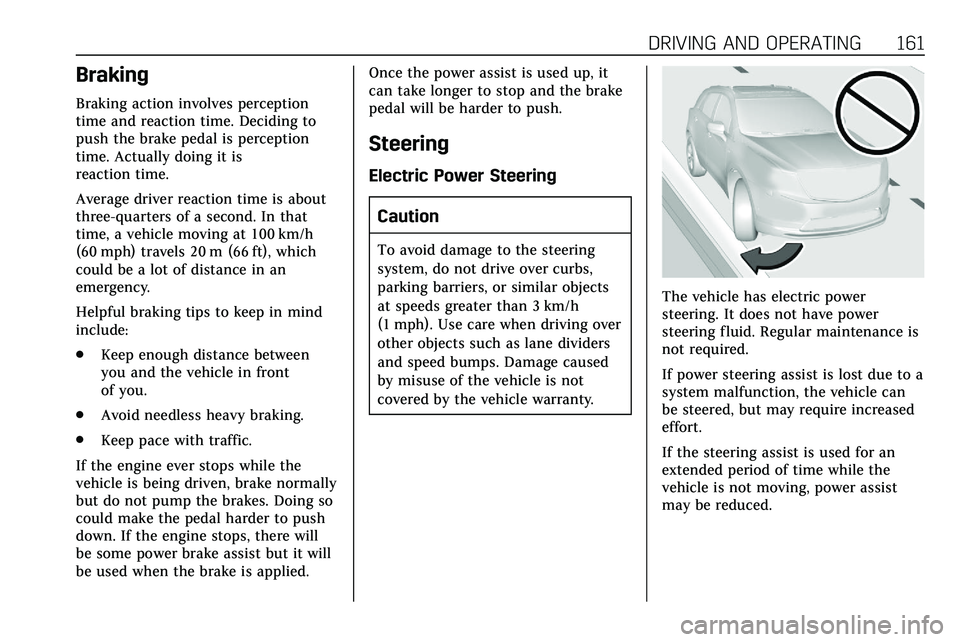
The vehicle has electric power
steering. It does not have power
steering fluid. Regular maintenance is
not required.
If power steering assist is lost due to a
system malfunction, the vehicle can
be steered, but may require increased
effort.
If the steering assist is used for an
extended period of time while the
vehicle is not moving, power assist
may be reduced.
Page 165 of 384
164 DRIVING AND OPERATING
To gain more ground clearance if
needed, it may be necessary to remove
the front fascia lower air dam.
However, driving without the air dam
reduces fuel economy.
Caution
Operating the vehicle for extended
periods without the front fascia
lower air dam installed can cause
improper airf low to the engine.
Reattach the front fascia air dam
after off-road driving.
Loading the Vehicle for Off-Road
Driving
{Warning
.Unsecured cargo on the load
floor can be tossed about
when driving over rough
terrain. You or your
passengers can be struck by
flying objects. Secure the
cargo properly.
(Continued)
Warning (Continued)
.Keep cargo in the cargo area
as far forward and as low as
possible. The heaviest things
should be on the floor,
forward of the rear axle.
. Heavy loads on the roof raise
the vehicle's center of gravity,
making it more likely to roll
over. You can be seriously or
fatally injured if the vehicle
rolls over. Put heavy loads
inside the cargo area, not on
the roof.
For more information about loading
the vehicle, see Vehicle Load Limits
0 170.
Environmental Concerns
.
Always use established trails,
roads, and areas that have been
set aside for public off-road
recreational driving and obey all
posted regulations.
. Do not damage shrubs, flowers,
trees, or grasses or disturb wildlife. .
Do not park over things that burn.
See Parking over Things That Burn
0 182.
Driving on Hills
Driving safely on hills requires good
judgment and an understanding of
what the vehicle can and cannot do.
{Warning
Many hills are simply too steep for
any vehicle. Driving up hills can
cause the vehicle to stall. Driving
down hills can cause loss of control.
Driving across hills can cause a
rollover. You could be injured or
killed. Do not drive on steep hills.
Before driving on a hill, assess the
steepness, traction, and obstructions.
If the terrain ahead cannot be seen,
get out of the vehicle and walk the hill
before driving further.
When driving on hills:
. Use a low gear and keep a firm
grip on the steering wheel.
. Maintain a slow speed.
Page 166 of 384
DRIVING AND OPERATING 165
.When possible, drive straight up
or down the hill.
. Slow down when approaching the
top of the hill.
. Use headlamps even during the
day to make the vehicle more
visible.
{Warning
Driving to the top of a hill at high
speed can cause a crash. There
could be a drop-off, embankment,
cliff, or even another vehicle. You
could be seriously injured or killed.
As you near the top of a hill, slow
down and stay alert.
. Never go downhill forward or
backward with the transmission in
N (Neutral). The brakes could
overheat and you could lose
control.
. When driving down a hill, keep
the vehicle headed straight down.
Use a low gear because the engine will work with the brakes to slow
the vehicle and help keep the
vehicle under control.
{Warning
Heavy braking when going down a
hill can cause your brakes to
overheat and fade. This could cause
loss of control and you or others
could be injured or killed. Apply the
brakes lightly when descending a
hill and use a low gear to keep
vehicle speed under control.
If the vehicle stalls on a hill: 1. Apply the brakes to stop the vehicle, and then apply the
parking brake.
2. Shift into P (Park) and then restart the engine.
.If driving uphill when the
vehicle stalls, shift to
R (Reverse), release the
parking brake, and back
straight down. .
Never try to turn the vehicle
around. If the hill is steep
enough to stall the vehicle, it
is steep enough to cause it to
roll over.
. If you cannot make it up the
hill, back straight down
the hill.
. Never back down a hill in
N (Neutral) using only the
brake.
. The vehicle can roll backward
quickly and you could lose
control.
. If driving downhill when the
vehicle stalls, shift to a lower
gear, release the parking
brake, and drive straight
down the hill.
3. If the vehicle cannot be restarted after stalling, set the parking
brake, shift into P (Park), and
turn the vehicle off.
3.1. Leave the vehicle and seek help.
Page 176 of 384
DRIVING AND OPERATING 175
the Remote Keyless Entry (RKE)
system. SeeRemote Keyless Entry
(RKE) System Operation 010.
To shift out of P (Park), the vehicle
must be turned on and the brake
pedal must be applied.
Stopping the Engine/OFF (No
Indicator Light) : When the vehicle is
stopped, press ENGINE START/STOP
once to turn the engine off.
If the vehicle is in P (Park), the
ignition will turn off, and Retained
Accessory Power (RAP) will remain
active. See Retained Accessory Power
(RAP) 0180.
If the vehicle is in R (Reverse),
D (Drive) or M (Manual Mode), the
vehicle will shift to P (Park), the
ignition will turn off, and Retained
Accessory Power (RAP) will remain
active. See Retained Accessory Power
(RAP) 0180.
If the vehicle is in N (Neutral), the
ignition will return to ACC/
ACCESSORY and display the message
SHIFT TO PARK in the Driver Information Center (DIC). When the
vehicle is shifted into P (Park), the
ignition will turn off.
{Warning
Turning off the vehicle while
moving may cause loss of power
assist in the brake and steering
systems and disable the airbags.
While driving, only shut the vehicle
off in an emergency.
If the vehicle must be shut off in an
emergency: 1. Brake using a firm and steady pressure. Do not pump the
brakes repeatedly. This may
deplete power assist, requiring
increased brake pedal force.
2. Shift the vehicle to N (Neutral). This can be done while the
vehicle is moving. After shifting
to N (Neutral), firmly apply the
brakes and steer the vehicle to a
safe location.
3. Come to a complete stop and shift to P (Park). 4. Set the parking brake. See
Electric Parking Brake 0191.
Press ENGINE START/STOP to
turn the vehicle off.
If the vehicle cannot be pulled over
and must be shut off while driving,
press and hold ENGINE START/STOP
for longer than two seconds, or press
twice in five seconds.
ACC/ACCESSORY (Amber Indicator
Light) : This mode allows you to use
some electrical accessories when the
engine is off.
With the ignition off, pressing
ENGINE START/STOP once without
the brake pedal applied will place the
ignition system in ACC/ACCESSORY.
The ignition will switch from ACC/
ACCESSORY to OFF after 10 minutes
to prevent battery rundown.
ON/RUN/START (Green Indicator
Light) : This mode is for driving and
starting. With the ignition off and the
brake pedal applied, pressing ENGINE
START/STOP once will place the
ignition system in ON/RUN/START.
Once engine cranking begins, release
the button. Engine cranking will
Page 181 of 384
180 DRIVING AND OPERATING
The length of time the heater should
remain plugged in depends on several
factors. Ask a dealer in the area where
you will be parking the vehicle for the
best advice on this.
Retained Accessory
Power (RAP)
When the ignition is turned from on
to off, the following features (if
equipped) will continue to function
for up to 10 minutes, or until the
driver door is opened. These features
will also work when the ignition is in
RUN or ACC/ACCESSORY:
.Infotainment System
. Power Windows (during RAP this
functionality will be lost when any
door is opened)
. Sunroof (during RAP this
functionality will be lost when any
door is opened)
. Auxiliary Power Outlet
. Audio System
. OnStar System
Shifting Into Park
To shift into P (Park):
1. Hold the brake pedal down and set the parking brake. See Electric
Parking Brake 0191.
2. Press the button on top of the shift lever to shift into P (Park).
See Automatic Transmission
0 184.
3. The P indicator on the shift lever will turn red when the vehicle is
in P (Park).
Leaving the Vehicle with the
Engine Running
{Warning
It can be dangerous to leave the
vehicle with the engine running.
It could overheat and catch fire.
It is dangerous to get out of the
vehicle if the vehicle is not in
P (Park) with the parking brake set.
The vehicle can roll.
(Continued)
Warning (Continued)
Do not leave the vehicle when the
engine is running. If you have left
the engine running, the vehicle can
move suddenly. You or others could
be injured. To be sure the vehicle
will not move, even when you are
on fairly level ground, always set
the parking brake and shift to
P (Park). SeeShifting Into Park 0180
. If you are towing a trailer, see
Driving Characteristics and Towing
Tips 0234.
If you have to leave the vehicle with
the engine running, be sure the
vehicle is in P (Park) and the parking
brake is set before you leave it.
If you are towing a trailer and parking
on a hill, see Driving Characteristics
and Towing Tips 0234.
Shifting out of Park
This vehicle is equipped with an
electronic transmission. The shift lock
release button is designed to prevent
Page 182 of 384

DRIVING AND OPERATING 181
inadvertent shifting out of P (Park)
unless the ignition is on, the brake
pedal is applied, and the shift lock
release button is pressed.
The shift lock control is always
functional except in the case of an
uncharged or low voltage (less than
9-volt) battery.
If the vehicle has an uncharged
battery or a battery with low voltage,
try charging or jump starting the
battery. SeeJump Starting - North
America 0316.
To shift out of P (Park): 1. Ensure the engine is running.
2. Apply the brake pedal.
3. Press the shift lock release button.
4. Move the shift lever to the desired position.
5. The P indicator will turn white and the gear indicator on the
shift lever will turn red when the
vehicle is no longer in P (Park).
6. After releasing the shift lever, it will return to the center position. If the vehicle cannot shift from
P (Park), a Driver Information
Center (DIC) message will be
displayed. See your dealer for service.
Manual Park Release
{Warning
The transmission will be placed in
N (Neutral) when the manual park
release is pulled. The vehicle can
roll and you or others could be
injured. Ensure the vehicle is on
level ground.
Caution
The manual park release is not
intended to be used for towing.
Damage may result from using the
manual park release in this way.
The repairs would not be covered
by the vehicle warranty.
This vehicle includes a manual park
release that can be used to shift the
vehicle into N (Neutral) when the
engine is not running.
Pulling the manual park release while
the vehicle is on or turning the
ignition on while the manual park
release is pulled, will cause a DIC
message to display.
To place the vehicle in N (Neutral)
using the manual park release:
1. Ensure the vehicle is on level ground and set the parking
brake. Release the brake pedal.
2. Turn the vehicle off.