spare tire CADILLAC XT5 2020 User Guide
[x] Cancel search | Manufacturer: CADILLAC, Model Year: 2020, Model line: XT5, Model: CADILLAC XT5 2020Pages: 384, PDF Size: 6.52 MB
Page 294 of 384

VEHICLE CARE 293
TPMS Malfunction Light and
Message
The TPMS will not function properly if
one or more of the TPMS sensors are
missing or inoperable. When the
system detects a malfunction, the low
tire pressure warning light flashes for
about one minute and then stays on
for the remainder of the ignition cycle.
A DIC warning message also displays.
The malfunction light and DIC
warning message come on at each
ignition cycle until the problem is
corrected. Some of the conditions that
can cause these to come on are:
.One of the road tires has been
replaced with the spare tire. The
spare tire does not have a TPMS
sensor. The malfunction light and
DIC message should go off after
the road tire is replaced and the
sensor matching process is
performed successfully. See “TPMS
Sensor Matching Process ”later in
this section.
. The TPMS sensor matching
process was not done or not
completed successfully after
rotating the tires. The malfunction light and the DIC message should
go off after successfully
completing the sensor matching
process. See "TPMS Sensor
Matching Process" later in this
section.
. One or more TPMS sensors are
missing or damaged. The
malfunction light and the DIC
message should go off when the
TPMS sensors are installed and
the sensor matching process is
performed successfully. See your
dealer for service.
. Replacement tires or wheels do
not match the original equipment
tires or wheels. Tires and wheels
other than those recommended
could prevent the TPMS from
functioning properly. See Buying
New Tires 0297.
. Operating electronic devices or
being near facilities using radio
wave frequencies similar to the
TPMS could cause the TPMS
sensors to malfunction.
If the TPMS is not functioning
properly it cannot detect or signal a
low tire pressure condition. See your dealer for service if the TPMS
malfunction light and DIC message
come on and stay on.Tire Fill Alert (If Equipped)
This feature provides visual and
audible alerts outside the vehicle to
help when inflating an underinflated
tire to the recommended cold tire
pressure.
When the low tire pressure warning
light comes on:
1. Park the vehicle in a safe, level place.
2. Set the parking brake firmly.
3. Place the vehicle in P (Park).
4. Add air to the tire that is underinflated. The turn signal
lamp will flash.
When the recommended
pressure is reached, the horn
sounds once and the turn signal
lamp will stop flashing and
briefly turn solid.
Page 295 of 384

294 VEHICLE CARE
Repeat these steps for all
underinflated tires that have
illuminated the low tire pressure
warning light.
{Warning
Overinflating a tire could cause the
tire to rupture and you or others
could be injured. Do not exceed the
maximum pressure listed on the
tire sidewall. SeeTire Sidewall
Labeling 0284 and
Vehicle Load Limits 0170.
If the tire is overinflated by more than
35 kPa (5 psi), the horn will sound
multiple times and the turn signal
lamp will continue to flash for several
seconds after filling stops. To release
and correct the pressure, while the
turn signal lamp is still flashing,
briefly press the center of the valve
stem. When the recommended
pressure is reached, the horn
sounds once. If the turn signal lamp does not flash
within 15 seconds after starting to
inflate the tire, the tire fill alert has
not been activated or is not working.
If the hazard warning flashers are on,
the tire fill alert visual feedback will
not work properly.
The TPMS will not activate the tire fill
alert properly under the following
conditions:
.
There is interference from an
external device or transmitter.
. The air pressure from the inflation
device is not sufficient to inflate
the tire.
. There is a malfunction in
the TPMS.
. There is a malfunction in the horn
or turn signal lamps.
. The identification code of the
TPMS sensor is not registered to
the system.
. The battery of the TPMS sensor
is low. If the tire fill alert does not operate
due to TPMS interference, move the
vehicle about 1 m (3 ft) back or
forward and try again. If the tire fill
alert feature is not working, use a tire
pressure gauge.TPMS Sensor Matching Process
Each TPMS sensor has a unique
identification code. The identification
code needs to be matched to a new
tire/wheel position after rotating the
vehicle’s tires or replacing one or more
of the TPMS sensors. The TPMS
sensor matching process should also
be performed after replacing a spare
tire with a road tire containing the
TPMS sensor. The malfunction light
and the DIC message should go off at
the next ignition cycle. The sensors
are matched to the tire/wheel
positions, using a TPMS relearn tool,
in the following order: driver side
front tire, passenger side front tire,
passenger side rear tire, and driver
side rear. See your dealer for service or
to purchase a relearn tool. A TPMS
relearn tool can also be purchased.
See Tire Pressure Monitor Sensor
Activation Tool at
Page 296 of 384

VEHICLE CARE 295
www.gmtoolsandequipment.com or
call 1-800-GM TOOLS
(1-800-468-6657).
There are two minutes to match the
first tire/wheel position, and
five minutes overall to match all four
tire/wheel positions. If it takes longer,
the matching process stops and must
be restarted.
The TPMS sensor matching process is:1. Set the parking brake.
2. Place the vehicle in Service Mode. See Ignition Positions
0 174.
3. Make sure the Tire Pressure info display option is turned on. The
info displays on the DIC can be
turned on and off through the
Options menu. See Driver
Information Center (DIC) 0124.
4. Use the five-way DIC control on the right side of the steering
wheel to scroll to the Tire
Pressure screen under the DIC
info page. See Driver Information
Center (DIC) 0124. 5. Press and hold SEL in the center
of the five-way DIC control.
The horn sounds twice to signal
the receiver is in relearn mode
and the TIRE LEARNING ACTIVE
message displays on the DIC
screen.
6. Start with the driver side front tire.
7. Place the relearn tool against the tire sidewall, near the valve stem.
Then press the button to activate
the TPMS sensor. A horn chirp
confirms that the sensor
identification code has been
matched to this tire and wheel
position.
8. Proceed to the passenger side front tire, and repeat Step 7.
9. Proceed to the passenger side rear tire, and repeat Step 7.
10. Proceed to the driver side rear tire, and repeat Step 7. The horn
sounds two times to indicate the
sensor identification code has
been matched to the driver side
rear tire, and the TPMS sensor
matching process is no longer active. The TIRE LEARNING
ACTIVE message on the DIC
display screen goes off.
11. Turn the vehicle off.
12. Set all four tires to the recommended air pressure level
as indicated on the Tire and
Loading Information label.
Tire Inspection
We recommend that the tires,
including the spare tire, if the
vehicle has one, be inspected for
signs of wear or damage at least
once a month.
Replace the tire if:
.The indicators at three or more
places around the tire can
be seen.
.There is cord or fabric showing
through the tire's rubber.
.The tread or sidewall is
cracked, cut, or snagged deep
enough to show cord or fabric.
Page 297 of 384
296 VEHICLE CARE
.The tire has a bump, bulge,
or split.
.The tire has a puncture, cut,
or other damage that cannot
be repaired well because of the
size or location of the damage.
Tire Rotation
Tires should be rotated every
12 000 km (7,500 mi). See
Maintenance Schedule0332.
Tires are rotated to achieve a
more uniform wear for all tires.
The first rotation is the most
important.
Anytime unusual wear is noticed,
rotate the tires as soon as
possible, check for proper tire
inflation pressure, and check for
damaged tires or wheels. If the
unusual wear continues after the
rotation, check the wheel
alignment. See When It Is Time for
New Tires 0297 and
Wheel Replacement 0301.
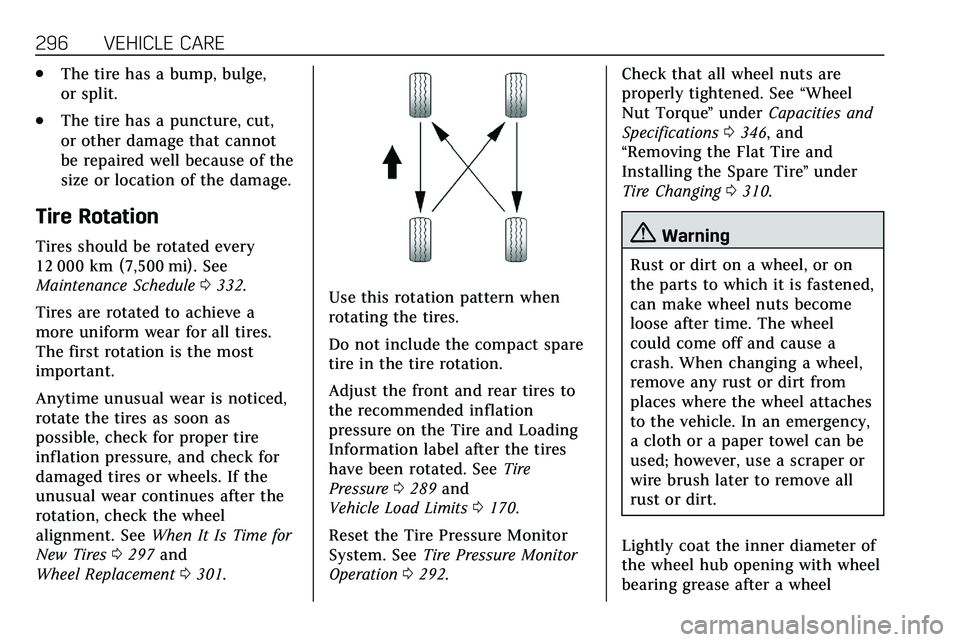
Use this rotation pattern when
rotating the tires.
Do not include the compact spare
tire in the tire rotation.
Adjust the front and rear tires to
the recommended inflation
pressure on the Tire and Loading
Information label after the tires
have been rotated. See Tire
Pressure 0289 and
Vehicle Load Limits 0170.
Reset the Tire Pressure Monitor
System. See Tire Pressure Monitor
Operation 0292. Check that all wheel nuts are
properly tightened. See
“Wheel
Nut Torque ”under Capacities and
Specifications 0346, and
“Removing the Flat Tire and
Installing the Spare Tire ”under
Tire Changing 0310.
{Warning
Rust or dirt on a wheel, or on
the parts to which it is fastened,
can make wheel nuts become
loose after time. The wheel
could come off and cause a
crash. When changing a wheel,
remove any rust or dirt from
places where the wheel attaches
to the vehicle. In an emergency,
a cloth or a paper towel can be
used; however, use a scraper or
wire brush later to remove all
rust or dirt.
Lightly coat the inner diameter of
the wheel hub opening with wheel
bearing grease after a wheel
Page 298 of 384
VEHICLE CARE 297
change or tire rotation to prevent
corrosion or rust buildup. Do not
get grease on the wheel mounting
surface or on the wheel nuts or
bolts.
When It Is Time for New
Tires
Factors such as maintenance,
temperatures, driving speeds, vehicle
loading, and road conditions affect the
wear rate of the tires.
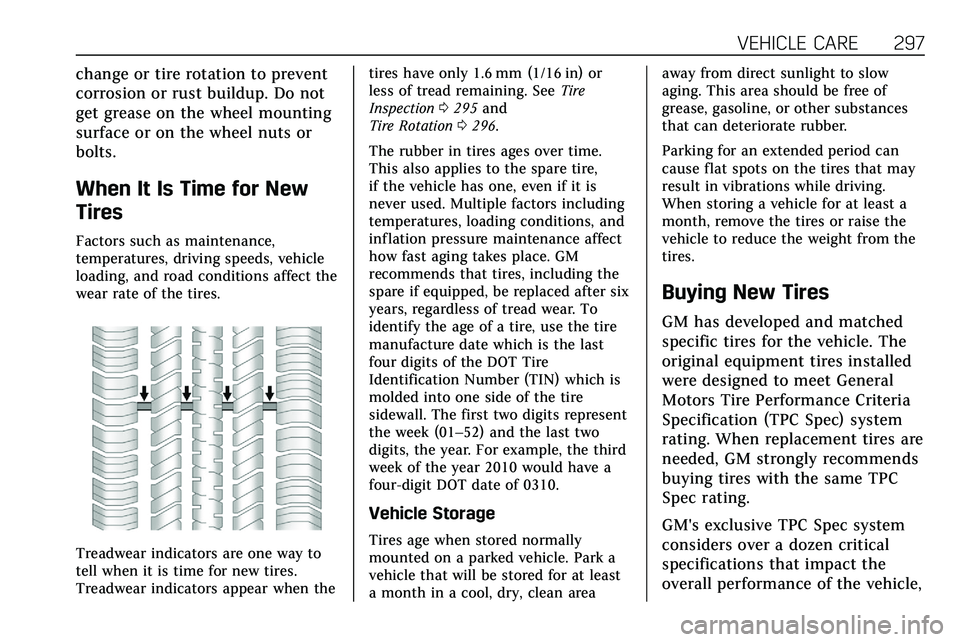
Treadwear indicators are one way to
tell when it is time for new tires.
Treadwear indicators appear when thetires have only 1.6 mm (1/16 in) or
less of tread remaining. See
Tire
Inspection 0295 and
Tire Rotation 0296.
The rubber in tires ages over time.
This also applies to the spare tire,
if the vehicle has one, even if it is
never used. Multiple factors including
temperatures, loading conditions, and
inflation pressure maintenance affect
how fast aging takes place. GM
recommends that tires, including the
spare if equipped, be replaced after six
years, regardless of tread wear. To
identify the age of a tire, use the tire
manufacture date which is the last
four digits of the DOT Tire
Identification Number (TIN) which is
molded into one side of the tire
sidewall. The first two digits represent
the week (01–52) and the last two
digits, the year. For example, the third
week of the year 2010 would have a
four-digit DOT date of 0310.
Vehicle Storage
Tires age when stored normally
mounted on a parked vehicle. Park a
vehicle that will be stored for at least
a month in a cool, dry, clean area away from direct sunlight to slow
aging. This area should be free of
grease, gasoline, or other substances
that can deteriorate rubber.
Parking for an extended period can
cause flat spots on the tires that may
result in vibrations while driving.
When storing a vehicle for at least a
month, remove the tires or raise the
vehicle to reduce the weight from the
tires.
Buying New Tires
GM has developed and matched
specific tires for the vehicle. The
original equipment tires installed
were designed to meet General
Motors Tire Performance Criteria
Specification (TPC Spec) system
rating. When replacement tires are
needed, GM strongly recommends
buying tires with the same TPC
Spec rating.
GM's exclusive TPC Spec system
considers over a dozen critical
specifications that impact the
overall performance of the vehicle,
Page 300 of 384
VEHICLE CARE 299
Vehicles that have a tire pressure
monitoring system could give an
inaccurate low-pressure warning if
non-TPC Spec rated tires are
installed. SeeTire Pressure Monitor
System 0291.
The Tire and Loading Information
label indicates the original
equipment tires on the vehicle.
See Vehicle Load Limits 0170.
Different Size Tires and
Wheels
If wheels or tires are installed that are
a different size than the original
equipment wheels and tires, vehicle
performance, including its braking,
ride and handling characteristics,
stability, and resistance to rollover
may be affected. If the vehicle has
electronic systems such as antilock
brakes, rollover airbags, traction
control, electronic stability control,
or All-Wheel Drive, the performance
of these systems can also be affected.
{Warning
If different sized wheels are used,
there may not be an acceptable
level of performance and safety if
tires not recommended for those
wheels are selected. This increases
the chance of a crash and serious
injury. Only use GM specific wheel
and tire systems developed for the
vehicle, and have them properly
installed by a GM certified
technician.
See Buying New Tires 0297 and
Accessories and Modifications 0249.
Uniform Tire Quality
Grading
The following information relates
to the system developed by the
United States National Highway
Traffic Safety Administration
(NHTSA), which grades tires by
treadwear, traction, and
temperature performance. This
applies only to vehicles sold in the United States. The grades are
molded on the sidewalls of most
passenger car tires. The Uniform
Tire Quality Grading (UTQG)
system does not apply to deep
tread, winter tires, compact spare
tires, tires with nominal rim
diameters of 10 to 12 inches
(25 to 30 cm), or to some
limited-production tires.
While the tires available on
General Motors passenger cars
and light trucks may vary with
respect to these grades, they must
also conform to federal safety
requirements and additional
General Motors Tire Performance
Criteria (TPC) standards.
Quality grades can be found where
applicable on the tire sidewall
between tread shoulder and
maximum section width. For
example:
Page 304 of 384

VEHICLE CARE 303
{Warning
Lifting a vehicle and getting under
it to do maintenance or repairs is
dangerous without the appropriate
safety equipment and training. If a
jack is provided with the vehicle, it
is designed only for changing a flat
tire. If it is used for anything else,
you or others could be badly injured
or killed if the vehicle slips off the
jack. If a jack is provided with the
vehicle, only use it for changing a
flat tire.
If a tire goes flat, avoid further tire
and wheel damage by driving slowly
to a level place, well off the road,
if possible. Turn on the hazard
warning flashers. See Hazard Warning
Flashers 0143.
{Warning
Changing a tire can be dangerous.
The vehicle can slip off the jack and
roll over or fall causing injury or
(Continued)
Warning (Continued)
death. Find a level place to change
the tire. To help prevent the vehicle
from moving:
1. Set the parking brake firmly.
2. Put an automatictransmission in P (Park) or a
manual transmission in
1 (First) or R (Reverse).
3. Turn off the engine and do not restart while the vehicle
is raised.
4. Do not allow passengers to remain in the vehicle.
5. Place wheel blocks, if equipped, on both sides of
the tire at the opposite corner
of the tire being changed.
This vehicle may come with a jack
and spare tire or a tire sealant and
compressor kit. To use the jacking
equipment to change a spare tire
safely, follow the instructions below.
Then see Tire Changing 0310. To use the tire sealant and compressor kit,
see
Tire Sealant and Compressor Kit
0 304.
When the vehicle has a flat tire (2),
use the following example as a guide
to assist you in the placement of
wheel blocks (1), if equipped.
1. Wheel Block (If Equipped)
2. Flat Tire
The following information explains
how to repair or change a tire.
Page 305 of 384

304 VEHICLE CARE
Tire Sealant and
Compressor Kit
{Warning
Idling a vehicle in an enclosed area
with poor ventilation is dangerous.
Engine exhaust may enter the
vehicle. Engine exhaust contains
carbon monoxide (CO) which
cannot be seen or smelled. It can
cause unconsciousness and even
death. Never run the engine in an
enclosed area that has no fresh air
ventilation. For more information,
seeEngine Exhaust 0183.
{Warning
Overinflating a tire could cause the
tire to rupture and you or others
could be injured. Be sure to read
and follow the tire sealant and
compressor kit instructions and
(Continued)
Warning (Continued)
inflate the tire to its recommended
pressure. Do not exceed the
recommended pressure.
{Warning
Storing the tire sealant and
compressor kit or other equipment
in the passenger compartment of
the vehicle could cause injury. In a
sudden stop or collision, loose
equipment could strike someone.
Store the tire sealant and
compressor kit in its original
location.
If this vehicle has a tire sealant and
compressor kit, there may not be a
spare tire or tire changing equipment,
and on some vehicles there may not
be a place to store a tire. The tire sealant and compressor can
be used to temporarily seal punctures
up to 6 mm (0.25 in) in the tread area
of the tire. It can also be used to
inflate an underinflated tire.
If the tire has been separated from the
wheel, has damaged sidewalls, or has
a large puncture, the tire is too
severely damaged for the tire sealant
and compressor kit to be effective. See
Roadside Service
0353.
Read and follow all of the tire sealant
and compressor kit instructions.
The kit includes:
1. Sealant Canister Inlet Valve
Page 311 of 384

310 VEHICLE CARE
15. Return the equipment to itsoriginal storage location in the
vehicle.
The tire sealant and compressor kit
has accessory adapters located in a
compartment on the bottom of its
housing that can be used to inflate air
mattresses, balls, etc.
Storing the Tire Sealant
and Compressor Kit
The tire sealant and compressor kit is
in a bag in the rear compartment
storage area. 1. Open the liftgate.
2. Remove the cargo management system divider. See Cargo
Management System 096.
3. Lift the load floor. Use the hook to hold the load floor open. See
Rear Storage 093.4. Turn the retainer nut
counterclockwise to remove the
tire sealant and compressor
kit bag.
5. Remove the tire sealant and compressor kit from the bag.
To store the tire sealant and
compressor kit, reverse the steps.
Tire Changing
Removing the Spare Tire and
Tools
To access the spare tire and tools: 1. Open the liftgate. See Liftgate
0 23. 2. Remove the cargo management
system divider. See Cargo
Management System 096.
3. Pull up on the handle to lift the
load floor. Use the hook to hold
the load floor open. See Rear
Storage 093.
Page 312 of 384

VEHICLE CARE 311
4. Turn the wing nut (4)counterclockwise to remove the
jack (1), wheel wrench (2), and
strap (3). Place the tool container
near the tire being changed.5. Remove the nut retaining thespare tire.
6. Remove the spare tire and place it next to the tire being changed.
Removing the Flat Tire and
Installing the Spare Tire
1. Do a safety check beforeproceeding. See If a Tire Goes Flat
0 302.
2. Turn the wheel wrench
counterclockwise to loosen all
the wheel nuts, but do not
remove them yet.
3. Place the jack near the flat tire.
Caution
Make sure that the jack lift head is
in the correct position or you may
damage your vehicle. The repairs
would not be covered by your
warranty.