wheel CADILLAC XT5 2020 Repair Manual
[x] Cancel search | Manufacturer: CADILLAC, Model Year: 2020, Model line: XT5, Model: CADILLAC XT5 2020Pages: 384, PDF Size: 6.52 MB
Page 260 of 384
VEHICLE CARE 259
See your dealer to have the fluid and
filter changed at the intervals listed in
theMaintenance Schedule 0332.
Engine Air Filter Life
System
If equipped, this feature provides the
engine air filter’s remaining life and
best timing for a change. The timing
to change an engine air filter depends
on driving and environmental
conditions.
When to Change the Engine Air
Filter
When the Driver Information Center
(DIC) displays a message to replace
the engine air filter at the next oil
change, follow this timing.
When the DIC displays a message to
replace the engine air filter soon,
replace the engine air filter at the
earliest convenience.
The system must be reset after the
engine air filter is changed.
If the DIC displays a message to check
the engine air filter system, see your
dealer.
How to Reset the Engine Air
Filter Life System
To reset:
1. Place the vehicle in P (Park).
2. Display the Air Filter Life on the DIC. See Driver Information Center
(DIC) 0124.
3. Press SELon the steering wheel
to move to the Reset/Disable
display area. Select Reset then
press SELfor several seconds.
4. Press SELto confirm the reset.
Engine Air Cleaner/Filter
The engine air cleaner/filter is in the
engine compartment on the passenger
side of the vehicle. See Engine
Compartment Overview 0252.
When to Inspect/Replace the
Engine Air Cleaner/Filter
If the vehicle is not equipped with the
engine air filter life system, see
Maintenance Schedule 0332.
How to Inspect/Replace the
Engine Air Cleaner/Filter
Do not start the engine or have the
engine running with the engine air
cleaner/filter housing open. Before
removing the engine air cleaner/filter,
make sure that the engine air cleaner/
filter housing and nearby components
are free of dirt and debris. Remove the
engine air cleaner/filter. Do not clean
the engine air cleaner/filter or
components with water or
compressed air.
To inspect or replace the engine air
cleaner/filter:
Page 268 of 384
VEHICLE CARE 267
Warning (Continued)
crash. When the brake wear
warning sound is heard, have the
vehicle serviced.
Caution
Continuing to drive with worn-out
brake pads could result in costly
brake repair.
Some driving conditions or climates
can cause a brake squeal when the
brakes are first applied or lightly
applied. This does not mean
something is wrong with the brakes.
Properly torqued wheel nuts are
necessary to help prevent brake
pulsation. When tires are rotated,
inspect brake pads for wear and
evenly tighten wheel nuts in the
proper sequence to torque
specifications. See Capacities and
Specifications 0346. Brake pads should be replaced as
complete sets.
Brake Pedal Travel
See your dealer if the brake pedal does
not return to normal height, or if
there is a rapid increase in pedal
travel. This could be a sign that brake
service may be required.
Replacing Brake System Parts
Always replace brake system parts
with new, approved replacement parts.
If this is not done, the brakes may not
work properly. The braking
performance expected can change in
many other ways if the wrong
replacement brake parts are installed
or if parts are improperly installed.
Brake Fluid
The brake master cylinder reservoir is
filled with GM approved DOT 3 brake
fluid as indicated on the reservoir cap.
See
Engine Compartment Overview
0 252 for the location of the reservoir.
Checking Brake Fluid
With the vehicle in P (Park) on a level
surface, the brake fluid level should be
between the minimum and maximum
marks on the brake fluid reservoir.
There are only two reasons why the
brake fluid level in the reservoir may
go down:
. Normal brake lining wear. When
new linings are installed, the fluid
level goes back up.
. A fluid leak in the brake hydraulic
system. Have the brake hydraulic
system fixed. With a leak, the
brakes will not work well.
Always clean the brake fluid reservoir
cap and the area around the cap
before removing it.
Do not top off the brake fluid. Adding
fluid does not correct a leak. If fluid is
added when the linings are worn,
there will be too much fluid when
Page 270 of 384

VEHICLE CARE 269
Warning (Continued)
chemicals known to the State of
California to cause cancer and birth
defects or other reproductive harm.
Batteries also contain other
chemicals known to the State of
California to cause cancer.WASH
HANDS AFTER HANDLING. For
more information go to
www.P65Warnings.ca.gov/
passenger-vehicle.
See California Proposition 65 Warning
0 248 and the back cover.
Vehicle Storage
{Warning
Batteries have acid that can burn
you and gas that can explode. You
can be badly hurt if you are not
careful. See Jump Starting - North
America 0316 for tips on working
around a battery without
getting hurt. Infrequent Usage: Remove the black,
negative (−) cable from the battery to
keep the battery from running down.
Extended Storage: Remove the black,
negative (−) cable from the battery or
use a battery trickle charger.
All-Wheel Drive
Transfer Case
Under normal driving conditions,
transfer case fluid does not require
maintenance unless there is a fluid
leak or unusual noise. If required,
have the transfer case serviced by
your dealer.
Starter Switch Check
{Warning
When you are doing this inspection,
the vehicle could move suddenly.
If the vehicle moves, you or others
could be injured.
1. Before starting this check, be
sure there is enough room
around the vehicle.
2. Apply both the parking brake and the regular brake.
Do not use the accelerator pedal,
and be ready to turn off the
engine immediately if it starts.
3. Try to start the engine in each gear. The vehicle should start
only in P (Park) or N (Neutral).
If the vehicle starts in any other
position, contact your dealer for
service.
Park Brake and P (Park)
Mechanism Check
{Warning
When you are doing this check, the
vehicle could begin to move. You or
others could be injured and
property could be damaged. Make
sure there is room in front of the
vehicle in case it begins to roll. Be
(Continued)
Page 277 of 384

276 VEHICLE CARE
FusesUsage
F5 DC DC transformer 2
F6 Amplifier 1
F7 Front blower
F8 Starter 3
F9 –
F10 –
F11 –
F12 Front wiper
F13 Starter 2
F14 LED/Automatic headlamp leveling
F15 Rear wiper 1
F16 –
F17 –
F18 Automatic headlamp leveling module
F19 –
F20 –
F21 –
F22 Electronic brake control module Fuses
Usage
F23 Parking/Trailer lamps
F24 Right trailer stoplamp/Turnlamp
F25 Steering column lock
F26 –
F27 Left trailer stoplamp/ Turnlamp
F28 –
F29 –
F30 Washer pump
F31 –
F32 –
F33 Fog lamps
F34 Horn
F35 –
F36 Headlamp high-beam –left
F37 Headlamp high-beam –right
F38 Automatic headlamp leveling motor Fuses
Usage
F39 Transmission control module/Battery 1
F40 Left rear bus electrical center/Ignition
F41 Instrument cluster
F42 Heating, ventilation, and air conditioning
F43 Head-Up display
F44 Electronic brake control module
electric brake booster/
Run/Crank
F45 –
F46 –
F47 –
F48 Rear wiper 2
F49 Interior rearview mirror/Trailer
F50 Fuel system control module
F51 Heated steering wheel
F52 Air conditioning clutch
Page 280 of 384
VEHICLE CARE 279
FusesUsage
F16 Sunroof
F17 Body control module 1
F18 Instrument cluster
F19 –
F20 Rear seat entertainment
F21 Body control module 4
F22 Infotainment/USB data/Aux jack
F23 Body control module 2
F24 USB charger/ Wireless charging
F25 Park aid/electronic transmission range
system
F26 Communications integration module
F27 Video Fuses
Usage
F28 Heating, ventilation, and air conditioning
display
F29 Radio
F30 Steering wheel adjustment controls
F31 Electronic brake control module
electric brake
booster
F32 DC AC inverter
F33 Driver power seat
F34 Passenger power seat
F35 Battery IEC 1 feed
F36 Electric power steering
F37 Rear seat entertainment/USB
charge/Wireless
charging module
F38 Body control module 8
F39 – Circuit
Breakers Usage
F40 –
F41 –
F42 Auxiliary power outlet/Lighter
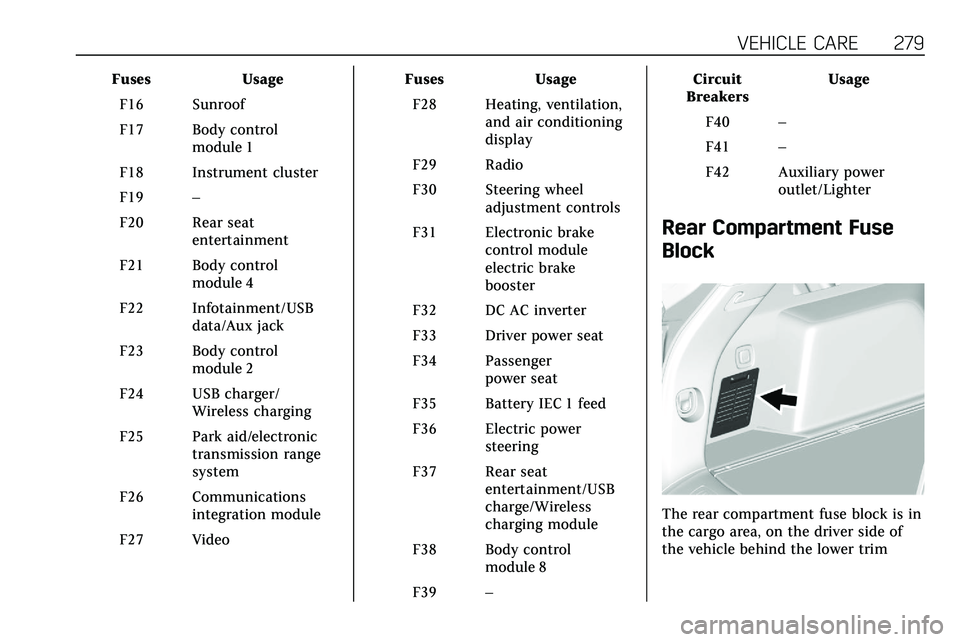
Rear Compartment Fuse
Block
The rear compartment fuse block is in
the cargo area, on the driver side of
the vehicle behind the lower trim
Page 283 of 384

282 VEHICLE CARE
Wheels and Tires
Tires
Every new GM vehicle has
high-quality tires made by a
leading tire manufacturer. See the
warranty manual for information
regarding the tire warranty and
where to get service. For
additional information refer to the
tire manufacturer.
{Warning
.Poorly maintained and
improperly used tires are
dangerous.
.Overloading the tires can
cause overheating as a
result of too much flexing.
There could be a blowout
and a serious crash. See
Vehicle Load Limits0170.
(Continued)
Warning (Continued)
.Underinflated tires pose
the same danger as
overloaded tires. The
resulting crash could cause
serious injury. Check all
tires frequently to
maintain the
recommended pressure.
Tire pressure should be
checked when the tires
are cold.
.Overinflated tires are more
likely to be cut, punctured,
or broken by a sudden
impact —such as when
hitting a pothole. Keep
tires at the recommended
pressure.
.Worn or old tires can
cause a crash. If the tread
is badly worn,
replace them.
(Continued)
Warning (Continued)
.Replace any tires that have
been damaged by impacts
with potholes, curbs, etc.
.Improperly repaired tires
can cause a crash. Only
the dealer or an authorized
tire service center should
repair, replace, dismount,
and mount the tires.
.Do not spin the tires in
excess of 56 km/h
(35 mph) on slippery
surfaces such as snow,
mud, ice, etc. Excessive
spinning may cause the
tires to explode.
See Tire Pressure for High-Speed
Operation 0290 for inflation
pressure adjustment for
high-speed driving.
Page 284 of 384

VEHICLE CARE 283
All-Season Tires
This vehicle may come with all-season
tires. These tires are designed to
provide good overall performance on
most road surfaces and weather
conditions. Original equipment tires
designed to GM's specific tire
performance criteria have a TPC
specification code molded onto the
sidewall. Original equipment
all-season tires can be identified by
the last two characters of this TPC
code, which will be“MS.”
Consider installing winter tires on the
vehicle if frequent driving on snow or
ice-covered roads is expected.
All-season tires provide adequate
performance for most winter driving
conditions, but they may not offer the
same level of traction or performance
as winter tires on snow or ice-covered
roads. See Winter Tires 0283.
Winter Tires
This vehicle was not originally
equipped with winter tires. Winter
tires are designed for increased
traction on snow and ice-covered roads. Consider installing winter tires
on the vehicle if frequent driving on
ice or snow covered roads is expected.
See your dealer for details regarding
winter tire availability and proper tire
selection. Also, see
Buying New Tires
0 297.
With winter tires, there may be
decreased dry road traction, increased
road noise, and shorter tread life.
After changing to winter tires, be alert
for changes in vehicle handling and
braking.
If using winter tires:
. Use tires of the same brand and
tread type on all four wheel
positions.
. Use only radial ply tires of the
same size, load range, and speed
rating as the original equipment
tires.
Winter tires with the same speed
rating as the original equipment tires
may not be available for H, V, W, Y,
and ZR speed rated tires. If winter
tires with a lower speed rating are
chosen, never exceed the tire's
maximum speed capability.
Summer Tires
This vehicle may come with 235/
65R18 or 235/55R20 high performance
summer tires. These tires have a
special tread and compound that are
optimized for maximum dry and wet
road performance. This special tread
and compound will have decreased
performance in cold climates, and on
ice and snow. It is recommended that
winter tires be installed on the vehicle
if frequent driving at temperatures
below approximately 5 °C (40 °F) or on
ice or snow covered roads is expected.
See Winter Tires 0283.
Caution
High performance summer tires
have rubber compounds that lose
flexibility and may develop surface
cracks in the tread area at
temperatures below −7 °C (20 °F).
Always store high performance
summer tires indoors and at
temperatures above −7 °C (20 °F)
when not in use. If the tires have
(Continued)
Page 287 of 384
286 VEHICLE CARE
description. The letter“T”as the
first character in the tire size
means the tire is for temporary
use only.
(7) TPC Spec (Tire Performance
Criteria Specification)
:Original
equipment tires designed to GM's
specific tire performance criteria
have a TPC specification code
molded onto the sidewall. GM's
TPC specifications meet or exceed
all federal safety guidelines.
Tire Designations
Tire Size
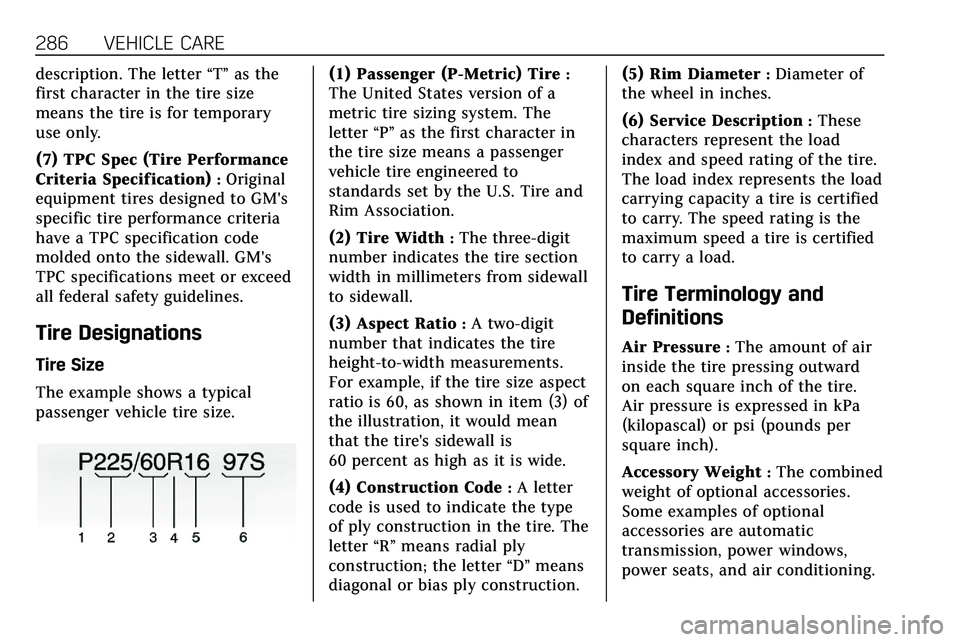
The example shows a typical
passenger vehicle tire size.
(1) Passenger (P-Metric) Tire:
The United States version of a
metric tire sizing system. The
letter “P”as the first character in
the tire size means a passenger
vehicle tire engineered to
standards set by the U.S. Tire and
Rim Association.
(2) Tire Width
:The three-digit
number indicates the tire section
width in millimeters from sidewall
to sidewall.
(3) Aspect Ratio
:A two-digit
number that indicates the tire
height-to-width measurements.
For example, if the tire size aspect
ratio is 60, as shown in item (3) of
the illustration, it would mean
that the tire's sidewall is
60 percent as high as it is wide.
(4) Construction Code
:A letter
code is used to indicate the type
of ply construction in the tire. The
letter “R”means radial ply
construction; the letter “D”means
diagonal or bias ply construction. (5) Rim Diameter
:Diameter of
the wheel in inches.
(6) Service Description
:These
characters represent the load
index and speed rating of the tire.
The load index represents the load
carrying capacity a tire is certified
to carry. The speed rating is the
maximum speed a tire is certified
to carry a load.
Tire Terminology and
Definitions
Air Pressure:The amount of air
inside the tire pressing outward
on each square inch of the tire.
Air pressure is expressed in kPa
(kilopascal) or psi (pounds per
square inch).
Accessory Weight
:The combined
weight of optional accessories.
Some examples of optional
accessories are automatic
transmission, power windows,
power seats, and air conditioning.
Page 292 of 384
VEHICLE CARE 291
flange. It will read something like this:
Maximum load 690 kg (1,521 lbs)
300 kPa (44 psi) Max. Press.
Tire Pressure Monitor
System
The Tire Pressure Monitor System
(TPMS) uses radio and sensor
technology to check tire pressure
levels. The TPMS sensors monitor the
air pressure in your tires and transmit
tire pressure readings to a receiver
located in the vehicle.
Each tire, including the spare (if
provided), should be checked monthly
when cold and inflated to the
inflation pressure recommended by
the vehicle manufacturer on the
vehicle placard or tire inflation
pressure label. (If your vehicle has
tires of a different size than the size
indicated on the vehicle placard or tire
inflation pressure label, you should
determine the proper tire inflation
pressure for those tires.)
As an added safety feature, your
vehicle has been equipped with a tire
pressure monitoring system (TPMS)that illuminates a low tire pressure
telltale when one or more of your tires
is significantly under-inflated.
Accordingly, when the low tire
pressure telltale illuminates, you
should stop and check your tires as
soon as possible, and inflate them to
the proper pressure. Driving on a
significantly under-inflated tire causes
the tire to overheat and can lead to
tire failure. Under-inflation also
reduces fuel efficiency and tire tread
life, and may affect the vehicle's
handling and stopping ability.
Please note that the TPMS is not a
substitute for proper tire maintenance,
and it is the driver's responsibility to
maintain correct tire pressure, even if
under-inflation has not reached the
level to trigger illumination of the
TPMS low tire pressure telltale.
Your vehicle has also been equipped
with a TPMS malfunction indicator to
indicate when the system is not
operating properly. The TPMS
malfunction indicator is combined
with the low tire pressure telltale.
When the system detects a
malfunction, the telltale will flash forapproximately one minute and then
remain continuously illuminated. This
sequence will continue upon
subsequent vehicle start-ups as long
as the malfunction exists.
When the malfunction indicator is
illuminated, the system may not be
able to detect or signal low tire
pressure as intended. TPMS
malfunctions may occur for a variety
of reasons, including the installation
of replacement or alternate tires or
wheels on the vehicle that prevent the
TPMS from functioning properly.
Always check the TPMS malfunction
telltale after replacing one or more
tires or wheels on your vehicle to
ensure that the replacement or
alternate tires and wheels allow the
TPMS to continue to function
properly.
See
Tire Pressure Monitor Operation
0 292.
See Radio Frequency Statement 0358.
Page 293 of 384

292 VEHICLE CARE
Tire Pressure Monitor
Operation
This vehicle may have a Tire Pressure
Monitor System (TPMS). The TPMS is
designed to warn the driver when a
low tire pressure condition exists.
TPMS sensors are mounted onto each
tire and wheel assembly, excluding the
spare tire and wheel assembly. The
TPMS sensors monitor the air
pressure in the tires and transmit the
tire pressure readings to a receiver
located in the vehicle.
When a low tire pressure condition is
detected, the TPMS illuminates the
low tire pressure warning light on the
instrument cluster. If the warning
light comes on, stop as soon as
possible and inflate the tires to the
recommended pressure shown on the
Tire and Loading Information label.
SeeVehicle Load Limits 0170. A message to check the pressure in a
specific tire displays in the Driver
Information Center (DIC). The low tire
pressure warning light and the DIC
warning message come on at each
ignition cycle until the tires are
inflated to the correct inflation
pressure. Using the DIC, tire pressure
levels can be viewed. For additional
information and details about the DIC
operation and displays see
Driver
Information Center (DIC) 0124.
The low tire pressure warning light
may come on in cool weather when
the vehicle is first started, and then
turn off as the vehicle is driven. This
could be an early indicator that the air
pressure is getting low and needs to
be inflated to the proper pressure.
A Tire and Loading Information label,
attached to your vehicle, shows the
size of the original equipment tires
and the correct inflation pressure for
the tires when they are cold. See
Vehicle Load Limits 0170, for an
example of the Tire and Loading
Information label and its location.
Also see Tire Pressure 0289. The TPMS can warn about a low tire
pressure condition but it does not
replace normal tire maintenance. See
Tire Inspection
0295, Tire Rotation
0 296 and
Tires 0282.
Caution
Tire sealant materials are not all
the same. A non-approved tire
sealant could damage the TPMS
sensors. TPMS sensor damage
caused by using an incorrect tire
sealant is not covered by the
vehicle warranty. Always use only
the GM approved tire sealant
available through your dealer or
included in the vehicle.
Factory-installed Tire Inflator Kits use
a GM approved liquid tire sealant.
Using non-approved tire sealants
could damage the TPMS sensors. See
Tire Sealant and Compressor Kit 0304
for information regarding the inflator
kit materials and instructions.