climate control CADILLAC XT5 2020 Owner's Manual
[x] Cancel search | Manufacturer: CADILLAC, Model Year: 2020, Model line: XT5, Model: CADILLAC XT5 2020Pages: 384, PDF Size: 6.52 MB
Page 2 of 384
ContentsIntroduction . . . . . . . . . . . . . . . . . . . . . . . . . . 2
Keys, Doors, and Windows . . . . . . . . . . 9
Seats and Restraints . . . . . . . . . . . . . . . 42
Storage . . . . . . . . . . . . . . . . . . . . . . . . . . . . . . 92
Instruments and Controls . . . . . . . . . . 99
Lighting . . . . . . . . . . . . . . . . . . . . . . . . . . . . 140
Infotainment System . . . . . . . . . . . . . 147
Climate Controls . . . . . . . . . . . . . . . . . . 148
Driving and Operating . . . . . . . . . . . . 158
Vehicle Care . . . . . . . . . . . . . . . . . . . . . . . 247
Service and Maintenance . . . . . . . . . 331
Technical Data . . . . . . . . . . . . . . . . . . . . 345
Customer Information . . . . . . . . . . . . 349
Reporting Safety Defects . . . . . . . . . 359
OnStar . . . . . . . . . . . . . . . . . . . . . . . . . . . . . . 363
Connected Services . . . . . . . . . . . . . . . 369
Index . . . . . . . . . . . . . . . . . . . . . . . . 372
Page 7 of 384
6 INTRODUCTION
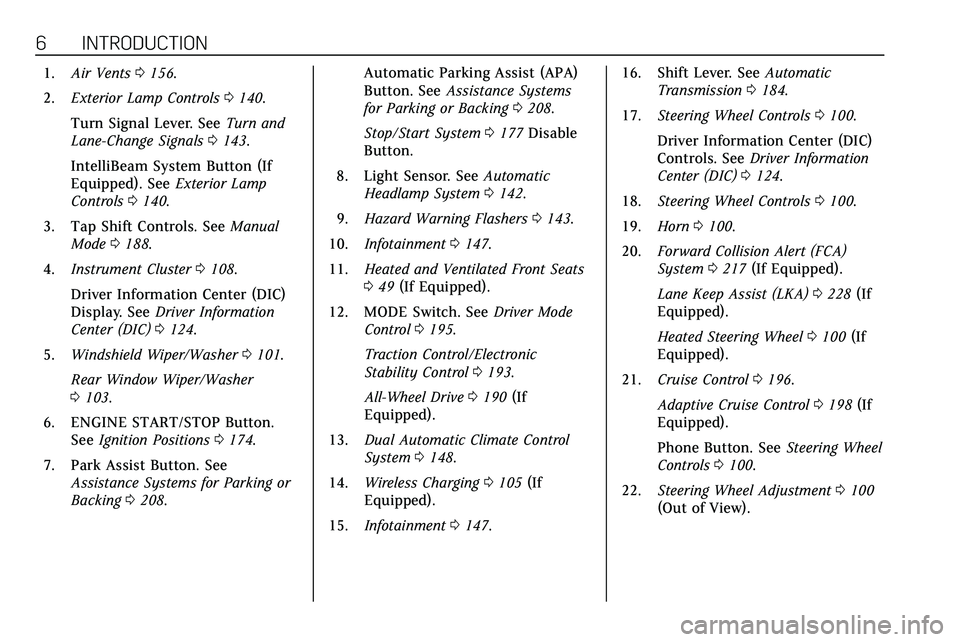
1.Air Vents 0156.
2. Exterior Lamp Controls 0140.
Turn Signal Lever. See Turn and
Lane-Change Signals 0143.
IntelliBeam System Button (If
Equipped). See Exterior Lamp
Controls 0140.
3. Tap Shift Controls. See Manual
Mode 0188.
4. Instrument Cluster 0108.
Driver Information Center (DIC)
Display. See Driver Information
Center (DIC) 0124.
5. Windshield Wiper/Washer 0101.
Rear Window Wiper/Washer
0 103.
6. ENGINE START/STOP Button. See Ignition Positions 0174.
7. Park Assist Button. See Assistance Systems for Parking or
Backing 0208. Automatic Parking Assist (APA)
Button. See
Assistance Systems
for Parking or Backing 0208.
Stop/Start System 0177 Disable
Button.
8. Light Sensor. See Automatic
Headlamp System 0142.
9. Hazard Warning Flashers 0143.
10. Infotainment 0147.
11. Heated and Ventilated Front Seats
049 (If Equipped).
12. MODE Switch. See Driver Mode
Control 0195.
Traction Control/Electronic
Stability Control 0193.
All-Wheel Drive 0190 (If
Equipped).
13. Dual Automatic Climate Control
System 0148.
14. Wireless Charging 0105 (If
Equipped).
15. Infotainment 0147. 16. Shift Lever. See
Automatic
Transmission 0184.
17. Steering Wheel Controls 0100.
Driver Information Center (DIC)
Controls. See Driver Information
Center (DIC) 0124.
18. Steering Wheel Controls 0100.
19. Horn 0100.
20. Forward Collision Alert (FCA)
System 0217 (If Equipped).
Lane Keep Assist (LKA) 0228 (If
Equipped).
Heated Steering Wheel 0100 (If
Equipped).
21. Cruise Control 0196.
Adaptive Cruise Control 0198 (If
Equipped).
Phone Button. See Steering Wheel
Controls 0100.
22. Steering Wheel Adjustment 0100
(Out of View).
Page 18 of 384
KEYS, DOORS, AND WINDOWS 17
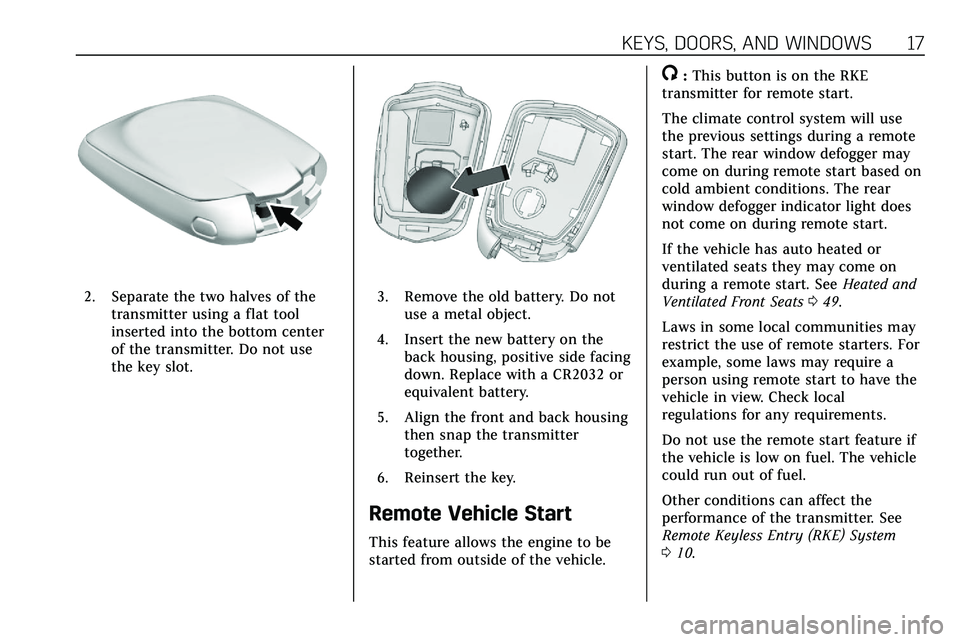
2. Separate the two halves of thetransmitter using a flat tool
inserted into the bottom center
of the transmitter. Do not use
the key slot.3. Remove the old battery. Do notuse a metal object.
4. Insert the new battery on the back housing, positive side facing
down. Replace with a CR2032 or
equivalent battery.
5. Align the front and back housing then snap the transmitter
together.
6. Reinsert the key.
Remote Vehicle Start
This feature allows the engine to be
started from outside of the vehicle.
/: This button is on the RKE
transmitter for remote start.
The climate control system will use
the previous settings during a remote
start. The rear window defogger may
come on during remote start based on
cold ambient conditions. The rear
window defogger indicator light does
not come on during remote start.
If the vehicle has auto heated or
ventilated seats they may come on
during a remote start. See Heated and
Ventilated Front Seats 049.
Laws in some local communities may
restrict the use of remote starters. For
example, some laws may require a
person using remote start to have the
vehicle in view. Check local
regulations for any requirements.
Do not use the remote start feature if
the vehicle is low on fuel. The vehicle
could run out of fuel.
Other conditions can affect the
performance of the transmitter. See
Remote Keyless Entry (RKE) System
0 10.
Page 24 of 384
KEYS, DOORS, AND WINDOWS 23
1. Unlock the door by activating theinside handle, by pressing the
power door lock switch, or by
using the Remote Keyless
Entry (RKE) transmitter.
2. Open the door from the outside.
When the safety lock is enabled,
adults and older children will not be
able to open the rear door from the
inside. Cancel the safety locks to
enable the doors to open from the
inside.
To cancel the safety lock: 1. Unlock the door and open it from the outside.
2. Move the lever up to unlock. Do the same for the other door.Doors
Liftgate
{Warning
Exhaust gases can enter the vehicle
if it is driven with the liftgate or
trunk/hatch open, or with any
objects that pass through the seal
between the body and the trunk/
hatch or liftgate. Engine exhaust
contains carbon monoxide (CO)
which cannot be seen or smelled.
It can cause unconsciousness and
even death.
If the vehicle must be driven with
the liftgate or trunk/hatch open:
. Close all of the windows.
. Fully open the air outlets on
or under the instrument
panel.
. Adjust the climate control
system to a setting that
brings in only outside air and
(Continued)
Warning (Continued)
set the fan speed to the
highest setting. See “Climate
Control Systems” in the Index.
. If the vehicle is equipped with
a power liftgate, disable the
power liftgate function.
See Engine Exhaust 0183.
Caution
To avoid damage to the liftgate or
liftgate glass, make sure the area
above and behind the liftgate is
clear before opening it.
Page 36 of 384
KEYS, DOORS, AND WINDOWS 35
one second to unfold. SeeRemote
Keyless Entry (RKE) System Operation
0 10.
This feature is turned on or off
through vehicle personalization. See
Vehicle Personalization 0131.
Heated Mirrors
K:Press to heat the mirrors.
See “Rear Window Defogger” under
Dual Automatic Climate Control System
0 148.
Automatic Dimming Mirror
If the vehicle has the automatic
dimming mirror, the driver outside
mirror automatically adjusts for the
glare of headlamps behind you.
Reverse Tilt Mirrors
If equipped with memory seats, the
passenger and/or driver mirror tilts to
a preselected position when the
vehicle is in R (Reverse). This allows
the curb to be seen when parallel
parking. The mirror(s) return to the original
position when:
.
The vehicle is shifted out of
R (Reverse), or remains in
R (Reverse) for about 30 seconds.
. The ignition is turned off.
. The vehicle is driven in
R (Reverse) above a set speed.
To turn this feature on or off, see
Vehicle Personalization 0131.
Interior Mirrors
Interior Rearview Mirrors
Adjust the rearview mirror for a clear
view of the area behind the vehicle.
Do not spray glass cleaner directly on
the mirror. Use a soft towel dampened
with water.
Manual Rearview Mirror
Push the tab forward for daytime use
and pull it rearward for nighttime use
to avoid glare of the headlamps from
behind.
Automatic Dimming
Rearview Mirror
If equipped, automatic dimming
reduces the glare of headlamps from
behind. The dimming feature comes
on when the vehicle is started.
Rear Camera Mirror
If equipped, this automatic dimming
mirror provides a wide angle camera
view of the area behind the vehicle.
Page 50 of 384
SEATS AND RESTRAINTS 49
.Power steering wheel, if equipped
Obstructions
If something has blocked the driver
seat and/or power steering wheel
while recalling a memory position, the
recall may stop. Remove the
obstruction and try the recall again.
If the memory position still does not
recall, see your dealer.
Heated and Ventilated
Front Seats
{Warning
If temperature change or pain to
the skin cannot be felt, the seat
heater may cause burns. To reduce
the risk of burns, use care when
using the seat heater, especially for
long periods of time. Do not place
anything on the seat that insulates
against heat, such as a blanket,
cushion, cover, or similar item. This
may cause the seat heater to (Continued)
Warning (Continued)
overheat. An overheated seat heater
may cause a burn or may damage
the seat.
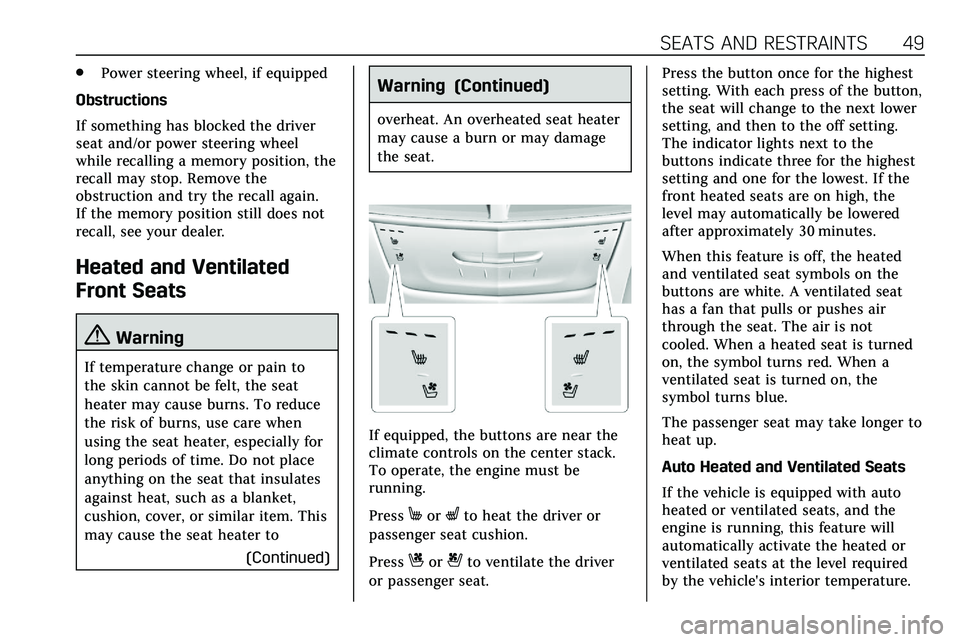
If equipped, the buttons are near the
climate controls on the center stack.
To operate, the engine must be
running.
Press
MorLto heat the driver or
passenger seat cushion.
Press
Cor{to ventilate the driver
or passenger seat. Press the button once for the highest
setting. With each press of the button,
the seat will change to the next lower
setting, and then to the off setting.
The indicator lights next to the
buttons indicate three for the highest
setting and one for the lowest. If the
front heated seats are on high, the
level may automatically be lowered
after approximately 30 minutes.
When this feature is off, the heated
and ventilated seat symbols on the
buttons are white. A ventilated seat
has a fan that pulls or pushes air
through the seat. The air is not
cooled. When a heated seat is turned
on, the symbol turns red. When a
ventilated seat is turned on, the
symbol turns blue.
The passenger seat may take longer to
heat up.
Auto Heated and Ventilated Seats
If the vehicle is equipped with auto
heated or ventilated seats, and the
engine is running, this feature will
automatically activate the heated or
ventilated seats at the level required
by the vehicle's interior temperature.
Page 54 of 384
SEATS AND RESTRAINTS 53
Heated Rear Seats
{Warning
If temperature change or pain to
the skin cannot be felt, the seat
heater may cause burns. See the
Warning underHeated and
Ventilated Front Seats 049.
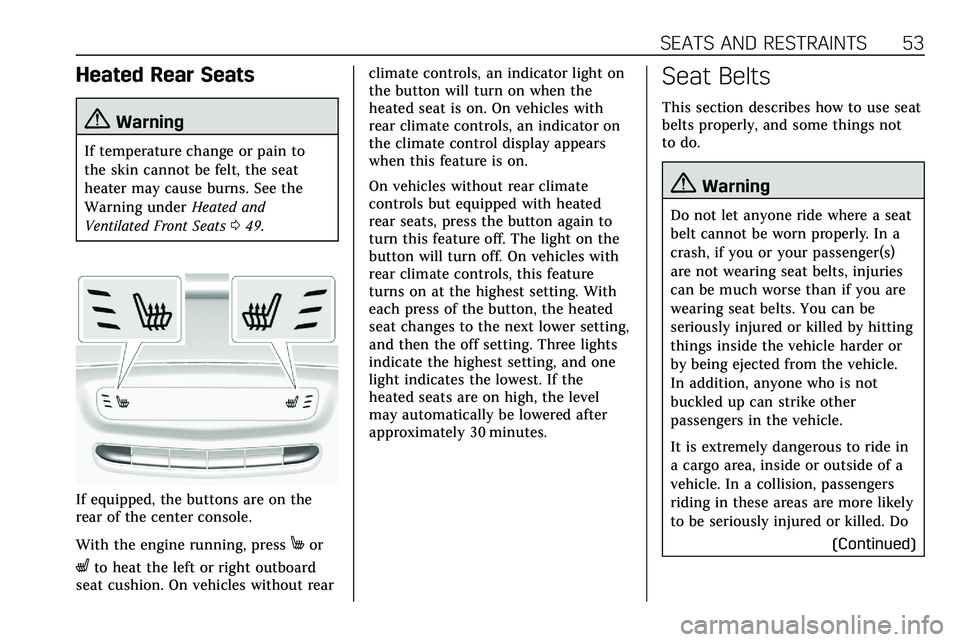
If equipped, the buttons are on the
rear of the center console.
With the engine running, press
Mor
Lto heat the left or right outboard
seat cushion. On vehicles without rear climate controls, an indicator light on
the button will turn on when the
heated seat is on. On vehicles with
rear climate controls, an indicator on
the climate control display appears
when this feature is on.
On vehicles without rear climate
controls but equipped with heated
rear seats, press the button again to
turn this feature off. The light on the
button will turn off. On vehicles with
rear climate controls, this feature
turns on at the highest setting. With
each press of the button, the heated
seat changes to the next lower setting,
and then the off setting. Three lights
indicate the highest setting, and one
light indicates the lowest. If the
heated seats are on high, the level
may automatically be lowered after
approximately 30 minutes.
Seat Belts
This section describes how to use seat
belts properly, and some things not
to do.
{Warning
Do not let anyone ride where a seat
belt cannot be worn properly. In a
crash, if you or your passenger(s)
are not wearing seat belts, injuries
can be much worse than if you are
wearing seat belts. You can be
seriously injured or killed by hitting
things inside the vehicle harder or
by being ejected from the vehicle.
In addition, anyone who is not
buckled up can strike other
passengers in the vehicle.
It is extremely dangerous to ride in
a cargo area, inside or outside of a
vehicle. In a collision, passengers
riding in these areas are more likely
to be seriously injured or killed. Do
(Continued)
Page 133 of 384
132 INSTRUMENTS AND CONTROLS
Rear Seat Reminder
This allows for a chime and a message
when the rear door has been opened
before or during operation of the
vehicle.
Touch Off or On.
Climate and Air Quality
Touch and the following may display:
.Auto Fan Speed
. Auto Cooled Seats
. Auto Heated Seats
. Auto Defog
. Auto Rear Defog
. Ionizer
Auto Fan Speed
This setting specifies the amount of
airf low when the climate control fan
setting is Auto Fan.
Touch Low, Medium, or High. Auto Cooled Seats
This setting automatically turns on
and regulates the ventilated seats
when the cabin temperature is warm.
See
Heated and Ventilated Front Seats
0 49.
Touch Off or On.
Auto Heated Seats
This setting automatically turns on
and regulates the heated seats when
the cabin temperature is cool. The
auto heated seats can be turned off by
using the heated seat buttons on the
center stack. See Heated and Ventilated
Front Seats 049.
If equipped with Auto Heated Steering
Wheel, this feature will turn on when
the Auto Heated Seats turn on.
Touch Off or On.
Auto Defog
This setting automatically turns the
front defogger on when the engine is
started.
Touch Off or On. Auto Rear Defog
Auto Rear Defog turns on the rear
window defogger based on
temperature and humidity conditions.
Touch Off or On.
Ionizer
If equipped and on, this feature helps
to clean the air inside the vehicle and
remove contaminants such as pollen,
odors, and dust. See
Dual Automatic
Climate Control System 0148.
Touch Off or On.
Collision / Detection Systems
Touch and the following may display:
. Alert Type
. Forward Collision System
. Front Pedestrian Detection
. Rear Pedestrian Detection
. Rear Camera Park Assist Symbols
. Rear Cross Traffic Alert
. Adaptive Cruise Go Notifier
. Lane Change Alert
Page 149 of 384
148 CLIMATE CONTROLS
Climate Controls
Climate Control Systems
Dual Automatic Climate ControlSystem . . . . . . . . . . . . . . . . . . . . . . . . . . 148
Rear Climate Control System . . . . 154
Air Vents
Air Vents . . . . . . . . . . . . . . . . . . . . . . . . . . 156
Maintenance
Passenger Compartment Air Filter . . . . . . . . . . . . . . . . . . . . . . . . . . . . . 156
Service . . . . . . . . . . . . . . . . . . . . . . . . . . . . 156
Climate Control Systems
Dual Automatic Climate Control System
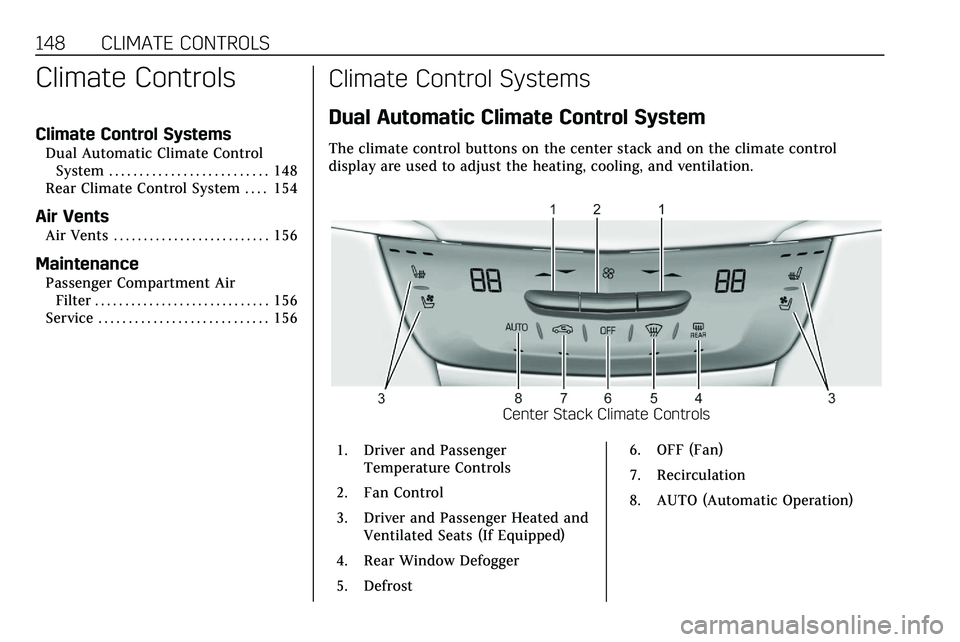
The climate control buttons on the center stack and on the climate control
display are used to adjust the heating, cooling, and ventilation.
Center Stack Climate Controls
1. Driver and Passenger Temperature Controls
2. Fan Control
3. Driver and Passenger Heated and Ventilated Seats (If Equipped)
4. Rear Window Defogger
5. Defrost 6. OFF (Fan)
7. Recirculation
8. AUTO (Automatic Operation)
Page 150 of 384
CLIMATE CONTROLS 149
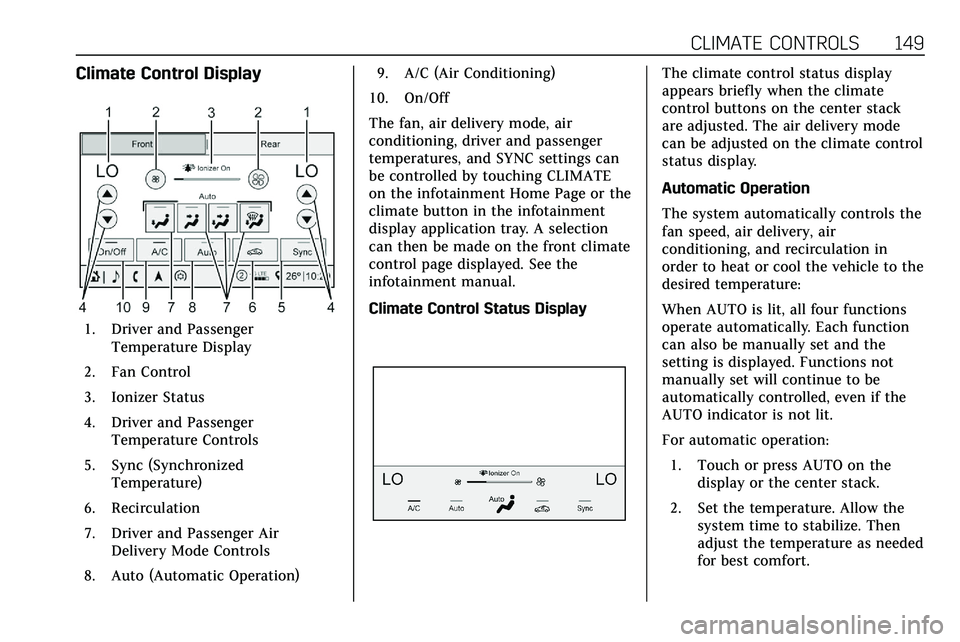
Climate Control Display
1. Driver and PassengerTemperature Display
2. Fan Control
3. Ionizer Status
4. Driver and Passenger Temperature Controls
5. Sync (Synchronized Temperature)
6. Recirculation
7. Driver and Passenger Air Delivery Mode Controls
8. Auto (Automatic Operation) 9. A/C (Air Conditioning)
10. On/Off
The fan, air delivery mode, air
conditioning, driver and passenger
temperatures, and SYNC settings can
be controlled by touching CLIMATE
on the infotainment Home Page or the
climate button in the infotainment
display application tray. A selection
can then be made on the front climate
control page displayed. See the
infotainment manual.
Climate Control Status Display
The climate control status display
appears briefly when the climate
control buttons on the center stack
are adjusted. The air delivery mode
can be adjusted on the climate control
status display.
Automatic Operation
The system automatically controls the
fan speed, air delivery, air
conditioning, and recirculation in
order to heat or cool the vehicle to the
desired temperature:
When AUTO is lit, all four functions
operate automatically. Each function
can also be manually set and the
setting is displayed. Functions not
manually set will continue to be
automatically controlled, even if the
AUTO indicator is not lit.
For automatic operation: 1. Touch or press AUTO on the display or the center stack.
2. Set the temperature. Allow the system time to stabilize. Then
adjust the temperature as needed
for best comfort.