torque CADILLAC XT5 2020 Owner's Manual
[x] Cancel search | Manufacturer: CADILLAC, Model Year: 2020, Model line: XT5, Model: CADILLAC XT5 2020Pages: 384, PDF Size: 6.52 MB
Page 196 of 384
DRIVING AND OPERATING 195
To turn off only TCS, press and
release
g. The Traction Off lighti
displays in the instrument cluster and
a DIC message may display. To turn
TCS on again, press and release
g.
The Traction Off light
idisplayed in
the instrument cluster will turn off
and a DIC message may display.
If TCS is limiting wheel spin when
g
is pressed, the system will not turn off
until the wheels stop spinning.
To turn off both TCS and StabiliTrak/
ESC, press and hold
guntil the
Traction Off light
iand StabiliTrak/
ESC Off light
gcome on and stay on
in the instrument cluster. A DIC
message may display. To turn TCS and
StabiliTrak/ESC on again, press and
release
g. The Traction Off lighti
and StabiliTrak/ESC Off lightgin the
instrument cluster turn off and a DIC
message may display.
StabiliTrak will automatically turn on
if the vehicle exceeds 56 km/h
(36 mph). Traction control will
remain off. Adding accessories can affect vehicle
performance. See
Accessories and
Modifications 0249.
Driver Mode Control
If equipped, the Driver Mode Control
has the following modes: Tour, Sport,
All-Wheel Drive (AWD), Snow/Ice
(Front-Wheel Drive vehicles only), and
Off-Road (AWD vehicles only). Press
MODE on the center console to make
a mode selection. The first press of
the switch will show the current mode
in the instrument cluster. Continue
pressing through the available modes.
If the vehicle is put in AWD Mode, it
will remain in AWD through future
ignition cycles, until a different mode
is selected.
If the vehicle is in Tour, Sport,
or Off-Road Mode when the engine is
turned off, Driver Mode Control will
come on in Tour Mode at the next
ignition cycle.
When AWD Mode or Sport Mode is
selected, the light will come on in the
AWD indicator below the MODE
switch. The indicator light will turn off when Tour Mode is selected. For
more information on AWD Mode, see
All-Wheel Drive
0190.
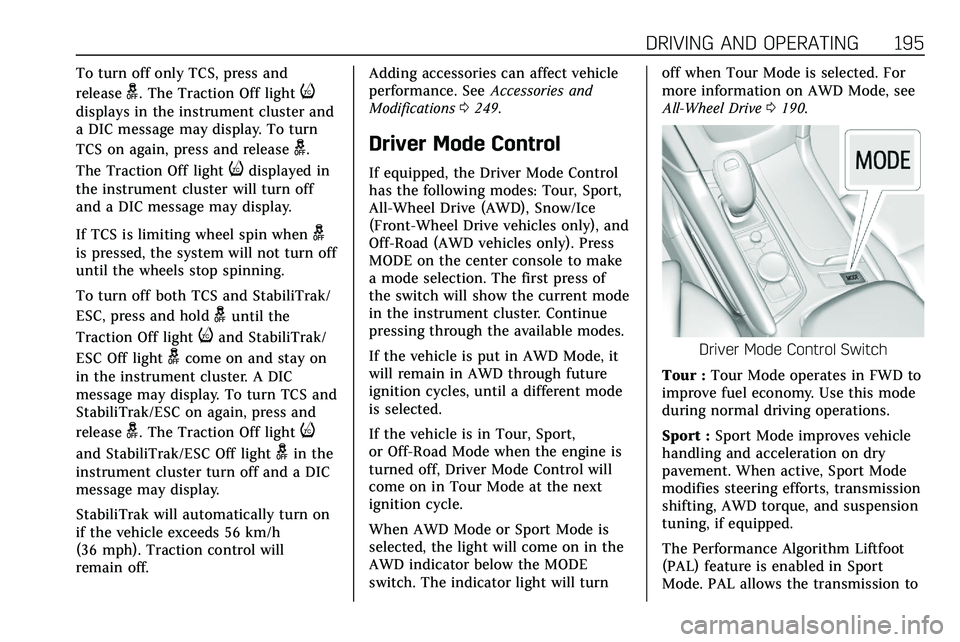
Driver Mode Control Switch
Tour : Tour Mode operates in FWD to
improve fuel economy. Use this mode
during normal driving operations.
Sport : Sport Mode improves vehicle
handling and acceleration on dry
pavement. When active, Sport Mode
modifies steering efforts, transmission
shifting, AWD torque, and suspension
tuning, if equipped.
The Performance Algorithm Liftfoot
(PAL) feature is enabled in Sport
Mode. PAL allows the transmission to
Page 197 of 384
196 DRIVING AND OPERATING
hold the current gear after a quick
release of a heavily applied accelerator
pedal. This provides greater engine
braking and enhanced vehicle control.
When PAL is activated, there may be
an additional green gear symbol which
appears in the instrument cluster
display. SeeGear Shifting Light 0119.
AWD : AWD Mode provides drive
torque to all four wheels. Select AWD
to improve traction and control on
slippery road surfaces, such as gravel,
sand, wet pavement, snow, and ice.
When in AWD Mode, the AWD Mode
indicator light will be on. For more
information on AWD Mode, see
All-Wheel Drive 0190.
Snow/Ice (FWD Vehicles Only) :
Snow/Ice Mode improves vehicle
acceleration on snow and ice covered
roads.
Off-Road (AWD Vehicles Only) : Use
this mode for off-road recreational
driving. Choosing Off-Road Mode also
engages AWD Mode. For more
information on Off-Road Mode, see
Off-Road Driving.Cruise Control
{Warning
Cruise control can be dangerous
where you cannot drive safely at a
steady speed. Do not use cruise
control on winding roads or in
heavy traffic.
Cruise control can be dangerous on
slippery roads. On such roads, fast
changes in tire traction can cause
excessive wheel slip, and you could
lose control. Do not use cruise
control on slippery roads.
With cruise control, a speed of about
40 km/h (25 mph) or more can be
maintained without keeping your foot
on the accelerator. Cruise control does
not work at speeds below about
40 km/h (25 mph).
If the Traction Control/StabiliTrak/
Electronic Stability Control (ESC)
system begins to limit wheel spin
while using cruise control, the cruise control automatically disengages. See
Traction Control/Electronic Stability
Control
0193. If a collision alert
occurs when cruise control is
activated, cruise control is disengaged.
See Forward Collision Alert (FCA)
System 0217. When road conditions
allow cruise control to be safely used,
it can be turned back on.
Cruise control will disengage if either
TCS or StabiliTrak/ESC is turned off.
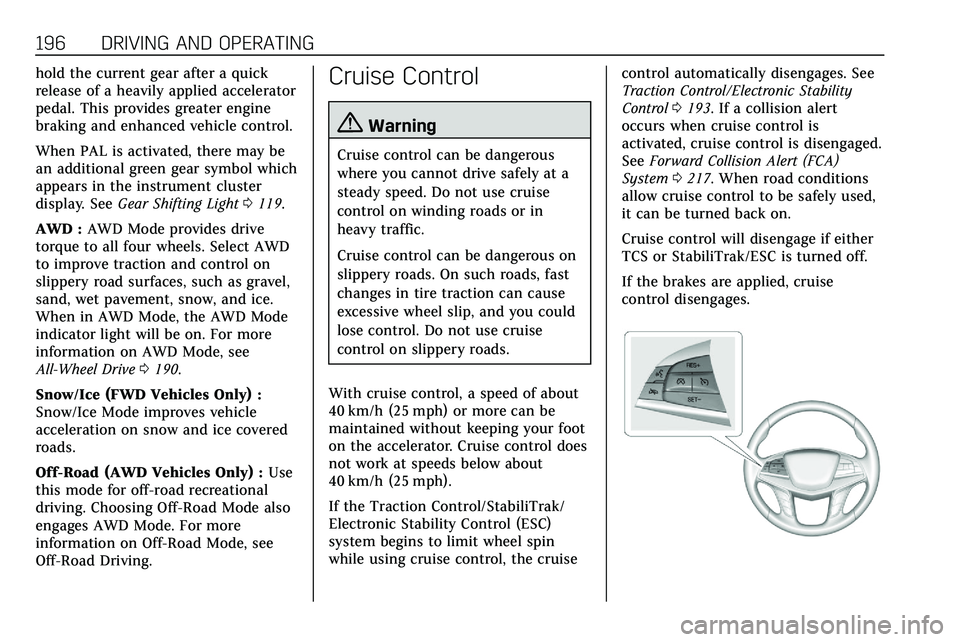
If the brakes are applied, cruise
control disengages.
Page 246 of 384
DRIVING AND OPERATING 245
If TSC is enabled, the Traction Control
System (TCS)/StabiliTrak/ESC warning
light will flash on the instrument
cluster. Reduce vehicle speed by
gradually removing your foot from the
accelerator. If trailer sway continues,
StabiliTrak/ESC can reduce engine
torque to help slow the vehicle. TSC
will not function if StabiliTrak/ESC is
turned off. SeeTraction Control/
Electronic Stability Control 0193.
{Warning
Trailer sway can result in a crash
and in serious injury or death, even
if the vehicle is equipped with TSC.
If the trailer begins to sway, reduce
vehicle speed by gradually removing
your foot from the accelerator. Then
pull over to check the trailer and
vehicle to help correct possible
causes, including an improperly or
overloaded trailer, unrestrained
cargo, improper trailer hitch
configuration, or improperly
inflated or incorrect vehicle or
(Continued)
Warning (Continued)
trailer tires. SeeTowing Equipment
0 241 for trailer ratings and hitch
setup recommendations.
Trailer Tires
Special Trailer (ST) tires differ from
vehicle tires. Trailer tires are designed
with stiff sidewalls to help prevent
sway and to support heavy loads.
These features can make it difficult to
determine if the trailer tire pressures
are low only based on a visual
inspection.
Always check all trailer tire pressures
before each trip when the tires are
cool. Low trailer tire pressure is a
leading cause of trailer tire blow-outs.
Trailer tires deteriorate over time. The
trailer tire sidewall will show the week
and year the tire was manufactured.
Many trailer tire manufacturers
recommend replacing tires more than
six years old. Overloading is another leading cause
of trailer tire blow-outs. Never load
your trailer with more weight than the
tires are designed to support. The load
rating is located on the trailer tire
sidewall.
Always know the maximum speed
rating for the trailer tires before
driving. This may be significantly
lower than the vehicle tire speed
rating. The speed rating may be on
the trailer tire sidewall. If the speed
rating is not shown, the default trailer
tire speed rating is 105 km/h
(65 mph).
Page 268 of 384
VEHICLE CARE 267
Warning (Continued)
crash. When the brake wear
warning sound is heard, have the
vehicle serviced.
Caution
Continuing to drive with worn-out
brake pads could result in costly
brake repair.
Some driving conditions or climates
can cause a brake squeal when the
brakes are first applied or lightly
applied. This does not mean
something is wrong with the brakes.
Properly torqued wheel nuts are
necessary to help prevent brake
pulsation. When tires are rotated,
inspect brake pads for wear and
evenly tighten wheel nuts in the
proper sequence to torque
specifications. See Capacities and
Specifications 0346. Brake pads should be replaced as
complete sets.
Brake Pedal Travel
See your dealer if the brake pedal does
not return to normal height, or if
there is a rapid increase in pedal
travel. This could be a sign that brake
service may be required.
Replacing Brake System Parts
Always replace brake system parts
with new, approved replacement parts.
If this is not done, the brakes may not
work properly. The braking
performance expected can change in
many other ways if the wrong
replacement brake parts are installed
or if parts are improperly installed.
Brake Fluid
The brake master cylinder reservoir is
filled with GM approved DOT 3 brake
fluid as indicated on the reservoir cap.
See
Engine Compartment Overview
0 252 for the location of the reservoir.
Checking Brake Fluid
With the vehicle in P (Park) on a level
surface, the brake fluid level should be
between the minimum and maximum
marks on the brake fluid reservoir.
There are only two reasons why the
brake fluid level in the reservoir may
go down:
. Normal brake lining wear. When
new linings are installed, the fluid
level goes back up.
. A fluid leak in the brake hydraulic
system. Have the brake hydraulic
system fixed. With a leak, the
brakes will not work well.
Always clean the brake fluid reservoir
cap and the area around the cap
before removing it.
Do not top off the brake fluid. Adding
fluid does not correct a leak. If fluid is
added when the linings are worn,
there will be too much fluid when
Page 297 of 384
296 VEHICLE CARE
.The tire has a bump, bulge,
or split.
.The tire has a puncture, cut,
or other damage that cannot
be repaired well because of the
size or location of the damage.
Tire Rotation
Tires should be rotated every
12 000 km (7,500 mi). See
Maintenance Schedule0332.
Tires are rotated to achieve a
more uniform wear for all tires.
The first rotation is the most
important.
Anytime unusual wear is noticed,
rotate the tires as soon as
possible, check for proper tire
inflation pressure, and check for
damaged tires or wheels. If the
unusual wear continues after the
rotation, check the wheel
alignment. See When It Is Time for
New Tires 0297 and
Wheel Replacement 0301.
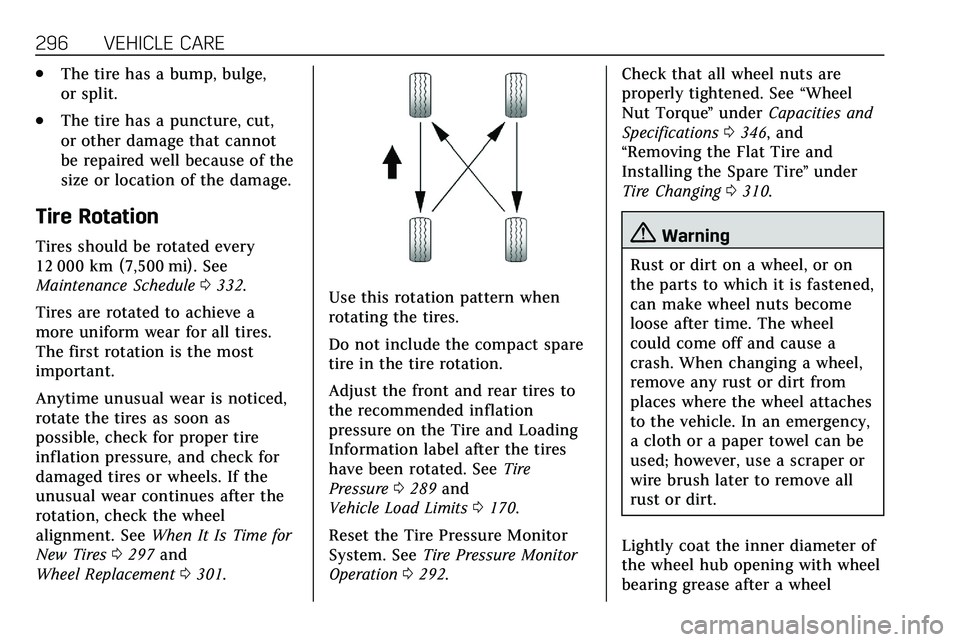
Use this rotation pattern when
rotating the tires.
Do not include the compact spare
tire in the tire rotation.
Adjust the front and rear tires to
the recommended inflation
pressure on the Tire and Loading
Information label after the tires
have been rotated. See Tire
Pressure 0289 and
Vehicle Load Limits 0170.
Reset the Tire Pressure Monitor
System. See Tire Pressure Monitor
Operation 0292. Check that all wheel nuts are
properly tightened. See
“Wheel
Nut Torque ”under Capacities and
Specifications 0346, and
“Removing the Flat Tire and
Installing the Spare Tire ”under
Tire Changing 0310.
{Warning
Rust or dirt on a wheel, or on
the parts to which it is fastened,
can make wheel nuts become
loose after time. The wheel
could come off and cause a
crash. When changing a wheel,
remove any rust or dirt from
places where the wheel attaches
to the vehicle. In an emergency,
a cloth or a paper towel can be
used; however, use a scraper or
wire brush later to remove all
rust or dirt.
Lightly coat the inner diameter of
the wheel hub opening with wheel
bearing grease after a wheel
Page 315 of 384
314 VEHICLE CARE
13. Lower the vehicle by turning thejack handle counterclockwise.
{Warning
Wheel nuts that are improperly or
incorrectly tightened can cause the
wheels to become loose or come off.
The wheel nuts should be tightened
with a torque wrench to the proper
torque specification after replacing.
Follow the torque specification
supplied by the aftermarket
manufacturer when using accessory
locking wheel nuts. See Capacities
and Specifications 0346 for original
equipment wheel nut torque
specifications.
Caution
Improperly tightened wheel nuts
can lead to brake pulsation and
rotor damage. To avoid expensive
brake repairs, evenly tighten the
wheel nuts in the proper sequence
(Continued)
Caution (Continued)
and to the proper torque
specification. SeeCapacities and
Specifications 0346 for the wheel
nut torque specification.
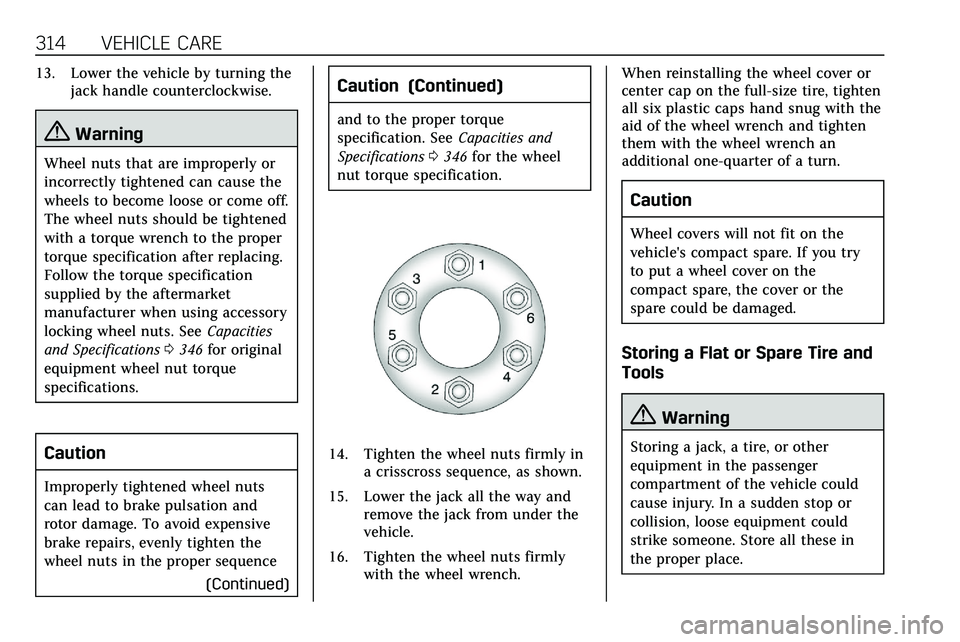
14. Tighten the wheel nuts firmly in a crisscross sequence, as shown.
15. Lower the jack all the way and remove the jack from under the
vehicle.
16. Tighten the wheel nuts firmly with the wheel wrench. When reinstalling the wheel cover or
center cap on the full-size tire, tighten
all six plastic caps hand snug with the
aid of the wheel wrench and tighten
them with the wheel wrench an
additional one-quarter of a turn.
Caution
Wheel covers will not fit on the
vehicle's compact spare. If you try
to put a wheel cover on the
compact spare, the cover or the
spare could be damaged.
Storing a Flat or Spare Tire and
Tools
{Warning
Storing a jack, a tire, or other
equipment in the passenger
compartment of the vehicle could
cause injury. In a sudden stop or
collision, loose equipment could
strike someone. Store all these in
the proper place.
Page 347 of 384
346 TECHNICAL DATA
Vehicle Data
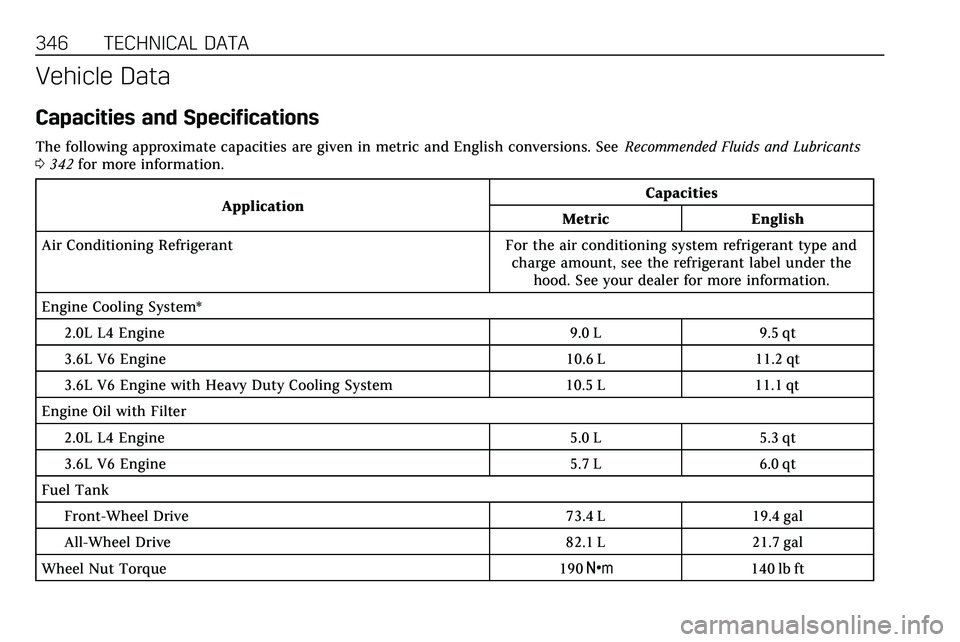
Capacities and Specifications
The following approximate capacities are given in metric and English conversions. SeeRecommended Fluids and Lubricants
0 342 for more information.
Application Capacities
Metric English
Air Conditioning Refrigerant For the air conditioning system refrigerant type and charge amount, see the refrigerant label under thehood. See your dealer for more information.
Engine Cooling System* 2.0L L4 Engine 9.0 L 9.5 qt
3.6L V6 Engine 10.6 L 11.2 qt
3.6L V6 Engine with Heavy Duty Cooling System 10.5 L 11.1 qt
Engine Oil with Filter 2.0L L4 Engine 5.0 L 5.3 qt
3.6L V6 Engine 5.7 L 6.0 qt
Fuel Tank Front-Wheel Drive 73.4 L 19.4 gal
All-Wheel Drive 82.1 L 21.7 gal
Wheel Nut Torque 190 Y140 lb ft