trunk CADILLAC XT5 2020 Owner's Manual
[x] Cancel search | Manufacturer: CADILLAC, Model Year: 2020, Model line: XT5, Model: CADILLAC XT5 2020Pages: 384, PDF Size: 6.52 MB
Page 24 of 384

KEYS, DOORS, AND WINDOWS 23
1. Unlock the door by activating theinside handle, by pressing the
power door lock switch, or by
using the Remote Keyless
Entry (RKE) transmitter.
2. Open the door from the outside.
When the safety lock is enabled,
adults and older children will not be
able to open the rear door from the
inside. Cancel the safety locks to
enable the doors to open from the
inside.
To cancel the safety lock: 1. Unlock the door and open it from the outside.
2. Move the lever up to unlock. Do the same for the other door.Doors
Liftgate
{Warning
Exhaust gases can enter the vehicle
if it is driven with the liftgate or
trunk/hatch open, or with any
objects that pass through the seal
between the body and the trunk/
hatch or liftgate. Engine exhaust
contains carbon monoxide (CO)
which cannot be seen or smelled.
It can cause unconsciousness and
even death.
If the vehicle must be driven with
the liftgate or trunk/hatch open:
. Close all of the windows.
. Fully open the air outlets on
or under the instrument
panel.
. Adjust the climate control
system to a setting that
brings in only outside air and
(Continued)
Warning (Continued)
set the fan speed to the
highest setting. See “Climate
Control Systems” in the Index.
. If the vehicle is equipped with
a power liftgate, disable the
power liftgate function.
See Engine Exhaust 0183.
Caution
To avoid damage to the liftgate or
liftgate glass, make sure the area
above and behind the liftgate is
clear before opening it.
Page 134 of 384

INSTRUMENTS AND CONTROLS 133
Alert Type
This setting specifies the type of
vehicle feedback provided, either a
beep or seat vibration, when you are
in danger of colliding with an object.
Touch Beeps or Safety Alert Seat.
Forward Collision System
This setting controls the vehicle
response when detecting a vehicle
ahead of you. The Off setting disables
all FCA and AEB functions. With the
Alert and Brake setting, both FCA and
AEB are available. The Alert setting
disables AEB. SeeAutomatic
Emergency Braking (AEB) 0220.
Touch Off, Alert, or Alert and Brake.
Front Pedestrian Detection
This feature may help avoid or reduce
the harm caused by front-end crashes
with nearby pedestrians.
See Front Pedestrian Braking (FPB)
System 0221.
Select Off, Alert, or Alert and Brake. Rear Pedestrian Detection
This setting specifies if alerts will
display when the vehicle detects
pedestrians behind when in
R (Reverse). See
Rear Pedestrian Alert
0 216.
Touch Off, Alert, or Alert and Brake.
Rear Camera Park Assist Symbols
This setting enables the Rear Camera
Park Assist Symbols. See Assistance
Systems for Parking or Backing 0208.
Touch Off or On.
Rear Cross Traffic Alert
This setting specifies if an alert will
display when the vehicle detects
approaching rear cross traffic when in
R (Reverse). See Assistance Systems for
Parking or Backing 0208.
Touch Off or On.
Adaptive Cruise Go Notifier
This setting determines if an alert will
appear when Adaptive Cruise Control
brings the vehicle to a complete stop
and the vehicle ahead of you starts
moving again. See Adaptive Cruise
Control 0198. Touch Off or On.
Lane Change Alert
This setting specifies if an alert will
display on the outside mirror to help
you avoid crashing into a vehicle in
your blind spot, or rapidly
approaching your blind spot, during a
lane change maneuver. See
Lane
Change Alert (LCA) 0226.
When Lane Change Alert is disabled,
Side Blind Zone Alert is also disabled.
Touch Off or On.
Comfort and Convenience
Touch and the following may display:
. Chime Volume
. Hands Free Liftgate/Trunk Control
. Reverse Tilt Mirror
. Remote Mirror Folding
. Rain Sense Wipers
. Auto Wipe in Reverse Gear
Chime Volume
This setting determines the chime
volume level.
Page 135 of 384

134 INSTRUMENTS AND CONTROLS
Touch the controls on the
infotainment display to adjust the
volume.
Hands Free Liftgate/Trunk Control
The liftgate may be operated with a
kicking motion under the left corner
of the rear bumper. SeeLiftgate023.
Select Off, On-Open and Close,
or On-Open Only.
Reverse Tilt Mirror
When on, both the driver and
passenger, driver, or passenger outside
mirrors will tilt downward when the
vehicle is shifted to R (Reverse) to
improve visibility of the ground near
the rear wheels. They will return to
their previous driving position when
the vehicle is shifted out of
R (Reverse) or the engine is turned off.
See Reverse Tilt Mirrors 035.
Touch Off, On - Driver and Passenger,
On - Driver, or On - Passenger. Remote Mirror Folding
When on, the outside mirrors will
automatically fold or unfold when the
Remote Keyless Entry (RKE)
transmitter
QorKbutton is pressed
and held. See Folding Mirrors 034.
Touch Off or On.
Rain Sense Wipers
This setting automatically turns on
the wipers when moisture is detected
and the wiper switch is in
intermittent mode.
Touch Disabled or Enabled.
Auto Wipe in Reverse Gear
When on and the front wiper is on,
the rear wiper will automatically
activate when the vehicle is shifted to
R (Reverse).
Select Off or On.
Lighting
Touch and the following may display:
. Vehicle Locator Lights
. Exit Lighting Vehicle Locator Lights
This setting flashes the headlamps of
your vehicle when you press
Kon the
Remote Keyless Entry (RKE)
transmitter.
Touch Off or On.
Exit Lighting
This setting specifies how long the
headlamps stay on after the vehicle is
turned off and exited.
Touch Off, 30 Seconds, 60 Seconds,
or 120 Seconds.
Power Door Locks
Touch and the following may display:
. Open Door Anti Lock Out
. Auto Door Unlock
. Delayed Door Lock
Open Door Anti Lock Out
This setting prevents the driver door
from locking when the door is open.
If this setting is on, the Delayed Door
Lock menu will not be available.
Touch Off or On.
Page 234 of 384

DRIVING AND OPERATING 233
Warning (Continued)
shutting off the pump or by
notifying the station attendant.
Leave the area immediately.
Filling the Tank with a Portable Fuel
Container
If the vehicle runs out of fuel and
must be filled from a portable fuel
container:
1. Locate the capless funnel adapter in the rear cargo area
under the load floor tray.
2. Insert and latch the funnel into the capless fuel system.
{Warning
Attempting to refuel from a
portable fuel container without
using the funnel adapter may cause
fuel spillage and damage the
capless fuel system. This could
cause a fire. You or others could be
badly burned and the vehicle could
be damaged.
3. Remove and clean the funnel adapter and return it to the
storage location.
Filling a Portable Fuel
Container
{Warning
Never fill a portable fuel container
while it is in the vehicle. Static
electricity discharge from the
container can ignite the fuel vapor.
You or others could be badly
(Continued)
Warning (Continued)
burned and the vehicle could be
damaged. To help avoid injury to
you and others:
. Dispense fuel only into
approved containers.
. Do not fill a container while
it is inside a vehicle, in a
vehicle's trunk, in a pickup
bed, or on any surface other
than the ground.
. Bring the fill nozzle in
contact with the inside of the
fill opening before operating
the nozzle. Maintain contact
until filling is complete.
. Keep sparks, flames, and
smoking materials away
from fuel.
. Do not use electronic devices
while pumping fuel.
Page 236 of 384

DRIVING AND OPERATING 235
If equipped, the following driver
assistance features should be turned
off when towing a trailer:
.Adaptive Cruise Control (ACC)
. Super Cruise Control
. Lane Keep Assist (LKA)
. Park Assist
. Automatic Parking Assist (APA)
. Reverse Automatic Braking (RAB)
If equipped, the following driver
assistance features should be turned
to alert or off when towing a trailer:
. Automatic Emergency
Braking (AEB)
. Intelligent Brake Assist (IBA)
. Front Pedestrian Braking (FPB)
If equipped with Lane Change Alert
(LCA), the LCA detection zones that
extend back from the side of the
vehicle do not move further back
when a trailer is towed. Use caution
while changing lanes when towing a
trailer. If equipped with Rear Cross Traffic
Alert (RCTA), use caution while
backing up when towing a trailer, as
the RCTA detection zones that extend
out from the back of the vehicle do
not move further back when a trailer
is towed.
{Warning
To prevent serious injury or death
from carbon monoxide (CO), when
towing a trailer:
. Do not drive with the liftgate,
trunk/hatch, or rear-most
window open.
. Fully open the air outlets on
or under the instrument
panel.
. Adjust the climate control
system to a setting that
brings in only outside air. See
“Climate Control Systems” in
the Index.
For more information about carbon
monoxide, see Engine Exhaust
0 183. Towing a trailer requires experience.
The combination of the vehicle and
trailer is longer and not as responsive
as the vehicle itself. Get used to the
handling and braking of the
combination by driving on a level road
surface before driving on public roads.
The trailer structure, the tires, and the
brakes must be all be rated to carry
the intended cargo. Inadequate trailer
equipment can cause the combination
to operate in an unexpected or unsafe
manner. Before driving, inspect all
trailer hitch parts and attachments,
safety chains, electrical connectors,
lamps, tires, and mirrors. See
Towing
Equipment 0241. If the trailer has
electric brakes, start the combination
moving and then manually apply the
trailer brake controller to check the
trailer brakes work. During the trip,
occasionally check that the cargo and
trailer are secure and that the lamps
and any trailer brakes are working.
Towing with a Stability Control
System
When towing, the stability control
system might be heard. The system
reacts to vehicle movement caused by
Page 272 of 384

VEHICLE CARE 271
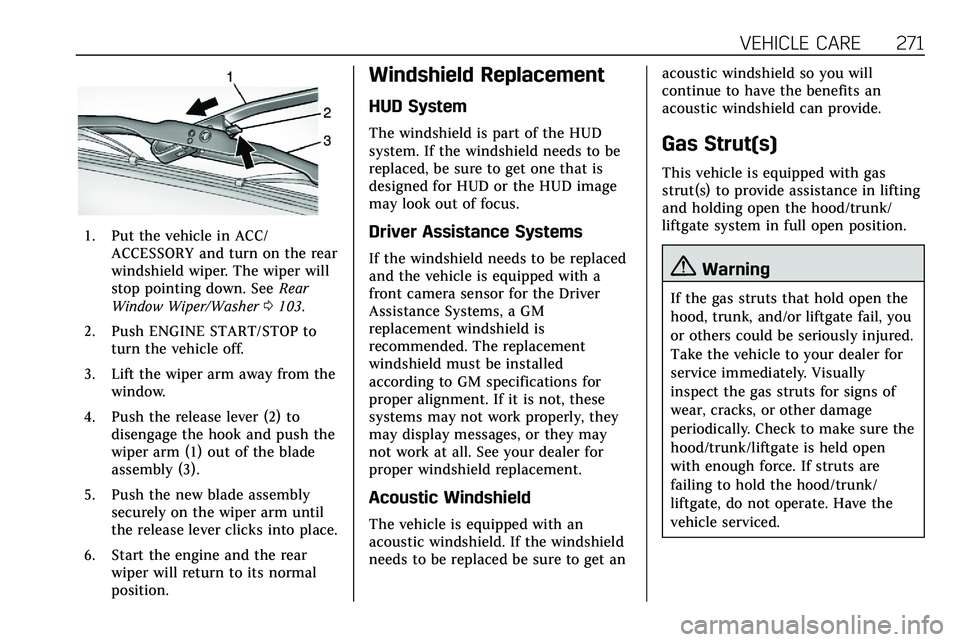
1. Put the vehicle in ACC/ACCESSORY and turn on the rear
windshield wiper. The wiper will
stop pointing down. See Rear
Window Wiper/Washer 0103.
2. Push ENGINE START/STOP to turn the vehicle off.
3. Lift the wiper arm away from the window.
4. Push the release lever (2) to disengage the hook and push the
wiper arm (1) out of the blade
assembly (3).
5. Push the new blade assembly securely on the wiper arm until
the release lever clicks into place.
6. Start the engine and the rear wiper will return to its normal
position.
Windshield Replacement
HUD System
The windshield is part of the HUD
system. If the windshield needs to be
replaced, be sure to get one that is
designed for HUD or the HUD image
may look out of focus.
Driver Assistance Systems
If the windshield needs to be replaced
and the vehicle is equipped with a
front camera sensor for the Driver
Assistance Systems, a GM
replacement windshield is
recommended. The replacement
windshield must be installed
according to GM specifications for
proper alignment. If it is not, these
systems may not work properly, they
may display messages, or they may
not work at all. See your dealer for
proper windshield replacement.
Acoustic Windshield
The vehicle is equipped with an
acoustic windshield. If the windshield
needs to be replaced be sure to get an acoustic windshield so you will
continue to have the benefits an
acoustic windshield can provide.
Gas Strut(s)
This vehicle is equipped with gas
strut(s) to provide assistance in lifting
and holding open the hood/trunk/
liftgate system in full open position.
{Warning
If the gas struts that hold open the
hood, trunk, and/or liftgate fail, you
or others could be seriously injured.
Take the vehicle to your dealer for
service immediately. Visually
inspect the gas struts for signs of
wear, cracks, or other damage
periodically. Check to make sure the
hood/trunk/liftgate is held open
with enough force. If struts are
failing to hold the hood/trunk/
liftgate, do not operate. Have the
vehicle serviced.
Page 273 of 384

272 VEHICLE CARE
Caution
Do not apply tape or hang any
objects from gas struts. Also do not
push down or pull on gas struts.
This may cause damage to the
vehicle.
See Maintenance Schedule 0332.
Hood
Trunk
Liftgate
Headlamp Aiming
Front Headlamp Aiming
Headlamp aim has been preset and
should need no further adjustment.
If the vehicle is damaged in a crash,
the headlamp aim may be affected.
If adjustment to the headlamps is
necessary, see your dealer.