center console CADILLAC XT5 2021 Convenience & Personalization Guide
[x] Cancel search | Manufacturer: CADILLAC, Model Year: 2021, Model line: XT5, Model: CADILLAC XT5 2021Pages: 20, PDF Size: 3.37 MB
Page 4 of 20
4
KEYLESS STARTAUTO ENGINE STOP/START
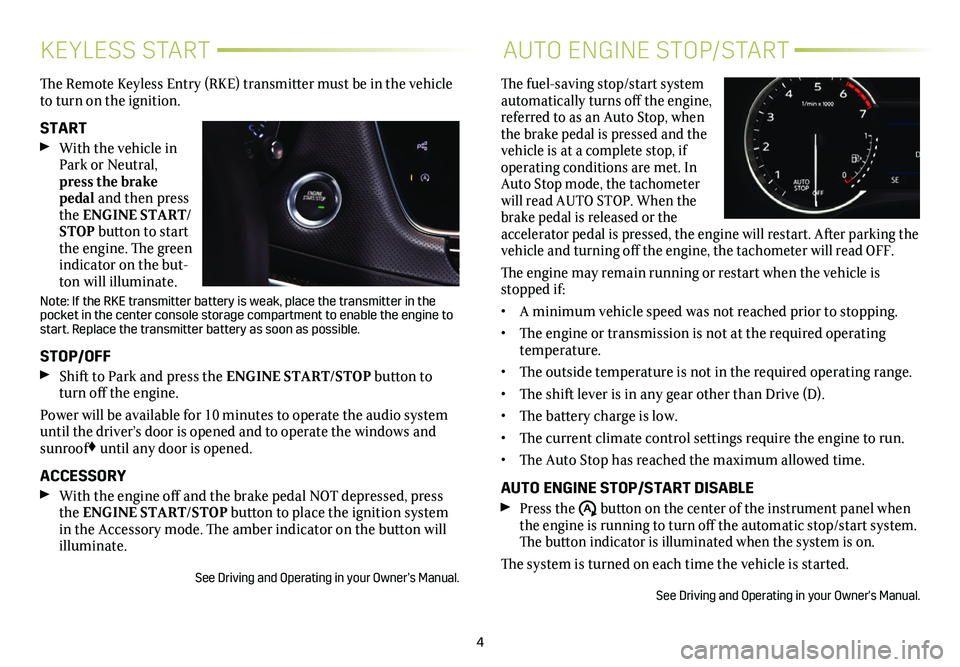
The Remote Keyless Entry (RKE) transmitter must be in the vehicle to turn on the ignition.
START With the vehicle in Park or Neutral, press the brake pedal and then press the ENGINE START/STOP button to start the engine. The green indicator on the but-ton will illuminate.
Note: If the RKE transmitter battery is weak, place the transmitter in t\
he pocket in the center console storage compartment to enable the engine to\
start. Replace the transmitter battery as soon as possible.
STOP/OFF Shift to Park and press the ENGINE START/STOP button to turn off the engine.
Power will be available for 10 minutes to operate the audio system until the driver’s door is opened and to operate the windows and sunroof♦ until any door is opened.
ACCESSORY With the engine off and the brake pedal NOT depressed, press the ENGINE START/STOP button to place the ignition system in the Accessory mode. The amber indicator on the button will illuminate.
See Driving and Operating in your Owner’s Manual.
The fuel-saving stop/start system automatically turns off the engine, referred to as an Auto Stop, when the brake pedal is pressed and the vehicle is at a complete stop, if operating conditions are met. In Auto Stop mode, the tachometer will read AUTO STOP. When the brake pedal is released or the accelerator pedal is pressed, the engine will restart. After parking the vehicle and turning off the engine, the tachometer will read OFF.
The engine may remain running or restart when the vehicle is stopped if:
• A minimum vehicle speed was not reached prior to stopping.
• The engine or transmission is not at the required operating temperature.
• The outside temperature is not in the required operating range.
• The shift lever is in any gear other than Drive (D).
• The battery charge is low.
• The current climate control settings require the engine to run.
• The Auto Stop has reached the maximum allowed time.
AUTO ENGINE STOP/START DISABLE Press the �$ button on the center of the instrument panel when the engine is running to turn off the automatic stop/start
system. The button indicator is illuminated when the system is on.
The system is turned on each time the vehicle is started.
See Driving and Operating in your Owner's Manual.
Page 5 of 20
5
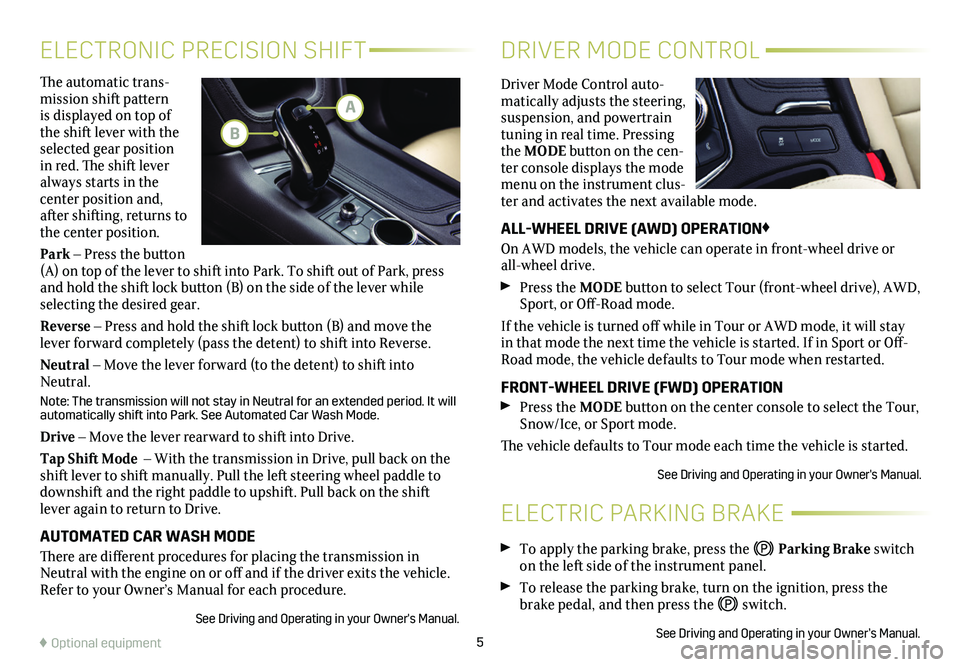
The automatic trans-mission shift pattern is displayed on top of the shift lever with the selected gear position in red. The shift lever always starts in the
center position and, after shifting, returns to the center position.
Park – Press the button (A) on top of the lever to shift into Park. To shift out of Park, press and hold the shift lock button (B) on the side of the lever while selecting the desired gear.
Reverse – Press and hold the shift lock button (B) and move the lever forward completely (pass the detent) to shift into Reverse.
Neutral – Move the lever forward (to the detent) to shift into Neutral.
Note: The transmission will not stay in Neutral for an extended period. It will automatically shift into Park. See Automated Car Wash Mode.
Drive – Move the lever rearward to shift into Drive.
Tap Shift Mode – With the transmission in Drive, pull back on the shift lever to shift manually. Pull the left steering wheel paddle to downshift and the right paddle to upshift. Pull back on the shift lever again to return to Drive.
AUTOMATED CAR WASH MODE
There are different procedures for placing the transmission in Neutral with the engine on or off and if the driver exits the vehicle. Refer to your Owner’s Manual for each procedure.
See Driving and Operating in your Owner's Manual.
ELECTRONIC PRECISION SHIFT
ELECTRIC PARKING BRAKE
DRIVER MODE CONTROL
Driver Mode Control auto-matically adjusts the steering, suspension, and powertrain tuning in real time. Pressing the MODE button on the cen-ter console displays the mode menu on the instrument clus-ter and activates the next available mode.
ALL-WHEEL DRIVE (AWD) OPERATION♦
On AWD models, the vehicle can operate in front-wheel drive or all-wheel drive.
Press the MODE button to select Tour (front-wheel drive), AWD, Sport, or Off-Road mode.
If the vehicle is turned off while in Tour or AWD mode, it will stay in that mode the next time the vehicle is started. If in Sport or Off-Road mode, the vehicle defaults to Tour mode when restarted.
FRONT-WHEEL DRIVE (FWD) OPERATION Press the MODE button on the center console to select the Tour, Snow/Ice, or Sport mode.
The vehicle defaults to Tour mode each time the vehicle is started.
See Driving and Operating in your Owner's Manual.
♦ Optional equipment
To apply the parking brake, press the Parking Brake switch on the left side of the instrument panel.
To release the parking brake, turn on the ignition, press the brake pedal, and then press the switch.
See Driving and Operating in your Owner’s Manual.
A
B
Page 9 of 20
9
STORING STATION FAVORITES
Radio stations from all bands (AM, FM or SiriusXM♦) can be stored in any order.
1. Display the desired radio station.
2. Touch and hold a favorite screen button. Favorites also can be saved by touching the in a station list.
3. Repeat the steps to store another favorite item.
SIRIUSXM® WITH 360L♦
Trialers and subscribers can enjoy an advanced entertainment
experience with SiriusXM with 360L. The personalized content features over 200 channels, including ad-free music, sports, com-edy, talk and news, along with access to thousands of hours of On Demand shows, performances and interviews. Certain features require a SiriusXM subscription and the Cadillac Connected Access plan. See siriusxm.com and onstar.com for details and limitations.
PORTABLE AUDIO DEVICES
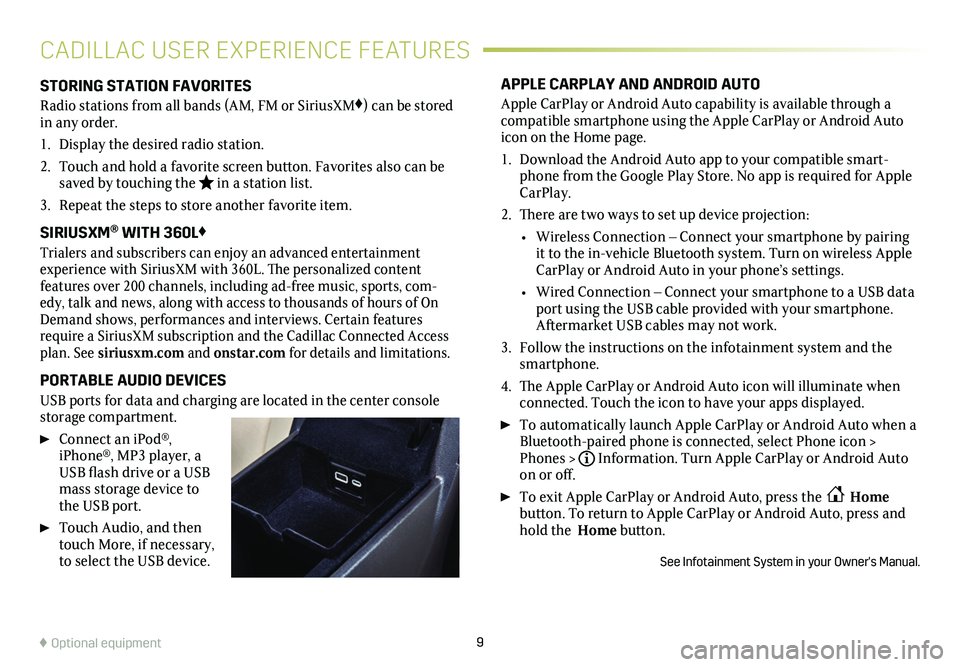
USB ports for data and
charging are located in the center console storage compartment.
Connect an iPod®, iPhone®, MP3 player, a USB flash drive or a USB mass storage device to the USB port.
Touch Audio, and then touch More, if necessary, to select the USB device.
APPLE CARPLAY AND ANDROID AUTO
Apple CarPlay or Android Auto capability is available through a compatible smartphone using the Apple CarPlay or Android Auto icon on the Home page.
1. Download the Android Auto app to your compatible smart-phone from the Google Play Store. No app is required for Apple CarPlay.
2. There are two ways to set up device projection:
• Wireless Connection – Connect your smartphone by pairing it to the in-vehicle Bluetooth system. Turn on wireless Apple CarPlay or Android Auto in your phone’s settings.
• Wired Connection – Connect your smartphone to a USB data port using the USB cable provided with your smartphone. Aftermarket USB cables may not work.
3. Follow the instructions on the infotainment system and the smartphone.
4. The Apple CarPlay or Android Auto icon will illuminate when connected. Touch the icon to have your apps displayed.
To automatically launch Apple CarPlay or Android Auto when a Bluetooth-paired phone is connected, select Phone icon > Phones >Information. Turn Apple CarPlay or Android Auto on or off.
To exit Apple CarPlay or Android Auto, press the Home button. To return to Apple CarPlay or Android Auto, press and hold the Home button.
See Infotainment System in your Owner's Manual.
CADILLAC USER EXPERIENCE FEATURES
♦ Optional equipment
Page 11 of 20
11
4G LTE WI-FI® HOTSPOT
VEHICLE CUSTOMIZATIONWIRELESS CHARGING♦
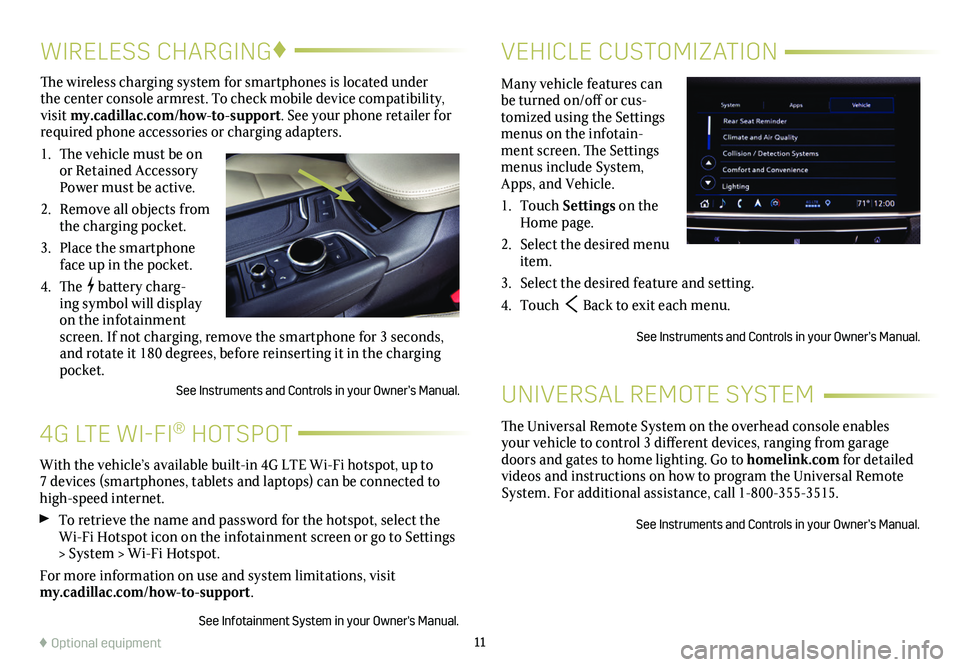
Many vehicle features can be turned on/off or cus-tomized using the Settings menus on the infotain-ment screen. The Settings menus include System, Apps, and Vehicle.
1. Touch Settings on the Home page.
2. Select the desired menu item.
3. Select the desired feature and setting.
4. Touch Back to exit each menu.
See Instruments and Controls in your Owner’s Manual.
The wireless charging system for smartphones is located under the center console armrest. To check mobile device compatibility, visit my.cadillac.com/how-to-support. See your phone retailer for required phone accessories or charging adapters.
1. The vehicle must be on or Retained Accessory Power must be active.
2. Remove all objects from the charging pocket.
3. Place the smartphone face up in the pocket.
4. The battery charg-ing symbol will display on the infotainment screen. If not charging, remove the smartphone for 3 seconds, and rotate it 180 degrees, before reinserting it in the charging pocket.
See Instruments and Controls in your Owner’s Manual.
With the vehicle’s available built-in 4G LTE Wi-Fi hotspot, up to 7 devices (smartphones, tablets and laptops) can be connected to high-speed internet.
To retrieve the name and password for the hotspot, select the Wi-Fi Hotspot icon on the infotainment screen or go to Settings > System > Wi-Fi Hotspot.
For more information on use and system limitations, visit my.cadillac.com/how-to-support.
See Infotainment System in your Owner's Manual.
♦ Optional equipment
The Universal Remote System on the overhead console enables your vehicle to control 3 different devices, ranging from garage doors and gates to home lighting. Go to homelink.com for detailed videos and instructions on how to program the Universal Remote System. For additional assistance, call 1-800-355-3515.
See Instruments and Controls in your Owner’s Manual.
UNIVERSAL REMOTE SYSTEM
Page 18 of 20
18
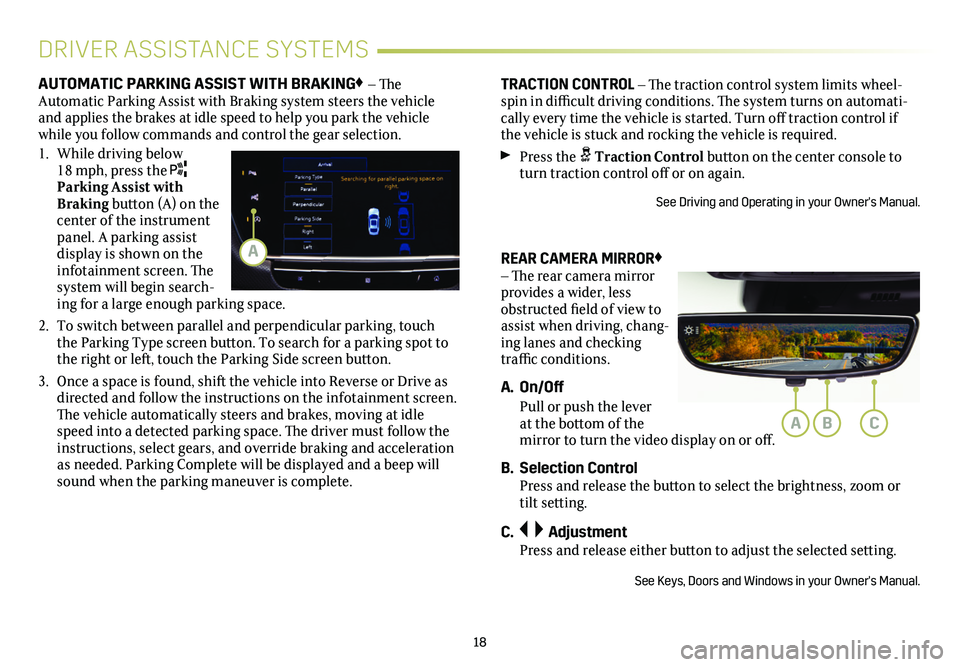
REAR CAMERA MIRROR♦ – The rear camera
mirror provides a wider, less obstructed field of view to assist when driving, chang-ing lanes and checking traffic conditions.
A. On/Off
Pull or push the lever at the bottom of the mirror to turn the video display on or off.
B. Selection Control Press and release the button to select the brightness, zoom or tilt setting.
C. Adjustment Press and release either button to adjust the selected setting.
See Keys, Doors and Windows in your Owner's Manual.
DRIVER ASSISTANCE SYSTEMS
AUTOMATIC PARKING ASSIST WITH BRAKING♦ – The Automatic Parking Assist with Braking system steers the vehicle and applies the brakes at idle speed to help you park the vehicle while you follow commands and control the gear selection.
1. While driving below 18 mph, press the Parking Assist with Braking button (A) on the center of the instrument panel. A parking assist display is shown on the infotainment screen. The system will begin search-ing for a large enough parking space.
2. To switch between parallel and perpendicular parking, touch the Parking Type screen button. To search for a parking spot to the right or left, touch the Parking Side screen button.
3. Once a space is found, shift the vehicle into Reverse or Drive as directed and follow the instructions on the infotainment screen. The vehicle automatically steers and brakes, moving at idle speed into a detected parking space. The driver must follow the instructions, select gears, and override braking and acceleration as needed. Parking Complete will be displayed and a beep will sound when the parking maneuver is complete.
TRACTION CONTROL – The traction control system limits wheel-spin in difficult driving conditions. The system turns on automati-cally every time the
vehicle is started. Turn off traction control if the vehicle is stuck and rocking the vehicle is required.
Press the Traction Control button on the center console to turn traction control off or on again.
See Driving and Operating in your Owner's Manual.
ABC
A
Page 19 of 20
19
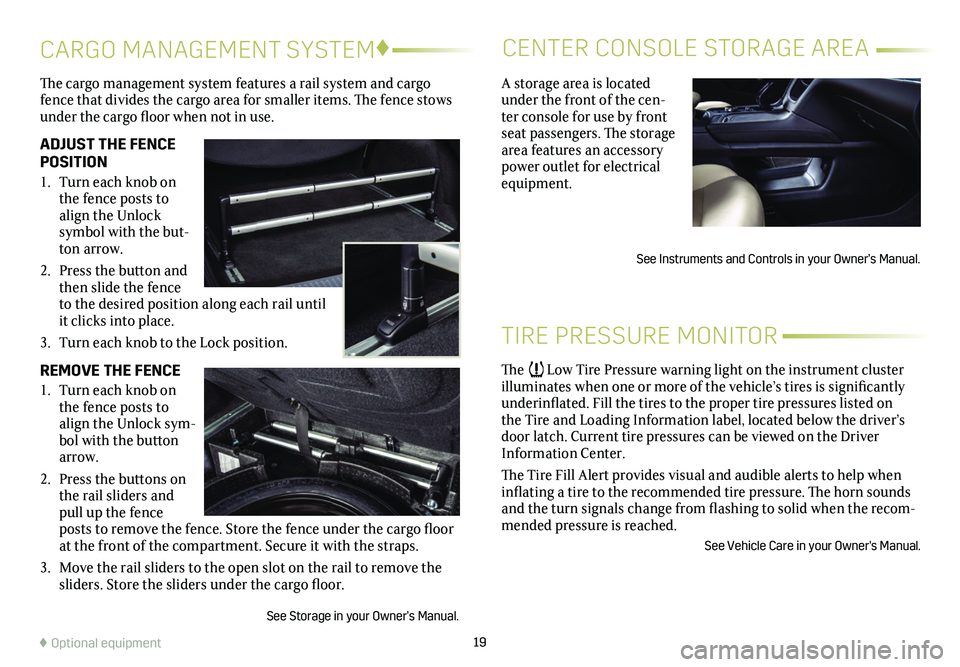
The cargo management system features a rail system and cargo fence that divides the cargo area for smaller items. The fence stows under the cargo floor when not in use.
ADJUST THE FENCE POSITION
1. Turn each knob on the fence posts to align the Unlock
symbol with the but-ton arrow.
2. Press the button and then slide the fence to the desired position along each rail until it clicks into place.
3. Turn each knob to the Lock position.
REMOVE THE FENCE
1. Turn each knob on the fence posts to align the Unlock sym-bol with the button arrow.
2. Press the buttons on the rail sliders and pull up the fence posts to remove the fence. Store the fence under the cargo floor at the front of the compartment. Secure it with the straps.
3. Move the rail sliders to the open slot on the rail to remove the sliders. Store the sliders under the cargo floor.
See Storage in your Owner’s Manual.
CARGO MANAGEMENT SYSTEM♦CENTER CONSOLE STORAGE AREA
♦ Optional equipment
A storage area is located under the front of the cen-ter console for use by front seat passengers. The storage area features an accessory power outlet for electrical equipment.
See Instruments and Controls in your Owner’s Manual.
TIRE PRESSURE MONITOR
The Low Tire Pressure warning light on the instrument cluster illuminates when one or more of the vehicle’s tires is significantly underinflated. Fill the tires to the proper tire pressures listed on the Tire and Loading Information label, located below the driver’s door latch. Current tire pressures can be viewed on the Driver Information Center.
The Tire Fill Alert provides visual and audible alerts to help when inflating a tire to the recommended tire pressure. The horn sounds and the turn signals change from flashing to solid when the recom-mended pressure is reached.
See Vehicle Care in your Owner's Manual.