service CADILLAC XT5 2021 Owners Manual
[x] Cancel search | Manufacturer: CADILLAC, Model Year: 2021, Model line: XT5, Model: CADILLAC XT5 2021Pages: 426, PDF Size: 8.73 MB
Page 344 of 426

Cadillac XT5 Owner Manual (GMNA-Localizing-U.S./Canada/Mexico-
14590481) - 2021 - CRC - 10/22/20
VEHICLE CARE 343
also conform to federal safety
requirements and additional
General Motors Tire Performance
Criteria (TPC) standards.
Quality grades can be found where
applicable on the tire sidewall
between tread shoulder and
maximum section width. For
example:
Treadwear 200 Traction AA
Temperature A
All Passenger Car Tires Must
Conform to Federal Safety
Requirements In Addition To
These Grades.
Treadwear
The treadwear grade is a
comparative rating based on the
wear rate of the tire when tested
under controlled conditions on a
specified government test course.
For example, a tire graded
150 would wear one and one-half
(1½) times as well on the
government course as a tiregraded 100. The relative
performance of tires depends
upon the actual conditions of
their use, however, and may
depart significantly from the norm
due to variations in driving habits,
service practices and differences
in road characteristics and
climate.
Traction
The traction grades, from highest
to lowest, are AA, A, B, and C.
Those grades represent the tire's
ability to stop on wet pavement as
measured under controlled
conditions on specified
government test surfaces of
asphalt and concrete. A tire
marked C may have poor traction
performance. Warning: The
traction grade assigned to this tire
is based on straight-ahead braking
traction tests, and does not
include acceleration, cornering,
hydroplaning, or peak traction
characteristics.Temperature
The temperature grades are A (the
highest), B, and C, representing
the tire's resistance to the
generation of heat and its ability
to dissipate heat when tested
under controlled conditions on a
specified indoor laboratory test
wheel. Sustained high temperature
can cause the material of the tire
to degenerate and reduce tire life,
and excessive temperature can
lead to sudden tire failure. The
grade C corresponds to a level of
performance which all passenger
car tires must meet under the
Federal Motor Safety Standard
No. 109. Grades B and A represent
higher levels of performance on
the laboratory test wheel than the
minimum required by law.
Warning: The temperature grade
for this tire is established for a tire
that is properly inflated and not
overloaded. Excessive speed,
underinflation, or excessive
Page 347 of 426
Cadillac XT5 Owner Manual (GMNA-Localizing-U.S./Canada/Mexico-
14590481) - 2021 - CRC - 10/22/20
346 VEHICLE CARE
Warning (Continued)
dealer or an authorized tire service
center repair or replace the flat tire
as soon as possible.
{Warning
Lifting a vehicle and getting under
it to do maintenance or repairs is
dangerous without the appropriate
safety equipment and training. If a
jack is provided with the vehicle, it
is designed only for changing a flat
tire. If it is used for anything else,
you or others could be badly injured
or killed if the vehicle slips off the
jack. If a jack is provided with the
vehicle, only use it for changing a
flat tire.
If a tire goes flat, avoid further tire
and wheel damage by driving slowly
to a level place, well off the road,
if possible. Turn on the hazard
warning flashers. See Hazard Warning
Flashers 0135.
{Warning
Changing a tire can be dangerous.
The vehicle can slip off the jack and
roll over or fall causing injury or
death. Find a level place to change
the tire. To help prevent the vehicle
from moving:
1. Set the parking brake firmly.
2. Put an automatic transmission in P (Park) or a manual
transmission in 1 (First) or
R (Reverse).
3. Turn off the engine and do not restart while the vehicle is
raised.
4. Do not allow passengers to remain in the vehicle.
5. Place wheel blocks, if equipped, on both sides of the tire at the
opposite corner of the tire
being changed.
This vehicle may come with a jack
and spare tire or a tire sealant and
compressor kit. To use the jacking
equipment to change a spare tire
safely, follow the instructions below. Then see
Tire Changing 0353. To use
the tire sealant and compressor kit,
see Tire Sealant and Compressor Kit
0 347.
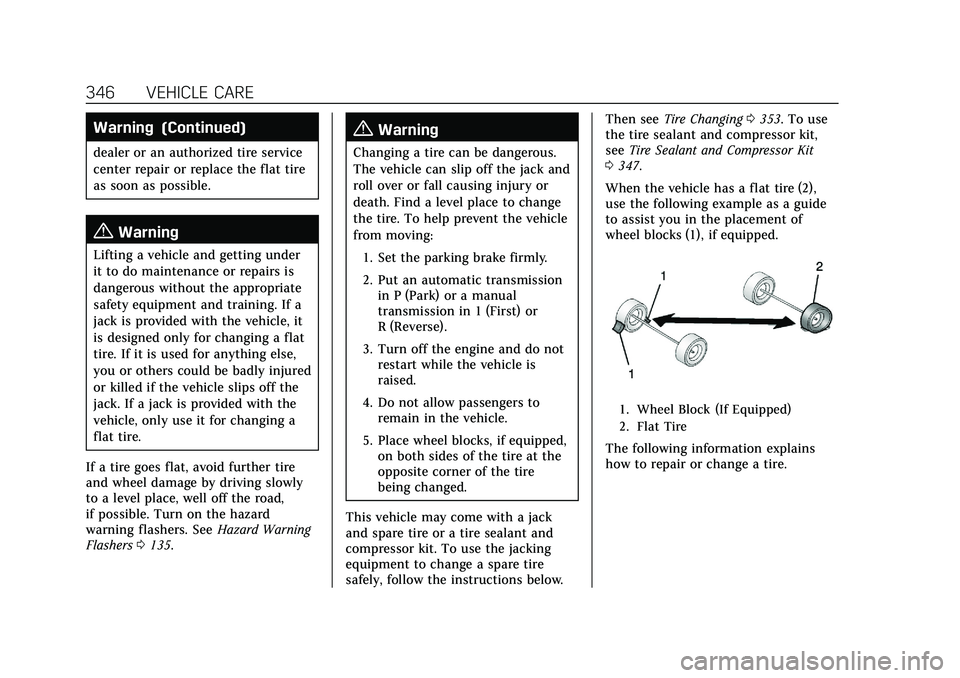
When the vehicle has a flat tire (2),
use the following example as a guide
to assist you in the placement of
wheel blocks (1), if equipped.
1. Wheel Block (If Equipped)
2. Flat Tire
The following information explains
how to repair or change a tire.
Page 348 of 426
Cadillac XT5 Owner Manual (GMNA-Localizing-U.S./Canada/Mexico-
14590481) - 2021 - CRC - 10/22/20
VEHICLE CARE 347
Tire Sealant and
Compressor Kit
{Warning
Idling a vehicle in an enclosed area
with poor ventilation is dangerous.
Engine exhaust may enter the
vehicle. Engine exhaust contains
carbon monoxide (CO) which
cannot be seen or smelled. It can
cause unconsciousness and even
death. Never run the engine in an
enclosed area that has no fresh air
ventilation. For more information,
seeEngine Exhaust 0231.
{Warning
Overinflating a tire could cause the
tire to rupture and you or others
could be injured. Be sure to read
and follow the tire sealant and
compressor kit instructions and
inflate the tire to its recommended
pressure. Do not exceed the
recommended pressure.
{Warning
Storing the tire sealant and
compressor kit or other equipment
in the passenger compartment of
the vehicle could cause injury. In a
sudden stop or collision, loose
equipment could strike someone.
Store the tire sealant and
compressor kit in its original
location.
If this vehicle has a tire sealant and
compressor kit, there may not be a
spare tire or tire changing equipment,
and on some vehicles there may not
be a place to store a tire.
The tire sealant and compressor can
be used to temporarily seal punctures
up to 6 mm (0.25 in) in the tread area
of the tire. It can also be used to
inflate an underinflated tire.
If the tire has been separated from the
wheel, has damaged sidewalls, or has
a large puncture, the tire is too
severely damaged for the tire sealant
and compressor kit to be effective. See
Roadside Service 0396. Read and follow all of the tire sealant
and compressor kit instructions.
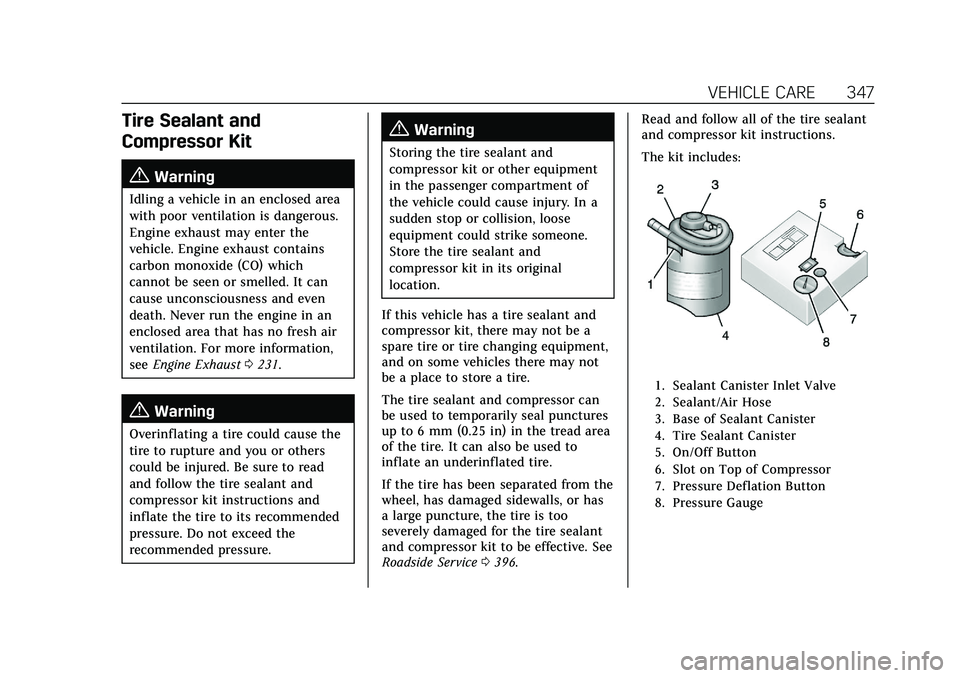
The kit includes:
1. Sealant Canister Inlet Valve
2. Sealant/Air Hose
3. Base of Sealant Canister
4. Tire Sealant Canister
5. On/Off Button
6. Slot on Top of Compressor
7. Pressure Deflation Button
8. Pressure Gauge
Page 350 of 426

Cadillac XT5 Owner Manual (GMNA-Localizing-U.S./Canada/Mexico-
14590481) - 2021 - CRC - 10/22/20
VEHICLE CARE 349
5. Slide the base of the tire sealantcanister (3) into the slot on the top
of the compressor (6) to hold it
upright.
Make sure the tire valve stem is
positioned close to the ground so
the hose will reach it.
6. Remove the valve stem cap from the flat tire by turning it
counterclockwise.
7. Attach the sealant/air hose (2) tothe tire valve stem by turning it
clockwise until tight. 8. Plug the power plug (9) into the
accessory power outlet in the
vehicle. Unplug all items from
other accessory power outlets. See
Power Outlets 098.
If the vehicle has an accessory
power outlet, do not use the
cigarette lighter.
If the vehicle only has a cigarette
lighter, use the cigarette lighter.
Do not pinch the power plug cord
in the door or window.
9. Start the vehicle. The vehicle must be running while using the air
compressor.
10. Press the on/off button (5) to turn the tire sealant and compressor
kit on.
The compressor will inject sealant
and air into the tire.
The pressure gauge (8) will initially
show a high pressure while the
compressor pushes the sealant into
the tire. Once the sealant is
completely dispersed into the tire,
the pressure will quickly drop and
start to rise again as the tire
inflates with air only. 11. Inflate the tire to the
recommended inflation pressure
using the pressure gauge (8). The
recommended inflation pressure
can be found on the Tire and
Loading Information label. See Tire
Pressure 0331.
The pressure gauge (8) may read
higher than the actual tire pressure
while the compressor is on. Turn
the compressor off to get an
accurate pressure reading. The
compressor may be turned on/off
until the correct pressure is
reached.
Caution
If the recommended pressure
cannot be reached after
approximately 25 minutes, the
vehicle should not be driven farther.
The tire is too severely damaged
and the tire sealant and compressor
kit cannot inflate the tire. Remove
the power plug from the accessory
power outlet and unscrew the
inflating hose from the tire valve.
See Roadside Service 0396.
Page 351 of 426

Cadillac XT5 Owner Manual (GMNA-Localizing-U.S./Canada/Mexico-
14590481) - 2021 - CRC - 10/22/20
350 VEHICLE CARE
12. Press the on/off button (5) to turnthe tire sealant and compressor
kit off.
The tire is not sealed and will
continue to leak air until the
vehicle is driven and the sealant is
distributed in the tire. Therefore,
Steps 13–21 must be done
immediately after Step 12.
Be careful while handling the tire
sealant and compressor kit as it
could be warm after usage.
13. Unplug the power plug (9) from the accessory power outlet in the
vehicle.
14. Turn the sealant/air hose (2) counterclockwise to remove it from
the tire valve stem.
15. Replace the tire valve stem cap.
16. Remove the tire sealant canister (4) from the slot on top of the
compressor (6).
17. Turn the air only hose (10) counterclockwise to remove it from
the tire sealant canister inlet
valve (1). 18. Turn the sealant/air hose (2)
clockwise onto the sealant canister
inlet valve (1) to prevent sealant
leakage.
19. Return the air only hose (10) and power plug (9) back to their
original storage location.
20. If the flat tire was able to inflate tothe recommended inflation
pressure, remove the maximum
speed label from the sealant
canister and place it in a highly
visible location.
Do not exceed the speed on this
label until the damaged tire is
repaired or replaced.
21. Return the equipment to its original storage location in the
vehicle.
22. Immediately drive the vehicle 8 km (5 mi) to distribute the sealant in
the tire. 23. Stop at a safe location and check
the tire pressure. Refer to Steps 1–
10 under “Using the Tire Sealant
and Compressor Kit without
Sealant to Inflate a Tire (Not
Punctured).”
If the tire pressure has fallen more
than 68 kPa (10 psi) below the
recommended inflation pressure,
stop driving the vehicle. The tire is
too severely damaged and the tire
sealant cannot seal the tire. See
Roadside Service 0396.
If the tire pressure has not dropped
more than 68 kPa (10 psi) from the
recommended inflation pressure,
inflate the tire to the
recommended inflation pressure.
24. Wipe off any sealant from the wheel, tire, or vehicle.
25. Dispose of the used tire sealant canister (4) at a local dealer or in
accordance with local state codes
and practices.
26. Replace it with a new canister available from your dealer.
27. After temporarily sealing a tire using the tire sealant and
compressor kit, take the vehicle to
Page 353 of 426

Cadillac XT5 Owner Manual (GMNA-Localizing-U.S./Canada/Mexico-
14590481) - 2021 - CRC - 10/22/20
352 VEHICLE CARE
8. Press the on/off button (5) to turnthe tire sealant and compressor
kit on.
The compressor will inflate the tire
with air only.
9. Inflate the tire to the recommended inflation pressure
using the pressure gauge (8). The
recommended inflation pressure
can be found on the Tire and
Loading Information label. See Tire
Pressure 0331.
The pressure gauge (8) may read
higher than the actual tire pressure
while the compressor is on. Turn
the compressor off to get an
accurate pressure reading. The
compressor may be turned on/off
until the correct pressure is
reached.
Caution
If the recommended pressure
cannot be reached after
approximately 25 minutes, the
vehicle should not be driven farther.
The tire is too severely damaged
and the tire sealant and compressor (Continued)
Caution (Continued)
kit cannot inflate the tire. Remove
the power plug from the accessory
power outlet and unscrew the
inflating hose from the tire valve.
SeeRoadside Service 0396.
10. Press the on/off button (5) to turn the tire sealant and compressor
kit off.
Be careful while handling the
compressor as it could be warm
after usage.
11. Unplug the power plug (9) from the accessory power outlet in the
vehicle.
12. Turn the air only hose (10) counterclockwise to remove it from
the tire valve stem.
13. Replace the tire valve stem cap.
14. Return the air only hose (10) and power plug (9) back to their
original storage location.
15. Return the equipment to its original storage location in the
vehicle. The tire sealant and compressor kit
has accessory adapters located in a
compartment on the bottom of its
housing that can be used to inflate air
mattresses, balls, etc.
Storing the Tire Sealant
and Compressor Kit
The tire sealant and compressor kit is
in a bag in the rear compartment
storage area.
1. Open the liftgate.
2. Remove the cargo management system divider. See Cargo
Management System 090.
3. Lift the load floor. Use the hook to hold the load floor open. See Rear
Storage 087.
Page 362 of 426
Cadillac XT5 Owner Manual (GMNA-Localizing-U.S./Canada/Mexico-
14590481) - 2021 - CRC - 10/22/20
VEHICLE CARE 361
8. Connect the other end of the blacknegative (–) cable to the remote
negative (–) ground terminal on the
driver side shock tower for the
discharged battery.
9. Start the engine in the vehicle with the good battery and run the
engine at idle speed for at least
four minutes.
10. Try to start the vehicle that had the dead battery. If it will not start
after a few tries, it probably needs
service.
Caution
If the jumper cables are connected
or removed in the wrong order,
electrical shorting may occur and
damage the vehicle. The repairs
would not be covered by the vehicle
warranty. Always connect and
remove the jumper cables in the
correct order, making sure that the
cables do not touch each other or
other metal.
Jumper Cable Removal
Reverse the sequence exactly when
removing the jumper cables. After starting the disabled vehicle and
removing the jumper cables, allow it
to idle for several minutes.
Towing the Vehicle
Caution
Incorrectly towing a disabled
vehicle may cause damage. The
damage would not be covered by
the vehicle warranty. Do not lash or
hook to suspension components.
Use the proper straps around the
tires to secure the vehicle. Do not
drag a locked wheel/tire. Use tire
skates or dollies under any locked
wheel/tire while loading the vehicle.
Do not use a sling type lift to tow
the vehicle. This could damage the
vehicle.
Caution
Improper use of the tow eye can
damage the vehicle. If equipped, use
the tow eye to load a disabled
vehicle onto a flatbed tow truck
(Continued)
Caution (Continued)
from a flat road surface, or to move
the vehicle a short distance. Use
caution and low speeds. The
transmission must be
in (N) Neutral when moving the
vehicle.
GM recommends a flatbed tow truck
to transport a disabled vehicle. Use
ramps to help reduce approach angles,
if necessary. A towed vehicle should
have its drive wheels off the ground.
Contact Roadside Service or a
professional towing service if the
disabled vehicle must be towed.
If the vehicle is equipped with a tow
eye, only use the tow eye to pull the
vehicle onto a flatbed car carrier from
a flat road surface. Do not use the tow
eye to pull the vehicle from snow,
mud, or sand.
Page 374 of 426

Cadillac XT5 Owner Manual (GMNA-Localizing-U.S./Canada/Mexico-
14590481) - 2021 - CRC - 10/22/20
SERVICE AND MAINTENANCE 373
Service and
Maintenance
General Information
General Information . . . . . . . . . . . . . 373
Maintenance Schedule
Maintenance Schedule . . . . . . . . . . . 374
Special Application Services
Special Application Services . . . . . 380
Additional Maintenance
and Care
Additional Maintenanceand Care . . . . . . . . . . . . . . . . . . . . . . . . . 380
Recommended Fluids,
Lubricants, and Parts
Recommended Fluids andLubricants . . . . . . . . . . . . . . . . . . . . . . . 383
Maintenance Replacement Parts . . . . . . . . . . . . . . . . . . . . . . . . . . . . . 384
Maintenance Records
Maintenance Records . . . . . . . . . . . . 386
General Information
Your vehicle is an important
investment. This section describes the
required maintenance for the vehicle.
Follow this schedule to help protect
against major repair expenses
resulting from neglect or inadequate
maintenance. It may also help to
maintain the value of the vehicle if it
is sold. It is the responsibility of the
owner to have all required
maintenance performed.
Your dealer has trained technicians
who can perform required
maintenance using genuine
replacement parts. They have
up-to-date tools and equipment for
fast and accurate diagnostics. Many
dealers have extended evening and
Saturday hours, courtesy
transportation, and online scheduling
to assist with service needs.
Your dealer recognizes the importance
of providing competitively priced
maintenance and repair services. With
trained technicians, the dealer is the
place for routine maintenance such as
oil changes and tire rotations and additional maintenance items like
tires, brakes, batteries, and wiper
blades.
Caution
Damage caused by improper
maintenance can lead to costly
repairs and may not be covered by
the vehicle warranty. Maintenance
intervals, checks, inspections,
recommended fluids, and lubricants
are important to keep the vehicle in
good working condition.
Do not have chemical flushes that
are not approved by GM performed
on the vehicle. The use of flushes,
solvents, cleaners, or lubricants that
are not approved by GM could
damage the vehicle, requiring
expensive repairs that are not
covered by the vehicle warranty.
The Tire Rotation and Required
Services are the responsibility of the
vehicle owner. It is recommended to
have your dealer perform these
services every 12 000 km/7,500 mi.
Proper vehicle maintenance helps to
Page 375 of 426
Cadillac XT5 Owner Manual (GMNA-Localizing-U.S./Canada/Mexico-
14590481) - 2021 - CRC - 10/22/20
374 SERVICE AND MAINTENANCE
keep the vehicle in good working
condition, improves fuel economy, and
reduces vehicle emissions.
Because of the way people use
vehicles, maintenance needs vary.
There may need to be more frequent
checks and services. The Additional
Required Services - Normal are for
vehicles that:
.Carry passengers and cargo within
recommended limits on the Tire
and Loading Information label. See
Vehicle Load Limits0220.
.Are driven on reasonable road
surfaces within legal driving limits.
.Use the recommended fuel. See
Recommended Fuel (3.6L V6 Engine)
0276 or
Recommended Fuel (2.0L L4 Engine)
0 276.
Refer to the information in the
Maintenance Schedule Additional
Required Services - Normal chart. The Additional Required Services -
Severe are for vehicles that are:
.Mainly driven in heavy city traffic
in hot weather.
.Mainly driven in hilly or
mountainous terrain.
.Frequently towing a trailer.
.Used for high speed or competitive
driving.
.Used for taxi, police, or delivery
service.
Refer to the information in the
Maintenance Schedule Additional
Required Services - Severe chart.
{Warning
Performing maintenance work can
be dangerous and can cause serious
injury. Perform maintenance work
only if the required information,
proper tools, and equipment are
available. If they are not, see your
dealer to have a trained technician
do the work. See Doing Your Own
Service Work 0294.
Maintenance Schedule
Owner Checks and Services
Check the engine oil level. See Engine
Oil 0299.
Once a Month
.Check the tire inflation pressures.
See Tire Pressure 0331.
.Inspect the tires for wear. See Tire
Inspection 0338.
.Check the windshield washer fluid
level. See Washer Fluid 0309.
Engine Oil Change
When the CHANGE ENGINE OIL
SOON message displays, have the
engine oil and filter changed within
the next 1 000 km (600 mi). If driven
under the best conditions, the engine
oil life system may not indicate the
need for vehicle service for up to a
year. The engine oil and filter must be
changed at least once a year and the
oil life system must be reset. Your
trained dealer technician can perform
this work. If the engine oil life system
Page 376 of 426
Cadillac XT5 Owner Manual (GMNA-Localizing-U.S./Canada/Mexico-
14590481) - 2021 - CRC - 10/22/20
SERVICE AND MAINTENANCE 375
is reset accidentally, service the
vehicle within 5 000 km (3,000 mi)
since the last service. Reset the oil life
system when the oil is changed. See
Engine Oil Life System0301.
Engine Air Filter Change
When the REPLACE AT NEXT OIL
CHANGE message displays, the engine
air filter should be replaced at the
next engine oil change. When the
REPLACE ENGINE AIR FILTER SOON
message displays, the engine air filter
should be replaced at the earliest
convenience. Reset the engine air
filter life system after the engine air
filter is replaced. See Engine Air Filter
Life System 0302.
Air Conditioning Desiccant
(Replace Every Seven Years)
The air conditioning system requires
maintenance every seven years. This
service requires replacement of the
desiccant to help the longevity and
efficient operation of the air
conditioning system. This service can
be complex. See your dealer.
Tire Rotation and Required
Services Every 12 000 km
(7,500 mi)
Rotate the tires, if recommended for
the vehicle, and perform the following
services. See Tire Rotation0339.
.Check engine oil level and oil
life percentage. If needed, change
engine oil and filter, and reset oil
life system. See Engine Oil0299 and
Engine Oil Life System 0301.
.Check the air filter life percentage.
If necessary, replace the engine air
filter and reset the engine air filter
life system. See Engine Air Filter Life
System 0302.
.Check engine coolant level. See
Cooling System 0304.
.Check windshield washer fluid level.
See Washer Fluid 0309.
.Check tire inflation pressures. See
Tire Pressure 0331.
.Inspect tire wear. See Tire Inspection
0 338.
.Visually check for fluid leaks.
.Inspect brake system. See Exterior
Care 0364.
.Visually inspect steering,
suspension, and chassis
components for damage, including
cracks or tears in the rubber boots,
loose or missing parts, or signs of
wear at least once a year. See
Exterior Care 0364.
.Inspect power steering for proper
electrical connections, binding,
cracks, chafing, etc.
.Visually inspect halfshafts and
driveshafts for excessive wear,
lubricant leaks, and/or damage
including: tube dents or cracks,
constant velocity joint or universal
joint looseness, cracked or missing
boots, loose or missing boot clamps,
center bearing excessive looseness,
loose or missing fasteners, and axle
seal leaks.
.Check restraint system components.
See Safety System Check 055.
.Visually inspect the fuel system,
including the evaporative (EVAP)
system, for damage or leaks.
Visually check all fuel pipes, vapor
lines, and hoses for proper
attachment, connection, routing,
and condition.