radio controls CADILLAC XT5 2021 Owner's Manual
[x] Cancel search | Manufacturer: CADILLAC, Model Year: 2021, Model line: XT5, Model: CADILLAC XT5 2021Pages: 426, PDF Size: 8.73 MB
Page 100 of 426
Cadillac XT5 Owner Manual (GMNA-Localizing-U.S./Canada/Mexico-
14590481) - 2021 - CRC - 10/22/20
INSTRUMENTS AND CONTROLS 99
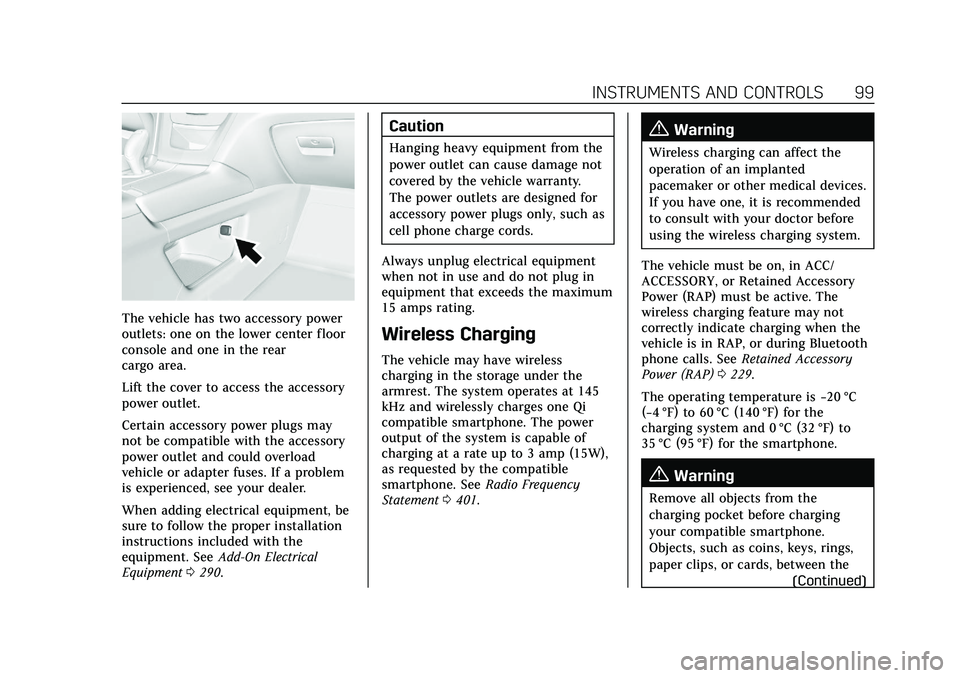
The vehicle has two accessory power
outlets: one on the lower center floor
console and one in the rear
cargo area.
Lift the cover to access the accessory
power outlet.
Certain accessory power plugs may
not be compatible with the accessory
power outlet and could overload
vehicle or adapter fuses. If a problem
is experienced, see your dealer.
When adding electrical equipment, be
sure to follow the proper installation
instructions included with the
equipment. SeeAdd-On Electrical
Equipment 0290.
Caution
Hanging heavy equipment from the
power outlet can cause damage not
covered by the vehicle warranty.
The power outlets are designed for
accessory power plugs only, such as
cell phone charge cords.
Always unplug electrical equipment
when not in use and do not plug in
equipment that exceeds the maximum
15 amps rating.
Wireless Charging
The vehicle may have wireless
charging in the storage under the
armrest. The system operates at 145
kHz and wirelessly charges one Qi
compatible smartphone. The power
output of the system is capable of
charging at a rate up to 3 amp (15W),
as requested by the compatible
smartphone. See Radio Frequency
Statement 0401.
{Warning
Wireless charging can affect the
operation of an implanted
pacemaker or other medical devices.
If you have one, it is recommended
to consult with your doctor before
using the wireless charging system.
The vehicle must be on, in ACC/
ACCESSORY, or Retained Accessory
Power (RAP) must be active. The
wireless charging feature may not
correctly indicate charging when the
vehicle is in RAP, or during Bluetooth
phone calls. See Retained Accessory
Power (RAP) 0229.
The operating temperature is −20 °C
(−4 °F) to 60 °C (140 °F) for the
charging system and 0 °C (32 °F) to
35 °C (95 °F) for the smartphone.
{Warning
Remove all objects from the
charging pocket before charging
your compatible smartphone.
Objects, such as coins, keys, rings,
paper clips, or cards, between the
(Continued)
Page 109 of 426
Cadillac XT5 Owner Manual (GMNA-Localizing-U.S./Canada/Mexico-
14590481) - 2021 - CRC - 10/22/20
108 INSTRUMENTS AND CONTROLS
If, after several seconds, both status
indicator lights remain on, or if there
are no lights at all, there may be a
problem with the lights or the
passenger sensing system. See your
dealer for service.
{Warning
If the airbag readiness light ever
comes on and stays on, it means
that something may be wrong with
the airbag system. To help avoid
injury to yourself or others, have
the vehicle serviced right away. See
Airbag Readiness Light0107 for
more information, including
important safety information.
Charging System Light
The charging system light comes on
briefly when the ignition is turned on,
but the engine is not running, as a check to show the light is working.
It should go out when the engine is
started.
If the light stays on, or comes on
while driving, there may be a problem
with the electrical charging system.
Have it checked by your dealer.
Driving while this light is on could
drain the battery.
When this light comes on, or is
flashing, the Driver Information
Center (DIC) also displays a message.
If a short distance must be driven
with the light on, be sure to turn off
all accessories, such as the radio and
air conditioner. Find a safe place to
stop the vehicle.
Malfunction Indicator Lamp
(Check Engine Light)
This light is part of the vehicle’s
emission control on-board diagnostic
system. If this light is on while the
engine is running, a malfunction has
been detected and the vehicle may
require service. The light should come
on to show that it is working when
the ignition is in Service Mode. See
Ignition Positions
0224.
Malfunctions are often indicated by
the system before any problem is
noticeable. Being aware of the light
and seeking service promptly when it
comes on may prevent damage.
Caution
If the vehicle is driven continually
with this light on, the emission
control system may not work as
well, the fuel economy may be
lower, and the vehicle may not run
smoothly. This could lead to costly
repairs that might not be covered
by the vehicle warranty.
Page 121 of 426
Cadillac XT5 Owner Manual (GMNA-Localizing-U.S./Canada/Mexico-
14590481) - 2021 - CRC - 10/22/20
120 INSTRUMENTS AND CONTROLS
If equipped with HUD, some
information concerning the operation
of the vehicle is projected onto the
windshield. The image is projected
through the HUD lens on top of the
instrument panel. The information
appears as an image focused out
toward the front of the vehicle.
Caution
If you try to use the HUD image as
a parking aid, you may misjudge
the distance and damage your
vehicle. Do not use the HUD image
as a parking aid.
The HUD information can be
displayed in various languages. The
speedometer reading and other
numerical values can be displayed in
either English or metric units.
The language selection is changed
through the radio and the units of
measurement is changed through the
instrument cluster. See Vehicle
Personalization 0123 and "Options"
under Instrument Cluster 0102.
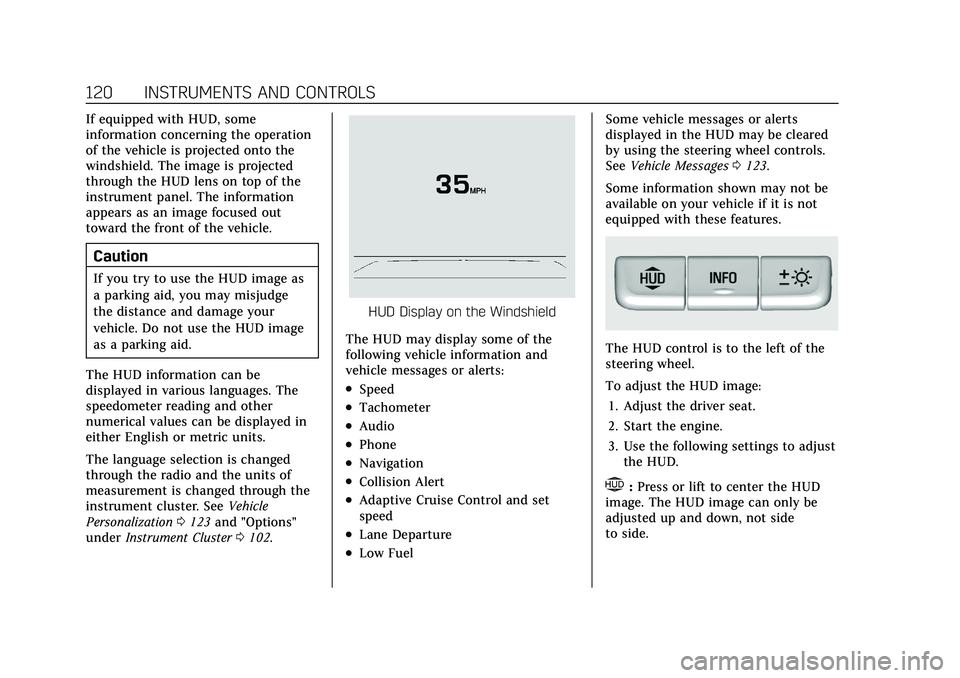
HUD Display on the Windshield
The HUD may display some of the
following vehicle information and
vehicle messages or alerts:
.Speed
.Tachometer
.Audio
.Phone
.Navigation
.Collision Alert
.Adaptive Cruise Control and set
speed
.Lane Departure
.Low Fuel Some vehicle messages or alerts
displayed in the HUD may be cleared
by using the steering wheel controls.
See
Vehicle Messages 0123.
Some information shown may not be
available on your vehicle if it is not
equipped with these features.
The HUD control is to the left of the
steering wheel.
To adjust the HUD image: 1. Adjust the driver seat.
2. Start the engine.
3. Use the following settings to adjust the HUD.
$:Press or lift to center the HUD
image. The HUD image can only be
adjusted up and down, not side
to side.
Page 122 of 426
Cadillac XT5 Owner Manual (GMNA-Localizing-U.S./Canada/Mexico-
14590481) - 2021 - CRC - 10/22/20
INSTRUMENTS AND CONTROLS 121
!:Press to select the display view.
Each press will change the
display view.
D: Lift and hold to brighten the
display. Press and hold to dim the
display. Continue to hold to turn the
display off.
The HUD image will automatically
dim and brighten to compensate for
outside lighting. The HUD brightness
control can also be adjusted as
needed.
The HUD image can temporarily light
up depending on the angle and
position of sunlight on the HUD
display. This is normal.
Polarized sunglasses could make the
HUD image harder to see.
Head-Up Display (HUD) Rotation
Option
This feature allows for adjusting the
angle of the HUD image.
Press SEL on the steering wheel
controls while Head-Up Display
Rotation is highlighted to enter Adjust
Mode. Press
yorzto adjust the
angle of the HUD display. Press
Sor
Tto highlight OK, then press SEL to
save the setting. CANCEL can also be
selected to cancel the setting. The
vehicle must be in P (Park). See
Instrument Cluster 0102.
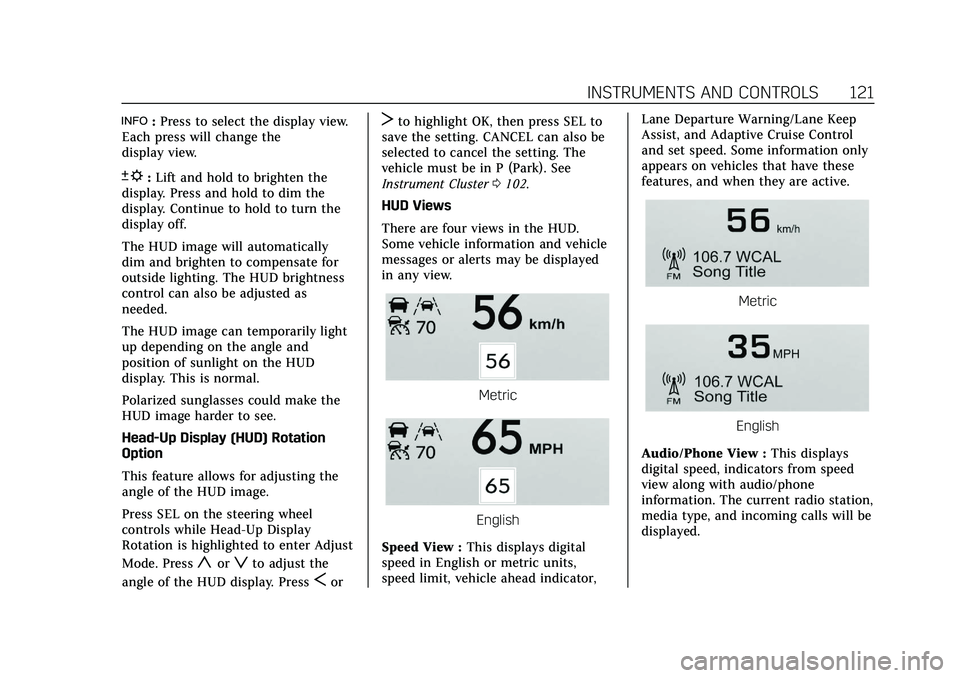
HUD Views
There are four views in the HUD.
Some vehicle information and vehicle
messages or alerts may be displayed
in any view.
Metric
English
Speed View : This displays digital
speed in English or metric units,
speed limit, vehicle ahead indicator, Lane Departure Warning/Lane Keep
Assist, and Adaptive Cruise Control
and set speed. Some information only
appears on vehicles that have these
features, and when they are active.
Metric
English
Audio/Phone View : This displays
digital speed, indicators from speed
view along with audio/phone
information. The current radio station,
media type, and incoming calls will be
displayed.
Page 129 of 426
Cadillac XT5 Owner Manual (GMNA-Localizing-U.S./Canada/Mexico-
14590481) - 2021 - CRC - 10/22/20
128 INSTRUMENTS AND CONTROLS
vehicle with the RKE transmitter. See
Remote Keyless Entry (RKE) System
Operation07.
Touch Off, On with Horn Chirp, or On.
Remote Left in Vehicle Alert
This feature sounds an alert when the
RKE transmitter is left in the vehicle.
This menu also enables Remote No
Longer in Vehicle Alert.
Touch Off or On.
Seating Position
Touch and the following may display:
.Seat Entry Memory
.Seat Exit Memory
Seat Entry Memory
This feature automatically recalls the
previously stored 1 or 2 button
positions when the ignition is changed
from off to on or ACC/ACCESSORY.
See Memory Seats 041.
Touch Off or On.
Seat Exit Memory
This feature automatically recalls the
previously stored exit button positions
when the ignition is changed from on or ACC/ACCESSORY to off if the driver
door is open or opened. See
Memory
Seats 041.
Touch Off or On.
Teen Driver
See “Teen Driver” underSettings 0181.
Valet Mode
This will lock the infotainment system
and steering wheel controls. It may
also limit access to vehicle storage
locations, if equipped.
To enable valet mode:
1. Enter a four-digit code on the keypad.
2. Touch Enter to go to the confirmation screen.
3. Re-enter the four-digit code.
Touch Lock or Unlock to lock or
unlock the system. Touch Back to go
back to the previous menu.
Universal Remote
System
See Radio Frequency Statement 0401.
Universal Remote System
Programming
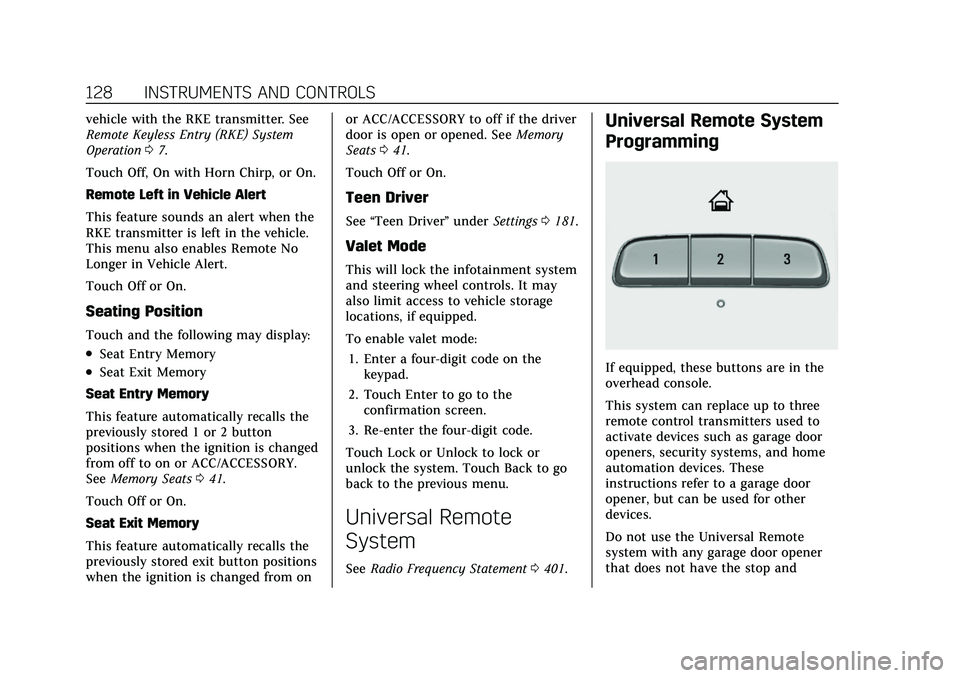
If equipped, these buttons are in the
overhead console.
This system can replace up to three
remote control transmitters used to
activate devices such as garage door
openers, security systems, and home
automation devices. These
instructions refer to a garage door
opener, but can be used for other
devices.
Do not use the Universal Remote
system with any garage door opener
that does not have the stop and
Page 130 of 426
Cadillac XT5 Owner Manual (GMNA-Localizing-U.S./Canada/Mexico-
14590481) - 2021 - CRC - 10/22/20
INSTRUMENTS AND CONTROLS 129
reverse feature. This includes any
garage door opener model
manufactured before April 1, 1982.
Read these instructions completely
before programming the Universal
Remote system. It may help to have
another person assist with the
programming process.
Keep the original hand-held
transmitter for use in other vehicles
as well as for future programming.
Erase the programming when vehicle
ownership is terminated. See“Erasing
Universal Remote System Buttons”
later in this section.
To program a garage door opener,
park outside directly in line with and
facing the garage door opener receiver.
Clear all people and objects near the
garage door.
Make sure the hand-held transmitter
has a new battery for quicker and
more accurate transmission of the
radio-frequency signal.Programming the Universal
Remote System
For questions or programming help,
see www.homelink.com/gm or call
1-800-355-3515. For calls placed
outside the U.S., Canada, or Puerto
Rico, international rates will apply and
may differ based on landline or mobile
phone.
Programming involves time-sensitive
actions, and may time out causing the
procedure to be repeated.
To program up to three devices:
1. Hold the end of the hand-held transmitter about 3 to 8 cm (1 to
3 in) away from the Universal
Remote system buttons with the
indicator light in view. The
hand-held transmitter was supplied
by the manufacturer of the garage
door opener receiver.
2. Press and release one of the three Universal Remote system buttons
to be programmed. Press and hold
the hand-held transmitter button.
Do not release the hand-held
transmitter button until the
indicator light changes from a slow to a rapid flash or continuous light.
Then release the hand-held
transmitter button.
Some garage door openers may
require substitution of Step 2 with
the procedure under
“Radio Signals
for Some Gate Operators ”later in
this section.
3. Press and hold the newly programmed Universal Remote
system button for five seconds
while watching the indicator light
and garage door activation.
.If the indicator light stays on
continuously or the garage door
moves when the button is
pressed, then programming is
complete. There is no need to
complete Steps 4–6.
.If the indicator light does not
come on or the garage door does
not move, a second button press
may be required. For a second
time, press and hold the newly
programmed button for
five seconds. If the indicator
light is continuously lit, or the
garage door moves,
programming is complete.
Page 131 of 426
Cadillac XT5 Owner Manual (GMNA-Localizing-U.S./Canada/Mexico-
14590481) - 2021 - CRC - 10/22/20
130 INSTRUMENTS AND CONTROLS
.If the indicator light flashes
rapidly and the garage door does
not move, continue with
programming Steps 4–6.
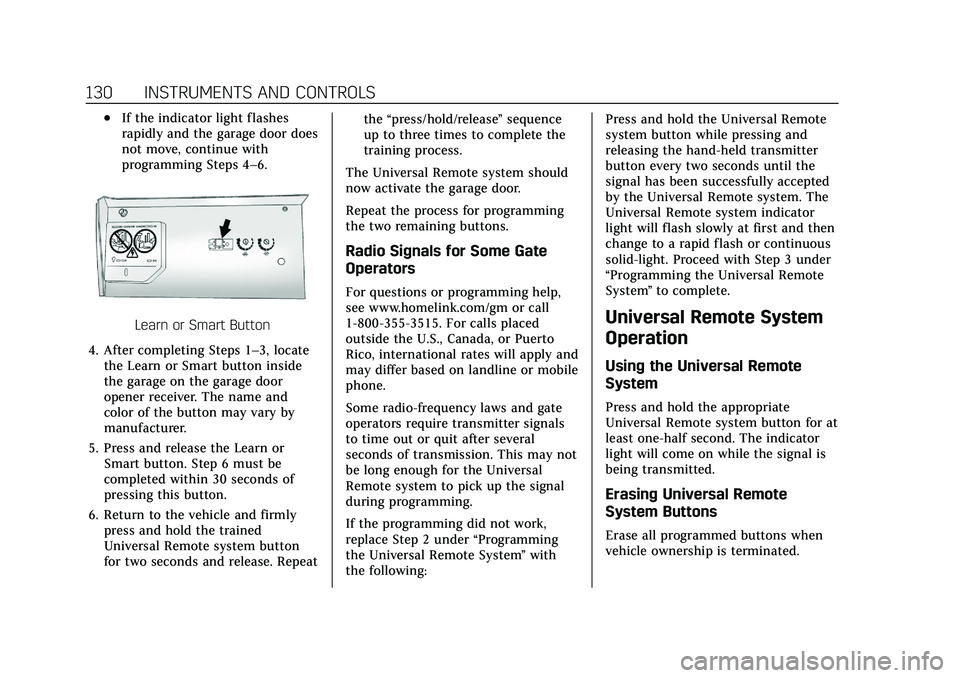
Learn or Smart Button
4. After completing Steps 1–3, locate the Learn or Smart button inside
the garage on the garage door
opener receiver. The name and
color of the button may vary by
manufacturer.
5. Press and release the Learn or Smart button. Step 6 must be
completed within 30 seconds of
pressing this button.
6. Return to the vehicle and firmly press and hold the trained
Universal Remote system button
for two seconds and release. Repeat the
“press/hold/release ”sequence
up to three times to complete the
training process.
The Universal Remote system should
now activate the garage door.
Repeat the process for programming
the two remaining buttons.
Radio Signals for Some Gate
Operators
For questions or programming help,
see www.homelink.com/gm or call
1-800-355-3515. For calls placed
outside the U.S., Canada, or Puerto
Rico, international rates will apply and
may differ based on landline or mobile
phone.
Some radio-frequency laws and gate
operators require transmitter signals
to time out or quit after several
seconds of transmission. This may not
be long enough for the Universal
Remote system to pick up the signal
during programming.
If the programming did not work,
replace Step 2 under “Programming
the Universal Remote System ”with
the following: Press and hold the Universal Remote
system button while pressing and
releasing the hand-held transmitter
button every two seconds until the
signal has been successfully accepted
by the Universal Remote system. The
Universal Remote system indicator
light will flash slowly at first and then
change to a rapid flash or continuous
solid-light. Proceed with Step 3 under
“Programming the Universal Remote
System
”to complete.
Universal Remote System
Operation
Using the Universal Remote
System
Press and hold the appropriate
Universal Remote system button for at
least one-half second. The indicator
light will come on while the signal is
being transmitted.
Erasing Universal Remote
System Buttons
Erase all programmed buttons when
vehicle ownership is terminated.
Page 140 of 426
Cadillac XT5 Owner Manual (GMNA-Localizing-U.S./Canada/Mexico-
14590481) - 2021 - CRC - 10/22/20
INFOTAINMENT SYSTEM 139
Infotainment System
Introduction
Introduction . . . . . . . . . . . . . . . . . . . . . . 139
Overview . . . . . . . . . . . . . . . . . . . . . . . . . . 140
Steering Wheel Controls . . . . . . . . . 142
Using the System . . . . . . . . . . . . . . . . . 143
Software Updates . . . . . . . . . . . . . . . . . 146
Radio
AM-FM Radio . . . . . . . . . . . . . . . . . . . . . 146
HD Radio Technology . . . . . . . . . . . . 148
Radio Data System (RDS) . . . . . . . . 148
Satellite Radio . . . . . . . . . . . . . . . . . . . . 149
Radio Reception . . . . . . . . . . . . . . . . . . 149
Multi-Band Antenna . . . . . . . . . . . . . 150
Audio Players
Avoiding Untrusted MediaDevices . . . . . . . . . . . . . . . . . . . . . . . . . . 150
USB Port . . . . . . . . . . . . . . . . . . . . . . . . . . 150
Bluetooth Audio . . . . . . . . . . . . . . . . . . 153
OnStar System
OnStar System . . . . . . . . . . . . . . . . . . . . 154
Navigation
Using the Navigation System . . . . 155
Maps . . . . . . . . . . . . . . . . . . . . . . . . . . . . . . 158
Navigation Symbols . . . . . . . . . . . . . . 158
Destination . . . . . . . . . . . . . . . . . . . . . . . 160 OnStar System . . . . . . . . . . . . . . . . . . . . 165
Global Positioning
System (GPS) . . . . . . . . . . . . . . . . . . . 166
Vehicle Positioning . . . . . . . . . . . . . . . 167
Problems with Route Guidance . . . . . . . . . . . . . . . . . . . . . . . . 167
If the System Needs Service . . . . . 168
Map Data Updates . . . . . . . . . . . . . . . 168
Database Coverage Explanations . . . . . . . . . . . . . . . . . . . . 168
Voice Recognition
Voice Recognition . . . . . . . . . . . . . . . . 168
Phone
Bluetooth (Overview) . . . . . . . . . . . . . 174
Bluetooth (Pairing and Using aPhone) . . . . . . . . . . . . . . . . . . . . . . . . . . . 175
Apple CarPlay and Android Auto . . . . . . . . . . . . . . . . . . . 179
Settings
Settings . . . . . . . . . . . . . . . . . . . . . . . . . . . 181
Teen Driver . . . . . . . . . . . . . . . . . . . . . . . 188
Trademarks and License
Agreements
Trademarks and LicenseAgreements . . . . . . . . . . . . . . . . . . . . . 191
Introduction
Read the following pages to become
familiar with the features.
{Warning
Taking your eyes off the road for
too long or too often while using
any infotainment feature can cause
a crash. You or others could be
injured or killed. Do not give
extended attention to infotainment
tasks while driving. Limit your
glances at the vehicle displays and
focus your attention on driving. Use
voice commands whenever possible.
The infotainment system has built-in
features intended to help avoid
distraction by disabling some features
when driving. These features may gray
out when they are unavailable. Many
infotainment features are also
available through the instrument
cluster and steering wheel controls.
Before driving:
.Become familiar with the operation,
center stack controls, steering wheel
controls, and infotainment display.
Page 141 of 426
Cadillac XT5 Owner Manual (GMNA-Localizing-U.S./Canada/Mexico-
14590481) - 2021 - CRC - 10/22/20
140 INFOTAINMENT SYSTEM
.Set up the audio by presetting
favorite stations, setting the tone,
and adjusting the speakers.
.Set up phone numbers in advance
so they can be called easily by
pressing a single control or by using
a single voice command.
See Distracted Driving 0210.
Active Noise Cancellation (ANC)
If equipped, ANC reduces engine noise
in the vehicle’s interior. ANC requires
the factory-installed audio system,
radio, speakers, amplifier (if
equipped), induction system, and
exhaust system to work properly.
Deactivation is required by your dealer
if related aftermarket equipment is
installed.
Overview
Infotainment System
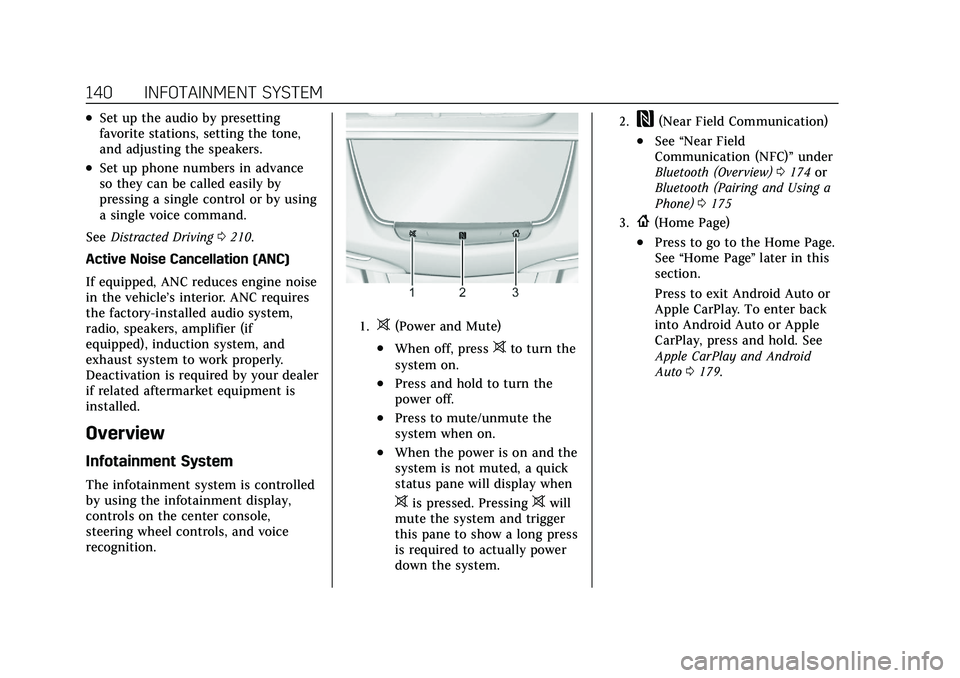
The infotainment system is controlled
by using the infotainment display,
controls on the center console,
steering wheel controls, and voice
recognition.
1.>(Power and Mute)
.When off, press>to turn the
system on.
.Press and hold to turn the
power off.
.Press to mute/unmute the
system when on.
.When the power is on and the
system is not muted, a quick
status pane will display when
>is pressed. Pressing>will
mute the system and trigger
this pane to show a long press
is required to actually power
down the system.
2.W(Near Field Communication)
.See “Near Field
Communication (NFC)” under
Bluetooth (Overview) 0174 or
Bluetooth (Pairing and Using a
Phone) 0175
3.{(Home Page)
.Press to go to the Home Page.
See “Home Page ”later in this
section.
Press to exit Android Auto or
Apple CarPlay. To enter back
into Android Auto or Apple
CarPlay, press and hold. See
Apple CarPlay and Android
Auto 0179.
Page 142 of 426
Cadillac XT5 Owner Manual (GMNA-Localizing-U.S./Canada/Mexico-
14590481) - 2021 - CRC - 10/22/20
INFOTAINMENT SYSTEM 141
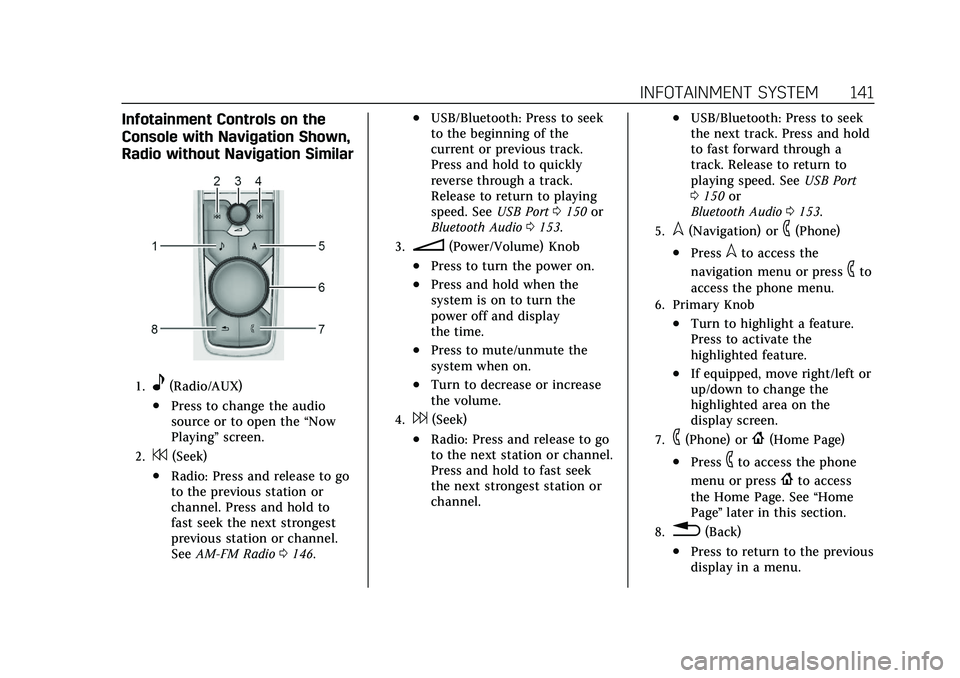
Infotainment Controls on the
Console with Navigation Shown,
Radio without Navigation Similar
1.e(Radio/AUX)
.Press to change the audio
source or to open the“Now
Playing” screen.
2.7(Seek)
.Radio: Press and release to go
to the previous station or
channel. Press and hold to
fast seek the next strongest
previous station or channel.
SeeAM-FM Radio 0146.
.USB/Bluetooth: Press to seek
to the beginning of the
current or previous track.
Press and hold to quickly
reverse through a track.
Release to return to playing
speed. See USB Port0150 or
Bluetooth Audio 0153.
3.n(Power/Volume) Knob
.Press to turn the power on.
.Press and hold when the
system is on to turn the
power off and display
the time.
.Press to mute/unmute the
system when on.
.Turn to decrease or increase
the volume.
4.6(Seek)
.Radio: Press and release to go
to the next station or channel.
Press and hold to fast seek
the next strongest station or
channel.
.USB/Bluetooth: Press to seek
the next track. Press and hold
to fast forward through a
track. Release to return to
playing speed. See USB Port
0 150 or
Bluetooth Audio 0153.
5.l(Navigation) or6(Phone)
.Presslto access the
navigation menu or press
6to
access the phone menu.
6. Primary Knob
.Turn to highlight a feature.
Press to activate the
highlighted feature.
.If equipped, move right/left or
up/down to change the
highlighted area on the
display screen.
7.6(Phone) or{(Home Page)
.Press6to access the phone
menu or press
{to access
the Home Page. See “Home
Page ”later in this section.
8.0(Back)
.Press to return to the previous
display in a menu.