rear compartment CADILLAC XT5 2021 Owner's Manual
[x] Cancel search | Manufacturer: CADILLAC, Model Year: 2021, Model line: XT5, Model: CADILLAC XT5 2021Pages: 426, PDF Size: 8.73 MB
Page 87 of 426
Cadillac XT5 Owner Manual (GMNA-Localizing-U.S./Canada/Mexico-
14590481) - 2021 - CRC - 10/22/20
86 STORAGE
Storage
Storage Compartments
Storage Compartments . . . . . . . . . . . . 86
Glove Box . . . . . . . . . . . . . . . . . . . . . . . . . . 86
Cupholders . . . . . . . . . . . . . . . . . . . . . . . . . 86
Sunglasses Storage . . . . . . . . . . . . . . . . 87
Armrest Storage . . . . . . . . . . . . . . . . . . . 87
Rear Storage . . . . . . . . . . . . . . . . . . . . . . . 87
Center Console Storage . . . . . . . . . . . . 88
Additional Storage Features
Cargo Cover . . . . . . . . . . . . . . . . . . . . . . . . 88
Cargo Tie-Downs . . . . . . . . . . . . . . . . . . . 90
Cargo Management System . . . . . . . 90
Convenience Net . . . . . . . . . . . . . . . . . . . 91
Roof Rack System
Roof Rack System . . . . . . . . . . . . . . . . . 91
Storage Compartments{
Warning
Do not store heavy or sharp objects
in storage compartments. In a
crash, these objects may cause the
cover to open and could result in
injury.
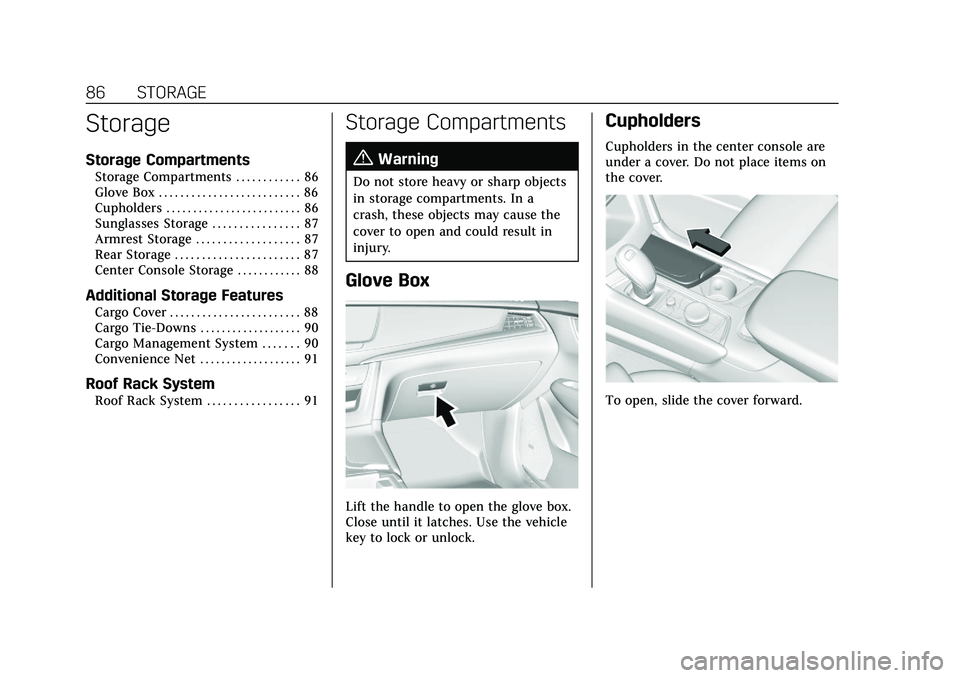
Glove Box
Lift the handle to open the glove box.
Close until it latches. Use the vehicle
key to lock or unlock.
Cupholders
Cupholders in the center console are
under a cover. Do not place items on
the cover.
To open, slide the cover forward.
Page 91 of 426
Cadillac XT5 Owner Manual (GMNA-Localizing-U.S./Canada/Mexico-
14590481) - 2021 - CRC - 10/22/20
90 STORAGE
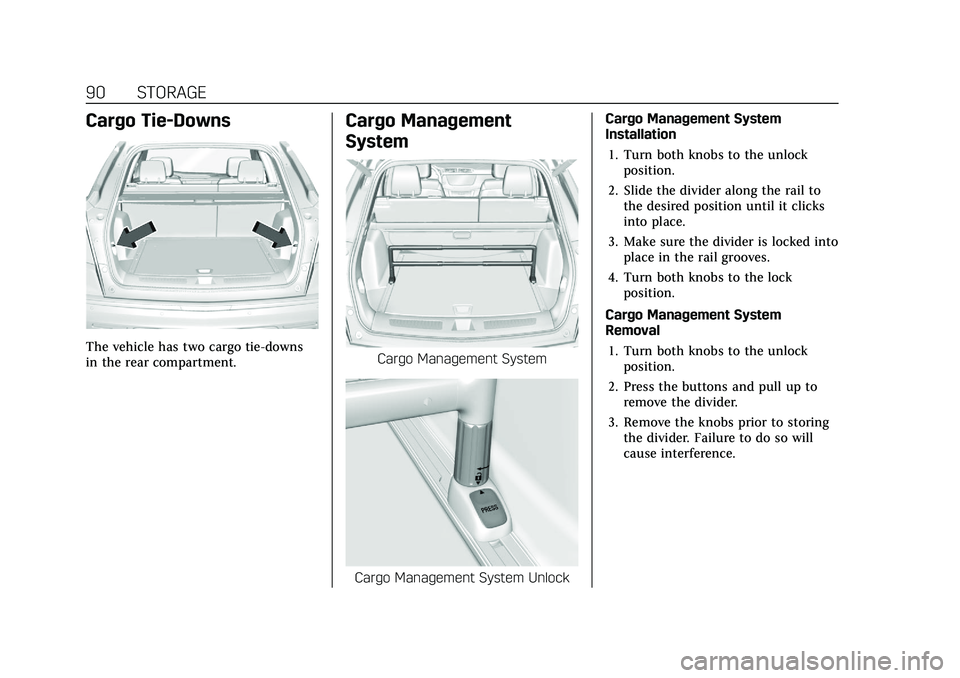
Cargo Tie-Downs
The vehicle has two cargo tie-downs
in the rear compartment.
Cargo Management
System
Cargo Management System
Cargo Management System UnlockCargo Management System
Installation
1. Turn both knobs to the unlock position.
2. Slide the divider along the rail to the desired position until it clicks
into place.
3. Make sure the divider is locked into place in the rail grooves.
4. Turn both knobs to the lock position.
Cargo Management System
Removal 1. Turn both knobs to the unlock position.
2. Press the buttons and pull up to remove the divider.
3. Remove the knobs prior to storing the divider. Failure to do so will
cause interference.
Page 202 of 426

Cadillac XT5 Owner Manual (GMNA-Localizing-U.S./Canada/Mexico-
14590481) - 2021 - CRC - 10/22/20
CLIMATE CONTROLS 201
Climate Controls
Climate Control Systems
Dual Automatic Climate ControlSystem . . . . . . . . . . . . . . . . . . . . . . . . . . 201
Rear Climate Control System . . . . 206
Air Vents
Air Vents . . . . . . . . . . . . . . . . . . . . . . . . . . 207
Maintenance
Passenger Compartment Air Filter . . . . . . . . . . . . . . . . . . . . . . . . . . . . . 208
Service . . . . . . . . . . . . . . . . . . . . . . . . . . . . 208
Climate Control Systems
Dual Automatic Climate Control System
The climate control buttons on the center stack and on the climate control
display are used to adjust the heating, cooling, and ventilation.
Center Stack Climate Controls
1. Driver and Passenger Temperature Controls
2. Fan Control
3. Driver and Passenger Heated and Ventilated Seats (If Equipped)
4. Rear Window Defogger
5. Defrost 6. OFF (Fan)
7. Recirculation
8. AUTO (Automatic Operation)
Page 209 of 426

Cadillac XT5 Owner Manual (GMNA-Localizing-U.S./Canada/Mexico-
14590481) - 2021 - CRC - 10/22/20
208 CLIMATE CONTROLS
Adjustable air vents are in the center
and on the sides of the instrument
panel, and on the rear of the center
console storage.
Move the slider knobs to change the
direction of or to close off the airf low.
Operation Tips
.Clear away any ice, snow, or leaves
from air inlets at the base of the
windshield that could block the
flow of air into the vehicle.
.Clear snow off the hood to improve
visibility and help decrease moisture
drawn into the vehicle.
.Keep the path under the front seats
clear of objects to help circulate the
air inside of the vehicle more
effectively.
.Use of non-GM approved hood
deflectors can adversely affect the
performance of the system. Check
with your dealer before adding
equipment to the outside of the
vehicle.
.Do not attach any devices to the air
vent slats. This restricts airf low and
may cause damage to the air vents.
Maintenance
Passenger Compartment
Air Filter
The filter reduces dust, pollen, and
other airborne irritants from outside
air that is pulled into the vehicle. The
filter should be replaced as part of
routine scheduled maintenance. See
Maintenance Schedule0374.
See your dealer regarding replacement
of the filter.
Service
All vehicles have a label underhood
that identifies the refrigerant used in
the vehicle. The refrigerant system
should only be serviced by trained and
certified technicians. The air
conditioning evaporator should never
be repaired or replaced by one from a
salvage vehicle. It should only be
replaced by a new evaporator to
ensure proper and safe operation.
During service, all refrigerants should
be reclaimed with proper equipment.
Venting refrigerants directly to the
atmosphere is harmful to the environment and may also create
unsafe conditions based on inhalation,
combustion, frostbite, or other
health-based concerns.
The air conditioning system requires
periodic maintenance. See
Maintenance Schedule
0374.
Page 221 of 426
Cadillac XT5 Owner Manual (GMNA-Localizing-U.S./Canada/Mexico-
14590481) - 2021 - CRC - 10/22/20
220 DRIVING AND OPERATING
This keeps the battery charged to
restart the vehicle and to signal for
help with the headlamps. Do this as
little as possible, to save fuel.
If the Vehicle Is Stuck
Slowly and cautiously spin the wheels
to free the vehicle when stuck in sand,
mud, ice, or snow.
If stuck too severely for the traction
system to free the vehicle, turn the
traction system off and use the
rocking method. SeeTraction Control/
Electronic Stability Control 0240.
{Warning
If the vehicle's tires spin at high
speed, they can explode, and you or
others could be injured. The vehicle
can overheat, causing an engine
compartment fire or other damage.
Spin the wheels as little as possible
and avoid going above 56 km/h
(35 mph).
For All-Wheel Drive (AWD), select
Off-Road or AWD mode. See Driver
Mode Control 0242 and
All-Wheel Drive 0237.
Rocking the Vehicle to Get it Out
Turn the steering wheel left and right
to clear the area around the front
wheels. Turn off any traction system.
Shift back and forth between
R (Reverse) and a low forward gear,
spinning the wheels as little as
possible. To prevent transmission
wear, wait until the wheels stop
spinning before shifting gears. Release
the accelerator pedal while shifting,
and press lightly on the accelerator
pedal when the transmission is in
gear. Slowly spinning the wheels in
the forward and reverse directions
causes a rocking motion that could
free the vehicle. If that does not get
the vehicle out after a few tries, it
might need to be towed out. If the
vehicle does need to be towed out, see
Towing the Vehicle 0361.
Vehicle Load Limits
It is very important to know how
much weight the vehicle can carry.
This weight is called the vehicle
capacity weight and includes the
weight of all occupants, cargo, and
all nonfactory-installed options. Two labels on the vehicle may
show how much weight it may
properly carry, the Tire and
Loading Information label and the
Certification/Tire label.
{Warning
Do not load the vehicle any
heavier than the Gross Vehicle
Weight Rating (GVWR),
or either the maximum front or
rear Gross Axle Weight Rating
(GAWR). This can cause
systems to break and change
the way the vehicle handles.
This could cause loss of control
and a crash. Overloading can
also reduce stopping
performance, damage the tires,
and shorten the life of the
vehicle.
Page 293 of 426
Cadillac XT5 Owner Manual (GMNA-Localizing-U.S./Canada/Mexico-
14590481) - 2021 - CRC - 10/22/20
292 VEHICLE CARE
Vehicle Care
General Information
General Information . . . . . . . . . . . . . 293
California Proposition65 Warning . . . . . . . . . . . . . . . . . . . . . 293
California Perchlorate Materials Requirements . . . . . . . . . . . . . . . . . . . 293
Accessories and Modifications . . . . . . . . . . . . . . . . . . . 294
Vehicle Checks
Doing Your OwnService Work . . . . . . . . . . . . . . . . . . . . 294
Hood . . . . . . . . . . . . . . . . . . . . . . . . . . . . . . 295
Engine Compartment Overview . . . . . . . . . . . . . . . . . . . . . . . . . 296
Engine Oil . . . . . . . . . . . . . . . . . . . . . . . . . 299
Engine Oil Life System . . . . . . . . . . . 301
Automatic Transmission Fluid . . . . . . . . . . . . . . . . . . . . . . . . . . . . . 302
Engine Air Filter Life System . . . . 302
Engine Air Cleaner/Filter . . . . . . . . . 303
Cooling System . . . . . . . . . . . . . . . . . . . 304
Engine Overheating . . . . . . . . . . . . . . 308
Washer Fluid . . . . . . . . . . . . . . . . . . . . . 309
Brakes . . . . . . . . . . . . . . . . . . . . . . . . . . . . . 310
Brake Fluid . . . . . . . . . . . . . . . . . . . . . . . 311
Battery - North America . . . . . . . . . 312
All-Wheel Drive . . . . . . . . . . . . . . . . . . 312 Park Brake and P (Park)
Mechanism Check . . . . . . . . . . . . . . 313
Wiper Blade Replacement . . . . . . . 313
Windshield Replacement . . . . . . . . 314
Gas Strut(s) . . . . . . . . . . . . . . . . . . . . . . . 314
Headlamp Aiming
Front Headlamp Aiming . . . . . . . . . 315
Bulb Replacement
Bulb Replacement . . . . . . . . . . . . . . . . 315
LED Lighting . . . . . . . . . . . . . . . . . . . . . 315
Electrical System
Electrical System Overload . . . . . . 316
Fuses and Circuit Breakers . . . . . . 316
Engine Compartment Fuse Block . . . . . . . . . . . . . . . . . . . . . . . . . . . . 317
Instrument Panel Fuse Block . . . . 320
Rear Compartment Fuse Block . . . . . . . . . . . . . . . . . . . . . . . . . . . . 323
Wheels and Tires
Tires . . . . . . . . . . . . . . . . . . . . . . . . . . . . . . . 325
All-Season Tires . . . . . . . . . . . . . . . . . . 325
Winter Tires . . . . . . . . . . . . . . . . . . . . . . 326
Summer Tires . . . . . . . . . . . . . . . . . . . . 326
Tire Sidewall Labeling . . . . . . . . . . . 327
Tire Designations . . . . . . . . . . . . . . . . . 328
Tire Terminology andDefinitions . . . . . . . . . . . . . . . . . . . . . . 329
Tire Pressure . . . . . . . . . . . . . . . . . . . . . . 331 Tire Pressure for High-Speed
Operation . . . . . . . . . . . . . . . . . . . . . . . . 333
Tire Pressure Monitor System . . . 334
Tire Pressure Monitor Operation . . . . . . . . . . . . . . . . . . . . . . . . 335
Tire Inspection . . . . . . . . . . . . . . . . . . . 338
Tire Rotation . . . . . . . . . . . . . . . . . . . . . 339
When It Is Time for New Tires . . . . . . . . . . . . . . . . . . . . . . . . . . . . . 340
Buying New Tires . . . . . . . . . . . . . . . . 341
Different Size Tires and Wheels . . . . . . . . . . . . . . . . . . . . . . . . . . 342
Uniform Tire Quality Grading . . . 342
Wheel Alignment and Tire Balance . . . . . . . . . . . . . . . . . . . . . . . . . . 344
Wheel Replacement . . . . . . . . . . . . . . 344
Tire Chains . . . . . . . . . . . . . . . . . . . . . . . 344
If a Tire Goes Flat . . . . . . . . . . . . . . . . 345
Tire Sealant and Compressor Kit . . . . . . . . . . . . . . . . . 347
Storing the Tire Sealant and Compressor Kit . . . . . . . . . . . . . . . . . 352
Tire Changing . . . . . . . . . . . . . . . . . . . . . 353
Compact Spare Tire . . . . . . . . . . . . . . 358
Jump Starting
Jump Starting - North America . . . . . . . . . . . . . . . . . . . . . . . . . 359
Page 324 of 426
Cadillac XT5 Owner Manual (GMNA-Localizing-U.S./Canada/Mexico-
14590481) - 2021 - CRC - 10/22/20
VEHICLE CARE 323
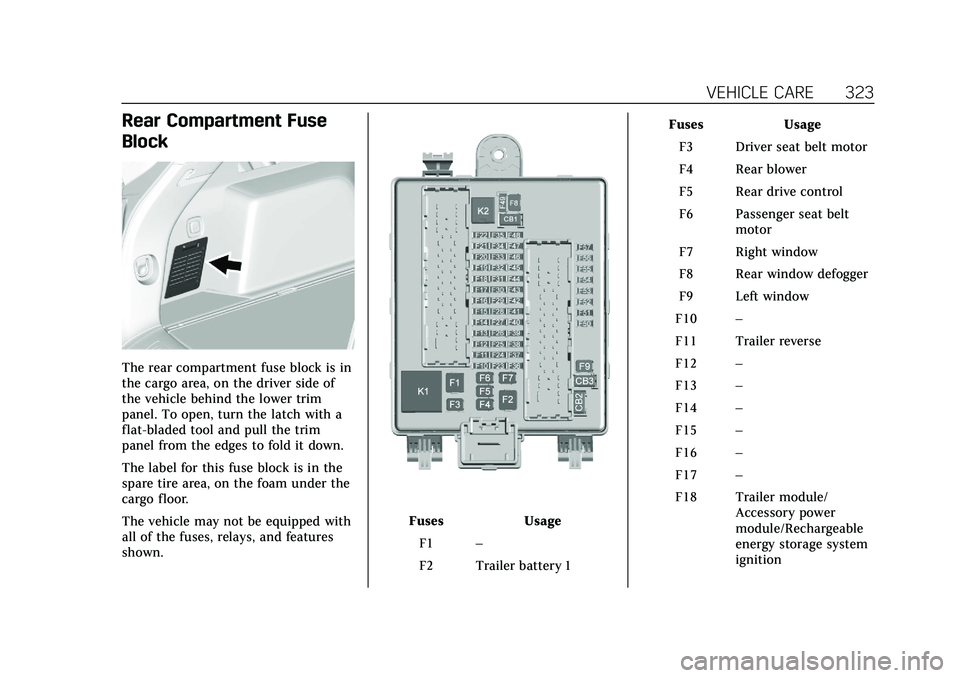
Rear Compartment Fuse
Block
The rear compartment fuse block is in
the cargo area, on the driver side of
the vehicle behind the lower trim
panel. To open, turn the latch with a
flat-bladed tool and pull the trim
panel from the edges to fold it down.
The label for this fuse block is in the
spare tire area, on the foam under the
cargo floor.
The vehicle may not be equipped with
all of the fuses, relays, and features
shown.
FusesUsage
F1 –
F2 Trailer battery 1 Fuses
Usage
F3 Driver seat belt motor
F4 Rear blower
F5 Rear drive control
F6 Passenger seat belt motor
F7 Right window
F8 Rear window defogger
F9 Left window
F10 –
F11 Trailer reverse
F12 –
F13 –
F14 –
F15 –
F16 –
F17 –
F18 Trailer module/ Accessory power
module/Rechargeable
energy storage system
ignition
Page 353 of 426

Cadillac XT5 Owner Manual (GMNA-Localizing-U.S./Canada/Mexico-
14590481) - 2021 - CRC - 10/22/20
352 VEHICLE CARE
8. Press the on/off button (5) to turnthe tire sealant and compressor
kit on.
The compressor will inflate the tire
with air only.
9. Inflate the tire to the recommended inflation pressure
using the pressure gauge (8). The
recommended inflation pressure
can be found on the Tire and
Loading Information label. See Tire
Pressure 0331.
The pressure gauge (8) may read
higher than the actual tire pressure
while the compressor is on. Turn
the compressor off to get an
accurate pressure reading. The
compressor may be turned on/off
until the correct pressure is
reached.
Caution
If the recommended pressure
cannot be reached after
approximately 25 minutes, the
vehicle should not be driven farther.
The tire is too severely damaged
and the tire sealant and compressor (Continued)
Caution (Continued)
kit cannot inflate the tire. Remove
the power plug from the accessory
power outlet and unscrew the
inflating hose from the tire valve.
SeeRoadside Service 0396.
10. Press the on/off button (5) to turn the tire sealant and compressor
kit off.
Be careful while handling the
compressor as it could be warm
after usage.
11. Unplug the power plug (9) from the accessory power outlet in the
vehicle.
12. Turn the air only hose (10) counterclockwise to remove it from
the tire valve stem.
13. Replace the tire valve stem cap.
14. Return the air only hose (10) and power plug (9) back to their
original storage location.
15. Return the equipment to its original storage location in the
vehicle. The tire sealant and compressor kit
has accessory adapters located in a
compartment on the bottom of its
housing that can be used to inflate air
mattresses, balls, etc.
Storing the Tire Sealant
and Compressor Kit
The tire sealant and compressor kit is
in a bag in the rear compartment
storage area.
1. Open the liftgate.
2. Remove the cargo management system divider. See Cargo
Management System 090.
3. Lift the load floor. Use the hook to hold the load floor open. See Rear
Storage 087.
Page 358 of 426
Cadillac XT5 Owner Manual (GMNA-Localizing-U.S./Canada/Mexico-
14590481) - 2021 - CRC - 10/22/20
VEHICLE CARE 357
Caution
Improperly tightened wheel nuts
can lead to brake pulsation and
rotor damage. To avoid expensive
brake repairs, evenly tighten the
wheel nuts in the proper sequence
and to the proper torque
specification. SeeCapacities and
Specifications 0388 for the wheel
nut torque specification.
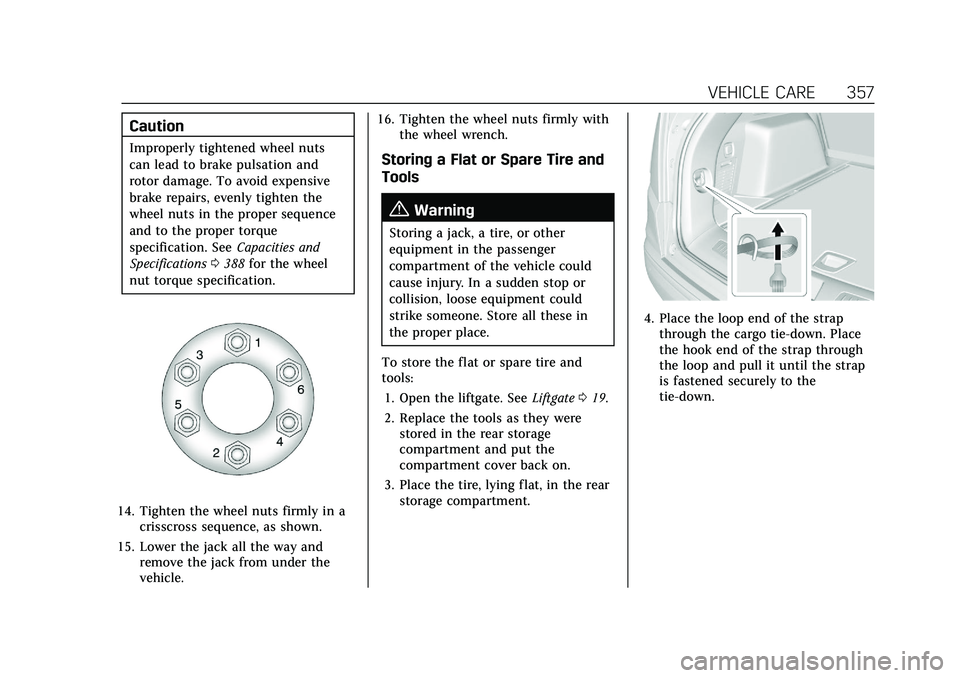
14. Tighten the wheel nuts firmly in a crisscross sequence, as shown.
15. Lower the jack all the way and remove the jack from under the
vehicle. 16. Tighten the wheel nuts firmly with
the wheel wrench.
Storing a Flat or Spare Tire and
Tools
{Warning
Storing a jack, a tire, or other
equipment in the passenger
compartment of the vehicle could
cause injury. In a sudden stop or
collision, loose equipment could
strike someone. Store all these in
the proper place.
To store the flat or spare tire and
tools: 1. Open the liftgate. See Liftgate019.
2. Replace the tools as they were stored in the rear storage
compartment and put the
compartment cover back on.
3. Place the tire, lying flat, in the rear storage compartment.
4. Place the loop end of the strapthrough the cargo tie-down. Place
the hook end of the strap through
the loop and pull it until the strap
is fastened securely to the
tie-down.
Page 378 of 426

Cadillac XT5 Owner Manual (GMNA-Localizing-U.S./Canada/Mexico-
14590481) - 2021 - CRC - 10/22/20
SERVICE AND MAINTENANCE 377
Maintenance Schedule
Additional Required Services -
Normal12 000 km/7,500 mi
24 000 km/15,000 mi
36 000 km/22,500 mi
48 000 km/30,000 mi
60 000 km/37,500 mi
72 000 km/45,000 mi
84 000 km/52,500 mi
96 000 km/60,000 mi
108 000 km/67,500 mi
120 000 km/75,000 mi
132 000 km/82,500 mi
144 000 km/90,000 mi
156 000 km/97,500 mi
168 000 km/105,000 mi
180 000 km/112,500 mi
192 000 km/120,000 mi
204 000 km/127,500 mi
216 000 km/135,000 mi
228 000 km/142,500 mi
240 000 km/150,000 mi
Rotate tires and perform Required Services. Check
engine oil level and oil life percentage. Change
engine oil and filter, if needed.
Check engine air filter life percentage and status.
Change engine air filter, if needed.
@ @ @ @ @ @ @ @ @ @ @ @ @ @ @ @ @ @ @ @
Replace passenger compartment air filter. (1)@ @@@@@
Replace spark plugs, if equipped with 2.0L turbo
engine. Inspect spark plug wires and/or boots.@ @
Replace spark plugs, if equipped with 3.6L engine.
Inspect spark plug wires and/or boots.@
Change rear axle fluid, if equipped with AWD. (2)@
Drain and fill engine cooling system. (3)@
Visually inspect accessory drive belts. (4)@
Replace brake fluid. (5)
Replace front and rear wiper blades. (6)
@ @ @ @ @ @ @ @ @ @
Replace hood and/or body lift support gas struts. (7)@ @
Replace air conditioning desiccant. (8)