engine CADILLAC XT6 2021 Owner's Manual
[x] Cancel search | Manufacturer: CADILLAC, Model Year: 2021, Model line: XT6, Model: CADILLAC XT6 2021Pages: 431, PDF Size: 8.29 MB
Page 332 of 431
Cadillac XT6 Owner Manual (GMNA-Localizing-U.S./Canada-14574701) -
2021 - CRC - 2/8/21
VEHICLE CARE 331
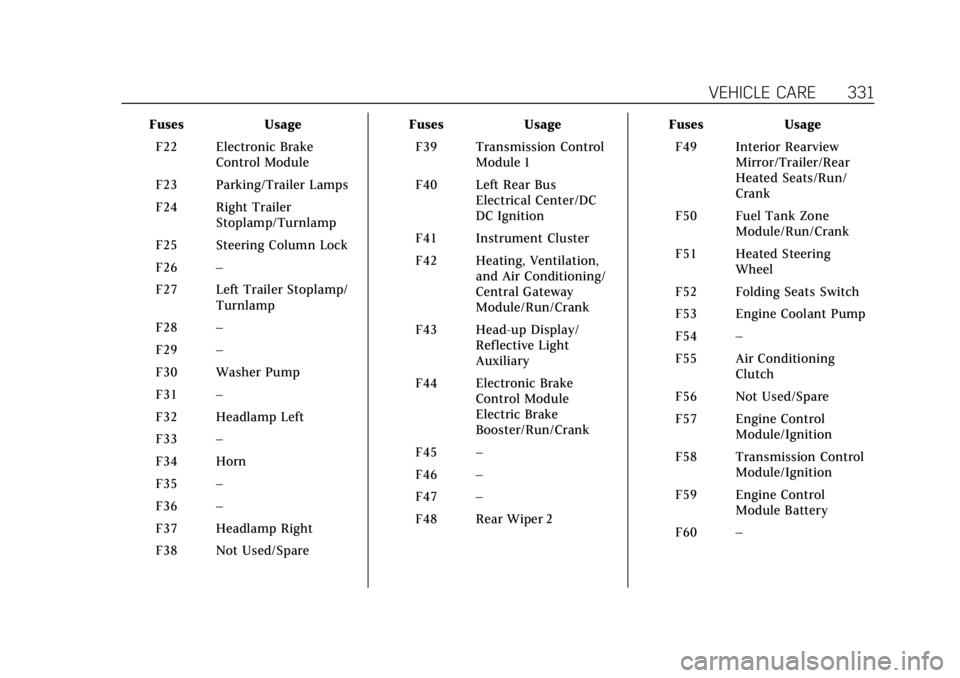
FusesUsage
F22 Electronic Brake Control Module
F23 Parking/Trailer Lamps
F24 Right Trailer Stoplamp/Turnlamp
F25 Steering Column Lock
F26 –
F27 Left Trailer Stoplamp/ Turnlamp
F28 –
F29 –
F30 Washer Pump
F31 –
F32 Headlamp Left
F33 –
F34 Horn
F35 –
F36 –
F37 Headlamp Right
F38 Not Used/Spare Fuses
Usage
F39 Transmission Control Module 1
F40 Left Rear Bus Electrical Center/DC
DC Ignition
F41 Instrument Cluster
F42 Heating, Ventilation, and Air Conditioning/
Central Gateway
Module/Run/Crank
F43 Head-up Display/ Reflective Light
Auxiliary
F44 Electronic Brake Control Module
Electric Brake
Booster/Run/Crank
F45 –
F46 –
F47 –
F48 Rear Wiper 2 Fuses
Usage
F49 Interior Rearview Mirror/Trailer/Rear
Heated Seats/Run/
Crank
F50 Fuel Tank Zone Module/Run/Crank
F51 Heated Steering Wheel
F52 Folding Seats Switch
F53 Engine Coolant Pump
F54 –
F55 Air Conditioning Clutch
F56 Not Used/Spare
F57 Engine Control Module/Ignition
F58 Transmission Control Module/Ignition
F59 Engine Control Module Battery
F60 –
Page 333 of 431

Cadillac XT6 Owner Manual (GMNA-Localizing-U.S./Canada-14574701) -
2021 - CRC - 2/8/21
332 VEHICLE CARE
FusesUsage
F61 O2 Sensor 1/ Aeroshutter/Mass Air
Flow Sensor
F62 Engine Control Module–Odd
F63 O2 Sensor 2
F64 Engine Control Module–Even
F65 Engine Control Module Powertrain 1
F66 Engine Control Module Powertrain 2
F67 Engine Control Module Powertrain 3
F68 –
F69 –
F70 –
F71 –
F72 –
F73 –
F74 –
F75 – Fuses
Usage
F76 –
F77 –
Relays Usage
K1 Starter 1
K2 Run/Crank
K3 Starter 3
K4 –
K5 Air Conditioning
K6 –
K7 Engine Control Module
K8 Folding Seats
K9 –
K10 Starter 2Instrument Panel Fuse
Block
The instrument panel fuse block is in
the center console between the driver
and passenger seats. To access the
fuses, open the fuse panel door,
or remove the panel from the
passenger side by pulling it out, or see
your dealer.
Page 342 of 431
Cadillac XT6 Owner Manual (GMNA-Localizing-U.S./Canada-14574701) -
2021 - CRC - 2/8/21
VEHICLE CARE 341
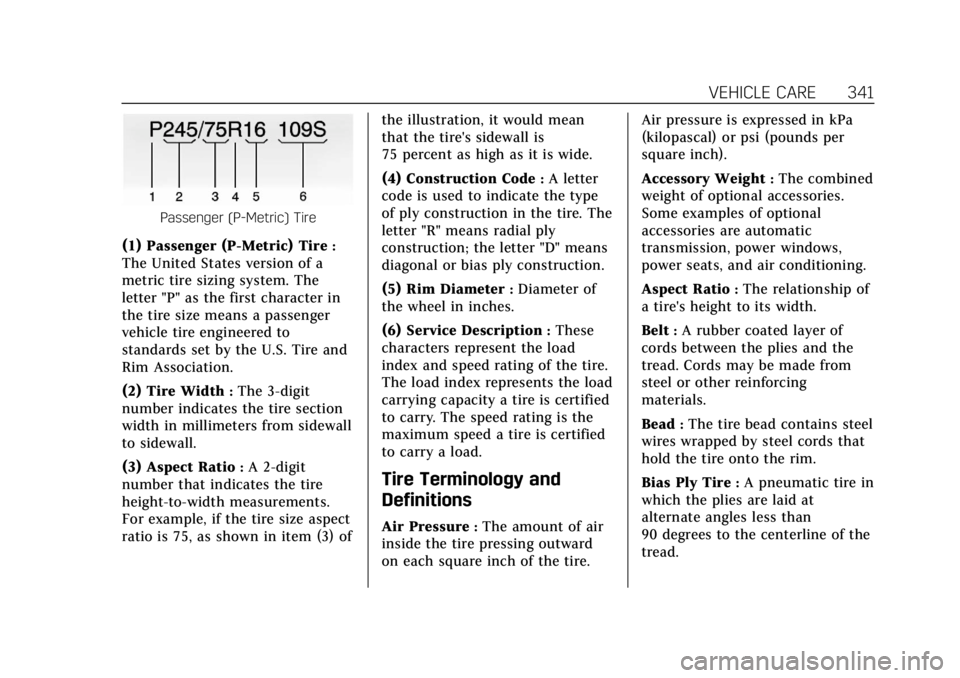
Passenger (P-Metric) Tire
(1) Passenger (P-Metric) Tire:
The United States version of a
metric tire sizing system. The
letter "P" as the first character in
the tire size means a passenger
vehicle tire engineered to
standards set by the U.S. Tire and
Rim Association.
(2) Tire Width
:The 3-digit
number indicates the tire section
width in millimeters from sidewall
to sidewall.
(3) Aspect Ratio
:A 2-digit
number that indicates the tire
height-to-width measurements.
For example, if the tire size aspect
ratio is 75, as shown in item (3) of the illustration, it would mean
that the tire's sidewall is
75 percent as high as it is wide.
(4) Construction Code
:A letter
code is used to indicate the type
of ply construction in the tire. The
letter "R" means radial ply
construction; the letter "D" means
diagonal or bias ply construction.
(5) Rim Diameter
:Diameter of
the wheel in inches.
(6) Service Description
:These
characters represent the load
index and speed rating of the tire.
The load index represents the load
carrying capacity a tire is certified
to carry. The speed rating is the
maximum speed a tire is certified
to carry a load.
Tire Terminology and
Definitions
Air Pressure:The amount of air
inside the tire pressing outward
on each square inch of the tire. Air pressure is expressed in kPa
(kilopascal) or psi (pounds per
square inch).
Accessory Weight
:The combined
weight of optional accessories.
Some examples of optional
accessories are automatic
transmission, power windows,
power seats, and air conditioning.
Aspect Ratio
:The relationship of
a tire's height to its width.
Belt
:A rubber coated layer of
cords between the plies and the
tread. Cords may be made from
steel or other reinforcing
materials.
Bead
:The tire bead contains steel
wires wrapped by steel cords that
hold the tire onto the rim.
Bias Ply Tire
:A pneumatic tire in
which the plies are laid at
alternate angles less than
90 degrees to the centerline of the
tread.
Page 359 of 431

Cadillac XT6 Owner Manual (GMNA-Localizing-U.S./Canada-14574701) -
2021 - CRC - 2/8/21
358 VEHICLE CARE
Warning (Continued)
dealer or an authorized tire service
center repair or replace the flat tire
as soon as possible.
{Warning
Lifting a vehicle and getting under
it to do maintenance or repairs is
dangerous without the appropriate
safety equipment and training. If a
jack is provided with the vehicle, it
is designed only for changing a flat
tire. If it is used for anything else,
you or others could be badly injured
or killed if the vehicle slips off the
jack. If a jack is provided with the
vehicle, only use it for changing a
flat tire.
If a tire goes flat, avoid further tire
and wheel damage by driving slowly
to a level place, well off the road,
if possible. Turn on the hazard
warning flashers. See Hazard Warning
Flashers 0142.
{Warning
Changing a tire can be dangerous.
The vehicle can slip off the jack and
roll over or fall causing injury or
death. Find a level place to change
the tire. To help prevent the vehicle
from moving:
1. Set the parking brake firmly.
2. Put an automatic transmission in P (Park) or a manual
transmission in 1 (First) or
R (Reverse).
3. Turn off the engine and do not restart while the vehicle is
raised.
4. Do not allow passengers to remain in the vehicle.
5. Place wheel blocks, if equipped, on both sides of the tire at the
opposite corner of the tire
being changed.
When the vehicle has a flat tire (2),
use the following example as a guide
to assist in the placement of the
wheel blocks (1), if equipped.
1. Wheel Block (If Equipped)
2. Flat Tire
The following information explains
how to repair or change a tire.
Tire Changing
Removing the Spare Tire and
Tools
To access the spare tire and tools: 1. Open the liftgate. See Liftgate020.
2. Lift the load floor.
Page 367 of 431

Cadillac XT6 Owner Manual (GMNA-Localizing-U.S./Canada-14574701) -
2021 - CRC - 2/8/21
366 VEHICLE CARE
The discharged battery positive (+)
terminal is under a cover. Remove the
cover to expose the terminal.1. Check the other vehicle. It must have a 12-volt battery with a
negative ground system.
Caution
If the other vehicle does not have a
12-volt system with a negative
ground, both vehicles can be
damaged. Only use a vehicle that
has a 12-volt system with a
negative ground for jump starting.
2. Position the two vehicles so that they are not touching.
3. Set the parking brake firmly and put the transmission in P (Park).
See Shifting Into Park 0237.
Caution
If any accessories are left on or
plugged in during the jump starting
procedure, they could be damaged.
The repairs would not be covered
by the vehicle warranty. Whenever
(Continued)
Caution (Continued)
possible, turn off or unplug all
accessories on either vehicle when
jump starting.
4. Turn the ignition off. Turn off all lights and accessories in both
vehicles, except the hazard warning
flashers if needed.
{Warning
An electric fan can start up even
when the engine is not running and
can injure you. Keep hands,
clothing, and tools away from any
underhood electric fan.
{Warning
Using a match near a battery can
cause battery gas to explode. People
have been hurt doing this, and
some have been blinded. Use a
flashlight if you need more light.
(Continued)
Warning (Continued)
Battery fluid contains acid that can
burn you. Do not get it on you.
If you accidentally get it in your
eyes or on your skin, flush the place
with water and get medical help
immediately.
{Warning
Fans or other moving engine parts
can injure you badly. Keep your
hands away from moving parts
once the engine is running.
5. Connect one end of the red positive (+) cable to the discharged
battery positive (+) terminal.
6. Connect the other end of the red positive (+) cable to the good
battery positive (+) terminal.
7. Connect one end of the black negative (–) cable to the good
battery negative (–) terminal.
8. Connect the other end of the black negative (–) cable to the discharged
negative (–) grounding point.
Page 368 of 431

Cadillac XT6 Owner Manual (GMNA-Localizing-U.S./Canada-14574701) -
2021 - CRC - 2/8/21
VEHICLE CARE 367
9. Start the engine in the vehicle withthe good battery and run the
engine at idle speed for at least
four minutes.
10. Try to start the vehicle that had the discharged battery. If it will not
start after a few tries, it probably
needs service.
Caution
If the jumper cables are connected
or removed in the wrong order,
electrical shorting may occur and
damage the vehicle. The repairs
would not be covered by the vehicle
warranty. Always connect and
remove the jumper cables in the
correct order, making sure that the
cables do not touch each other or
other metal.
Jumper Cable Removal
Reverse the sequence exactly when
removing the jumper cables.
After starting the disabled vehicle and
removing the jumper cables, allow it
to idle for several minutes.
Towing the Vehicle
Caution
Incorrectly towing a disabled
vehicle may cause damage. The
damage would not be covered by
the vehicle warranty. Do not lash or
hook to suspension components.
Use the proper straps around the
tires to secure the vehicle. Do not
drag a locked wheel/tire. Use tire
skates or dollies under any locked
wheel/tire while loading the vehicle.
Do not use a sling type lift to tow
the vehicle. This could damage the
vehicle.
Caution
Improper use of the tow eye can
damage the vehicle. If equipped, use
the tow eye to load a disabled
vehicle onto a flatbed tow truck
from a flat road surface, or to move
the vehicle a short distance. Use
caution and low speeds. The (Continued)
Caution (Continued)
transmission must be
in (N) Neutral when moving the
vehicle.
GM recommends a flatbed tow truck
to transport a disabled vehicle. Use
ramps to help reduce approach angles,
if necessary. A towed vehicle should
have its drive wheels off the ground.
Contact Roadside Service or a
professional towing service if the
disabled vehicle must be towed.
If the vehicle is equipped with a tow
eye, only use the tow eye to pull the
vehicle onto a flatbed car carrier from
a flat road surface. Do not use the tow
eye to pull the vehicle from snow,
mud, or sand.
Page 373 of 431
Cadillac XT6 Owner Manual (GMNA-Localizing-U.S./Canada-14574701) -
2021 - CRC - 2/8/21
372 VEHICLE CARE
.Use a nonabrasive wax on the
vehicle after washing to protect and
extend the molding finish.
Cleaning Exterior Lamps/Lenses,
Emblems, Decals, and Stripes
Use only lukewarm or cold water, a
soft cloth, and a car washing soap to
clean exterior lamps, lenses, emblems,
decals, and stripes. Follow instructions
under "Washing the Vehicle"
previously in this section.
Lamp covers are made of plastic, and
some have a UV protective coating. Do
not clean or wipe them when dry.
Do not use any of the following on
lamp covers:
.Abrasive or caustic agents.
.Washer fluids and other cleaning
agents in higher concentrations
than suggested by the manufacturer.
.Solvents, alcohols, fuels, or other
harsh cleaners.
.Ice scrapers or other hard items.
.Aftermarket appearance caps or
covers while the lamps are
illuminated, due to excessive heat
generated.
Caution
Failure to clean lamps properly can
cause damage to the lamp cover
that would not be covered by the
vehicle warranty.
Caution
Using wax on low gloss black finish
stripes can increase the gloss level
and create a non-uniform finish.
Clean low gloss stripes with soap
and water only.
Air Intakes
Clear debris from the air intakes,
between the hood and windshield,
when washing the vehicle.
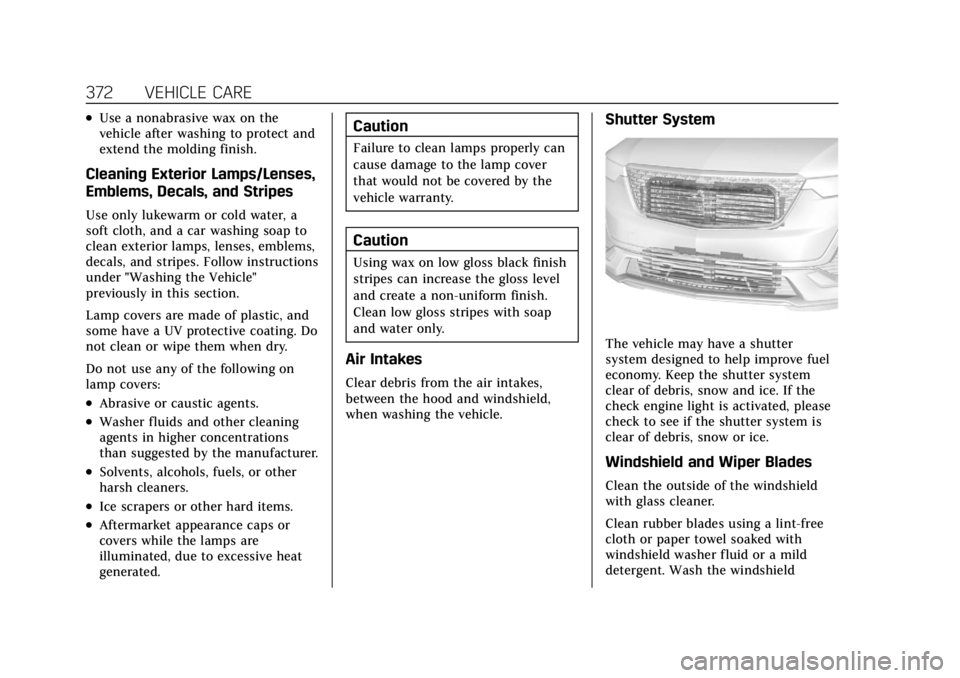
Shutter System
The vehicle may have a shutter
system designed to help improve fuel
economy. Keep the shutter system
clear of debris, snow and ice. If the
check engine light is activated, please
check to see if the shutter system is
clear of debris, snow or ice.
Windshield and Wiper Blades
Clean the outside of the windshield
with glass cleaner.
Clean rubber blades using a lint-free
cloth or paper towel soaked with
windshield washer fluid or a mild
detergent. Wash the windshield
Page 381 of 431
Cadillac XT6 Owner Manual (GMNA-Localizing-U.S./Canada-14574701) -
2021 - CRC - 2/8/21
380 SERVICE AND MAINTENANCE
keep the vehicle in good working
condition, improves fuel economy, and
reduces vehicle emissions.
Because of the way people use
vehicles, maintenance needs vary.
There may need to be more frequent
checks and services. The Additional
Required Services - Normal are for
vehicles that:
.Carry passengers and cargo within
recommended limits on the Tire
and Loading Information label. See
Vehicle Load Limits0228.
.Are driven on reasonable road
surfaces within legal driving limits.
.Use the recommended fuel. See
Recommended Fuel (3.6L V6 Engine)
0286 or
Recommended Fuel (2.0L L4 Turbo
Engine) 0286.
Refer to the information in the
Maintenance Schedule Additional
Required Services - Normal chart. The Additional Required Services -
Severe are for vehicles that are:
.Mainly driven in heavy city traffic
in hot weather.
.Mainly driven in hilly or
mountainous terrain.
.Frequently towing a trailer.
.Used for high speed or competitive
driving.
.Used for taxi, police, or delivery
service.
Refer to the information in the
Maintenance Schedule Additional
Required Services - Severe chart.
{Warning
Performing maintenance work can
be dangerous and can cause serious
injury. Perform maintenance work
only if the required information,
proper tools, and equipment are
available. If they are not, see your
dealer to have a trained technician
do the work. See Doing Your Own
Service Work 0305.
Maintenance Schedule
Owner Checks and Services
Check the engine oil level. See Engine
Oil 0311.
Once a Month
.Check the tire inflation pressures.
See Tire Pressure 0343.
.Inspect the tires for wear. See Tire
Inspection 0350.
.Check the windshield washer fluid
level. See Washer Fluid 0321.
Engine Oil Change
When the CHANGE ENGINE OIL
SOON message displays, have the
engine oil and filter changed within
the next 1 000 km (600 mi). If driven
under the best conditions, the engine
oil life system may not indicate the
need for vehicle service for up to a
year. The engine oil and filter must be
changed at least once a year and the
oil life system must be reset. Your
trained dealer technician can perform
Page 382 of 431
Cadillac XT6 Owner Manual (GMNA-Localizing-U.S./Canada-14574701) -
2021 - CRC - 2/8/21
SERVICE AND MAINTENANCE 381
this work. If the engine oil life system
is reset accidentally, service the
vehicle within 5 000 km (3,000 mi)
since the last service. Reset the oil life
system when the oil is changed. See
Engine Oil Life System0313.
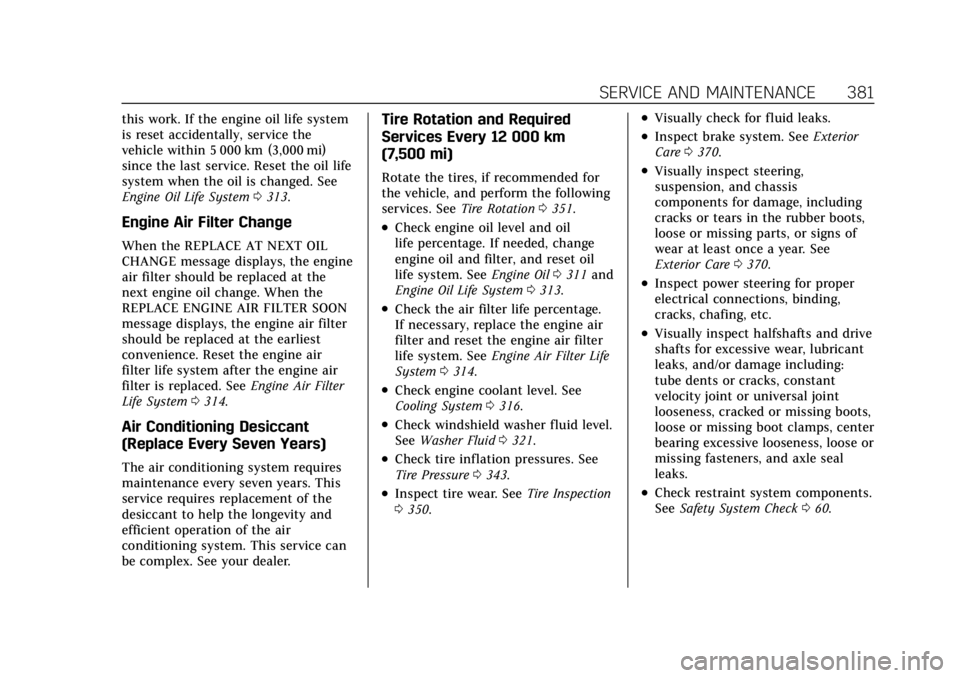
Engine Air Filter Change
When the REPLACE AT NEXT OIL
CHANGE message displays, the engine
air filter should be replaced at the
next engine oil change. When the
REPLACE ENGINE AIR FILTER SOON
message displays, the engine air filter
should be replaced at the earliest
convenience. Reset the engine air
filter life system after the engine air
filter is replaced. See Engine Air Filter
Life System 0314.
Air Conditioning Desiccant
(Replace Every Seven Years)
The air conditioning system requires
maintenance every seven years. This
service requires replacement of the
desiccant to help the longevity and
efficient operation of the air
conditioning system. This service can
be complex. See your dealer.
Tire Rotation and Required
Services Every 12 000 km
(7,500 mi)
Rotate the tires, if recommended for
the vehicle, and perform the following
services. See Tire Rotation0351.
.Check engine oil level and oil
life percentage. If needed, change
engine oil and filter, and reset oil
life system. See Engine Oil0311 and
Engine Oil Life System 0313.
.Check the air filter life percentage.
If necessary, replace the engine air
filter and reset the engine air filter
life system. See Engine Air Filter Life
System 0314.
.Check engine coolant level. See
Cooling System 0316.
.Check windshield washer fluid level.
See Washer Fluid 0321.
.Check tire inflation pressures. See
Tire Pressure 0343.
.Inspect tire wear. See Tire Inspection
0 350.
.Visually check for fluid leaks.
.Inspect brake system. See Exterior
Care 0370.
.Visually inspect steering,
suspension, and chassis
components for damage, including
cracks or tears in the rubber boots,
loose or missing parts, or signs of
wear at least once a year. See
Exterior Care 0370.
.Inspect power steering for proper
electrical connections, binding,
cracks, chafing, etc.
.Visually inspect halfshafts and drive
shafts for excessive wear, lubricant
leaks, and/or damage including:
tube dents or cracks, constant
velocity joint or universal joint
looseness, cracked or missing boots,
loose or missing boot clamps, center
bearing excessive looseness, loose or
missing fasteners, and axle seal
leaks.
.Check restraint system components.
See Safety System Check 060.
Page 384 of 431
Cadillac XT6 Owner Manual (GMNA-Localizing-U.S./Canada-14574701) -
2021 - CRC - 2/8/21
SERVICE AND MAINTENANCE 383
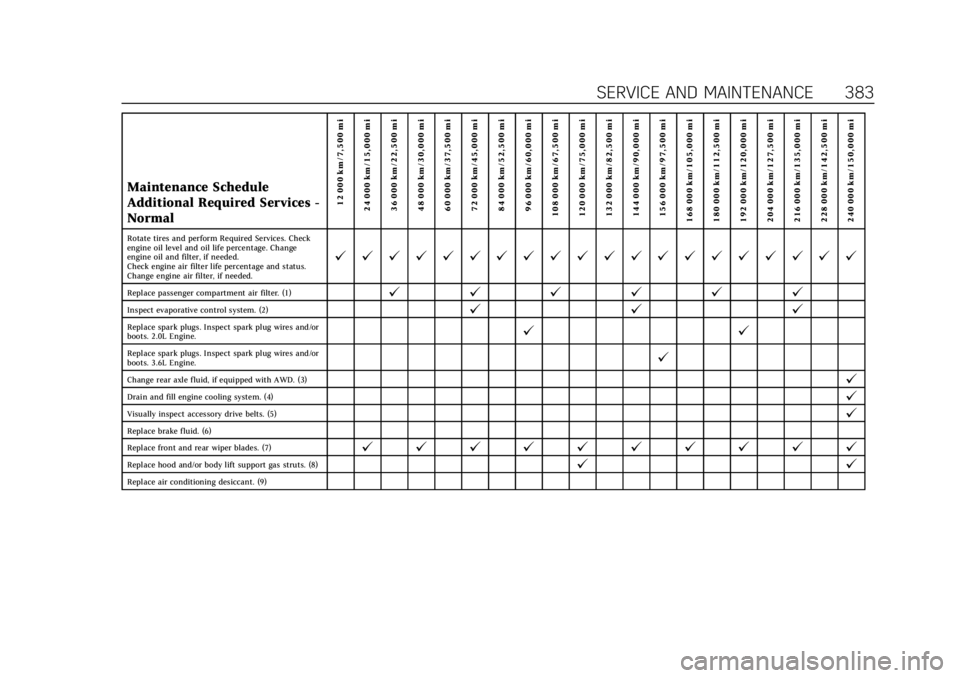
Maintenance Schedule
Additional Required Services -
Normal12 000 km/7,500 mi
24 000 km/15,000 mi
36 000 km/22,500 mi
48 000 km/30,000 mi
60 000 km/37,500 mi
72 000 km/45,000 mi
84 000 km/52,500 mi
96 000 km/60,000 mi
108 000 km/67,500 mi
120 000 km/75,000 mi
132 000 km/82,500 mi
144 000 km/90,000 mi
156 000 km/97,500 mi
168 000 km/105,000 mi
180 000 km/112,500 mi
192 000 km/120,000 mi
204 000 km/127,500 mi
216 000 km/135,000 mi
228 000 km/142,500 mi
240 000 km/150,000 mi
Rotate tires and perform Required Services. Check
engine oil level and oil life percentage. Change
engine oil and filter, if needed.
Check engine air filter life percentage and status.
Change engine air filter, if needed.
@ @ @ @ @ @ @ @ @ @ @ @ @ @ @ @ @ @ @ @
Replace passenger compartment air filter. (1)@ @@@@@
Inspect evaporative control system. (2)@ @@
Replace spark plugs. Inspect spark plug wires and/or
boots. 2.0L Engine.@ @
Replace spark plugs. Inspect spark plug wires and/or
boots. 3.6L Engine.@
Change rear axle fluid, if equipped with AWD. (3)@
Drain and fill engine cooling system. (4)@
Visually inspect accessory drive belts. (5)@
Replace brake fluid. (6)
Replace front and rear wiper blades. (7)
@ @ @ @ @ @ @ @ @ @
Replace hood and/or body lift support gas struts. (8)@ @
Replace air conditioning desiccant. (9)