transmission oil CADILLAC XTS 2014 Owner's Manual
[x] Cancel search | Manufacturer: CADILLAC, Model Year: 2014, Model line: XTS, Model: CADILLAC XTS 2014Pages: 412, PDF Size: 4.65 MB
Page 7 of 412
Black plate (1,1)Cadillac XTS Owner Manual (GMNA-Localizing-U.S./Canada-6006999) -
2014 - CRC - 9/11/13
In Brief 1-1
In Brief
Instrument Panel
Instrument Panel Overview . . . . 1-2
Initial Drive Information
Initial Drive Information . . . . . . . . 1-4
Remote Keyless Entry (RKE)System . . . . . . . . . . . . . . . . . . . . . . 1-4
Remote Vehicle Start . . . . . . . . . 1-4
Door Locks . . . . . . . . . . . . . . . . . . . 1-5
Trunk . . . . . . . . . . . . . . . . . . . . . . . . . 1-5
Windows . . . . . . . . . . . . . . . . . . . . . . 1-6
Seat Adjustment . . . . . . . . . . . . . . 1-6
Memory Features . . . . . . . . . . . . . 1-7
Second Row Seats . . . . . . . . . . . 1-7
Heated and Ventilated Seats . . . . . . . . . . . . . . . . . . . . . . . . 1-8
Head Restraint Adjustment . . . . 1-8
Safety Belts . . . . . . . . . . . . . . . . . . . 1-8
Passenger Sensing System . . . 1-9 Mirror Adjustment . . . . . . . . . . . . . 1-9
Steering Wheel
Adjustment . . . . . . . . . . . . . . . . . 1-10
Interior Lighting . . . . . . . . . . . . . . 1-10
Exterior Lighting . . . . . . . . . . . . . 1-11
Windshield Wiper/Washer . . . . 1-11
Climate Controls . . . . . . . . . . . . . 1-12
Transmission . . . . . . . . . . . . . . . . 1-13
Vehicle Features
Steering Wheel Controls . . . . . 1-14
Cruise Control . . . . . . . . . . . . . . . 1-15
Infotainment System . . . . . . . . . 1-15
Driver Information Center (DIC) . . . . . . . . . . . . . . . 1-15
Forward Collision Alert (FCA) System . . . . . . . . . . . . . . . . . . . . . 1-16
Lane Departure Warning (LDW) . . . . . . . . . . . . . 1-16
Side Blind Zone Alert (SBZA) . . . . . . . . . . . . . . . 1-16 Rear Vision
Camera (RVC) . . . . . . . . . . . . . 1-16
Ultrasonic Parking Assist . . . . 1-16
Automatic Parking Assist (APA) . . . . . . . . . . . . . . . . 1-17
Active Emergency Braking System . . . . . . . . . . . . . . . . . . . . . 1-17
Power Outlets . . . . . . . . . . . . . . . 1-17
Universal Remote System . . . 1-17
Sunroof . . . . . . . . . . . . . . . . . . . . . . 1-18Performance and Maintenance
Traction Control/Electronic Stability Control . . . . . . . . . . . . 1-19
Tire Pressure Monitor . . . . . . . . 1-19
Engine Oil Life System . . . . . . 1-20
Driving for Better Fuel Economy . . . . . . . . . . . . . . . . . . . 1-20
Roadside Service . . . . . . . . . . . . 1-21
OnStar
®. . . . . . . . . . . . . . . . . . . . . 1-21
Page 208 of 412

Black plate (18,1)Cadillac XTS Owner Manual (GMNA-Localizing-U.S./Canada-6006999) -
2014 - CRC - 9/11/13
9-18 Driving and Operating
Starting Procedure
1. With the keyless access system,the transmitter must be in the
vehicle. Put your foot on the
brake pedal and push the
ENGINE START/STOP button.
When the engine begins
cranking, let go of the button.
The idle speed will go down as
the engine gets warm. Do not
race the engine immediately
after starting it. Operate the
engine and transmission gently
to allow the oil to warm up and
lubricate all moving parts.
If the transmitter is not in the
vehicle or something is
interfering with the transmitter,
the Driver Information Center
(DIC) will display a message.
See Key and Lock Messages on
page 5-40. If the battery in the Remote
Keyless Entry (RKE) transmitter
needs replacing, the DIC will
display a message. The vehicle
can still be driven. See
“Starting
the Vehicle with a Low
Transmitter Battery” inRemote
Keyless Entry (RKE) System
Operation on page 2-3.
The vehicle has a
Computer-Controlled Cranking
System. This feature assists in
starting the engine and protects
components. If the ENGINE
START/STOP button is pressed,
and then released when the
engine begins cranking, the
engine will continue cranking for
a few seconds or until the
vehicle starts. If the engine does
not start and the button is
pressed for many seconds,
cranking will be stopped after
15 seconds to prevent cranking
motor damage. To prevent gear
damage, this system also
prevents cranking if the
engine is already running. Engine cranking can be stopped
by pressing the ENGINE
START/STOP button a
second time.
{Caution
Cranking the engine for long
periods of time, by pressing the
ENGINE START/STOP button
immediately after cranking has
ended, can overheat and damage
the cranking motor, and drain the
battery. Wait at least 15 seconds
between each try, to let the
cranking motor cool down.
2. If the engine does not start after five to 10 seconds, especially in
very cold weather (below −18°C
or 0°F), it could be flooded with
too much gasoline. Try pushing
the accelerator pedal all the way
to the floor and holding it there
as you press the ENGINE
START/STOP button, for up
to a maximum of 15 seconds.
Page 209 of 412
Black plate (19,1)Cadillac XTS Owner Manual (GMNA-Localizing-U.S./Canada-6006999) -
2014 - CRC - 9/11/13
Driving and Operating 9-19
Wait at least 15 seconds
between each try, to allow the
cranking motor to cool down.
When the engine starts, let go of
the button and the accelerator.
If the vehicle starts briefly but
then stops again, do the same
thing. This clears the extra
gasoline from the engine. Do not
race the engine immediately
after starting it. Operate the
engine and transmission gently
until the oil warms up and
lubricates all moving parts.
Engine Heater
The engine coolant heater,
if available, can help in cold weather
conditions at or below−18°C (0°F)
for easier starting and better fuel
economy during engine warm-up.
Plug in the coolant heater at least
four hours before starting the
vehicle. An internal thermostat in
the plug end of the cord will prevent
engine coolant heater operation at
temperatures above −18°C (0°F).
To Use the Engine Coolant
Heater
1. Turn off the engine.
2. Open the hood and unwrap the
electrical cord.
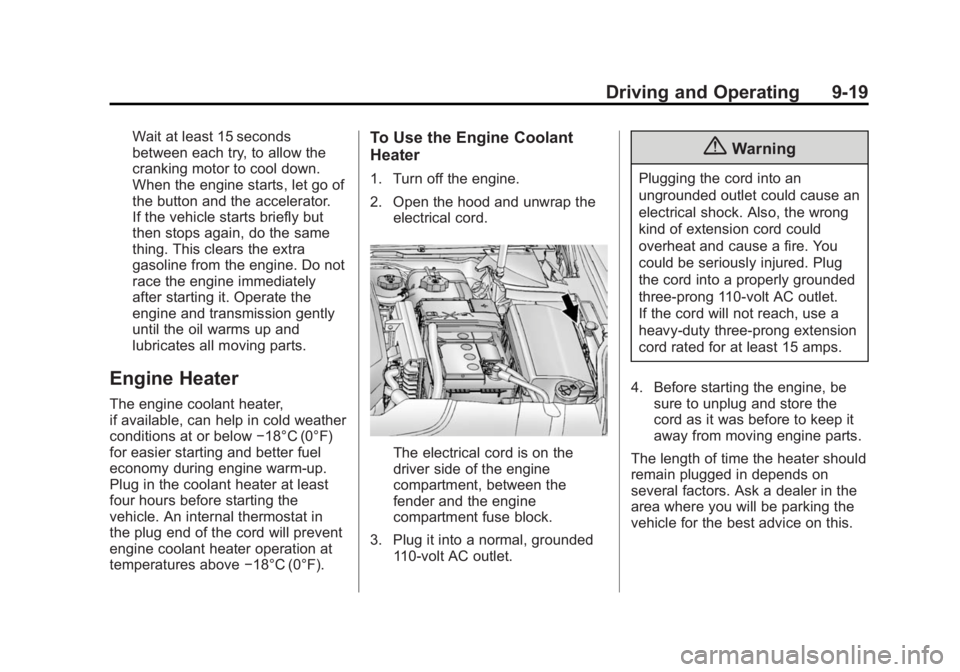
The electrical cord is on the
driver side of the engine
compartment, between the
fender and the engine
compartment fuse block.
3. Plug it into a normal, grounded 110-volt AC outlet.
{Warning
Plugging the cord into an
ungrounded outlet could cause an
electrical shock. Also, the wrong
kind of extension cord could
overheat and cause a fire. You
could be seriously injured. Plug
the cord into a properly grounded
three-prong 110-volt AC outlet.
If the cord will not reach, use a
heavy-duty three-prong extension
cord rated for at least 15 amps.
4. Before starting the engine, be sure to unplug and store the
cord as it was before to keep it
away from moving engine parts.
The length of time the heater should
remain plugged in depends on
several factors. Ask a dealer in the
area where you will be parking the
vehicle for the best advice on this.
Page 254 of 412
Black plate (64,1)Cadillac XTS Owner Manual (GMNA-Localizing-U.S./Canada-6006999) -
2014 - CRC - 9/11/13
9-64 Driving and Operating
Passing
More passing distance is needed
when towing a trailer. The
combination will not accelerate as
quickly and is longer so it is
necessary to go much farther
beyond the passed vehicle before
returning to the lane.
Backing Up
Hold the bottom of the steering
wheel with one hand. To move the
trailer to the left, move that hand to
the left. To move the trailer to the
right, move your hand to the right.
Always back up slowly and,
if possible, have someone
guide you.
Making Turns
{Caution
Making very sharp turns while
trailering could cause the trailer to
come in contact with the vehicle.(Continued)
Caution (Continued)
The vehicle could be damaged.
Avoid making very sharp turns
while trailering.
When turning with a trailer, make
wider turns than normal. Do this so
the trailer will not strike soft
shoulders, curbs, road signs, trees,
or other objects. Avoid jerky or
sudden maneuvers. Signal well in
advance.
If the trailer turn signal bulbs burn
out, the arrows on the instrument
cluster will still flash for turns. It is
important to check occasionally to
be sure the trailer bulbs are still
working.
Driving on Grades
Reduce speed and shift to a lower
gear before starting down a long
or steep downgrade. If the
transmission is not shifted down, the
brakes might get hot and no longer
work well. Vehicles can tow in D (Drive). Shift
the transmission to a lower gear if
the transmission shifts too often
under heavy loads and/or hilly
conditions.
When towing at high altitude on
steep uphill grades, consider the
following: Engine coolant will boil at
a lower temperature than at normal
altitudes. If the engine is turned off
immediately after towing at high
altitude on steep uphill grades, the
vehicle may show signs similar to
engine overheating. To avoid this,
let the engine run while parked,
preferably on level ground, with the
automatic transmission in P (Park)
for a few minutes before turning the
engine off. If the overheat warning
comes on, see
Engine Overheating
on page 10-19.
Page 255 of 412
Black plate (65,1)Cadillac XTS Owner Manual (GMNA-Localizing-U.S./Canada-6006999) -
2014 - CRC - 9/11/13
Driving and Operating 9-65
Parking on Hills
{Warning
Parking the vehicle on a hill with
the trailer attached can be
dangerous. If something goes
wrong, the rig could start to move.
People can be injured, and both
the vehicle and the trailer can be
damaged. When possible, always
park the rig on a flat surface.
If parking the rig on a hill:
1. Press the brake pedal, but do not shift into P (Park) yet. Turn
the wheels into the curb if facing
downhill or into traffic if facing
uphill.
2. Have someone place chocks under the trailer wheels.
3. When the wheel chocks are in place, release the regular brakes
until the chocks absorb the load. 4. Reapply the brake pedal. Then
apply the parking brake and shift
into P (Park).
5. Release the brake pedal.Leaving After Parking on a Hill
1. Apply and hold the brake pedal.
2. Start the engine.
3. Shift into a gear.
4. Release the parking brake.
5. Let up on the brake pedal.
6. Drive slowly until the trailer is clear of the chocks.
7. Stop and have someone pick up and store the chocks.
Maintenance when Trailer
Towing
The vehicle needs service more
often when pulling a trailer. See
Maintenance Schedule on
page 11-4. Things that are
especially important in trailer operation are automatic
transmission fluid, engine oil, axle
lubricant, belts, cooling system, and
brake system. It is a good idea to
inspect these before and during
the trip.
Check periodically to see that all
hitch nuts and bolts are tight.
Trailer Towing
Before pulling a trailer, three
important considerations have to do
with weight:
.Weight of the trailer.
.Weight of the trailer tongue.
.Total weight on your vehicle's
tires.
Weight of the Trailer
How heavy can a trailer safely be?
It should never weigh more than
454 kg (1,000 lb). But even that can
be too heavy.
Page 259 of 412
Black plate (1,1)Cadillac XTS Owner Manual (GMNA-Localizing-U.S./Canada-6006999) -
2014 - CRC - 9/11/13
Vehicle Care 10-1
Vehicle Care
General Information
General Information . . . . . . . . . . 10-2
California Proposition65 Warning . . . . . . . . . . . . . . . . . 10-2
California Perchlorate Materials Requirements . . . . 10-3
Accessories and Modifications . . . . . . . . . . . . . . . 10-3
Vehicle Checks
Doing Your OwnService Work . . . . . . . . . . . . . . . 10-3
Hood . . . . . . . . . . . . . . . . . . . . . . . . 10-4
Engine Compartment Overview . . . . . . . . . . . . . . . . . . . 10-5
Engine Cover . . . . . . . . . . . . . . . . 10-8
Engine Oil . . . . . . . . . . . . . . . . . . . 10-9
Engine Oil Life System . . . . . 10-11
Automatic Transmission Fluid . . . . . . . . . . . . . . . . . . . . . . 10-13
Engine Air Cleaner/Filter . . . . 10-13
Cooling System . . . . . . . . . . . . 10-15
Engine Coolant . . . . . . . . . . . . . 10-16
Engine Overheating . . . . . . . . 10-19 Overheated Engine
Protection
Operating Mode . . . . . . . . . . . 10-20
Power Steering Fluid (LF3 and LFX
with AWD) . . . . . . . . . . . . . . . . 10-21
Power Steering Fluid (LFX with FWD) . . . . . . . . . . . . . . . . 10-21
Washer Fluid . . . . . . . . . . . . . . . 10-22
Brakes . . . . . . . . . . . . . . . . . . . . . 10-22
Brake Fluid . . . . . . . . . . . . . . . . . 10-23
Battery . . . . . . . . . . . . . . . . . . . . . 10-25
All-Wheel Drive . . . . . . . . . . . . . 10-25
Starter Switch Check . . . . . . . 10-25
Automatic Transmission Shift Lock Control Function
Check . . . . . . . . . . . . . . . . . . . . . 10-26
Park Brake and P (Park) Mechanism Check . . . . . . . . 10-26
Wiper Blade Replacement . . . . . . . . . . . . . . 10-27
Windshield Replacement . . . 10-27
Headlamp Aiming
Headlamp Aiming . . . . . . . . . . 10-28
Bulb Replacement
Bulb Replacement . . . . . . . . . . 10-28
High Intensity Discharge (HID) Lighting . . . . . . . . . . . . . 10-28
LED Lighting . . . . . . . . . . . . . . . 10-28
Back-Up Lamps . . . . . . . . . . . . 10-28
License Plate Lamp . . . . . . . . 10-29
Replacement Bulbs . . . . . . . . . 10-29
Electrical System
Electrical System Overload . . . . . . . . . . . . . . . . . . 10-30
Fuses and Circuit Breakers . . . . . . . . . . . . . . . . . . 10-30
Engine Compartment Fuse Block . . . . . . . . . . . . . . . . . . . . . 10-31
Instrument Panel Fuse Block . . . . . . . . . . . . . . . . . . . . . 10-34
Rear Compartment Fuse Block . . . . . . . . . . . . . . . . . . . . . 10-36
Wheels and Tires
Tires . . . . . . . . . . . . . . . . . . . . . . . . 10-38
All-Season Tires . . . . . . . . . . . . 10-39
Winter Tires . . . . . . . . . . . . . . . . 10-39
Summer Tires . . . . . . . . . . . . . . 10-39
Tire Sidewall Labeling . . . . . . 10-40
Tire Designations . . . . . . . . . . . 10-42
Page 271 of 412
Black plate (13,1)Cadillac XTS Owner Manual (GMNA-Localizing-U.S./Canada-6006999) -
2014 - CRC - 9/11/13
Vehicle Care 10-13
Automatic Transmission
Fluid
A transmission fluid leak is the only
reason for fluid loss. If a leak
occurs, take the vehicle to the
dealer and have it repaired as soon
as possible.
See your dealer to have the fluid
and filter changed at the intervals
listed in theMaintenance Schedule
on page 11-4.
Engine Air Cleaner/Filter
The engine air cleaner/filter is in the
engine compartment on the
passenger side of the vehicle. See
Engine Compartment Overview on
page 10-5.
When to Inspect the Engine Air
Cleaner/Filter
Inspect the air cleaner/filter at the
scheduled maintenance intervals.
See Maintenance Schedule on
page 11-4. If you are driving in
dusty/dirty conditions, inspect the
filter at each engine oil change.
How to Inspect the Engine Air
Cleaner/Filter
To inspect the air cleaner/filter,
remove the filter from the vehicle
and lightly shake it to release loose
dust and dirt. If the filter remains
covered with dirt, a new filter is
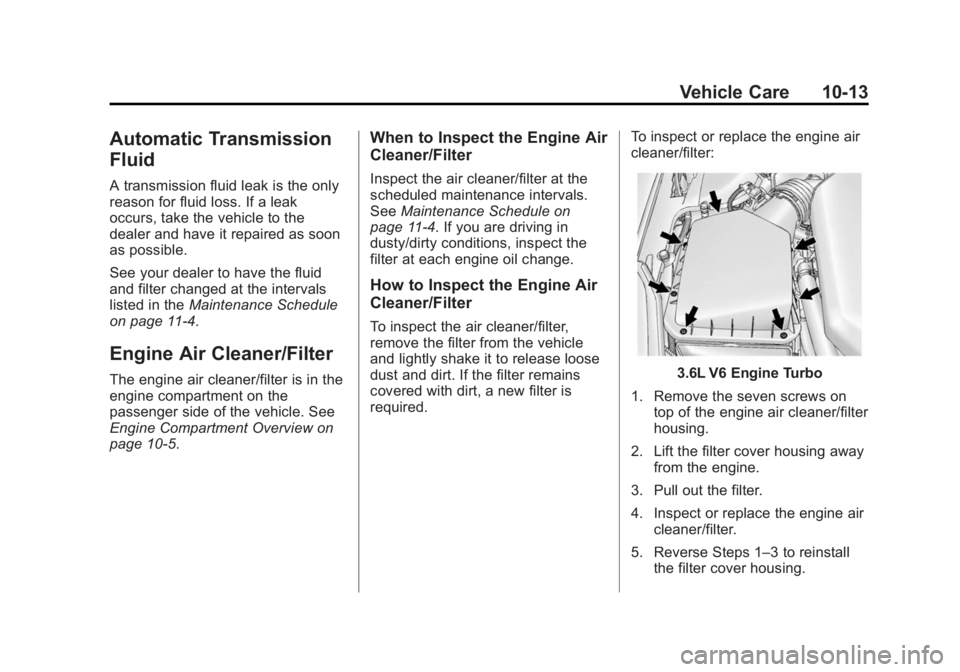
required. To inspect or replace the engine air
cleaner/filter:
3.6L V6 Engine Turbo
1. Remove the seven screws on top of the engine air cleaner/filter
housing.
2. Lift the filter cover housing away from the engine.
3. Pull out the filter.
4. Inspect or replace the engine air cleaner/filter.
5. Reverse Steps 1–3 to reinstall the filter cover housing.
Page 290 of 412
Black plate (32,1)Cadillac XTS Owner Manual (GMNA-Localizing-U.S./Canada-6006999) -
2014 - CRC - 9/11/13
10-32 Vehicle Care
J-CaseFuses Usage
25 Retained Accessory Power
26 Antilock Brake System Pump
27 Electric Parking Brake
28 Rear Window Defogger
41 Brake Vacuum Assist Pump
42 Cooling Fan K2
44 Headlamp Washer
45 Cooling Fan K1
Mini Fuses Usage 1 Transmission Control Module –
Battery
2 Engine Control Module Battery Mini Fuses Usage
3 Air Conditioning Compressor Clutch
4 SAI Solenoid
5 Engine Control Module Run/Crank
8 Ignition Coils –Even
(Six Cylinder
Engine)
9 Ignition Coils –Odd
(Six Cylinder
Engine)
10 Engine Control Module–Switched
Battery (from Engine
Control Module
Relay)
11 Six Cylinder Engine: Post Catalytic
Converter Oxygen
Sensor Heater,
Mass Air Flow
Sensor, Flex Fuel
Sensor Mini Fuses Usage
13 Run/Crank for Transmission
Control Module and
Fuel System Control
Module
14 Right Rear Heated Seat
15 Left Rear Heated Seat
16 Ventilated Seats Run/Crank
17 Body Run/Crank
18 Autonet Run/Crank (Aftermarket)
20 Heated Steering Wheel
23 Variable Effort Steering
29 Passive Entry/ Passive Start
Module–Battery
Page 301 of 412
Black plate (43,1)Cadillac XTS Owner Manual (GMNA-Localizing-U.S./Canada-6006999) -
2014 - CRC - 9/11/13
Vehicle Care 10-43
(4) Construction Code:A letter
code is used to indicate the type
of ply construction in the tire.
The letter R means radial ply
construction; the letter D means
diagonal or bias ply
construction; and the letter B
means belted-bias ply
construction.
(5) Rim Diameter
:Diameter of
the wheel in inches.
(6) Service Description
:These
characters represent the load
index and speed rating of the
tire. The load index represents
the load carrying capacity a tire
is certified to carry. The speed
rating is the maximum speed a
tire is certified to carry a load.
Tire Terminology and
Definitions
Air Pressure:The amount of
air inside the tire pressing
outward on each square inch of
the tire. Air pressure is
expressed in kPa (kilopascal)
or psi (pounds per square inch).
Accessory Weight
:The
combined weight of optional
accessories. Some examples of
optional accessories are
automatic transmission, power
windows, power seats, and air
conditioning.
Aspect Ratio
:The relationship
of a tire's height to its width.
Belt
:A rubber coated layer of
cords between the plies and the
tread. Cords may be made from
steel or other reinforcing
materials. Bead
:The tire bead contains
steel wires wrapped by steel
cords that hold the tire onto
the rim.
Bias Ply Tire
:A pneumatic tire
in which the plies are laid at
alternate angles less than
90 degrees to the centerline of
the tread.
Cold Tire Pressure
:The
amount of air pressure in a tire,
measured in kPa (kilopascal)
or psi (pounds per square inch)
before a tire has built up heat
from driving. See Tire Pressure
on page 10-46.
Curb Weight
:The weight of a
motor vehicle with standard and
optional equipment including the
maximum capacity of fuel, oil,
and coolant, but without
passengers and cargo.
Page 356 of 412
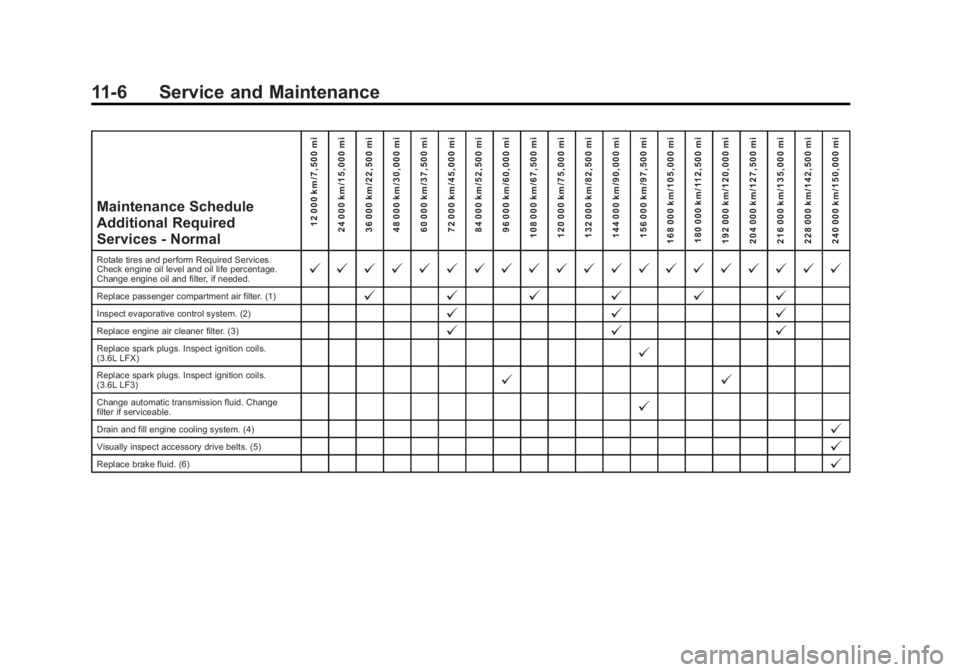
Black plate (6,1)Cadillac XTS Owner Manual (GMNA-Localizing-U.S./Canada-6006999) -
2014 - CRC - 9/11/13
11-6 Service and Maintenance
Maintenance Schedule
Additional Required
Services - Normal12 000 km/7,500 mi
24 000 km/15,000 mi
36 000 km/22,500 mi
48 000 km/30,000 mi
60 000 km/37,500 mi
72 000 km/45,000 mi
84 000 km/52,500 mi
96 000 km/60,000 mi
108 000 km/67,500 mi
120 000 km/75,000 mi
132 000 km/82,500 mi
144 000 km/90,000 mi
156 000 km/97,500 mi
168 000 km/105,000 mi 180 000 km/112,500 mi
192 000 km/120,000 mi
204 000 km/127,500 mi
216 000 km/135,000 mi
228 000 km/142,500 mi
240 000 km/150,000 mi
Rotate tires and perform Required Services.
Check engine oil level and oil life percentage.
Change engine oil and filter, if needed.@ @ @ @ @ @ @ @ @ @ @ @ @ @ @ @ @ @ @ @
Replace passenger compartment air filter. (1)@ @@@@@
Inspect evaporative control system. (2)@ @@
Replace engine air cleaner filter. (3)@@@
Replace spark plugs. Inspect ignition coils.
(3.6L LFX)@
Replace spark plugs. Inspect ignition coils.
(3.6L LF3)@ @
Change automatic transmission fluid. Change
filter if serviceable.@
Drain and fill engine cooling system. (4)@
Visually inspect accessory drive belts. (5)@
Replace brake fluid. (6)@