CADILLAC XTS 2016 1.G Owners Manual
Manufacturer: CADILLAC, Model Year: 2016, Model line: XTS, Model: CADILLAC XTS 2016 1.GPages: 320, PDF Size: 2.07 MB
Page 251 of 320
Cadillac XTS Owner Manual (GMNA-Localizing-MidEast-9369806) - 2016 -
crc - 6/24/15
250 Vehicle Care
Warning (Continued)
roll. Be ready to apply the regular
brake at once should the vehicle
begin to move.
Park on a fairly steep hill, with the
vehicle facing downhill. Keeping
your foot on the regular brake, set
the parking brake.
. To check the parking brake's
holding ability: With the engine
running and the transmission in
N (Neutral), slowly remove foot
pressure from the regular brake
pedal. Do this until the vehicle is
held by the parking brake only.
. To check the P (Park)
mechanism's holding ability:
With the engine running, shift to
P (Park). Then release the
parking brake followed by the
regular brake.
Contact your dealer if service is
required.
Wiper Blade Replacement
Windshield wiper blades should be
inspected for wear or cracking.
It is a good idea to clean the wiper
blade assembly on a regular basis.
When worn, or when cleaning is
ineffective, replace the wiper blade.
For proper windshield wiper blade
length and type, see Maintenance
Replacement Parts 0302.
Caution
Allowing the wiper arm to touch
the windshield when no wiper
blade is installed could damage
the windshield. Any damage that
occurs would not be covered by
the vehicle warranty. Do not allow
the wiper arm to touch the
windshield.
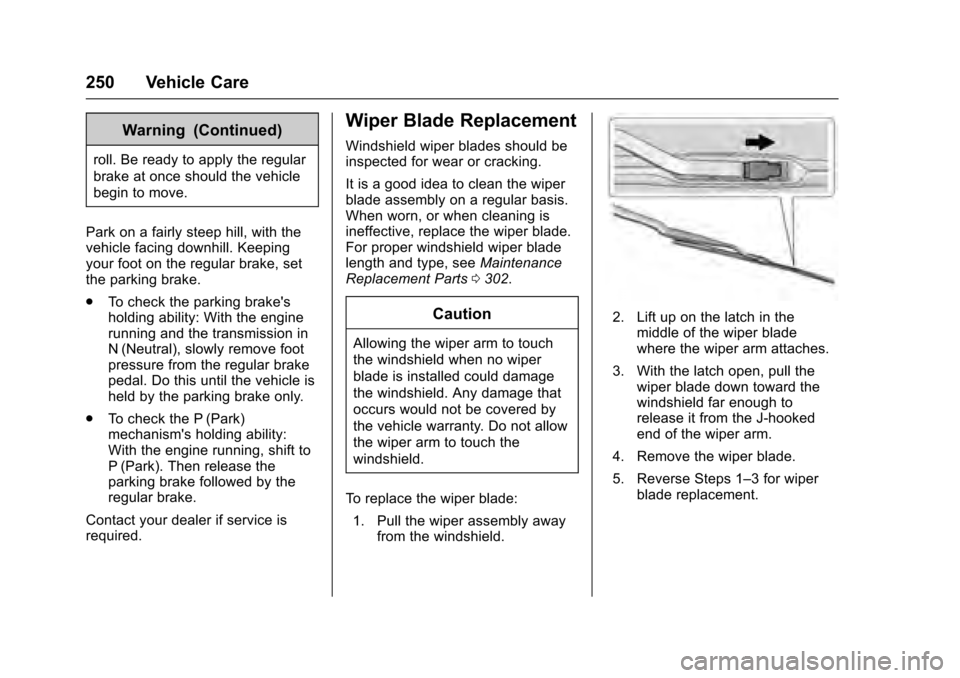
To replace the wiper blade: 1. Pull the wiper assembly away from the windshield.
2. Lift up on the latch in the
middle of the wiper blade
where the wiper arm attaches.
3. With the latch open, pull the wiper blade down toward the
windshield far enough to
release it from the J-hooked
end of the wiper arm.
4. Remove the wiper blade.
5. Reverse Steps 1–3 for wiper blade replacement.
Page 252 of 320
Cadillac XTS Owner Manual (GMNA-Localizing-MidEast-9369806) - 2016 -
crc - 6/24/15
Vehicle Care 251
Windshield Replacement
HUD System
The windshield is part of the HUD
system. If the windshield must be
replaced, get one that is designed
for HUD or the HUD image may
look out of focus.
Driver Assistance Systems
When a windshield replacement is
needed and the vehicle is equipped
with a front-looking camera sensor
for the Driver Assistance Systems,
the windshield must be installed
according to GM specifications for
these systems to work properly. If it
is not, there may be unexpected
behavior and/or messages from
these systems. SeeObject
Detection System Messages 0139.
Headlamp Aiming
Headlamp aim has been preset and
should need no further adjustment.
If the vehicle is damaged in a crash,
the headlamp aim may be affected.
If adjustment to the headlamps is
necessary, see your dealer.
Bulb Replacement
For the proper type of replacement
bulbs, see Replacement Bulbs
0 253.
For any bulb-changing procedure
not listed in this section, contact
your dealer.
High Intensity Discharge
(HID) Lighting
{Warning
The high intensity discharge
lighting system operates at a very
high voltage. If you try to service
any of the system components,
you could be seriously injured.
Have your dealer or a qualified
technician service them.
After an HID headlamp bulb has
been replaced, the beam might be a
slightly different shade than it was
originally. This is normal.
Page 253 of 320
Cadillac XTS Owner Manual (GMNA-Localizing-MidEast-9369806) - 2016 -
crc - 6/24/15
252 Vehicle Care
LED Lighting
This vehicle has several LED lamps.
For replacement of any LED lighting
assembly, contact your dealer.
Back-Up Lamps
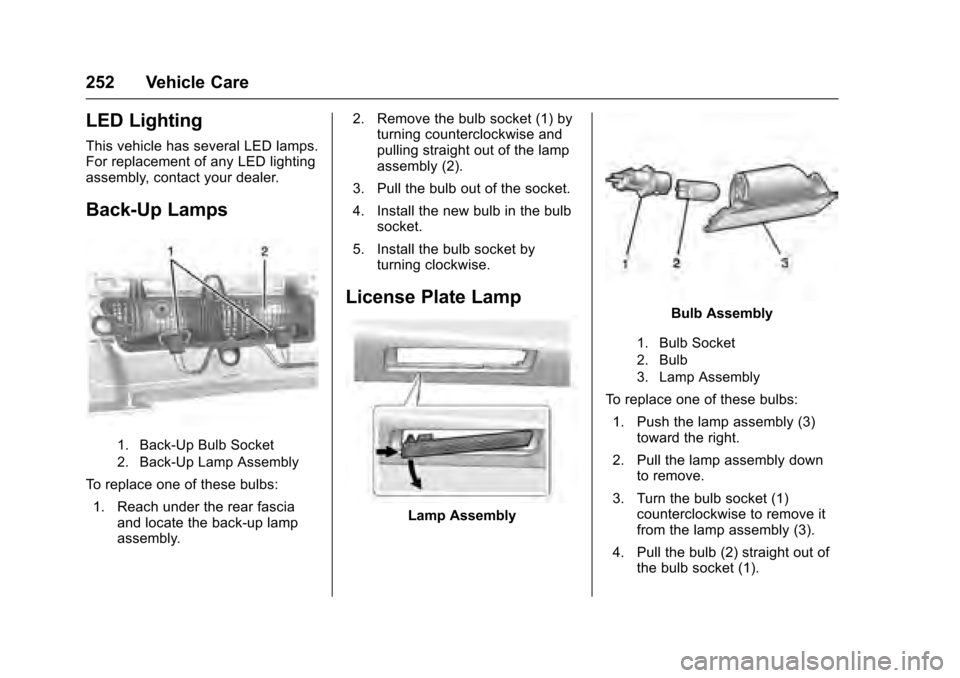
1. Back-Up Bulb Socket
2. Back-Up Lamp Assembly
To replace one of these bulbs:1. Reach under the rear fascia and locate the back-up lamp
assembly. 2. Remove the bulb socket (1) by
turning counterclockwise and
pulling straight out of the lamp
assembly (2).
3. Pull the bulb out of the socket.
4. Install the new bulb in the bulb socket.
5. Install the bulb socket by turning clockwise.
License Plate Lamp
Lamp Assembly
Bulb Assembly
1. Bulb Socket
2. Bulb
3. Lamp Assembly
To replace one of these bulbs:
1. Push the lamp assembly (3) toward the right.
2. Pull the lamp assembly down to remove.
3. Turn the bulb socket (1) counterclockwise to remove it
from the lamp assembly (3).
4. Pull the bulb (2) straight out of the bulb socket (1).
Page 254 of 320
Cadillac XTS Owner Manual (GMNA-Localizing-MidEast-9369806) - 2016 -
crc - 6/24/15
Vehicle Care 253
5. Push the replacement bulbstraight into the bulb socket
and turn the bulb socket
clockwise to install it into the
lamp assembly.
6. Push the lamp assembly back into position until the release
tab locks into place.
Replacement Bulbs
Exterior Lamp Bulb
Number
Back-Up Lamp 921
(W16W)
License Plate Lamp W5W LL
For replacement bulbs not listed
here, contact your dealer.
Electrical System
Electrical System
Overload
The vehicle has fuses and circuit
breakers to protect against an
electrical system overload.
When the current electrical load is
too heavy, the circuit breaker opens
and closes, protecting the circuit
until the current load returns to
normal or the problem is fixed. This
greatly reduces the chance of circuit
overload and fire caused by
electrical problems.
Fuses and circuit breakers protect
power devices in the vehicle.
Replace a bad fuse with a new one
of the identical size and rating.
If there is a problem on the road and
a fuse needs to be replaced, the
same amperage fuse can be
borrowed. Choose some feature of
the vehicle that is not needed to use
and replace it as soon as possible.
Headlamp Wiring
An electrical overload may cause
the lamps to go on and off, or in
some cases to remain off. Have the
headlamp wiring checked right away
if the lamps go on and off or
remain off.
Windshield Wipers
If the wiper motor overheats due to
heavy snow or ice, the windshield
wipers will stop until the motor cools
and will then restart.
Although the circuit is protected
from electrical overload, overload
due to heavy snow or ice may
cause wiper linkage damage.
Always clear ice and heavy snow
from the windshield before using the
windshield wipers.
If the overload is caused by an
electrical problem and not snow or
ice, be sure to get it fixed.
Page 255 of 320
Cadillac XTS Owner Manual (GMNA-Localizing-MidEast-9369806) - 2016 -
crc - 6/24/15
254 Vehicle Care
Fuses and Circuit
Breakers
The wiring circuits in the vehicle are
protected from short circuits by a
combination of fuses and circuit
breakers. This greatly reduces the
chance of damage caused by
electrical problems.
To check a fuse, look at the
silver-colored band inside the fuse.
If the band is broken or melted,
replace the fuse. Be sure to replace
a bad fuse with a new one of the
identical size and rating.
Fuses of the same amperage can
be temporarily borrowed from
another fuse location, if a fuse goes
out. Replace the fuse as soon as
possible.
To identify and check fuses, circuit
breakers, and relays, seeEngine
Compartment Fuse Block 0254,
Instrument Panel Fuse Block 0257,
and Rear Compartment Fuse Block
0 259.
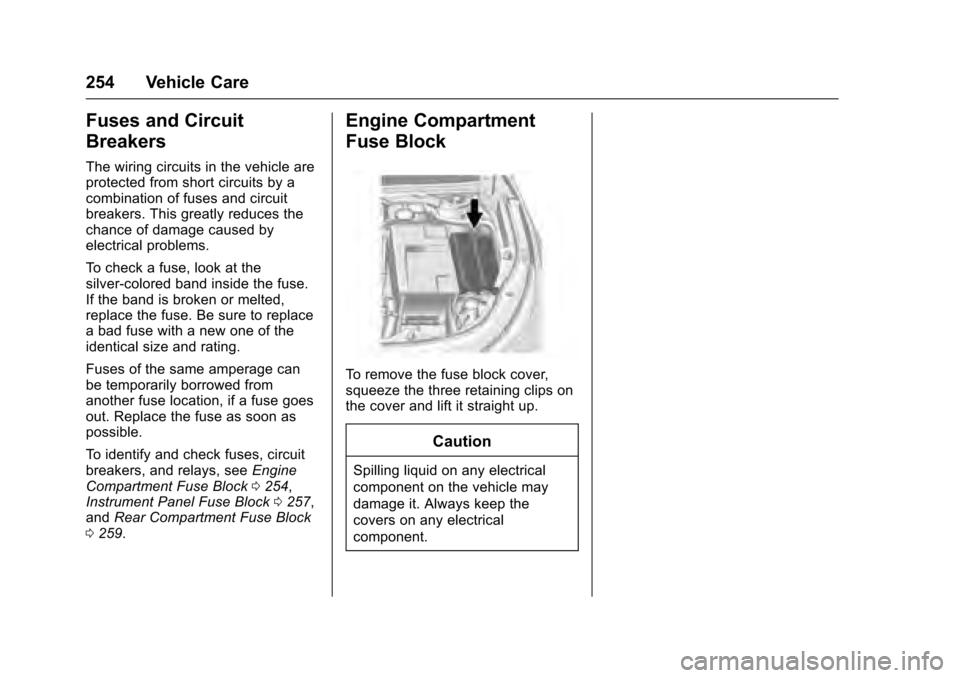
Engine Compartment
Fuse Block
To remove the fuse block cover,
squeeze the three retaining clips on
the cover and lift it straight up.
Caution
Spilling liquid on any electrical
component on the vehicle may
damage it. Always keep the
covers on any electrical
component.
Page 256 of 320
Cadillac XTS Owner Manual (GMNA-Localizing-MidEast-9369806) - 2016 -
crc - 6/24/15
Vehicle Care 255
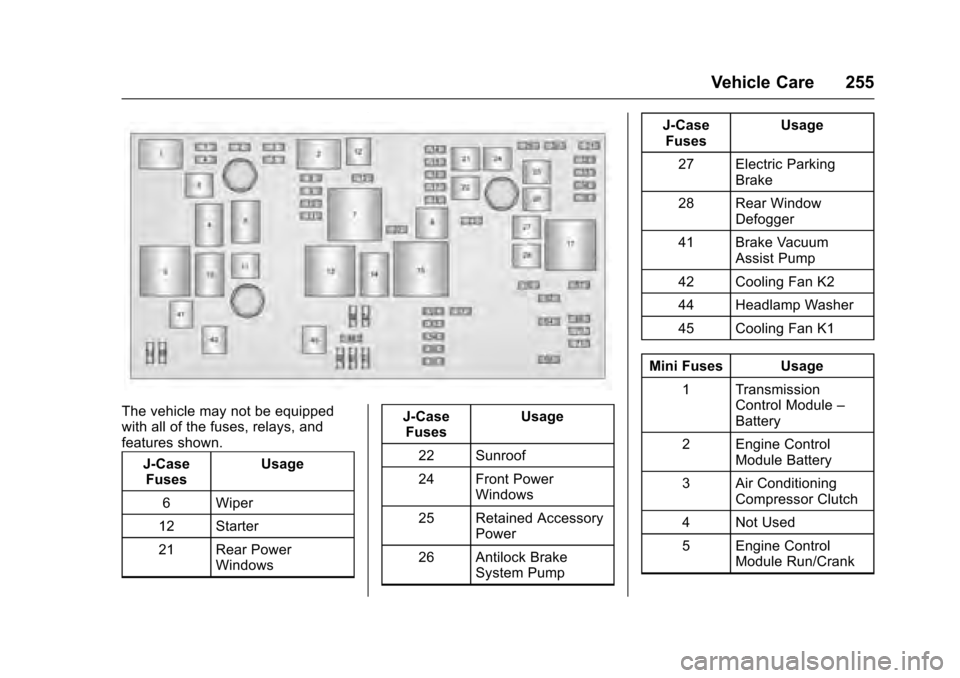
The vehicle may not be equipped
with all of the fuses, relays, and
features shown.J-CaseFuses Usage
6 Wiper
12 Starter
21 Rear Power Windows J-Case
Fuses Usage
22 Sunroof
24 Front Power Windows
25 Retained Accessory Power
26 Antilock Brake System Pump J-Case
Fuses Usage
27 Electric Parking Brake
28 Rear Window Defogger
41 Brake Vacuum Assist Pump
42 Cooling Fan K2
44 Headlamp Washer
45 Cooling Fan K1
Mini Fuses Usage 1 Transmission Control Module –
Battery
2 Engine Control Module Battery
3 Air Conditioning Compressor Clutch
4 Not Used
5 Engine Control Module Run/Crank
Page 257 of 320
Cadillac XTS Owner Manual (GMNA-Localizing-MidEast-9369806) - 2016 -
crc - 6/24/15
256 Vehicle Care
Mini Fuses Usage8 Ignition Coils –Even
(6–Cylinder Engine)
9 Ignition Coils –Odd
(6–Cylinder Engine)
10 Engine Control Module–Switched
Battery (from Engine
Control Module
Relay)
11 6–Cylinder Engine: Post Catalytic
Converter Oxygen
Sensor Heater,
Mass Air Flow
Sensor, Flex Fuel
Sensor
13 Run/Crank for Transmission
Control Module and
Chassis Control
Module
14 Right Rear Heated Seat
15 Left Rear Heated Seat Mini Fuses Usage
16 Not Used
17 Body Run/Crank
18 Autonet Run/Crank (Aftermarket)
20 Not Used
23 Variable Effort Steering
29 Passive Entry/ Passive Start
Module–Battery
30 All-Wheel Drive Module
31 Left Front Heated Seat
32 Body Control Module 6
33 Right Front Heated Seat
34 Antilock Brake System Valves
35 Amplifier
37 Right High Beam Mini Fuses Usage
38 Left High Beam
46 Cooling Fan Relay
47 6–Cylinder Engine: Pre Catalytic
Converter Oxygen
Sensor Heater,
Canister Purge
Solenoid
48 Coolant Pump
49 Right High Intensity Discharge
Headlamp
50 Left High Intensity Discharge
Headlamp
51 Horn
52 Cluster Run/Crank
53 Run/Crank for Inside Rearview Mirror,
Rear Vision Camera
54 Run/Crank for Heating, Ventilation,
and Air Conditioning
Page 258 of 320
Cadillac XTS Owner Manual (GMNA-Localizing-MidEast-9369806) - 2016 -
crc - 6/24/15
Vehicle Care 257
Mini Fuses Usage55 Outside Rearview Mirror, Front Window
Switches
56 Windshield Washer
57 Steering Column Lock
60 Heated Mirror
62 Massage Memory Bolster
64 Adaptive Forward Lighting (AFL)
Module–Battery
66 Trunk Release
67 Chassis Control Module
69 Regulated Voltage Control Sensor
70 Vent Canister Solenoid
71 Memory Module Mini Relays Usage
7 Engine Control Module
9 Cooling Fan
13 Cooling Fan
15 Run/Crank
17 Rear Window Defogger
Micro
Relays Usage
1 Air Conditioning Compressor Clutch
2 Starter
4 Wiper Speed
5 Wiper Control
8 Not Used
10 Cooling Fan
11 Headlamp Washer
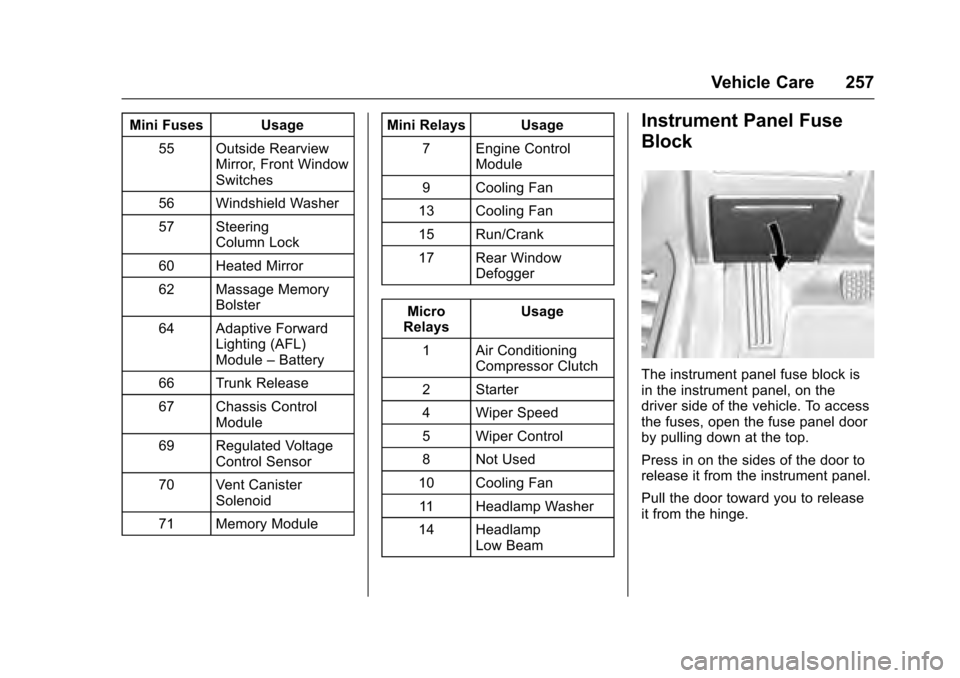
14 Headlamp Low BeamInstrument Panel Fuse
Block
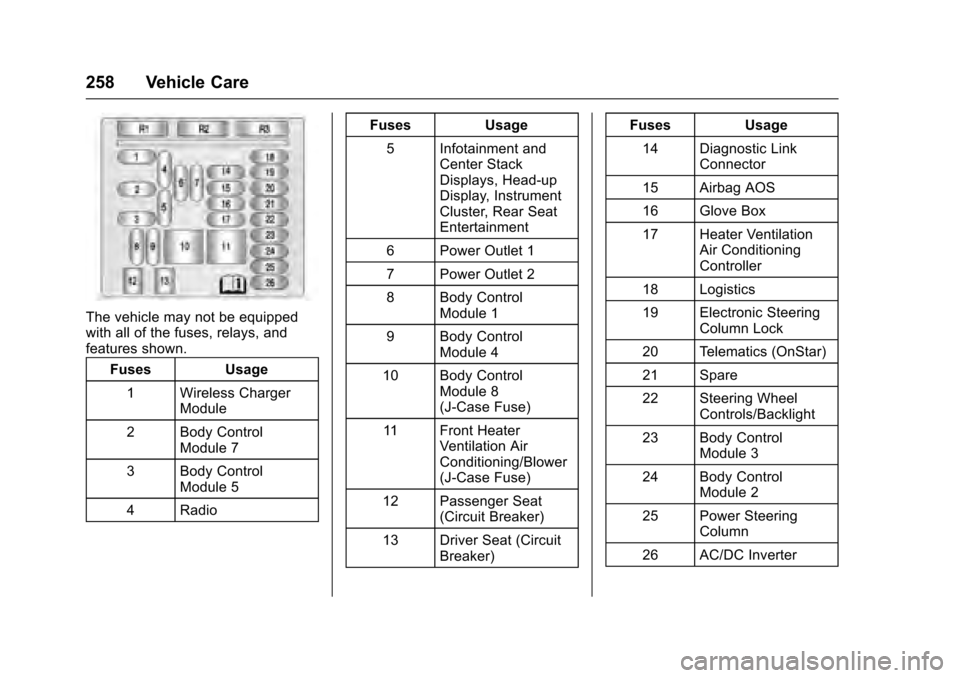
The instrument panel fuse block is
in the instrument panel, on the
driver side of the vehicle. To access
the fuses, open the fuse panel door
by pulling down at the top.
Press in on the sides of the door to
release it from the instrument panel.
Pull the door toward you to release
it from the hinge.
Page 259 of 320
Cadillac XTS Owner Manual (GMNA-Localizing-MidEast-9369806) - 2016 -
crc - 6/24/15
258 Vehicle Care
The vehicle may not be equipped
with all of the fuses, relays, and
features shown.Fuses Usage
1 Wireless Charger Module
2 Body Control Module 7
3 Body Control Module 5
4 Radio Fuses
Usage
5 Infotainment and Center Stack
Displays, Head-up
Display, Instrument
Cluster, Rear Seat
Entertainment
6 Power Outlet 1
7 Power Outlet 2
8 Body Control Module 1
9 Body Control Module 4
10 Body Control Module 8
(J-Case Fuse)
11 Front Heater Ventilation Air
Conditioning/Blower
(J-Case Fuse)
12 Passenger Seat (Circuit Breaker)
13 Driver Seat (Circuit Breaker) Fuses
Usage
14 Diagnostic Link Connector
15 Airbag AOS
16 Glove Box
17 Heater Ventilation Air Conditioning
Controller
18 Logistics
19 Electronic Steering Column Lock
20 Telematics (OnStar)
21 Spare
22 Steering Wheel Controls/Backlight
23 Body Control Module 3
24 Body Control Module 2
25 Power Steering Column
26 AC/DC Inverter
Page 260 of 320
Cadillac XTS Owner Manual (GMNA-Localizing-MidEast-9369806) - 2016 -
crc - 6/24/15
Vehicle Care 259
RelaysUsage
R1 Glove Box
R2 Logistics
R3 Retained Accessory Power/Accessory
Rear Compartment Fuse
Block
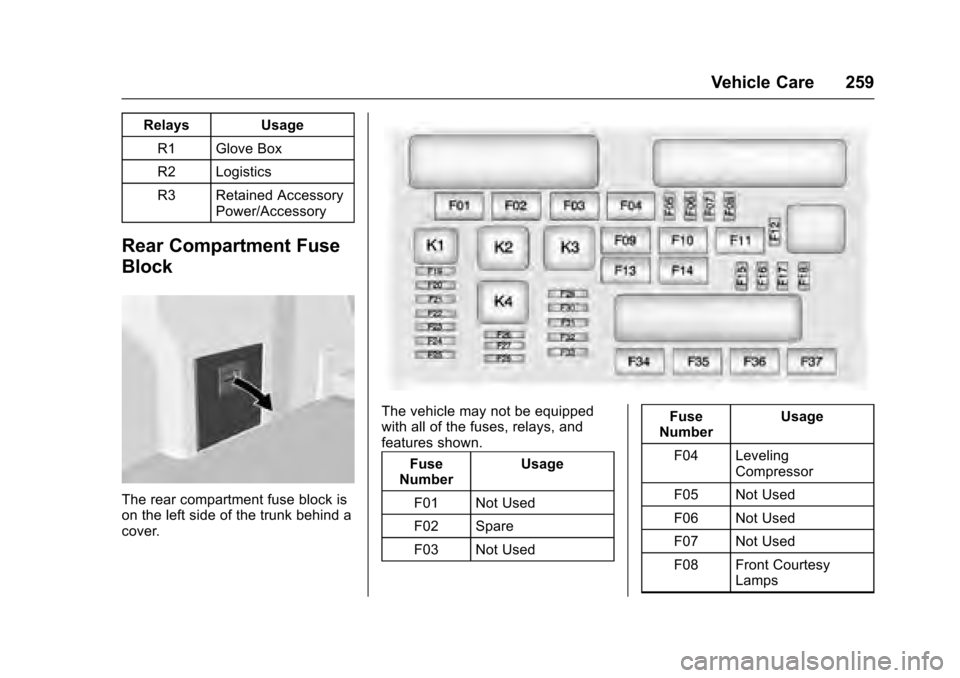
The rear compartment fuse block is
on the left side of the trunk behind a
cover.
The vehicle may not be equipped
with all of the fuses, relays, and
features shown.
Fuse
Number Usage
F01 Not Used
F02 Spare
F03 Not Used Fuse
Number Usage
F04 Leveling Compressor
F05 Not Used
F06 Not Used
F07 Not Used
F08 Front Courtesy Lamps