canister CADILLAC XTS 2018 Owner's Manual
[x] Cancel search | Manufacturer: CADILLAC, Model Year: 2018, Model line: XTS, Model: CADILLAC XTS 2018Pages: 370, PDF Size: 6.45 MB
Page 263 of 370
Cadillac XTS Owner Manual (GMNA-Localizing-U.S./Canada-11354412) -
2018 - crc - 11/16/17
262 VEHICLE CARE
FusesUsage
23 Variable effort steering module
24 Front power windows
25 Retained accessory power
26 ABS pump
27 Electric park brake
28 Rear window defogger
29 Passive entry/Passive start
30 Spare
31 Heated driver seat
32 Stop lamps —center
high mounted stop
lamp/Backup-reverse
lamps/Interior
33 Heated passenger seat
34 ABS valves
35 Amplifier
36 Tail park lamp —
driver side Fuses
Usage
37 Right high-beam headlamp
38 Left high-beam headlamp
39 Tail park lamp —
passenger side
40 Long range radar
41 Brake vacuum assist pump
42 Cooling fan high speed
43 –
44 –
45 Cooling fan low speed
46 Cooling fan control
47 Pre-catalytic converter O2 sensor
heater/Canister purge
solenoid
48 Low temperature radiator coolant pump
49 Right headlamp LED Fuses
Usage
50 Left headlamp LED
51 Horn
52 Display/Ignition
53 Air quality sensor/ Inside rearview
mirror/Rear vision
camera
54 HVAC/Reflective LED alert display
55 Driver and passenger door switches/Outside
rearview mirror
switch/Mirror
memory module
56 Windshield washer
57 –
58 –
59 –
60 Heated outside rearview mirror
61 –
62 Front seats massage module
Page 264 of 370
Cadillac XTS Owner Manual (GMNA-Localizing-U.S./Canada-11354412) -
2018 - crc - 11/16/17
VEHICLE CARE 263
FusesUsage
63 –
64 Spare
65 Spare
66 Trunk release
67 Chassis control module
68 –
69 Battery voltage sensor
70 Canister vent solenoid
71 Memory seat module
72 Electric power steering
Relays Usage
1 A/C clutch
2 Starter
3 –
4 Wiper speed
5 Wiper control
6 –
7 Powertrain Relays
Usage
8 –
9 Cooling fan —high
speed
10 Cooling fan —low
speed
11 Tail/Park lamps
12 –
13 Cooling fan control
14 Low beam LED headlamps
15 Run/Crank
16 –
17 Rear window and mirror defoggerInstrument Panel Fuse
Block
The instrument panel fuse block is in
the instrument panel, on the driver
side of the vehicle. To access the
fuses, open the fuse panel door by
pulling down at the top.
Press in on the sides of the door to
release it from the instrument panel.
Pull the door toward you to release it
from the hinge.
Page 290 of 370
Cadillac XTS Owner Manual (GMNA-Localizing-U.S./Canada-11354412) -
2018 - crc - 11/16/17
VEHICLE CARE 289
The tire sealant and compressor can
be used to temporarily seal punctures
up to 6 mm (0.25 in) in the tread area
of the tire. It can also be used to
inflate an underinflated tire.
If the tire has been separated from the
wheel, has damaged sidewalls, or has
a large puncture, the tire is too
severely damaged for the tire sealant
and compressor kit to be effective. See
Roadside Service0338.
Read and follow all of the tire sealant
and compressor kit instructions.
The kit includes:
1. Selector Switch (Sealant/Air or Air Only)
2. On/Off Button
3. Pressure Gauge 4. Pressure Deflation Button
5. Tire Sealant Canister
6. Sealant/Air Hose (Clear)
7. Air Only Hose (Black)
8. Power Plug
9. Canister Release Button
(Under Sealant/Air Hose)
Tire Sealant
Read and follow the safe handling
instructions on the label adhered to
the sealant canister.
Check the tire sealant expiration date
on the sealant canister. The sealant
canister should be replaced before its
expiration date. Replacement sealant
canisters are available at your local
dealer. See “Removal and Installation
of the Sealant Canister” following.
There is only enough sealant to seal
one tire. After usage, the sealant
canister and sealant/air hose assembly
must be replaced. See “Removal and
Installation of the Sealant Canister”
following.
Page 291 of 370

Cadillac XTS Owner Manual (GMNA-Localizing-U.S./Canada-11354412) -
2018 - crc - 11/16/17
290 VEHICLE CARE
Using the Tire Sealant and
Compressor Kit to Temporarily
Seal and Inflate a
Punctured Tire
Follow the directions closely for
correct sealant usage.
1. Selector Switch (Sealant/Airor Air Only)
2. On/Off Button
3. Pressure Gauge 4. Pressure Deflation Button
5. Tire Sealant Canister
6. Sealant/Air Hose (Clear)
7. Air Only Hose (Black)
8. Power Plug
9. Canister Release Button
(Under Sealant/Air Hose)
When using the tire sealant and
compressor kit during cold
temperatures, warm the kit in a
heated environment for five minutes.
This will help to inflate the tire faster.
If a tire goes flat, avoid further tire
and wheel damage by driving slowly
to a level place. Turn on the hazard
warning flashers. See Hazard Warning
Flashers 0155.
See If a Tire Goes Flat 0286 for other
important safety warnings.
Do not remove any objects that have
penetrated the tire.
1. Remove the tire sealant and compressor kit from its storage
location. See Storing the Tire
Sealant and Compressor Kit 0295.
2. Unwrap the sealant/air hose (6) and the power plug (8).
Page 293 of 370
Cadillac XTS Owner Manual (GMNA-Localizing-U.S./Canada-11354412) -
2018 - crc - 11/16/17
292 VEHICLE CARE
Be careful while handling the tire
sealant and compressor kit as it
could be warm after usage.
12. Unplug the power plug (8) from the accessory power outlet in the
vehicle.
13. Turn the sealant/air hose (6) counterclockwise to remove it
from the tire valve stem.
14. Replace the tire valve stem cap.
15. Replace the sealant/air hose (6), and the power plug (8) back in
their original location.
16. If the flat tire was able to inflateto the recommended inflation
pressure, remove the maximum
speed label from the sealant
canister (5) and place it in a
highly visible location. Do not exceed the speed on this label
until the damaged tire is repaired
or replaced.
17. Return the equipment to its original storage location in the
vehicle.
18. Immediately drive the vehicle 8 km (5 mi) to distribute the
sealant in the tire.
19. Stop at a safe location and check the tire pressure. Refer to
Steps 1–11 under “Using the Tire
Sealant and Compressor Kit
without Sealant to Inflate a Tire
(Not Punctured).”
If the tire pressure has fallen
more than 68 kPa (10 psi) below
the recommended inflation
pressure, stop driving the vehicle.
The tire is too severely damaged
and the tire sealant cannot seal
the tire. See Roadside Service
0 338.
If the tire pressure has not
dropped more than 68 kPa
(10 psi) from the recommended inflation pressure, inflate the tire
to the recommended inflation
pressure.
20. Wipe off any sealant from the wheel, tire, and vehicle.
21. Dispose of the used sealant canister (5) and sealant/air hose
(6) assembly at a local dealer or
in accordance with local state
codes and practices.
22. Replace with a new canister assembly available from your
dealer.
23. After temporarily sealing the tire using the tire sealant and
compressor kit, take the vehicle
to an authorized dealer within
161 km (100 mi) of driving to
have the tire repaired or
replaced.Using the Tire Sealant and
Compressor Kit without Sealant
to Inflate a Tire (Not Punctured)
To use the air compressor to inflate a
tire with air only and not sealant:
Page 294 of 370
Cadillac XTS Owner Manual (GMNA-Localizing-U.S./Canada-11354412) -
2018 - crc - 11/16/17
VEHICLE CARE 293
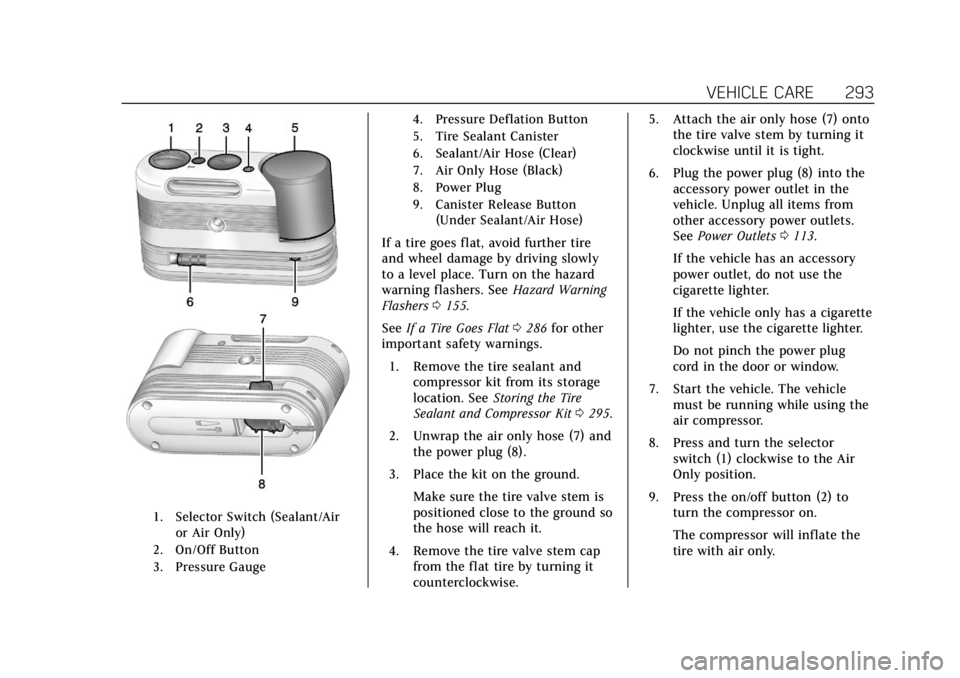
1. Selector Switch (Sealant/Airor Air Only)
2. On/Off Button
3. Pressure Gauge 4. Pressure Deflation Button
5. Tire Sealant Canister
6. Sealant/Air Hose (Clear)
7. Air Only Hose (Black)
8. Power Plug
9. Canister Release Button
(Under Sealant/Air Hose)
If a tire goes flat, avoid further tire
and wheel damage by driving slowly
to a level place. Turn on the hazard
warning flashers. See Hazard Warning
Flashers 0155.
See If a Tire Goes Flat 0286 for other
important safety warnings.
1. Remove the tire sealant and compressor kit from its storage
location. See Storing the Tire
Sealant and Compressor Kit 0295.
2. Unwrap the air only hose (7) and the power plug (8).
3. Place the kit on the ground. Make sure the tire valve stem is
positioned close to the ground so
the hose will reach it.
4. Remove the tire valve stem cap from the flat tire by turning it
counterclockwise. 5. Attach the air only hose (7) onto
the tire valve stem by turning it
clockwise until it is tight.
6. Plug the power plug (8) into the accessory power outlet in the
vehicle. Unplug all items from
other accessory power outlets.
See Power Outlets 0113.
If the vehicle has an accessory
power outlet, do not use the
cigarette lighter.
If the vehicle only has a cigarette
lighter, use the cigarette lighter.
Do not pinch the power plug
cord in the door or window.
7. Start the vehicle. The vehicle must be running while using the
air compressor.
8. Press and turn the selector switch (1) clockwise to the Air
Only position.
9. Press the on/off button (2) to turn the compressor on.
The compressor will inflate the
tire with air only.
Page 295 of 370
Cadillac XTS Owner Manual (GMNA-Localizing-U.S./Canada-11354412) -
2018 - crc - 11/16/17
294 VEHICLE CARE
10. Inflate the tire to therecommended inflation pressure
using the pressure gauge (3). The
recommended inflation pressure
can be found on the Tire and
Loading Information label. See
Tire Pressure 0274.
The pressure gauge (3) may read
higher than the actual tire
pressure while the compressor is
on. Turn the compressor off to
get an accurate reading. The
compressor may be turned on/off
until the correct pressure is
reached.
If you inflate the tire higher than
the recommended pressure you
can adjust the excess pressure by
pressing the pressure deflation
button (4) until the proper
pressure reading is reached. This
option is only functional when
using the air only hose (7).
11. Press the on/off button (2) to turn the tire sealant and
compressor kit off. Be careful while handling the tire
sealant and compressor kit as it
could be warm after usage.
12. Unplug the power plug (8) from the accessory power outlet in the
vehicle.
13. Disconnect the air only hose (7) from the tire valve stem, by
turning it counterclockwise, and
replace the tire valve stem cap.
14. Replace the air only hose (7) and the power plug (8) and cord back
in its original location.
15. Place the equipment in the original storage location in the
vehicle.
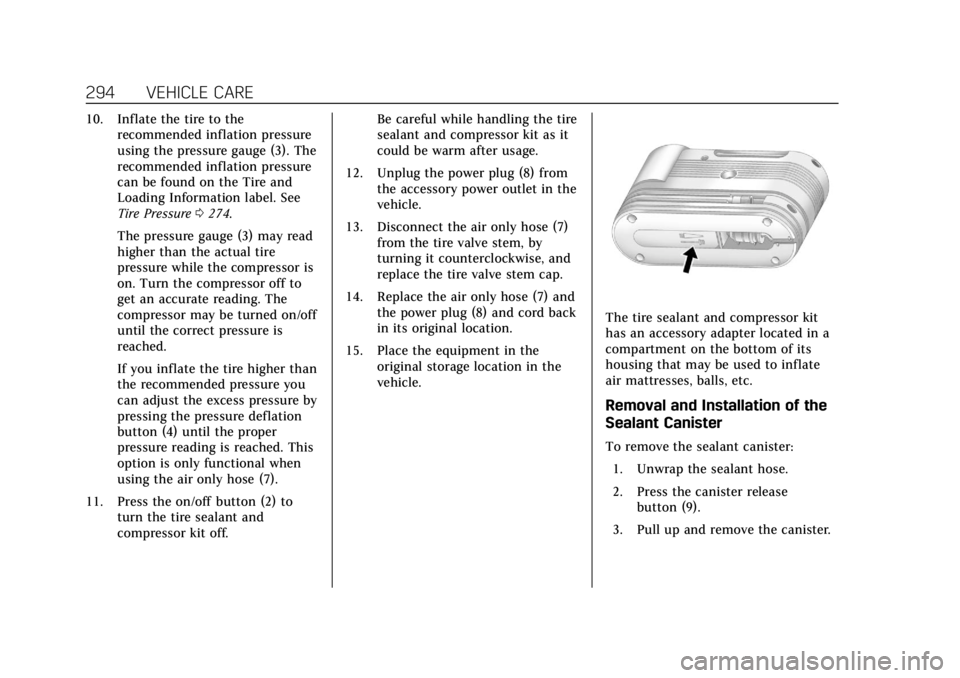
The tire sealant and compressor kit
has an accessory adapter located in a
compartment on the bottom of its
housing that may be used to inflate
air mattresses, balls, etc.
Removal and Installation of the
Sealant Canister
To remove the sealant canister:
1. Unwrap the sealant hose.
2. Press the canister release button (9).
3. Pull up and remove the canister.
Page 296 of 370
Cadillac XTS Owner Manual (GMNA-Localizing-U.S./Canada-11354412) -
2018 - crc - 11/16/17
VEHICLE CARE 295
4. Replace with a new canisterwhich is available from your
dealer.
5. Push the new canister into place.
Storing the Tire Sealant
and Compressor Kit
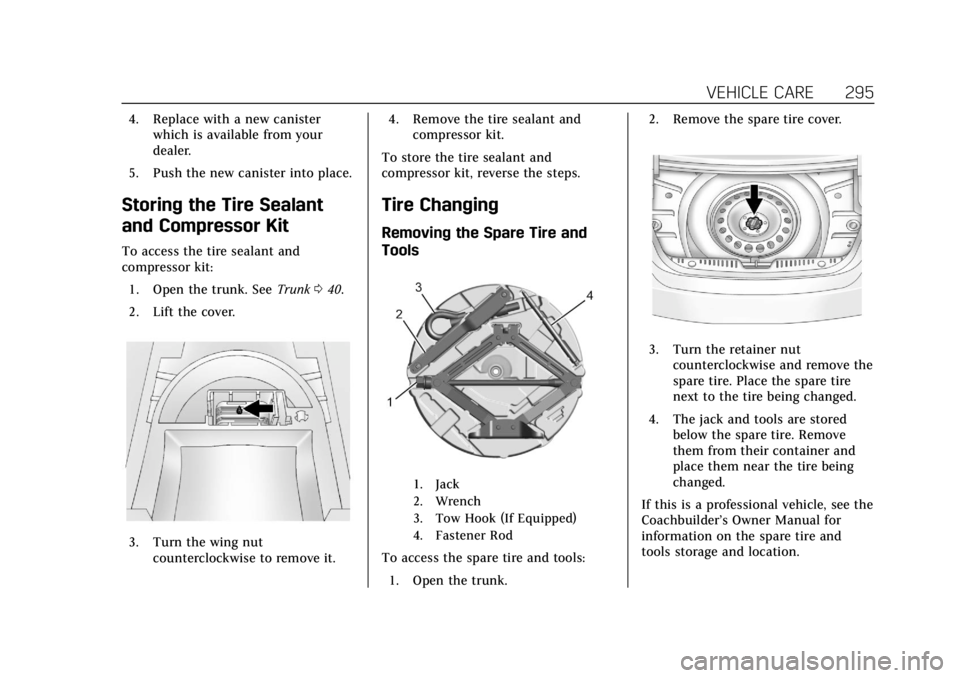
To access the tire sealant and
compressor kit: 1. Open the trunk. See Trunk040.
2. Lift the cover.
3. Turn the wing nut counterclockwise to remove it. 4. Remove the tire sealant and
compressor kit.
To store the tire sealant and
compressor kit, reverse the steps.
Tire Changing
Removing the Spare Tire and
Tools
1. Jack
2. Wrench
3. Tow Hook (If Equipped)
4. Fastener Rod
To access the spare tire and tools: 1. Open the trunk. 2. Remove the spare tire cover.
3. Turn the retainer nut
counterclockwise and remove the
spare tire. Place the spare tire
next to the tire being changed.
4. The jack and tools are stored below the spare tire. Remove
them from their container and
place them near the tire being
changed.
If this is a professional vehicle, see the
Coachbuilder’s Owner Manual for
information on the spare tire and
tools storage and location.