jacking CHEVROLET ASTRO 1996 Owners Manual
[x] Cancel search | Manufacturer: CHEVROLET, Model Year: 1996, Model line: ASTRO, Model: CHEVROLET ASTRO 1996Pages: 372, PDF Size: 21.51 MB
Page 214 of 372

Engine Fan Noise
This vehicle has a clutched engine cooling fan. When
the clutch is engaged, the fan spins faster to provide
more air
to cool the engine. In most every day driving
conditions, the clutch is not fully engaged. This
improves fuel economy and reduces fan noise. Under
heavy vehicle loading, trailer towing and/or high outside
temperatures,
the fan speed increases when the clutch
engages.
So you may hear an increase in fan noise. This
is normal and should not be mistaken as the
transmission slipping or making extra shifts. It is merely
the cooling system functioning properly. The fan will
slow down when additional cooling is
not required and
the clutch disengages.
You may also hear this fan noise when
you start the
engine. It will go away as the fan clutch disengages.
If a Tire Goes Flat
It’s unusual for a tire to “blow out” while you’re driving,
especially if
you maintain your tires properly. If air goes
out of a tire, it’s much more likely to leak out slowly.
But if you should ever have a 4‘blowout,” here are a few
tips about what
to expect and what to do:
If a front tire fails, the flat tire will create a drag that
pulls the vehicle toward that side. Take your foot off the
accelerator pedal and grip the steering wheel firmly.
Steer to maintain lane position, and then gently brake to
a stop well
out of the traffic lane.
A rear blowout, particularly on a curve, acts much like a
skid and may require the same correction you’d use in a
skid.
In any rear blowout, remove your foot from the
accelerator pedal. Get the vehicle under control by steering the way
you want the vehicle to go. It may be
very bumpy and noisy, but
you can still steer. Gently
brake
to a stop -- well off the road if possible.
If a tire goes flat, the next part shows how to
use your
jacking equipment to change a flat tire safely.
5-22
Page 216 of 372

- Removing the Spare Tire and Tools
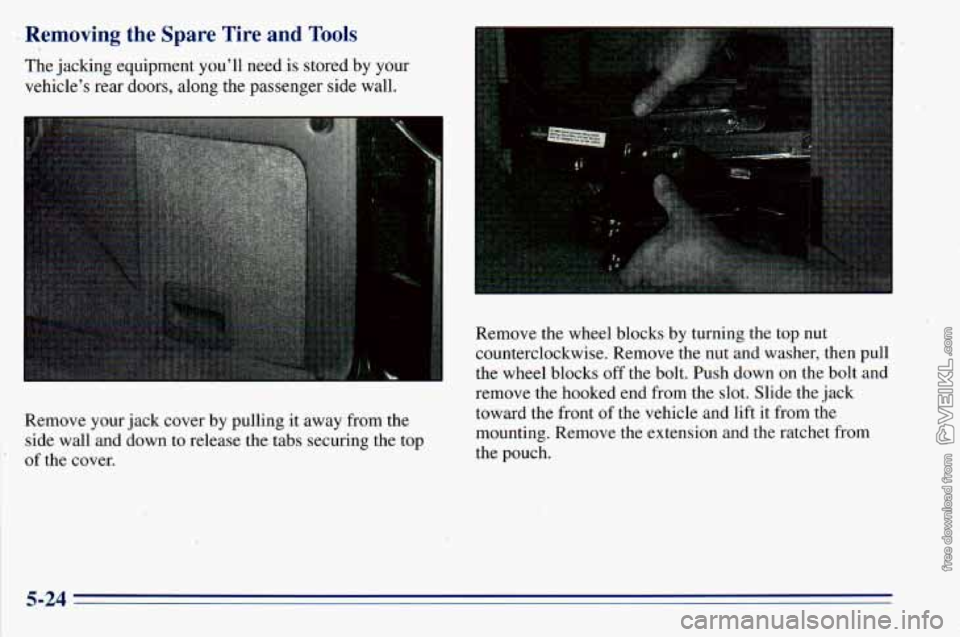
The jacking equipment you’ll need is stored by your
vehicle’s rear doors, along the passenger side wall.
Remove your jack cover by pulling
it away from the
side wall and down to release the tabs securing the top
‘ of the cover. Remove the wheel, blocks by turning the top nut
counterclockwise. Remove the nut and washer, then pull
the wheel blocks off the bolt. Push down on the bolt and
remove the hooked
end from the slot. Slide the jack
toward the front of the vehicle and lift it from the
mounting. Remove the extension and the ratchet from
the pouch.
5-24
Page 227 of 372

1.
2.
3.
Put the flat tire on the ground at the rear of the
vehicle, with the valve stem pointed down.
Tilt retaining bar downward and through the wheel
opening. Make sure it is fully seated across the
underside of the wheel. Attach the ratchet, with the
UP side facing you, to the extension.
Put the
flat end of the extension on an angle through
the hole in the rear door frame, above the bumper.
Turn the ratchet clockwise until the tire is against the
underside
of the vehicle.
You will
feel two “clicks” when the tire is up all the
way. Try to move the tire with your hands to make
sure it is securely in place.
The compact spare is for temporary use only. Replace
the compact spare tire with a full-size tire
as soon as
you can. See “Compact Spare Tire” in the Index. See
the storage instructions label to restore your compact
spare properly.
Return the jacking equipment
to its proper location.
I 4
3
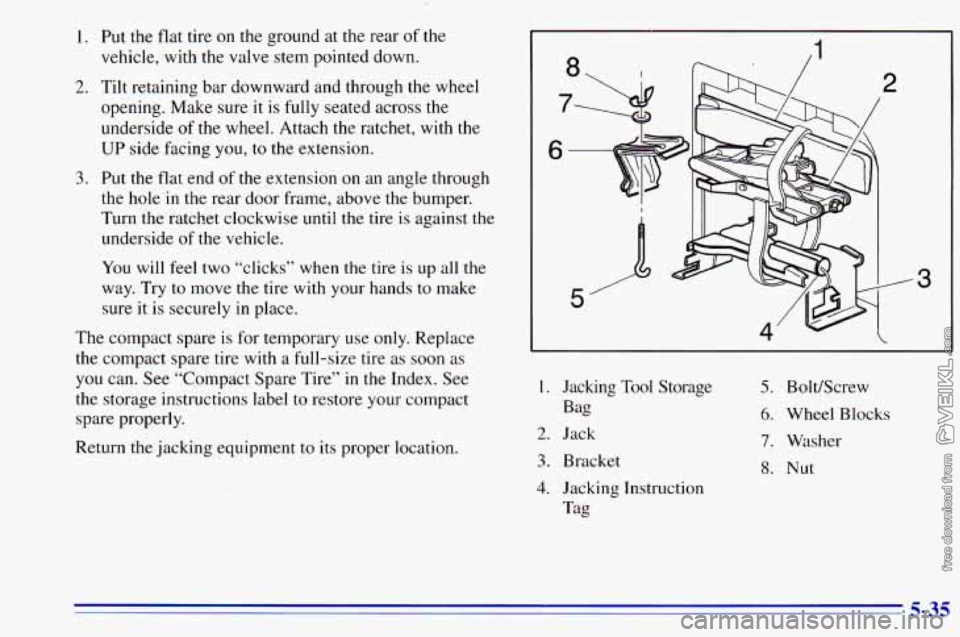
I. Jacking Tool Storage
Bag
2. Jack
3. Bracket
4. Jacking Instruction
Tag
5. BoltKcrew
6. Wheel Blocks
7, Washer
8. Nut
5-35