radio controls CHEVROLET ASTRO 2003 Owners Manual
[x] Cancel search | Manufacturer: CHEVROLET, Model Year: 2003, Model line: ASTRO, Model: CHEVROLET ASTRO 2003Pages: 386, PDF Size: 17.31 MB
Page 126 of 386
Section 3 Instrument Panel
Instrument Panel Overview ............................... 3.2
Hazard Warning Flashers
................................ 3-4
Other Warning Devices
................................... 3-5
Horn
............................................................. 3-5
Tilt Wheel
..................................................... 3-5
Turn SignaVMultifunction Lever
......................... 3.6
Exterior Lamps
.......................................... 3.12
Interior Lamps
................................ ....... 3.15
Accessory Power Outlets
............................... 3.16
Ashtrays and Cigarette Lighter
........................ 3.17
Climate Controls ............................................ 3.18
Climate Control System
................................. 3.18
Rear Heating System
................................... -3-1 9
Rear Air Conditioning System ......................... 3.20
Rear Climate Control System
......................... 3.21
Warning Lights, Gages and Indicators ............. 3.23
Instrument Panel Cluster
................................ 3.24
Speedometer and Odometer
........................... 3.25
Safety Belt Reminder Light
............................. 3.26
Air Bag Readiness Light
................................ 3-26
Charging System Light
.................................. 3.27
Voltmeter Gage
........................................... -3-28
Brake System Warning Light
.......................... 3.28 Anti-Lock
Brake System Warning Light
............. 3.29
Engine Coolant Temperature Gage
= = =. ~ = = ~ ~ ~ = i. 3-39
Malfunction Indicator Lamp
............................. 3.30
Oil Pressure Gage
........................................ 3.34
Security Light
.............................................. -3-35
Service All-Wheel Drive Light
......................... 3.35
Tow/Haul Mode Light
......... ................... 3.36
Fuel Gage
................................................... 3.36
Low Fuel Warning Light
................................. 3.37
Audio System@) ............................................. 3.38
Setting the Time for Radios with
the Set Button
.......................................... 3-38
Setting the Time for Radios with
HR and MN Buttons .................................. 3-38
AM-FM Radio
............................................... 3.39
Radio with CD
.............................................. 3-41
Theft-Deterrent Feature
........... ................ 3.47
Understanding Radio Reception
................... 3.50
Care of Your CDs
......................................... 3-50
Care of Your CD Player
................................ 3-50
Fixed Mast Antenna
...................................... 3.50
Check Gages Warning
Light
........................... 3-36
Rear Seat Audio (RSA)
. . .... ............ 3.46
3-
1
Page 163 of 386
Audio System(s)
Notice; Before you add any sound equipment to
your vehicle
- like a tape player, CB radio, mobile
telephone or two-way radio
- be sure you can add
what you want. If you can, it’s very important to do
it
properly. Added sound equipment may interfere
with the operation of your vehicle’s engine, Delphi Electronics radio or other systems, and even damage
them. Your vehicle’s systems may interfere with the
operation
of sound equipment that has been added
improperly.
So, before adding sound equipment, check with
your dealer and be sure to check federal rules
covering mobile radio and telephone units.
Your audio system has been designed to operate easily
and to give years of listening pleasure. You will get the
most enjoyment out of it
if you acquaint yourself with it
first. Find out what your audio system can do and how to
operate all of its controls to be sure you’re getting the
most out of the advanced engineering that went into it.
Your vehicle may have a feature called Retained
Accessory Power (RAP). With RAP, you can play
your audio system even after the ignition is turned
off.
See “Retained Accessory Power (RAP)” under
Ignition Positions on page 2- 79.
Setting the Time for Radios with
the Set Button
Press SET. Within five seconds, press and hold the
right SEEK arrow until the correct minute appears on the
display. Press and hold the left SEEK arrow until the
correct hour appears on the display.
Setting the Time for Radios with
HR and MN Buttons
Press and hold HR until the correct hour appears on the
display. Press and hold
MN until the correct minute
appears on the display.
To display the time with the
ignition
off, press RECALL or HR/MN and the time will
be displayed for a few seconds. There is an initial
two-second delay before the clock goes into the
time-set mode.
3-38
Page 171 of 386
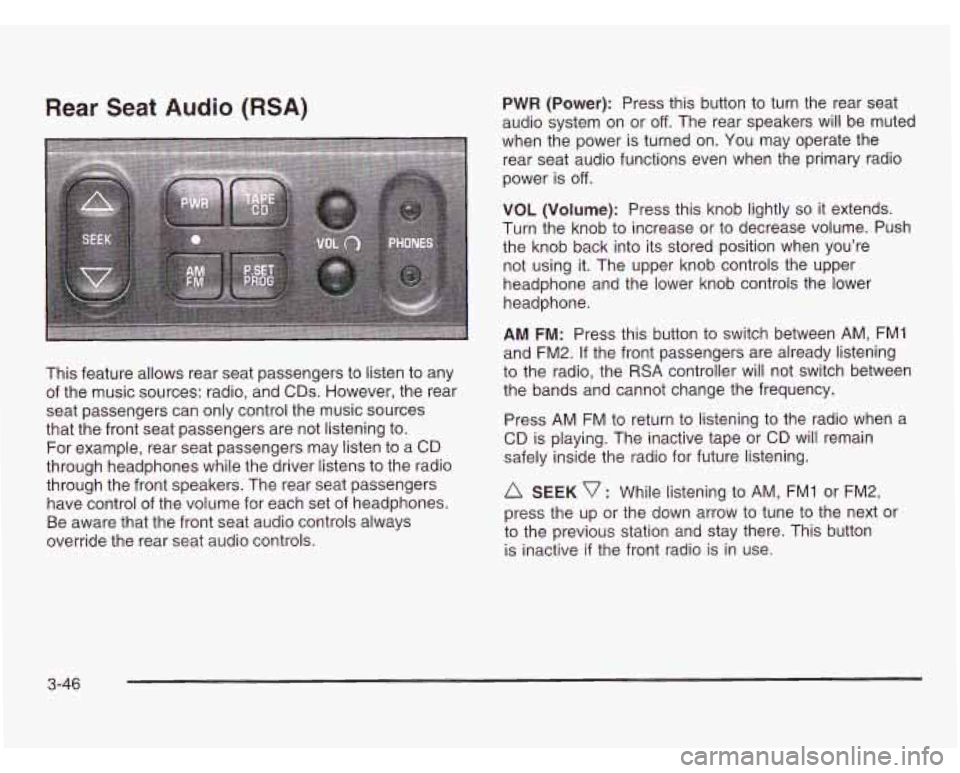
Rear Seat Audio (RSA) PWR (Power): Press this button to turn the rear seat
audio system on or
off. The rear speakers will be muted
when the power is turned on. You may operate the
rear seat audio functions even when the primary radio
power is
off.
VOL (Volume): Press this knob lightly so it extends.
Turn the knob
to increase or to decrease volume. Push
the knob back into its stored position when you’re
not using it. The upper knob controls the upper
headphone and the lower knob controls the lower
headphone.
This feature allows rear seat passengers to listen
to any
of the music sources: radio, and CDs. However, the rear
seat passengers can only control the music sources
that the front seat passengers are not listening to.
For example, rear seat passengers may listen to a CD
through headphones while the driver listens to the radio
through the front speakers. The rear seat passengers
have control of the volume for each set of headphones.
Be aware that the front seat audio controls always
override the rear seat audio controls.
AM FM: Press this button to switch between AM, FMI
and FM2.
If the front passengers are already listening
to the radio, the RSA controller will not switch between
the bands and cannot change the frequency.
Press AM FM to return to listening
to the radio when a
CD is playing. The inactive tape or CD will remain
safely inside the radio for future listening.
A SEEK v : While listening to AM, FMI or FM2,
press the up or the down arrow to tune
to the next or
to the previous station and stay there. This button
is inactive
if the front radio is in use.
3-46
Page 311 of 386
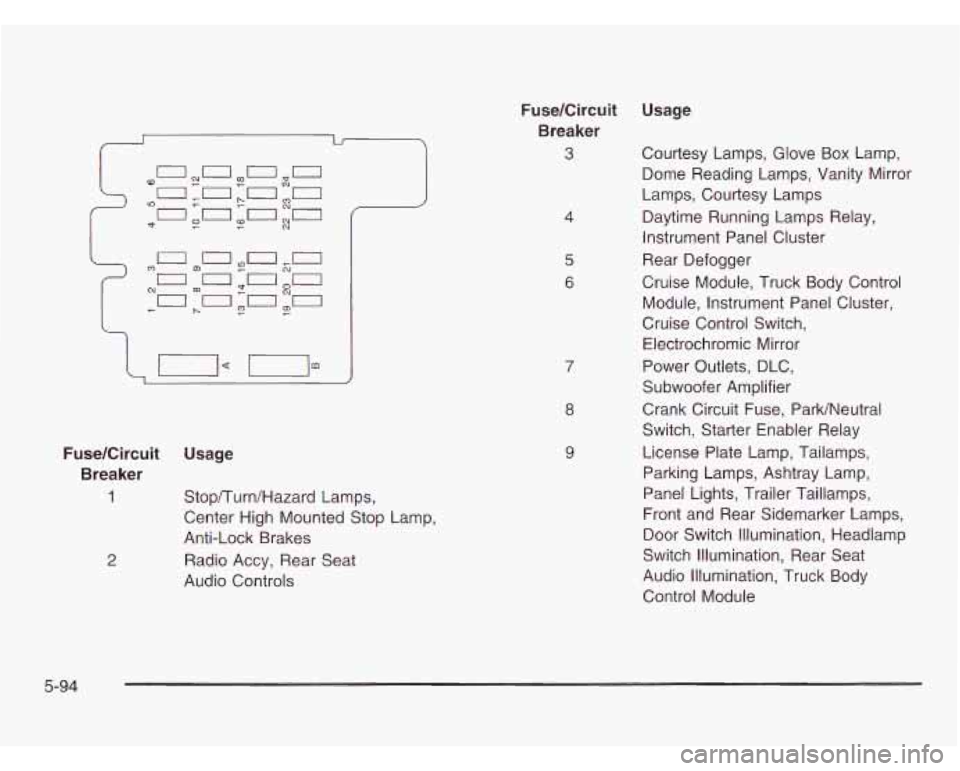
FuseKircuit Usage
Breaker
1
2
Stop/Turn/Hazard Lamps,
Center High Mounted Stop Lamp,
Anti-Lock Brakes
Radio Accy, Rear Seat
Audio Controls
FuseKircuit
Breaker
3
4
5
6
8
9
Usage
Courtesy Lamps, Glove Box Lamp,
Dome Reading Lamps, Vanity Mirror
Lamps, Courtesy Lamps
Daytime Running Lamps Relay,
Instrument Panel Cluster
Rear Defogger
Cruise Module, Truck Body Control Module, Instrument Panel Cluster,
Cruise Control Switch,
Electrochromic Mirror
Power Outlets, DLC,
Subwoofer Amplifier
Crank Circuit Fuse, ParWNeutral
Switch, Starter Enabler Relay
License Plate Lamp, Tailamps,
Parking Lamps, Ashtray Lamp,
Panel Lights, Trailer Taillamps,
Front and Rear Sidemarker Lamps,
Door Switch Illumination, Headlamp
Switch Illumination, Rear Seat
Audio Illumination, Truck Body
Control Module
5-94
Page 312 of 386
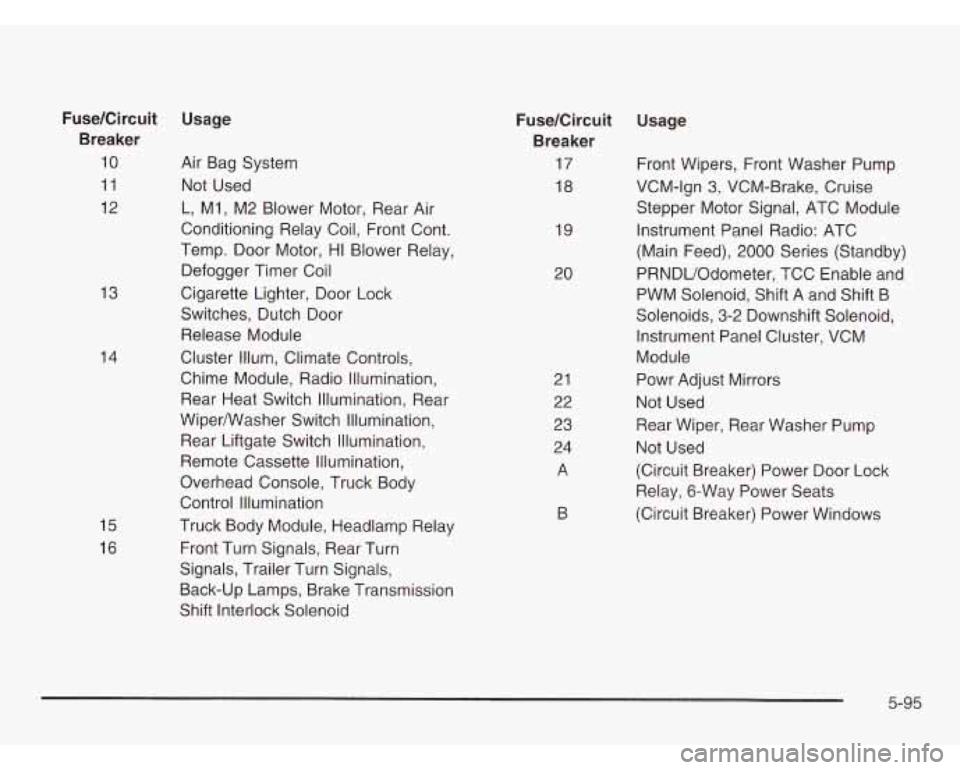
13
14
15
16
Fuse/Circuit Usage Breaker
10 Air Bag System
11 Not Used
12 L, MI, M2 Blower Motor, Rear Air
Conditioning Relay Coil, Front Cont.
Temp. Door Motor, HI Blower Relay.
Defogger Timer Coil
Cigarette Lighter, Door Lock
Switches, Dutch Door Release Module
Cluster Illum, Climate Controls,
Chime Module, Radio Illumination,
Rear Heat Switch Illumination, Rear
Wipermasher Switch Illumination,
Rear Liftgate Switch Illumination,
Remote Cassette Illumination,
Overhead Console, Truck Body
Control Illurnination
Truck Body Module, Headlamp Relay
Front Turn Signals, Rear Turn
Signals, Trailer Turn Signals,
Back-up Lamps, Brake Transmission
Shift Interlock Solenoid 21
22
23
24
A
19
20
FuseKircuit
Usage
Breaker
17 Front Wipers, Front Washer Pump
18 VCM-lgn
3, VCM-Brake, Cruise
Stepper Motor Signal, ATC Module
Instrument Panel Radio: ATC
(Main Feed),
2000 Series (Standby)
PRNDUOdometer, TCC Enable and
PWM Solenoid, Shift A and Shift B
Solenoids, 3-2 Downshift Solenoid, Instrument Panel Cluster, VCM
Module
Powr Adjust Mirrors
Not Used
Rear Wiper, Rear Washer Pump
Not Used
(Circuit Breaker) Power Door Lock
Relay, 6-Way Power Seats
(Circuit Breaker) Power Windows
B
5-95