transmission oil CHEVROLET ASTRO 2005 Owners Manual
[x] Cancel search | Manufacturer: CHEVROLET, Model Year: 2005, Model line: ASTRO, Model: CHEVROLET ASTRO 2005Pages: 376, PDF Size: 2.45 MB
Page 98 of 376
How long should you keep the coolant heater plugged
in? The answer depends on the outside temperature, the
kind of oil you have, and some other things. Instead
of trying to list everything here, we ask that you contact
your dealer in the area where you will be parking
your vehicle. The dealer can give you the best advice
for that particular area.
Automatic Transmission Operation
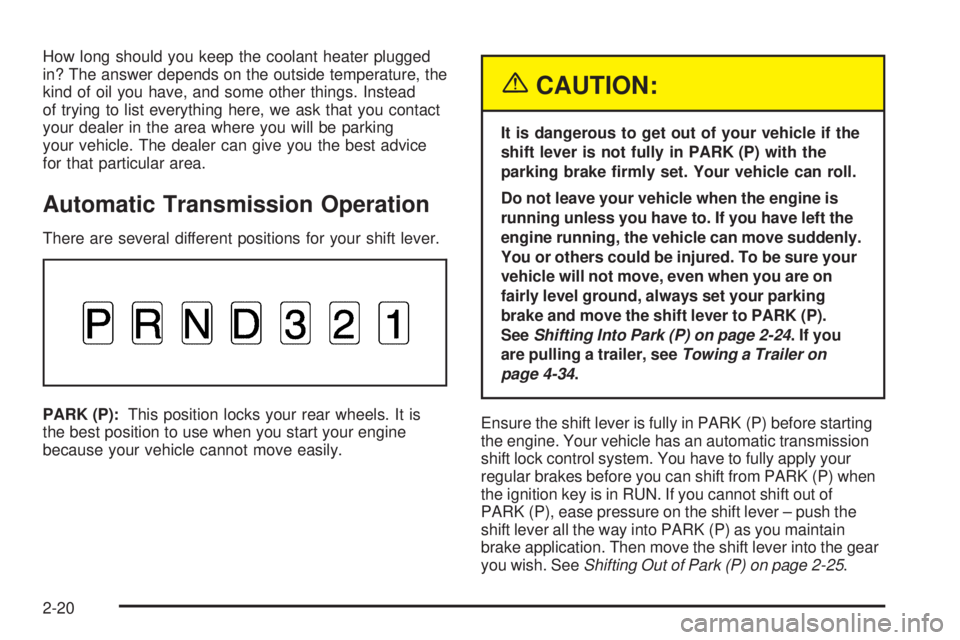
There are several different positions for your shift lever.
PARK (P):This position locks your rear wheels. It is
the best position to use when you start your engine
because your vehicle cannot move easily.
{CAUTION:
It is dangerous to get out of your vehicle if the
shift lever is not fully in PARK (P) with the
parking brake �rmly set. Your vehicle can roll.
Do not leave your vehicle when the engine is
running unless you have to. If you have left the
engine running, the vehicle can move suddenly.
You or others could be injured. To be sure your
vehicle will not move, even when you are on
fairly level ground, always set your parking
brake and move the shift lever to PARK (P).
SeeShifting Into Park (P) on page 2-24.Ifyou
are pulling a trailer, seeTowing a Trailer on
page 4-34.
Ensure the shift lever is fully in PARK (P) before starting
the engine. Your vehicle has an automatic transmission
shift lock control system. You have to fully apply your
regular brakes before you can shift from PARK (P) when
the ignition key is in RUN. If you cannot shift out of
PARK (P), ease pressure on the shift lever – push the
shift lever all the way into PARK (P) as you maintain
brake application. Then move the shift lever into the gear
you wish. SeeShifting Out of Park (P) on page 2-25.
2-20
Page 209 of 376
Driving On Grades
Reduce speed and shift to a lower gearbeforeyou
start down a long or steep downgrade. If you don’t shift
down, you might have to use your brakes so much
that they would get hot and no longer work well.
You can tow in DRIVE (D). You may want to shift the
transmission to THIRD (3) or, if necessary, a lower
gear selection if the transmission shifts too often
(e.g., under heavy loads and/or hilly conditions).
When towing at high altitude on steep uphill grades,
consider the following: Engine coolant will boil at a lower
temperature than at normal altitudes. If you turn your
engine off immediately after towing at high altitude
on steep uphill grades, your vehicle may show signs
similar to engine overheating. To avoid this, let the
engine run while parked (preferably on level ground)
with the transmission in PARK (P) for a few minutes
before turning the engine off. If you do get the overheat
warning, seeEngine Overheating on page 5-28.
Parking on Hills
{CAUTION:
You really should not park your vehicle, with
a trailer attached, on a hill. If something goes
wrong, your rig could start to move. People
can be injured, and both your vehicle and the
trailer can be damaged.
But if you ever have to park your rig on a hill, here’s
how to do it:
1. Apply your regular brakes, but don’t shift into
PARK (P) yet.
2. Have someone place chocks under the trailer
wheels.
3. When the wheel chocks are in place, release the
regular brakes until the chocks absorb the load.
4. Reapply the regular brakes. Then apply your
parking brake, and shift to PARK (P).
5. Release the regular brakes.
4-43
Page 210 of 376
When You Are Ready to Leave After
Parking on a Hill
1. Apply your regular brakes and hold the pedal down
while you:
start your engine,
shift into a gear, and
release the parking brake.
2. Let up on the brake pedal.
3. Drive slowly until the trailer is clear of the chocks.
4. Stop and have someone pick up and store the
chocks.
Maintenance When Trailer Towing
Your vehicle will need service more often when you’re
pulling a trailer. See the Maintenance Schedule for
more on this. Things that are especially important in
trailer operation are automatic transmission �uid
(don’t over�ll), engine oil, axle lubricant, belt, cooling
system and brake system. Each of these is covered in
this manual, and the Index will help you �nd them
quickly. If you’re trailering, it’s a good idea to review
these sections before you start your trip.
Check periodically to see that all hitch nuts and bolts
are tight.
4-44
Page 213 of 376
Service............................................................5-3
Doing Your Own Service Work.........................5-4
Adding Equipment to the Outside
of Your Vehicle...........................................5-5
Fuel................................................................5-5
Gasoline Octane............................................5-5
Gasoline Speci�cations....................................5-5
California Fuel...............................................5-6
Additives.......................................................5-6
Fuels in Foreign Countries...............................5-7
Filling Your Tank............................................5-8
Filling a Portable Fuel Container.....................5-10
Checking Things Under the Hood....................5-10
Hood Release..............................................5-11
Engine Compartment Overview.......................5-12
Engine Oil...................................................5-13
Engine Cover...............................................5-17
Engine Air Cleaner/Filter................................5-21
Automatic Transmission Fluid.........................5-23
Engine Coolant.............................................5-26
Radiator Pressure Cap..................................5-28
Engine Overheating.......................................5-28
Cooling System............................................5-30
Engine Fan Noise.........................................5-35
Power Steering Fluid.....................................5-36Windshield Washer Fluid................................5-37
Brakes........................................................5-38
Battery........................................................5-42
Jump Starting...............................................5-42
All-Wheel Drive..............................................5-47
Rear Axle.......................................................5-48
Front Axle......................................................5-49
Bulb Replacement..........................................5-50
Halogen Bulbs..............................................5-50
Headlamps and Sidemarker Lamps.................5-50
Front Turn Signal and Parking Lamps..............5-54
Taillamps, Turn Signal, Stoplamps and
Back-up Lamps.........................................5-55
Replacement Bulbs.......................................5-56
Windshield Wiper Blade Replacement..............5-57
Tires..............................................................5-58
Tire Sidewall Labelling...................................5-59
Tire Terminology and De�nitions.....................5-61
In�ation - Tire Pressure.................................5-64
Tire Inspection and Rotation...........................5-65
When It Is Time for New Tires.......................5-66
Buying New Tires.........................................5-67
Uniform Tire Quality Grading..........................5-68
Wheel Alignment and Tire Balance..................5-69
Section 5 Service and Appearance Care
5-1
Page 225 of 376
A. Windshield Washer Fluid Reservoir. See “Adding
Washer Fluid” underWindshield Washer Fluid
on page 5-37.
B. Engine Coolant Recovery Tank. SeeCooling System
on page 5-30.
C. Engine Oil Dipstick. See “Checking Engine Oil”
underEngine Oil on page 5-13.
D. Automatic Transmission Fluid Dipstick. See
“Checking the Fluid Level” underAutomatic
Transmission Fluid on page 5-23.
E. Engine Air Cleaner/Filter. SeeEngine Air
Cleaner/Filter on page 5-21.
F. Engine Oil Fill Cap. See “When to Add Engine Oil”
underEngine Oil on page 5-13.
G. Brake Master Cylinder Reservoir. See “Brake Fluid”
underBrakes on page 5-38.
H. Power Steering Fluid Reservoir. SeePower Steering
Fluid on page 5-36.
I. Battery. SeeBattery on page 5-42.
Engine Oil
Checking Engine Oil
It is a good idea to check your engine oil every time you
get fuel. In order to get an accurate reading, the oil
must be warm and the vehicle must be on level ground.The engine oil dipstick handle is a yellow loop. See
Engine Compartment Overview on page 5-12for
the location of the engine oil dipstick.
1. Turn off the engine and give the oil several minutes
to drain back into the oil pan. If you do not do this,
the oil dipstick might not show the actual level.
2. Pull out the dipstick and clean it with a paper towel
or cloth, then push it back in all the way. Remove it
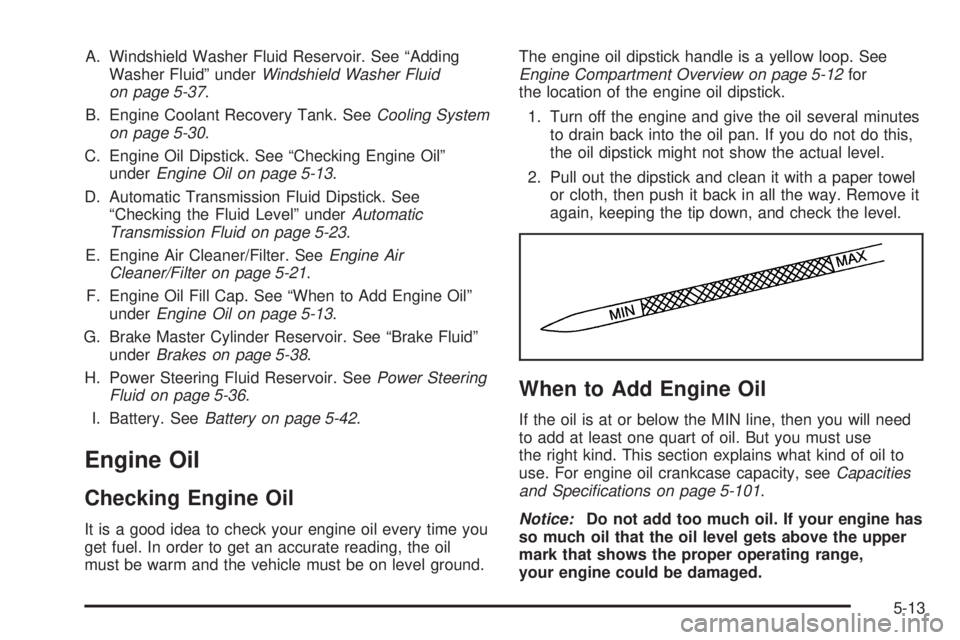
again, keeping the tip down, and check the level.
When to Add Engine Oil
If the oil is at or below the MIN line, then you will need
to add at least one quart of oil. But you must use
the right kind. This section explains what kind of oil to
use. For engine oil crankcase capacity, seeCapacities
and Speci�cations on page 5-101.
Notice:Do not add too much oil. If your engine has
so much oil that the oil level gets above the upper
mark that shows the proper operating range,
your engine could be damaged.
5-13
Page 235 of 376
Automatic Transmission Fluid
When to Check and Change
A good time to check your automatic transmission �uid
level is when the engine oil is changed.
Change both the �uid and �lter every 15,000 miles
(25,000 km) if the vehicle is mainly driven under one
or more of these conditions:
In heavy city traffic where the outside temperature
regularly reaches 90°F (32°C) or higher.
In hilly or mountainous terrain.
When doing frequent trailer towing.
Uses such as found in taxi, police or delivery
service.
If you do not use your vehicle under any of
these conditions, change the �uid and �lter every
50,000 miles (83 000 km).
SeePart A: Scheduled Maintenance Services on
page 6-4.
How to Check
Because this operation can be a little difficult, you may
choose to have this done at the dealership service
department.
If you do it yourself, be sure to follow all the instructions
here, or you could get a false reading on the dipstick.
Notice:Too much or too little �uid can damage
your transmission. Too much can mean that some
of the �uid could come out and fall on hot engine
part or exhaust system parts, starting a �re.
Too little �uid could cause the transmission to
overheat. Be sure to get an accurate reading if you
check your transmission �uid.
Wait at least 30 minutes before checking the
transmission �uid level if you have been driving:
When outside temperatures are above 90°F (32°C).
At high speed for quite a while.
In heavy traffic — especially in hot weather.
While pulling a trailer.
To get the right reading, the �uid should be at
normal operating temperature, which is 180°F to 200°F
(82°C to 93°C).
5-23
Page 309 of 376
Fuse/Circuit
BreakerUsage
3Courtesy Lamps, Glove Box Lamp,
Dome Reading Lamps, Vanity Mirror
Lamps, Courtesy Lamps
4Daytime Running Lamps Relay,
Instrument Panel Cluster
5 Rear Defogger
6Cruise Module, Truck Body Control
Module, Instrument Panel Cluster,
Cruise Control Switch,
Electrochromic Mirror
7 Power Outlets, Subwoofer Ampli�er
8Crank Circuit Fuse, Park/Neutral
Switch, Starter Enabler Relay
9License Plate Lamp, Tailamps,
Parking Lamps, Ashtray Lamp,
Panel Lights, Trailer Taillamps,
Front and Rear Sidemarker Lamps,
Door Switch Illumination, Headlamp
Switch Illumination, Rear Seat
Audio Illumination, Truck Body
Control Module
10 Air Bag SystemFuse/Circuit
BreakerUsage
11 Not Used
12Blower Motor, Rear Air Conditioning
Relay Coil, Front Cont. Temp.
Door Motor, HI Blower Relay,
Defogger Timer Coil
13Cigarette Lighter, Door Lock
Switches, Dutch Door Release
Module
14Cluster Illumination, Climate
Controls, Chime Module, Radio
Illumination, Rear Heat Switch
Illumination, Rear Wiper/Washer
Switch Illumination, Rear Liftgate
Switch Illumination, Remote
Cassette Illumination, Overhead
Console, Truck Body Control
Illumination
15Truck Body Module,
Headlamp Relay
16Front Turn Signals, Rear Turn
Signals, Trailer Turn Signals,
Back-Up Lamps, Brake
Transmission Shift Interlock
Solenoid
5-97
Page 313 of 376
Capacities and Speci�cations
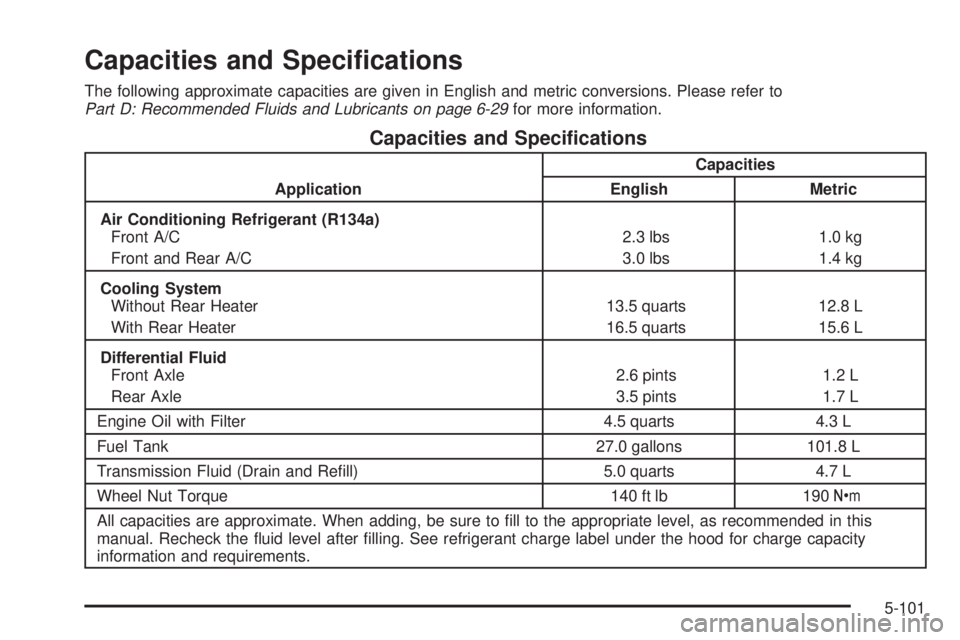
The following approximate capacities are given in English and metric conversions. Please refer to
Part D: Recommended Fluids and Lubricants on page 6-29for more information.
Capacities and Speci�cations
ApplicationCapacities
English Metric
Air Conditioning Refrigerant (R134a)
Front A/C
Front and Rear A/C2.3 lbs
3.0 lbs1.0 kg
1.4 kg
Cooling System
Without Rear Heater
With Rear Heater13.5 quarts
16.5 quarts12.8 L
15.6 L
Differential Fluid
Front Axle
Rear Axle2.6 pints
3.5 pints1.2 L
1.7 L
Engine Oil with Filter 4.5 quarts 4.3 L
Fuel Tank 27.0 gallons 101.8 L
Transmission Fluid (Drain and Re�ll) 5.0 quarts 4.7 L
Wheel Nut Torque 140 ft lb 190Y
All capacities are approximate. When adding, be sure to �ll to the appropriate level, as recommended in this
manual. Recheck the �uid level after �lling. See refrigerant charge label under the hood for charge capacity
information and requirements.
5-101
Page 314 of 376
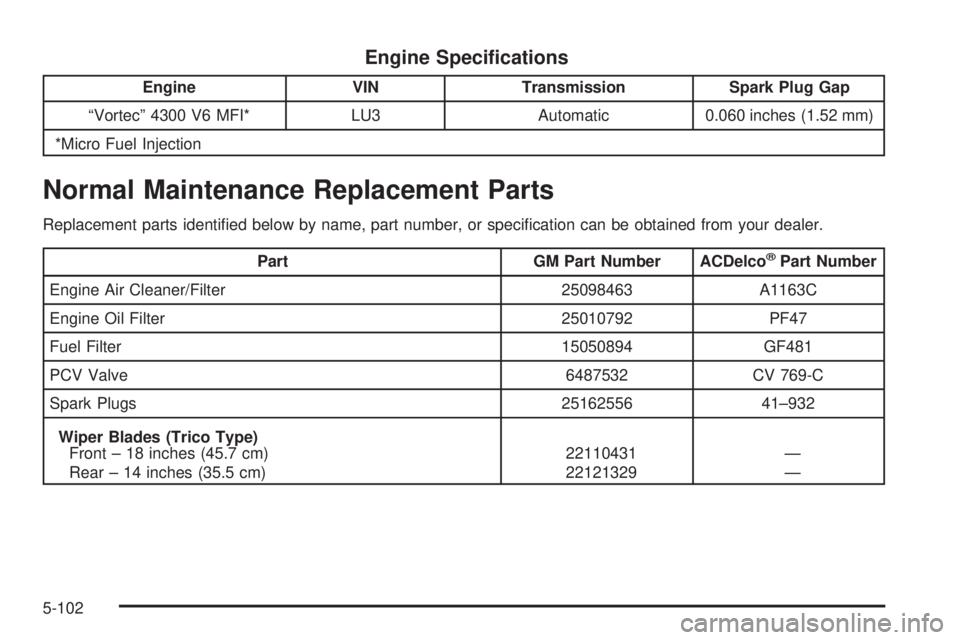
Engine Speci�cations
Engine VIN Transmission Spark Plug Gap
“Vortec” 4300 V6 MFI* LU3 Automatic 0.060 inches (1.52 mm)
*Micro Fuel Injection
Normal Maintenance Replacement Parts
Replacement parts identi�ed below by name, part number, or speci�cation can be obtained from your dealer.
Part GM Part Number ACDelco®Part Number
Engine Air Cleaner/Filter 25098463 A1163C
Engine Oil Filter 25010792 PF47
Fuel Filter 15050894 GF481
PCV Valve 6487532 CV 769-C
Spark Plugs 25162556 41–932
Wiper Blades (Trico Type)
Front – 18 inches (45.7 cm)
Rear – 14 inches (35.5 cm)22110431
22121329—
—
5-102
Page 319 of 376
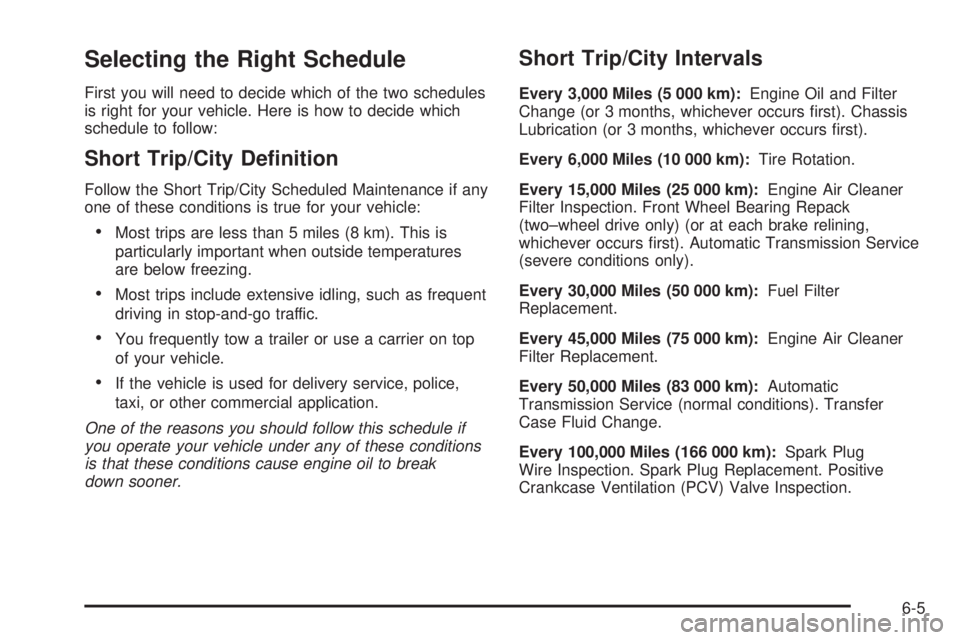
Selecting the Right Schedule
First you will need to decide which of the two schedules
is right for your vehicle. Here is how to decide which
schedule to follow:
Short Trip/City De�nition
Follow the Short Trip/City Scheduled Maintenance if any
one of these conditions is true for your vehicle:
Most trips are less than 5 miles (8 km). This is
particularly important when outside temperatures
are below freezing.
Most trips include extensive idling, such as frequent
driving in stop-and-go traffic.
You frequently tow a trailer or use a carrier on top
of your vehicle.
If the vehicle is used for delivery service, police,
taxi, or other commercial application.
One of the reasons you should follow this schedule if
you operate your vehicle under any of these conditions
is that these conditions cause engine oil to break
down sooner.
Short Trip/City Intervals
Every 3,000 Miles (5 000 km):Engine Oil and Filter
Change (or 3 months, whichever occurs �rst). Chassis
Lubrication (or 3 months, whichever occurs �rst).
Every 6,000 Miles (10 000 km):Tire Rotation.
Every 15,000 Miles (25 000 km):Engine Air Cleaner
Filter Inspection. Front Wheel Bearing Repack
(two–wheel drive only) (or at each brake relining,
whichever occurs �rst). Automatic Transmission Service
(severe conditions only).
Every 30,000 Miles (50 000 km):Fuel Filter
Replacement.
Every 45,000 Miles (75 000 km):Engine Air Cleaner
Filter Replacement.
Every 50,000 Miles (83 000 km):Automatic
Transmission Service (normal conditions). Transfer
Case Fluid Change.
Every 100,000 Miles (166 000 km):Spark Plug
Wire Inspection. Spark Plug Replacement. Positive
Crankcase Ventilation (PCV) Valve Inspection.
6-5