oil pressure CHEVROLET ASTRO CARGO VAN 1995 2.G Owners Manual
[x] Cancel search | Manufacturer: CHEVROLET, Model Year: 1995, Model line: ASTRO CARGO VAN, Model: CHEVROLET ASTRO CARGO VAN 1995 2.GPages: 342, PDF Size: 17.57 MB
Page 12 of 342
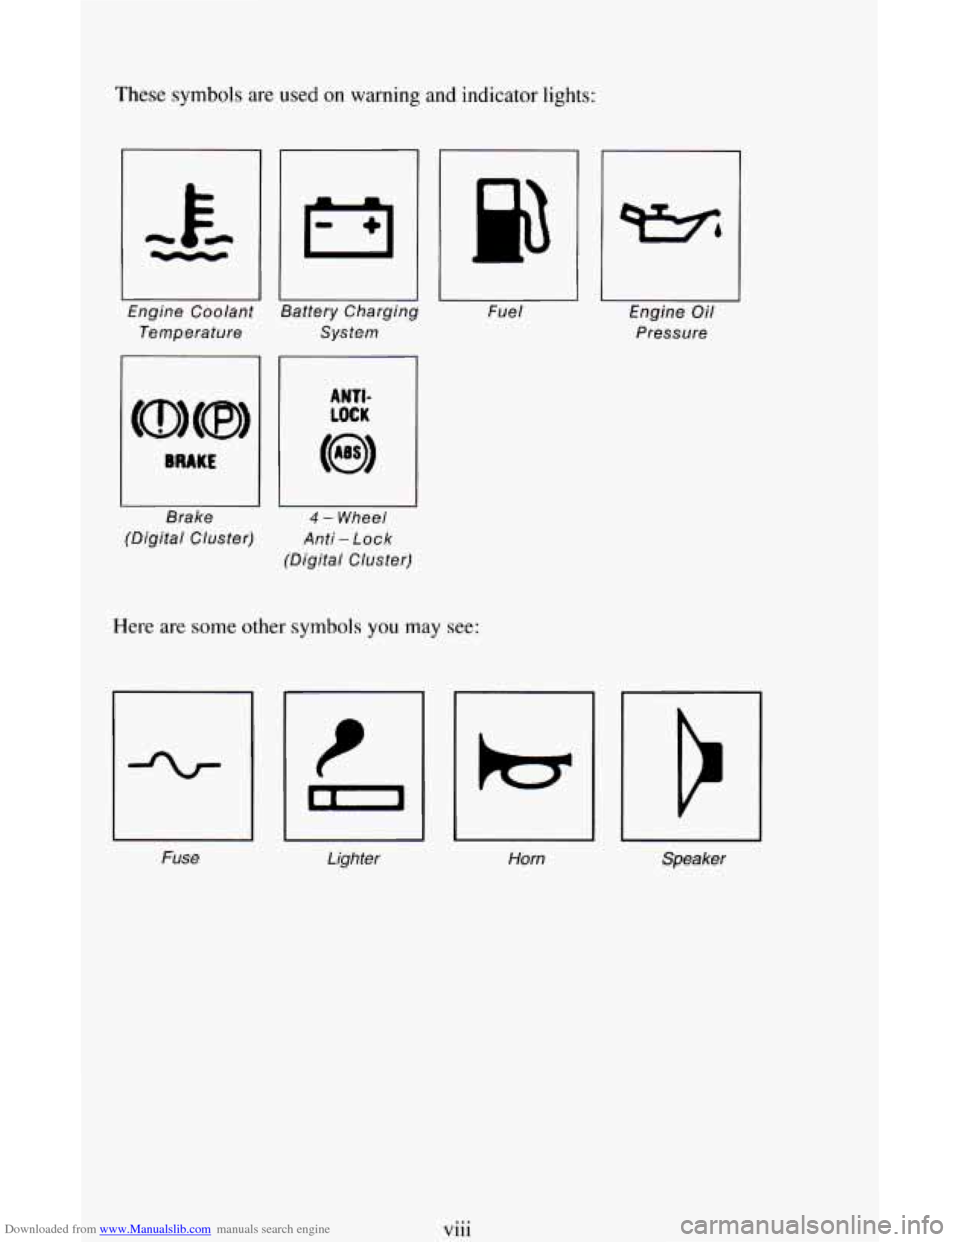
Downloaded from www.Manualslib.com manuals search engine These symbols are used on warning and indicator lights:
Engine Coolant
Temperature System
I I
Fue
I
I II
Brake 4 - Wheel
(Digital Cluster)
Anti - Lock
(Digital Cluster)
Here are some other symbols you may see:
Fuse Lighter
Horn Engine
Oil
Pressure
I
Speaker
viii
Page 113 of 342
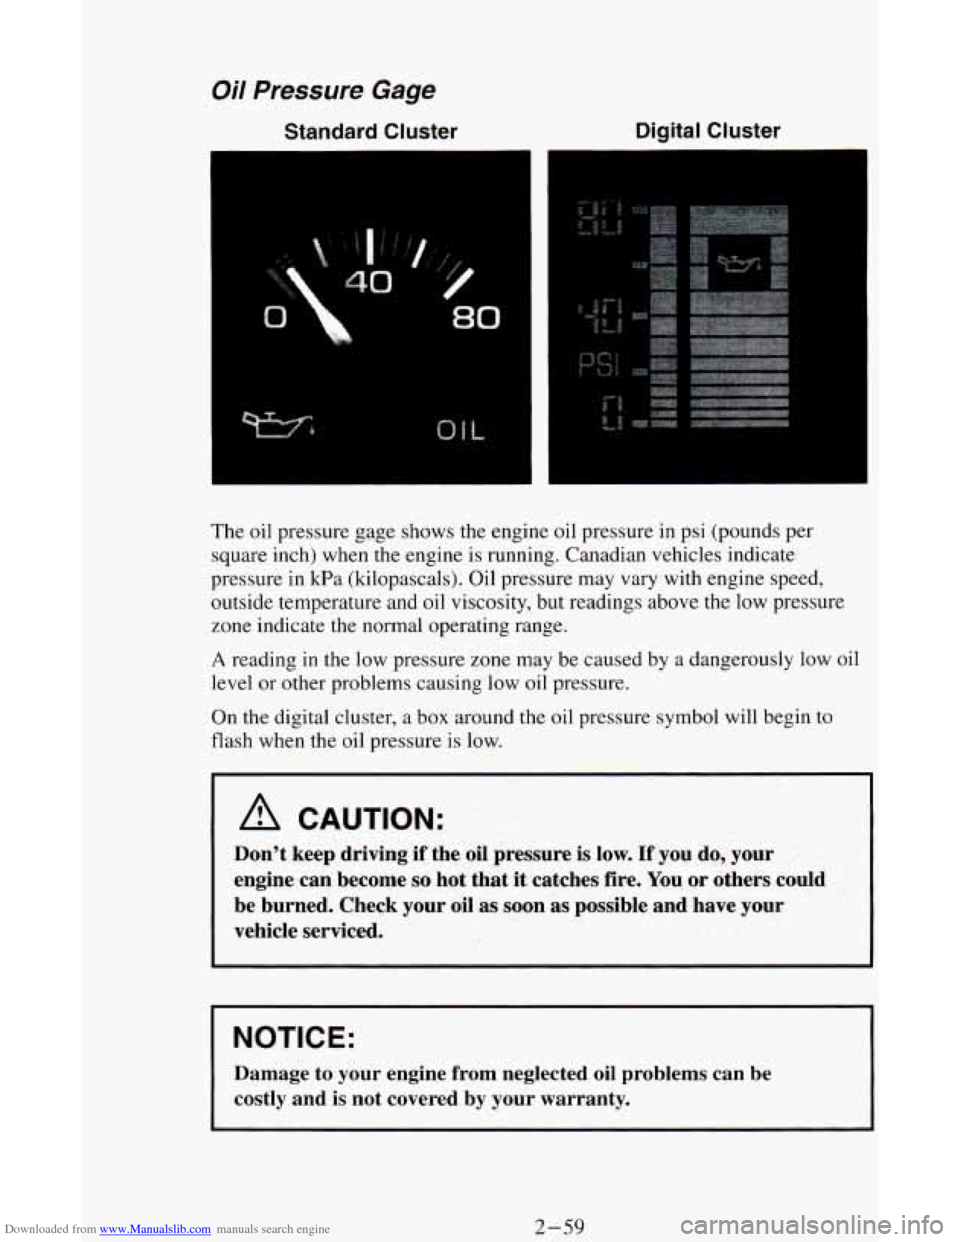
Downloaded from www.Manualslib.com manuals search engine Oil Pressure Gage
Standard Cluster Digital Cluster
The
oil pressure gage shows the engine oil pressure in psi (pounds per
square inch) when the engine is running. Canadian vehicles indicate
pressure in kPa (kilopascals). Oil pressure may vary with engine speed,
outside temperature and oil viscosity, but readings above the low pressure
zone indicate the normal operating range.
A reading in the low pressure zone may be caused by a dangerously low oil
level or other problems causing low
oil pressure.
On the digital cluster, a box around the oil pressure symbol will begin to
flash when the oil pressure
is low.
A CAUTION:
Don’t keep driving if the oil pressure is low. If you do, your
engine can become
so hot that it catches fire. You or others could
be burned. Check your oil
as soon as possible and have your
vehicle serviced.
NOTICE:
Damage to your engine from neglected oil problems can be
costly and
is not covered by your warranty.
2-59
Page 155 of 342
Downloaded from www.Manualslib.com manuals search engine Before Leaving on a Long Trip
Make sure you’re ready. Try to be well rested. If you must start when you’re
not fresh
- such as after a day’s work - don’t plan to make too many
miles that first
part of the journey. Wear comfortable clothing and shoes you
can easily drive in.
Is your vehicle ready for a long trip?
If you keep it serviced and maintained,
it’s ready to go. If it needs service, have it done before starting out. Of
course, you’ll find experienced and able service experts in
GM dealerships
all across North America. They’ll be ready and willing to help if you need
it.
Here are some things you can check before a trip:
Windshield Washer Fluid: Is the reservoir full? Are all windows clean
inside and outside?
Wiper Blades: Are they in good shape?
0 Fuel, Engine Oil, Other Fluids: Have you checked all levels?
0 Lights: Are they all working? Are the lenses clean?
Tires: They are vitally important to a safe, trouble-free trip. Is the tread
good enough for long-distance driving? Are the tires all inflated to the
recommended pressure?
Should you delay your trip a short time to avoid a major storm system?
Weather Forecasts: What’s the weather outlook along your route?
Maps: Do you have up-to-date maps?
High way Hypnosis
Is there actually such a condition as “highway hypnosis”? Or is it just plain
falling asleep at the wheel? Call it highway hypnosis, lack
of awareness, or
whatever.
There is something about an easy stretch of road with the same scenery,
along with the hum
of the tires on the road, the drone of the engine, and the
rush of the wind against the vehicle that can make you sleepy. Don’t let it
happen to you! If it does, your vehicle can leave the road in
less than a
second, and you could crash and be injured.
What can you do about highway hypnosis? First, be aware that it can
happen.
4- 17
Page 187 of 342
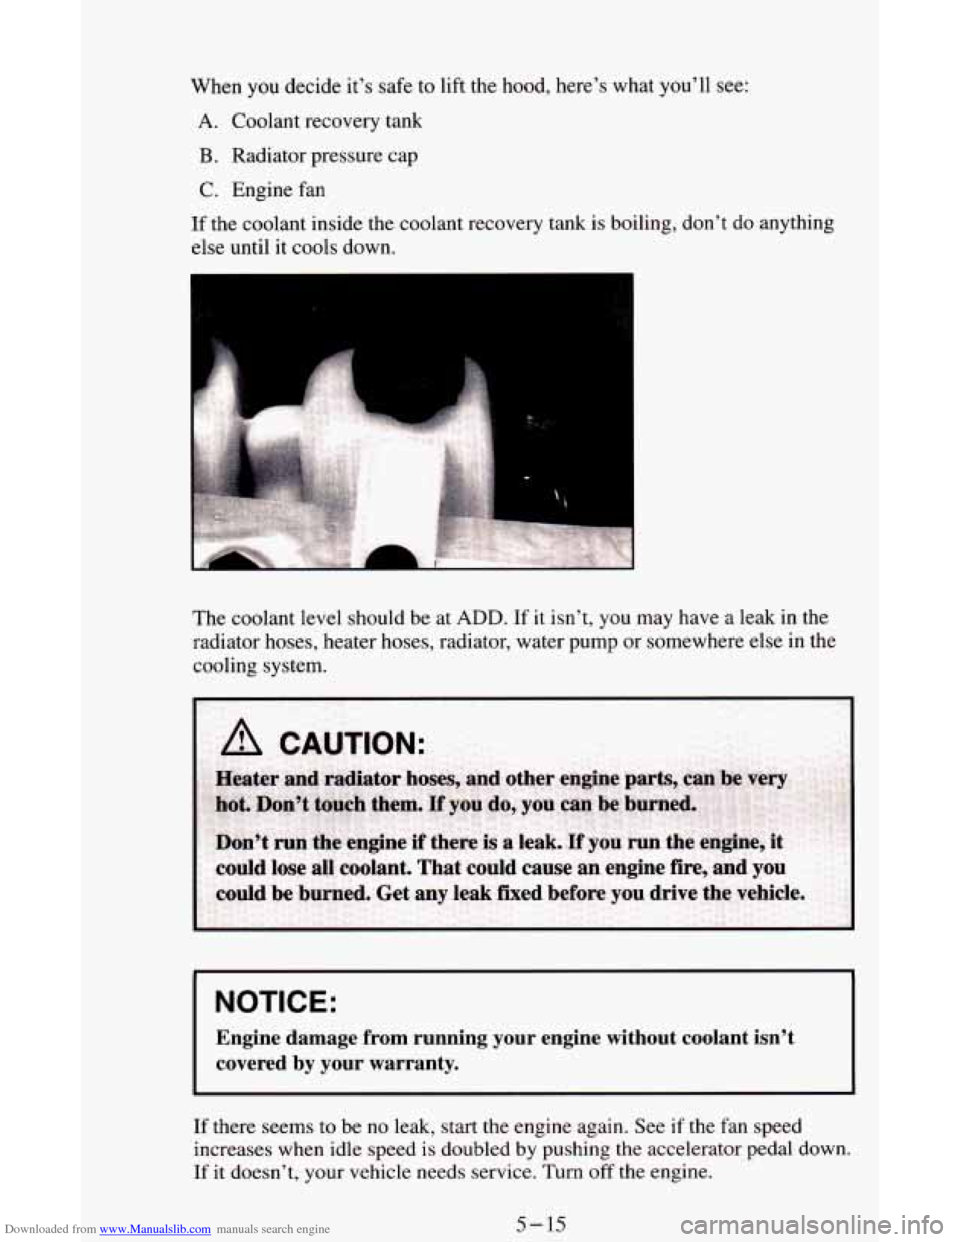
Downloaded from www.Manualslib.com manuals search engine When you decide it’s safe to lift the hood, here’s what you’ll see:
A. Coolant recovery tank
B. Radiator pressure cap
C. Engine fan
If the coolant inside the coolant recovery tank is boiling, don’t do anything
else until it cools down.
The coolant level should be at
ADD. If it isn’t, you may have a leak in the
radiator hoses, heater hoses, radiator, water pump
or somewhere else in the
cooling system.
NOTICE:
Engine damage from running your engine without coolant isn’t \
covered by your warranty.
If there seems to be no leak, start the engine again. See if the fan speed
increases when idle speed is doubled
by pushing the accelerator pedal down.
If it doesn’t, your vehicle needs service. Turn off the engine.
5-15
Page 258 of 342
Downloaded from www.Manualslib.com manuals search engine Rinse the section with a clean, wet sponge.
Wipe off what’s left with a slightly damp paper towel or cloth.
Then dry it immediately with a blow dryer or a heat lamp.
NOTICE:
Be careful. A blow dryer may scorch the fabric.
Wipe with a clean cloth.
Using Solvent-Type Cleaner on Fabric
First, see if you have to use solvent-type cleaner at all. Some spots and
stains will clean off better
with just water and mild soap.
If you need to
use a solvent:
Gently scrape excess soil from the trim material with a clean, dull knife or
scraper. Use
very little cleaner, light pressure and clean cloths (preferably
cheesecloth). Cleaning should start at the outside
of the stain, “feathering”
toward the center. Keep changing
to a clean section of the cloth.
blow dryer to help prevent a cleaning ring. (See the previous NOTICE.)
0 When you clean a stain from fabric, immediately dry the area with a
Fabric Protection
Your vehicle has upholstery that has been treated with Scotchgard” Fabric
Protector,
a 3M product. Scotchgard“ protects fabrics by repelling oil and
water, which are the carriers of most stains. Even with this protection, you
still need to clean your upholstery often to keep it looking new.
Further information on cleaning is available by calling 1-800-433-3296
(in
Minnesota, 1-800-642-6 167).
Special Cleaning Problems
Greasy or Oily Stains
Stains caused by grease, oil, butter, margarine, shoe polish, coffee with
cream, chewing gum, cosmetic creams, vegetable oils, wax crayon, tar and
asphalt can be removed as follows:
Carefully scrape off excess stain.
Follow the solvent-type instructions described earlier.
Shoe polish, wax crayon, tar and asphalt will stain if left on a vehicle
seat fabric. They should be removed as soon
as possible. Be careful,
because the cleaner will dissolve them and may cause them to spread.
4-50
Page 261 of 342
Downloaded from www.Manualslib.com manuals search engine Cleaning the Outside of Your Vehicle
The paint finish on your vehicle provides beauty, depth of color, gloss
retention and durability.
Washing Your Vehicle
The best way to preserve your vehicle’s finish is to keep it clean by washing
it often with lukewarm or cold water.
Don’t wash your vehicle in the direct rays of
the sun. Don’t use strong soaps
or chemical detergents. Use liquid hand, dish or car washing (mild
detergent) soaps. Don’t use cleaning agents that are petroleum based, or that
contain acid or abrasives. All cleaning agents should be flushed promptly
and not allowed to dry on the surface,
or they could stain. Dry the finish
with a soft, clean chamois or a 100% cotton towel to avoid surface scratches
and water spotting.
High pressure vehicle washes may cause water
t0 eater your vehicle.
Finish Care
Occasional waxing or mild polishing of your vehicle by hand may be
necessary to remove residue from the paint finish.
You can get GM
approved cleaning products from your dealer. (See “Appearance Care and
Materials’’ in the Index.)
Your vehicle has a “basecoatjclearcoat” paint finish. The clearcoat gives
more depth and gloss to the colored basecoat. Always use waxes and
polishes that are non-abrasive and made for
a basecoat/clearcoat paint
finish.
NOTICE:
Machine compounding or aggressive polishing on a
basecoatklearcoat paint finish may dull the finish or leave swirl
marks.
Foreign materials such as calcium chloride and other salts, ice melting
agents, road oil and tar, tree sap, bird droppings, chemicals from industrial
chimneys, etc. can damage your vehicle’s finish if
they remain on painted
surfaces. Wash the vehicle as soon as possible. If necessary, use
non-abrasive cleaners that are marked safe for painted surfaces to remove
foreign matter.
Exterior painted surfaces are subject to aging, weather and chemical fallout
that can take their toll over a period
of years. You can help to keep the paint
finish looking new by keeping your vehicle garaged or covered whenever
possible.
6-53
Page 287 of 342
Downloaded from www.Manualslib.com manuals search engine Maintenance Schedule I
30,000 Miles (50 000 km)
0
0
0
0
0
0
Change engine oil and filter (or every 3 months, whichever occurs
first).
An Emission Control Service.
Lubricate the front suspension, ball joints and king pin bushings,
steering linkage and transfer case shift linkage, parking brake cable
guides, and brake pedal springs at every
oil change (or every 6 months,
whichever occurs first).
Check redfront axle fluid
level and add fluid as needed. Check
constant velocity joints and
axle seals for leaking.**
Drain, flush and refill cooling system
(or every 24 months, whichever
occurs first). See “Engine Coolant’’
in the Index for what to use.
Inspect hoses. Clean radiator, condenser, pressure cap and neck.
Pressure test
the cooling system and pressure cap. An Emission
Control Service.
For 2-Wheel Drive vehicles only: Clean and repack the front wheel
bearings (or at each brake relining, whichever occurs first).
Replace spark plugs.
An Emission Control Service.
Replace fuel filter. An Emission Control Service.
Replace air cleaner filter. Replace filter more often under dusty
conditions. An Emission Control Service.
Rotate tires. See “Tire Inspection and Rotation” in the Index for proper
rotation pattern and additional information.
I DATE I ACTUALMILEAGE I SERVICED BY: I
7-1 1
Page 293 of 342
Downloaded from www.Manualslib.com manuals search engine 60,000 Miles (100 000 km)
0 Change engine oil and filter (or every 3 months, whichever occurs
first).
An Emission Control Service.
0 Lubricate the front suspension, ball joints and king pin bushings,
steering linkage and transfer case shift linkage, parking brake cable
guides, and brake pedal springs at every oil change (or every
6 months,
whichever occurs first).
0 Check readfront axle fluid level and add fluid as needed. Check
constant velocity joints and axle seals for leaking.**
bearings
(or at each brake relining, whichever occurs first),
0 For 2-Wheel Drive vehicles only: Clean and repack the front wheel
0 Inspect engine accessory drive belt. An Emission Control Service.
0 Drain, flush and refill cooling system (or every 24 months, whichever
occurs first). See “Engine Coolant” in the Index for what to use.
Inspect hoses. Clean radiator, condenser, pressure cap and neck.
Pressure test the cooling system and pressure cap.
An Emission
Control Service.
0 Replace spark plugs. An Emission Control Service.
0 Inspect spark plug wires. An Emission Control Service.
0 Replace fuel filter. An Emission Control Service.
Replace air cleaner filter. Replace filter more often under dusty
conditions.
An Emission Control Service.
Inspect fuel tank, cap and lines for damage or leaks. Inspect fuel cap
gasket for any damage. Replace parts
as needed. An Emission Control
Service.
DATE SERVICED BY ACTUAL MILEAGE
7-17
Page 298 of 342
Downloaded from www.Manualslib.com manuals search engine I Maintenance Schedule I I ~~~ ~
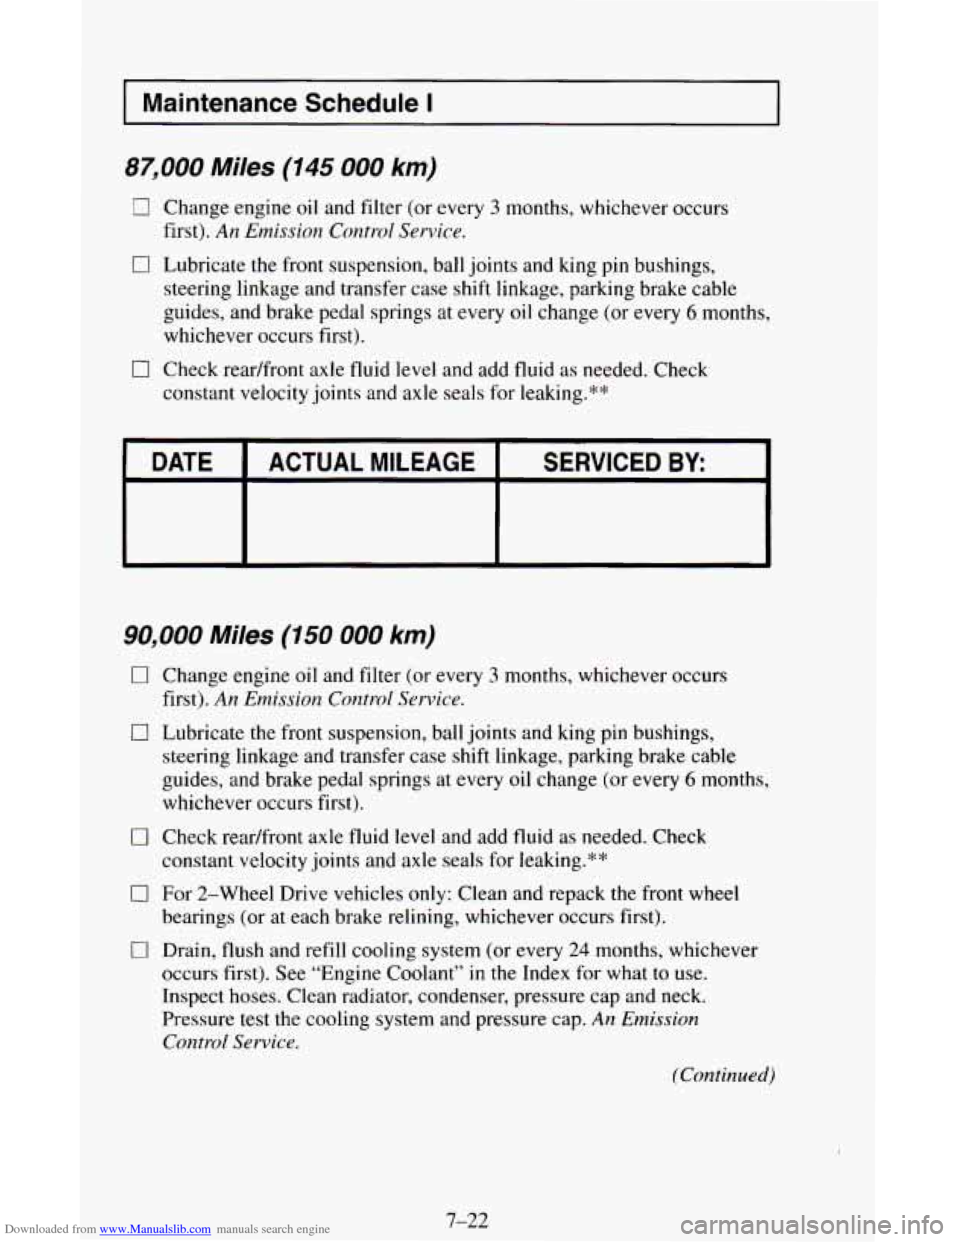
87,000 Miles (145 000 km)
0
0
0
Change engine oil and filter (or every 3 months, whichever occurs
first).
An Emission Control Service.
Lubricate the front suspension, ball joints and king pin bushings,
steering linkage and transfer case shift linkage, parking brake cable
guides, and brake pedal springs
at every oil change (or every 6 months,
whichever occurs first).
Check readfront axle fluid level and add fluid as needed. Check
constant velocity joints and axle seals for leaking.**
DATE
SERVICED BY ACTUAL MILEAGE
90,000 Miles (150 000 km)
0 Change engine oil and filter (or every 3 months, whichever occurs
first).
An Emission Control Service.
0 Lubricate the front suspension, ball joints and king pin bushings,
steering linkage and transfer case shift linkage, parking brake cable
guides, and brake pedal springs at every oil change
(or every 6 months,
whichever occurs first).
0 Check readfront axle fluid level and add fluid as needed. Check
constant velocity joints and axle seals for leaking.**
bearings (or at each brake relining, whichever occurs first).
0 For 2-Wheel Drive vehicles only: Clean and repack the front wheel
0 Drain, flush and refill cooling system (or every 24 months, whichever
occurs first). See “Engine Coolant”
in the Index for what to use.
Inspect hoses. Clean radiator, condenser, pressure cap and neck.
Pressure test
the cooling system and pressure cap. An Emission
Control Service.
(Continued)
7-22
Page 304 of 342
Downloaded from www.Manualslib.com manuals search engine I Maintenance Schedule II
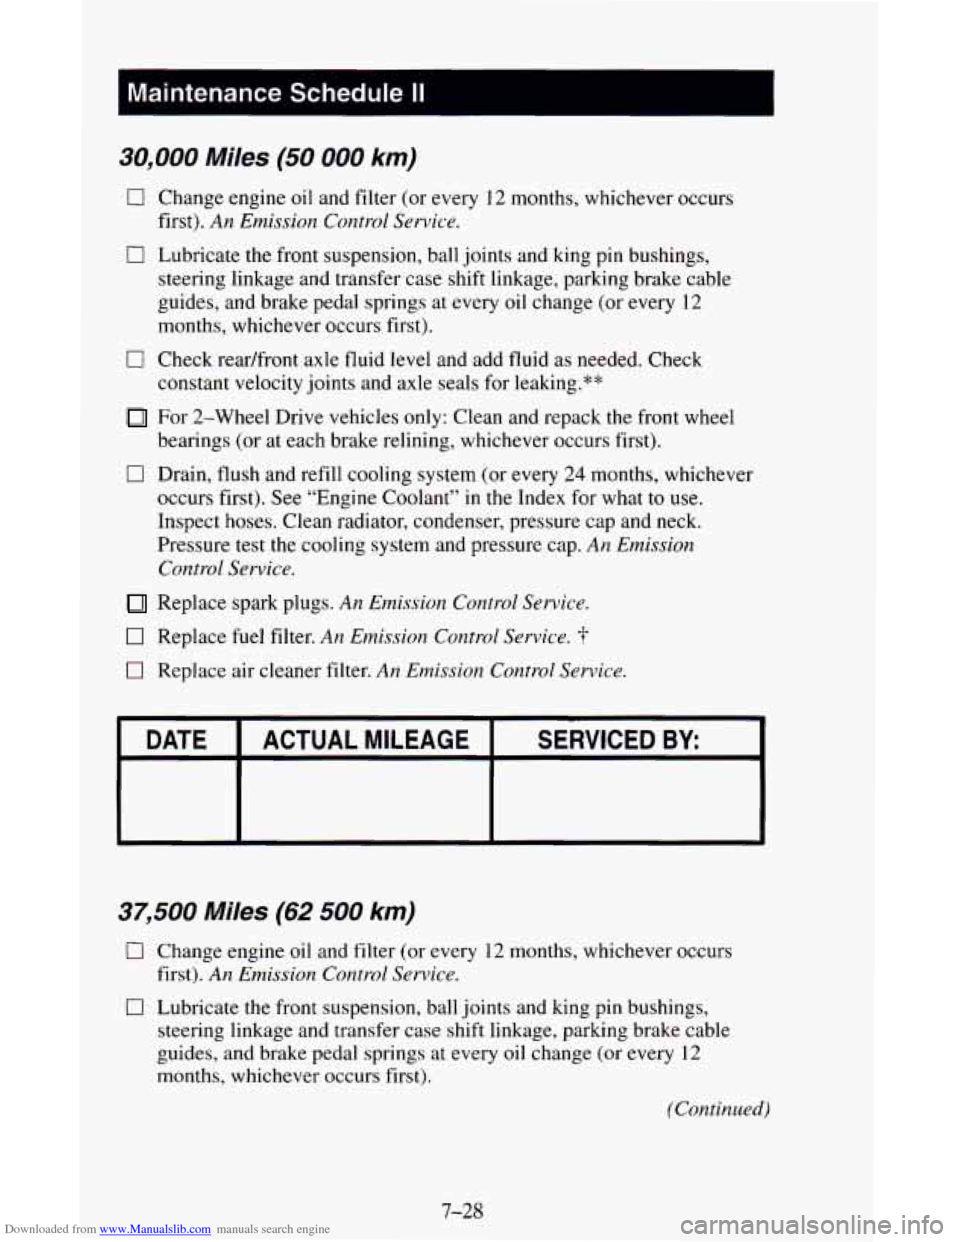
30,000 Miles (50 000 km)
0 Change engine oil and filter (or every 12 months, whichever occurs
first).
An Emission Control Service.
0 Lubricate the front suspension, ball joints and king pin bushings,
steering linkage and transfer case shift linkage, parking brake cable
guides, and brake pedal springs at every oil change (or every
12
months, whichever occurs first).
0 Check readfront axle fluid level and add fluid as needed. Check
constant velocity joints and axle seals
for leaking.**
For 2-Wheel Drive vehicles only: Clean and repack the front wheel
0 Drain, flush and refill cooling system (or every 24 months, whichever
bearings (or
at each brake relining, whichever occurs first).
occurs first). See “Engine Coolant’’
in the Index for what to use.
Inspect hoses. Clean radiator, condenser, pressure cap and neck.
Pressure test the cooling system and pressure cap.
An Emission
Control Service.
Replace spark plugs. An Emission Control Service.
0 Replace fuel filter. An Emission Control Service. -f-
0 Replace air cleaner filter. An Emission Control Service.
37,500 Miles (62 500 km)
0 Change engine oil and filter (or every 12 months, whichever occurs
0 Lubricate the front suspension, ball joints and king pin bushings,
first).
An Emission Control
Service.
steering linkage and transfer case shift linkage, parking brake cable
guides, and brake pedal springs at every oil change (or every 12
months, whichever occurs first).
(Continued)
7-28