oil pressure CHEVROLET ASTRO CARGO VAN 2003 2.G Owners Manual
[x] Cancel search | Manufacturer: CHEVROLET, Model Year: 2003, Model line: ASTRO CARGO VAN, Model: CHEVROLET ASTRO CARGO VAN 2003 2.GPages: 382, PDF Size: 2.63 MB
Page 125 of 382
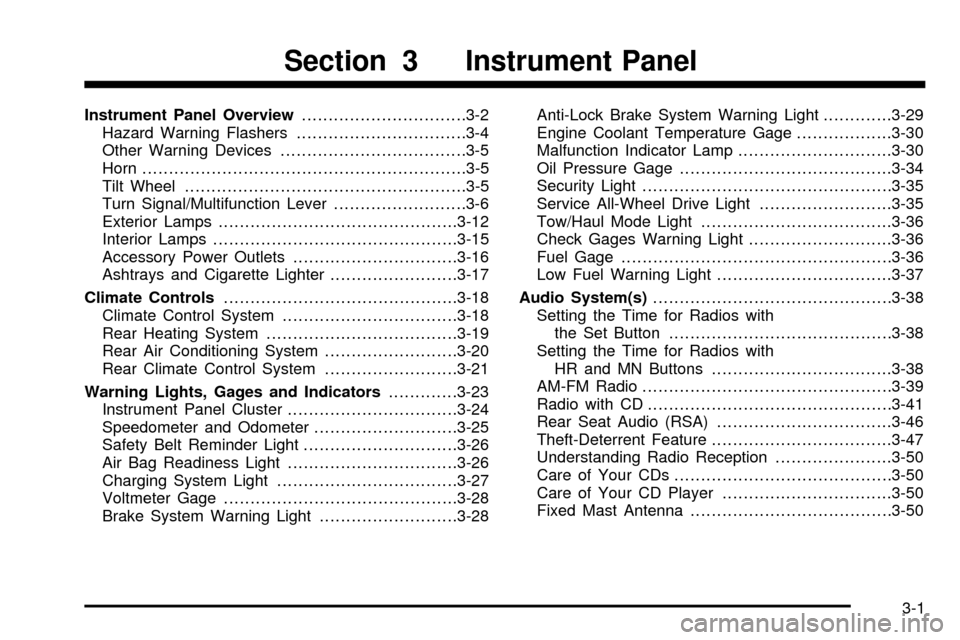
Instrument Panel Overview...............................3-2
Hazard Warning Flashers................................3-4
Other Warning Devices...................................3-5
Horn.............................................................3-5
Tilt Wheel.....................................................3-5
Turn Signal/Multifunction Lever.........................3-6
Exterior Lamps.............................................3-12
Interior Lamps..............................................3-15
Accessory Power Outlets...............................3-16
Ashtrays and Cigarette Lighter........................3-17
Climate Controls............................................3-18
Climate Control System.................................3-18
Rear Heating System....................................3-19
Rear Air Conditioning System.........................3-20
Rear Climate Control System.........................3-21
Warning Lights, Gages and Indicators.............3-23
Instrument Panel Cluster................................3-24
Speedometer and Odometer...........................3-25
Safety Belt Reminder Light.............................3-26
Air Bag Readiness Light................................3-26
Charging System Light..................................3-27
Voltmeter Gage............................................3-28
Brake System Warning Light..........................3-28Anti-Lock Brake System Warning Light.............3-29
Engine Coolant Temperature Gage..................3-30
Malfunction Indicator Lamp.............................3-30
Oil Pressure Gage........................................3-34
Security Light...............................................3-35
Service All-Wheel Drive Light.........................3-35
Tow/Haul Mode Light....................................3-36
Check Gages Warning Light...........................3-36
Fuel Gage...................................................3-36
Low Fuel Warning Light.................................3-37
Audio System(s).............................................3-38
Setting the Time for Radios with
the Set Button..........................................3-38
Setting the Time for Radios with
HR and MN Buttons..................................3-38
AM-FM Radio...............................................3-39
Radio with CD..............................................3-41
Rear Seat Audio (RSA).................................3-46
Theft-Deterrent Feature..................................3-47
Understanding Radio Reception......................3-50
Care of Your CDs.........................................3-50
Care of Your CD Player................................3-50
Fixed Mast Antenna......................................3-50
Section 3 Instrument Panel
3-1
Page 158 of 382

Oil Pressure Gage
The oil pressure gage
shows the engine oil
pressure in psi (pounds
per square inch) when the
engine is running.
Canadian vehicles indicate pressure in kPa
(kilopascals). Oil pressure may vary with engine speed,
outside temperature and oil viscosity, but readings
above the low pressure zone indicate the normal
operating range.A reading in the low pressure zone may be caused by a
dangerously low oil level or other problems causing
low oil pressure.
{CAUTION:
Don't keep driving if the oil pressure is low.
If you do, your engine can become so hot that
it catches ®re. You or others could be burned.
Check your oil as soon as possible and have
your vehicle serviced.
Notice:Damage to your engine from neglected oil
problems can be costly and is not covered by
your warranty.
3-34
Page 160 of 382
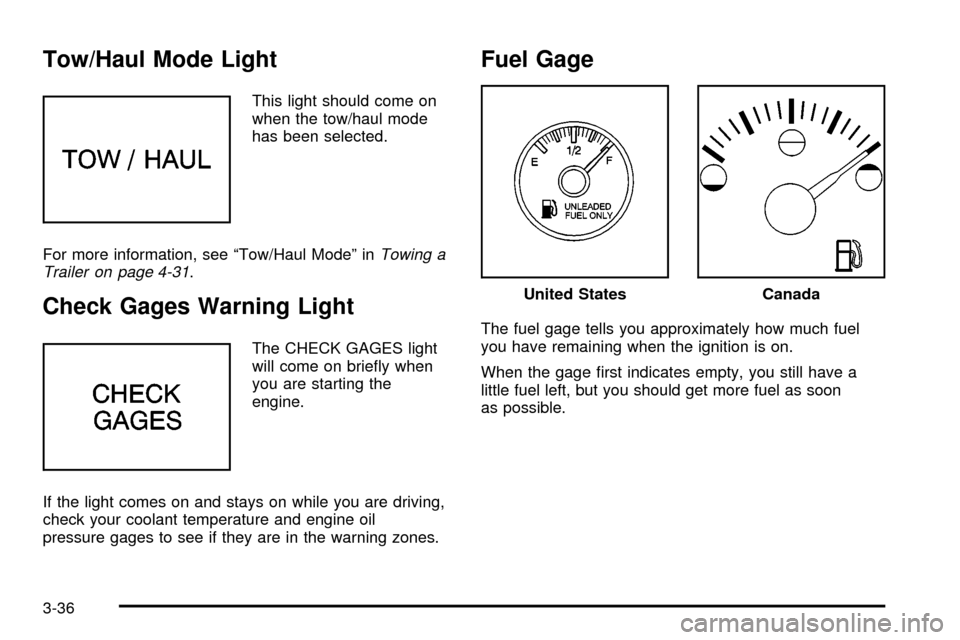
Tow/Haul Mode Light
This light should come on
when the tow/haul mode
has been selected.
For more information, see ªTow/Haul Modeº in
Towing a
Trailer on page 4-31.
Check Gages Warning Light
The CHECK GAGES light
will come on brie¯y when
you are starting the
engine.
If the light comes on and stays on while you are driving,
check your coolant temperature and engine oil
pressure gages to see if they are in the warning zones.
Fuel Gage
The fuel gage tells you approximately how much fuel
you have remaining when the ignition is on.
When the gage ®rst indicates empty, you still have a
little fuel left, but you should get more fuel as soon
as possible.
United StatesCanada
3-36
Page 195 of 382
The exit ramp can be curved, sometimes quite sharply.
The exit speed is usually posted.
Reduce your speed according to your speedometer, not
to your sense of motion. After driving for any distance
at higher speeds, you may tend to think you are
going slower than you actually are.
Before Leaving on a Long Trip
Make sure you're ready. Try to be well rested. If you
must start when you're not fresh Ð such as after a day's
work Ð don't plan to make too many miles that ®rst
part of the journey. Wear comfortable clothing and shoes
you can easily drive in.
Is your vehicle ready for a long trip? If you keep it
serviced and maintained, it's ready to go. If it needs
service, have it done before starting out. Of course,
you'll ®nd experienced and able service experts in
GM dealerships all across North America. They'll be
ready and willing to help if you need it.Here are some things you can check before a trip:
·Windshield Washer Fluid:Is the reservoir full? Are
all windows clean inside and outside?
·Wiper Blades:Are they in good shape?
·Fuel, Engine Oil, Other Fluids:Have you checked
all levels?
·Lamps:Are they all working? Are the lenses clean?
·Tires:They are vitally important to a safe,
trouble-free trip. Is the tread good enough for
long-distance driving? Are the tires all in¯ated to the
recommended pressure?
·Weather Forecasts:What's the weather outlook
along your route? Should you delay your trip a
short time to avoid a major storm system?
·Maps:Do you have up-to-date maps?
4-21
Page 217 of 382
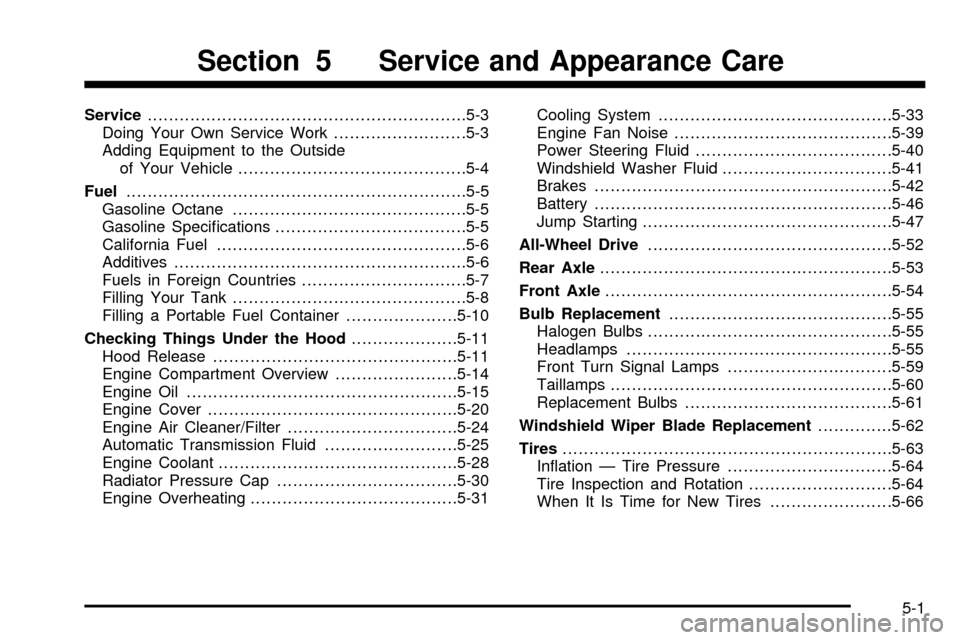
Service............................................................5-3
Doing Your Own Service Work.........................5-3
Adding Equipment to the Outside
of Your Vehicle...........................................5-4
Fuel................................................................5-5
Gasoline Octane............................................5-5
Gasoline Speci®cations....................................5-5
California Fuel...............................................5-6
Additives.......................................................5-6
Fuels in Foreign Countries...............................5-7
Filling Your Tank............................................5-8
Filling a Portable Fuel Container.....................5-10
Checking Things Under the Hood....................5-11
Hood Release..............................................5-11
Engine Compartment Overview.......................5-14
Engine Oil...................................................5-15
Engine Cover...............................................5-20
Engine Air Cleaner/Filter................................5-24
Automatic Transmission Fluid.........................5-25
Engine Coolant.............................................5-28
Radiator Pressure Cap..................................5-30
Engine Overheating.......................................5-31Cooling System............................................5-33
Engine Fan Noise.........................................5-39
Power Steering Fluid.....................................5-40
Windshield Washer Fluid................................5-41
Brakes........................................................5-42
Battery........................................................5-46
Jump Starting...............................................5-47
All-Wheel Drive..............................................5-52
Rear Axle.......................................................5-53
Front Axle......................................................5-54
Bulb Replacement..........................................5-55
Halogen Bulbs..............................................5-55
Headlamps..................................................5-55
Front Turn Signal Lamps...............................5-59
Taillamps.....................................................5-60
Replacement Bulbs.......................................5-61
Windshield Wiper Blade Replacement..............5-62
Tires..............................................................5-63
In¯ation Ð Tire Pressure...............................5-64
Tire Inspection and Rotation...........................5-64
When It Is Time for New Tires.......................5-66
Section 5 Service and Appearance Care
5-1
Page 249 of 382
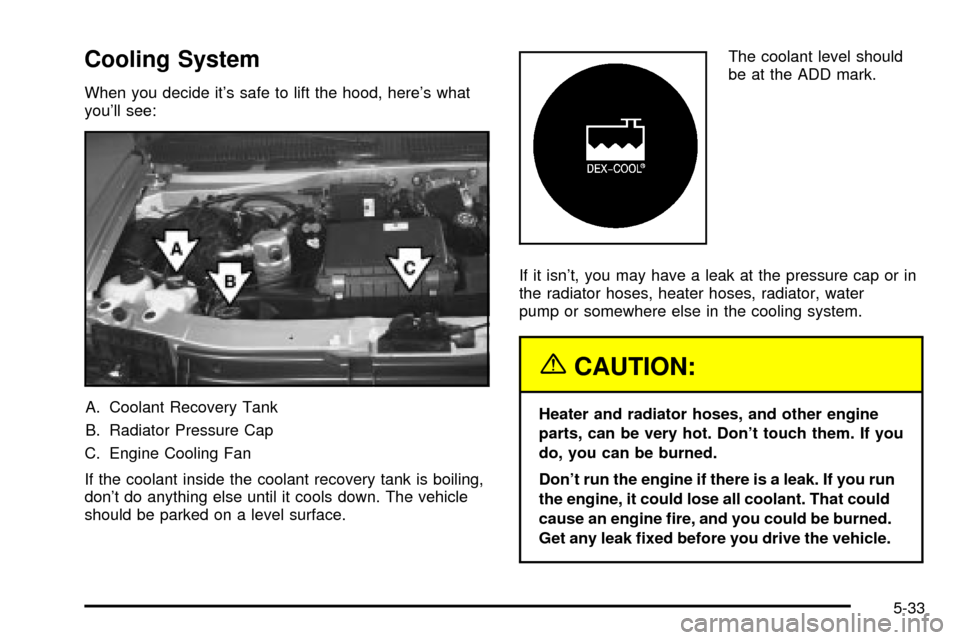
Cooling System
When you decide it's safe to lift the hood, here's what
you'll see:
A. Coolant Recovery Tank
B. Radiator Pressure Cap
C. Engine Cooling Fan
If the coolant inside the coolant recovery tank is boiling,
don't do anything else until it cools down. The vehicle
should be parked on a level surface.The coolant level should
be at the ADD mark.
If it isn't, you may have a leak at the pressure cap or in
the radiator hoses, heater hoses, radiator, water
pump or somewhere else in the cooling system.
{CAUTION:
Heater and radiator hoses, and other engine
parts, can be very hot. Don't touch them. If you
do, you can be burned.
Don't run the engine if there is a leak. If you run
the engine, it could lose all coolant. That could
cause an engine ®re, and you could be burned.
Get any leak ®xed before you drive the vehicle.
5-33
Page 313 of 382
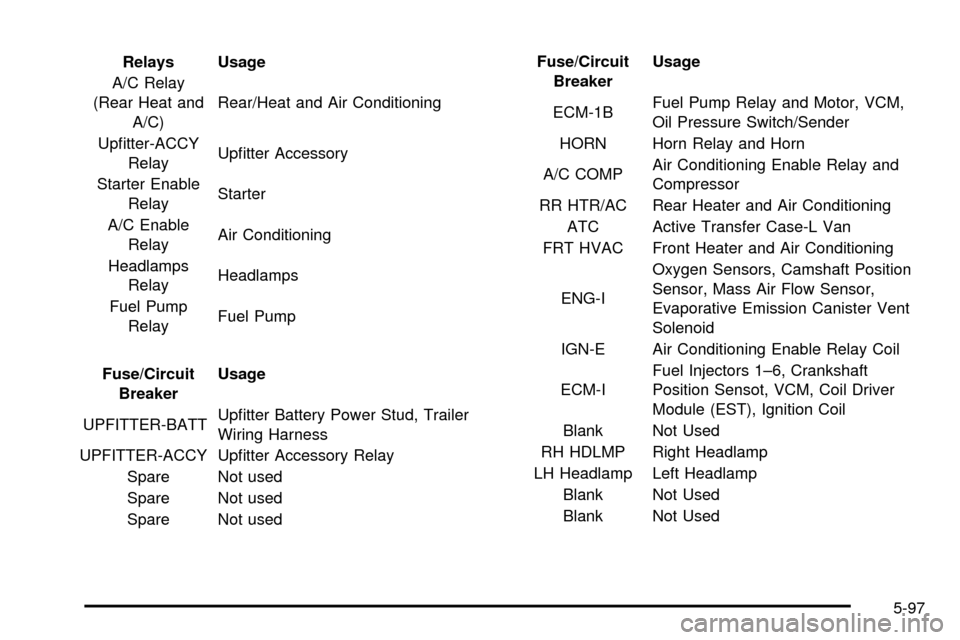
Relays Usage
A/C Relay
(Rear Heat and
A/C)Rear/Heat and Air Conditioning
Up®tter-ACCY
RelayUp®tter Accessory
Starter Enable
RelayStarter
A/C Enable
RelayAir Conditioning
Headlamps
RelayHeadlamps
Fuel Pump
RelayFuel Pump
Fuse/Circuit
BreakerUsage
UPFITTER-BATTUp®tter Battery Power Stud, Trailer
Wiring Harness
UPFITTER-ACCY Up®tter Accessory Relay
Spare Not used
Spare Not used
Spare Not usedFuse/Circuit
BreakerUsage
ECM-1BFuel Pump Relay and Motor, VCM,
Oil Pressure Switch/Sender
HORN Horn Relay and Horn
A/C COMPAir Conditioning Enable Relay and
Compressor
RR HTR/AC Rear Heater and Air Conditioning
ATC Active Transfer Case-L Van
FRT HVAC Front Heater and Air Conditioning
ENG-IOxygen Sensors, Camshaft Position
Sensor, Mass Air Flow Sensor,
Evaporative Emission Canister Vent
Solenoid
IGN-E Air Conditioning Enable Relay Coil
ECM-IFuel Injectors 1±6, Crankshaft
Position Sensot, VCM, Coil Driver
Module (EST), Ignition Coil
Blank Not Used
RH HDLMP Right Headlamp
LH Headlamp Left Headlamp
Blank Not Used
Blank Not Used
5-97
Page 315 of 382
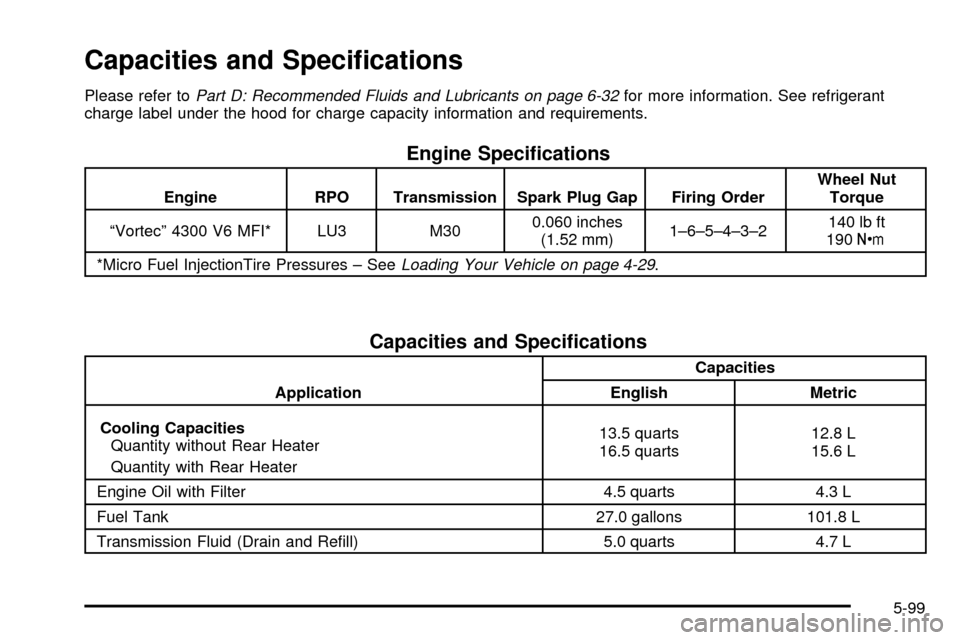
Capacities and Speci®cations
Please refer toPart D: Recommended Fluids and Lubricants on page 6-32for more information. See refrigerant
charge label under the hood for charge capacity information and requirements.
Engine Speci®cations
Engine RPO Transmission Spark Plug Gap Firing OrderWheel Nut
Torque
ªVortecº 4300 V6 MFI* LU3 M300.060 inches
(1.52 mm)1±6±5±4±3±2140 lb ft
190Y
*Micro Fuel InjectionTire Pressures ± See
Loading Your Vehicle on page 4-29.
Capacities and Speci®cations
ApplicationCapacities
English Metric
Cooling Capacities
Quantity without Rear Heater
Quantity with Rear Heater13.5 quarts
16.5 quarts12.8 L
15.6 L
Engine Oil with Filter 4.5 quarts 4.3 L
Fuel Tank 27.0 gallons 101.8 L
Transmission Fluid (Drain and Re®ll) 5.0 quarts 4.7 L
5-99
Page 335 of 382
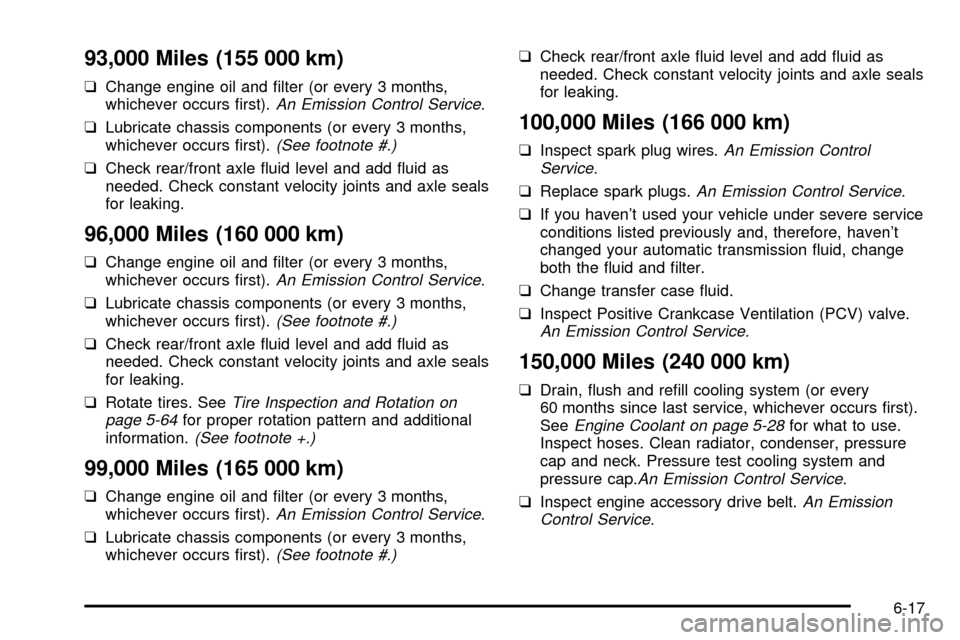
93,000 Miles (155 000 km)
qChange engine oil and ®lter (or every 3 months,
whichever occurs ®rst).An Emission Control Service.
qLubricate chassis components (or every 3 months,
whichever occurs ®rst).(See footnote #.)
qCheck rear/front axle ¯uid level and add ¯uid as
needed. Check constant velocity joints and axle seals
for leaking.
96,000 Miles (160 000 km)
qChange engine oil and ®lter (or every 3 months,
whichever occurs ®rst).An Emission Control Service.
qLubricate chassis components (or every 3 months,
whichever occurs ®rst).(See footnote #.)
qCheck rear/front axle ¯uid level and add ¯uid as
needed. Check constant velocity joints and axle seals
for leaking.
qRotate tires. See
Tire Inspection and Rotation on
page 5-64for proper rotation pattern and additional
information.(See footnote +.)
99,000 Miles (165 000 km)
qChange engine oil and ®lter (or every 3 months,
whichever occurs ®rst).An Emission Control Service.
qLubricate chassis components (or every 3 months,
whichever occurs ®rst).(See footnote #.)
qCheck rear/front axle ¯uid level and add ¯uid as
needed. Check constant velocity joints and axle seals
for leaking.
100,000 Miles (166 000 km)
qInspect spark plug wires.An Emission Control
Service.
qReplace spark plugs.An Emission Control Service.
qIf you haven't used your vehicle under severe service
conditions listed previously and, therefore, haven't
changed your automatic transmission ¯uid, change
both the ¯uid and ®lter.
qChange transfer case ¯uid.
qInspect Positive Crankcase Ventilation (PCV) valve.
An Emission Control Service.
150,000 Miles (240 000 km)
qDrain, ¯ush and re®ll cooling system (or every
60 months since last service, whichever occurs ®rst).
See
Engine Coolant on page 5-28for what to use.
Inspect hoses. Clean radiator, condenser, pressure
cap and neck. Pressure test cooling system and
pressure cap.
An Emission Control Service.
qInspect engine accessory drive belt.An Emission
Control Service.
6-17
Page 343 of 382

97,500 Miles (162 500 km)
qChange engine oil and ®lter (or every 12 months,
whichever occurs ®rst).An Emission Control
Service.
qLubricate chassis components (or every 12 months,
whichever occurs ®rst).(See footnote #).
qCheck rear/front axle ¯uid level and add ¯uid as
needed. Check constant velocity joints and axle seals
for leaking.
qRotate tires. See
Tire Inspection and Rotation on
page 5-64for proper rotation pattern and additional
information.(See footnote +).
100,000 Miles (166 000 km)
qInspect spark plug wires.An Emission Control
Service.
qReplace spark plugs.An Emission Control Service.
qIf you haven't used your vehicle under severe service
conditions listed previously and, therefore, haven't
changed your automatic transmission ¯uid, change
both the ¯uid and ®lter.
qChange transfer case ¯uid.
qInspect Positive Crankcase Ventilation (PCV) valve.
An Emission Control Service.
150,000 Miles (240 000 km)
qDrain, ¯ush and re®ll cooling system (or every
60 months since last service, whichever occurs ®rst).
See
Engine Coolant on page 5-28for what to use.
Inspect hoses. Clean radiator, condenser, pressure
cap and neck. Pressure test the cooling system
and pressure cap.
An Emission Control Service.
qInspect engine accessory drive belt.An Emission
Control Service.
6-25