ECU CHEVROLET AVALANCHE 2003 1.G Owner's Manual
[x] Cancel search | Manufacturer: CHEVROLET, Model Year: 2003, Model line: AVALANCHE, Model: CHEVROLET AVALANCHE 2003 1.GPages: 492, PDF Size: 3.53 MB
Page 70 of 492

The passenger sensing system is designed to turn off
the passenger's frontal air bag when a rear facing infant
seat, a forward-facing child restraint or a booster seat
is detected. If the child restraint has been installed
and the on indicator is lit, turn the vehicle off, remove
the child restraint from the vehicle and reinstall the
restraint following the child restraint manufacturer's
directions and refer to
Securing a Child Restraint in the
Right Front Seat Position on page 1-48of this manual.
If after reinstalling the child restraint and restarting
the vehicle, the on indicator is still lit, secure the child in
the child restraint in a rear seat position in the vehicle
and check with your dealer.
The passenger sensing system is designed to enable
(may in¯ate) the right front passenger's frontal air
bag anytime the system senses that a person of adult
size is sitting properly in the right front passenger's seat.
When the passenger sensing system has allowed the
air bag to be enabled, the on indicator will light and stay
lit to remind you that the air bag is active.For some children who have outgrown child restraints
and for very small adults, the passenger sensing system
may or may not turn off the right front passenger's
frontal air bag, depending upon the person's seating
posture and body build. Everyone in your vehicle
who has outgrown child restraints should wear a safety
belt properly Ð whether or not there is an air bag
for that person.
If a person of adult-size is sitting in the right front
passenger's seat, but the off indicator is lit, it could be
because that person isn't sitting properly in the seat.
If this happens, turn the vehicle off and ask the person
to place the seatback in the full upright position,
then sit upright in the seat, centered on the seat cushion,
with the person's legs comfortably extended. Restart
the vehicle and have the person remain in this position
for about two minutes. This will allow the system to
detect that person and then enable the passenger's
air bag.
1-64
Page 75 of 492

Keys...............................................................2-3
Remote Keyless Entry System.........................2-4
Remote Keyless Entry System Operation...........2-5
Doors and Locks.............................................2-7
Door Locks....................................................2-7
Power Door Locks..........................................2-8
Delayed Locking.............................................2-8
Programmable Automatic Door Locks................2-8
Rear Door Security Locks..............................2-11
Lockout Protection........................................2-12
Midgate.......................................................2-12
Tailgate.......................................................2-21
Windows........................................................2-23
Power Windows............................................2-24
Sun Visors...................................................2-24
Theft-Deterrent Systems..................................2-25
Content Theft-Deterrent.................................2-25
Passlock
ž....................................................2-26
Starting and Operating Your Vehicle................2-27
New Vehicle Break-In....................................2-27
Ignition Positions..........................................2-27
Starting Your Engine.....................................2-28
Adjustable Throttle and Brake Pedal................2-29Engine Coolant Heater..................................2-30
Automatic Transmission Operation...................2-31
Four-Wheel Drive..........................................2-34
Parking Brake..............................................2-39
Shifting Into Park (P).....................................2-40
Shifting Out of Park (P).................................2-42
Parking Over Things That Burn.......................2-43
Engine Exhaust............................................2-44
Running Your Engine While You Are Parked. . . .2-44
Mirrors...........................................................2-46
Manual Rearview Mirror.................................2-46
Automatic Dimming Rearview Mirror with
OnStar
ž, Compass and Temperature
Display....................................................2-46
Automatic Dimming Rearview Mirror with
Compass and Temperature Display..............2-48
Outside Camper-Type Mirrors.........................2-51
Outside Power Mirrors...................................2-51
Outside Convex Mirror...................................2-52
Outside Heated Mirrors..................................2-52
Outside Automatic Dimming Mirror with Curb
View Assist..............................................2-53
Section 2 Features and Controls
2-1
Page 85 of 492

Rear Door Security Locks
With this feature, you can lock the rear doors so they
can't be opened from the inside by passengers.
This feature is located on
the inside edge of the rear
doors.To use one of the locks, do the following:
1. Open one of the rear doors.
2. Move the lever forward to engage the rear door
security lock.
3. Close the door.
4. Do the same thing to the other rear door.
The rear doors or your vehicle cannot be opened from
the inside when this feature is in use. If you want to
open the rear door while the security lock is engaged,
unlock the door and open the door from the outside.
Move the lever rearward to disengage the child security
lock feature.
2-11
Page 87 of 492

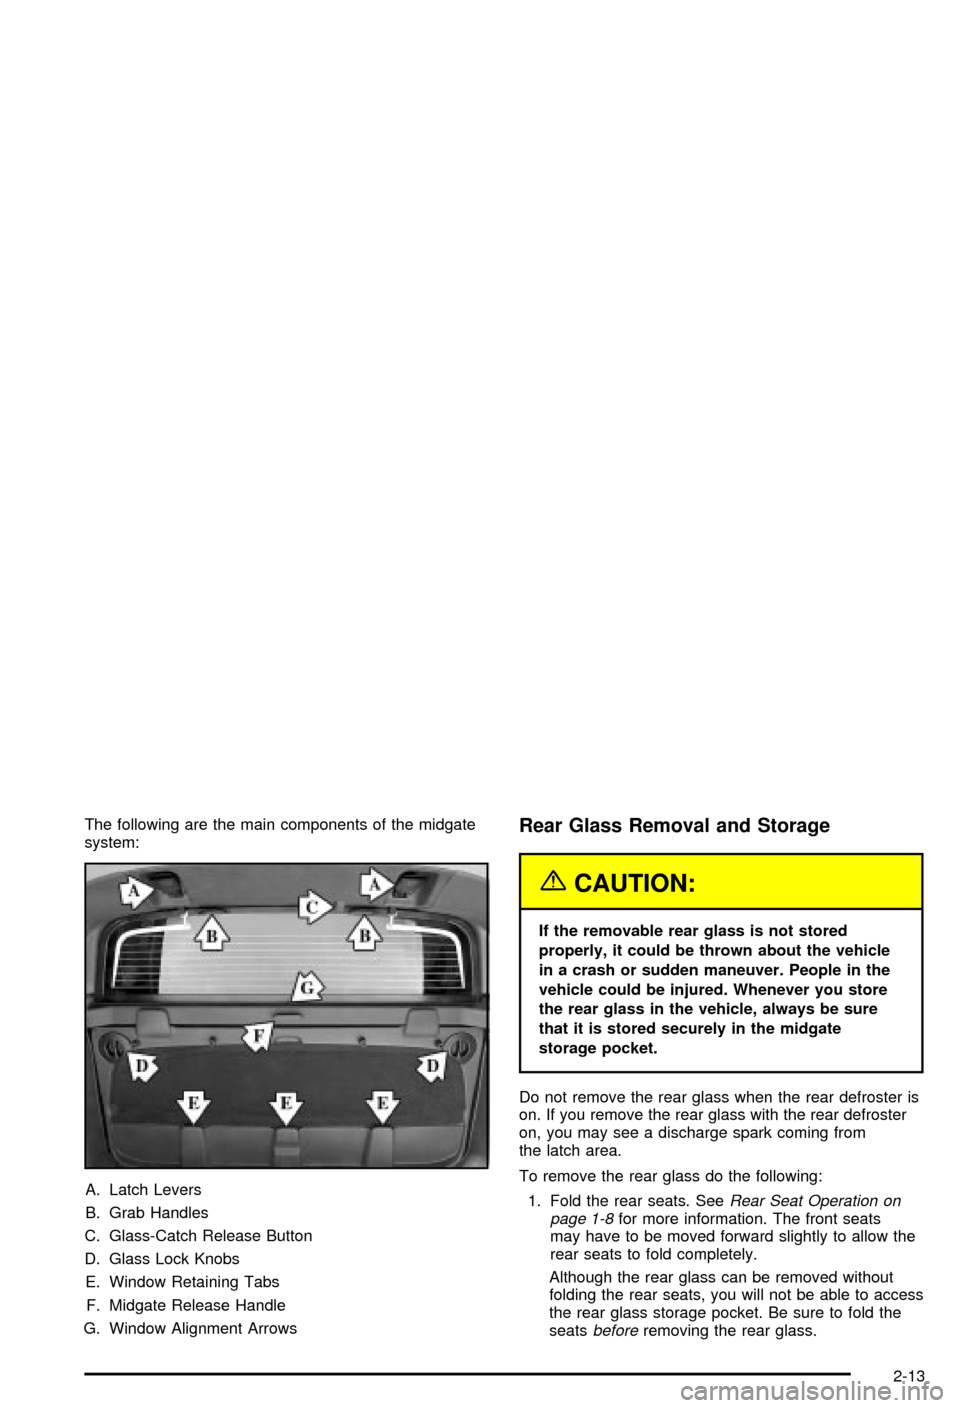
The following are the main components of the midgate
system:
A. Latch Levers
B. Grab Handles
C. Glass-Catch Release Button
D. Glass Lock Knobs
E. Window Retaining Tabs
F. Midgate Release Handle
G. Window Alignment ArrowsRear Glass Removal and Storage
{CAUTION:
If the removable rear glass is not stored
properly, it could be thrown about the vehicle
in a crash or sudden maneuver. People in the
vehicle could be injured. Whenever you store
the rear glass in the vehicle, always be sure
that it is stored securely in the midgate
storage pocket.
Do not remove the rear glass when the rear defroster is
on. If you remove the rear glass with the rear defroster
on, you may see a discharge spark coming from
the latch area.
To remove the rear glass do the following:
1. Fold the rear seats. See
Rear Seat Operation on
page 1-8for more information. The front seats
may have to be moved forward slightly to allow the
rear seats to fold completely.
Although the rear glass can be removed without
folding the rear seats, you will not be able to access
the rear glass storage pocket. Be sure to fold the
seats
beforeremoving the rear glass.
2-13
Page 90 of 492

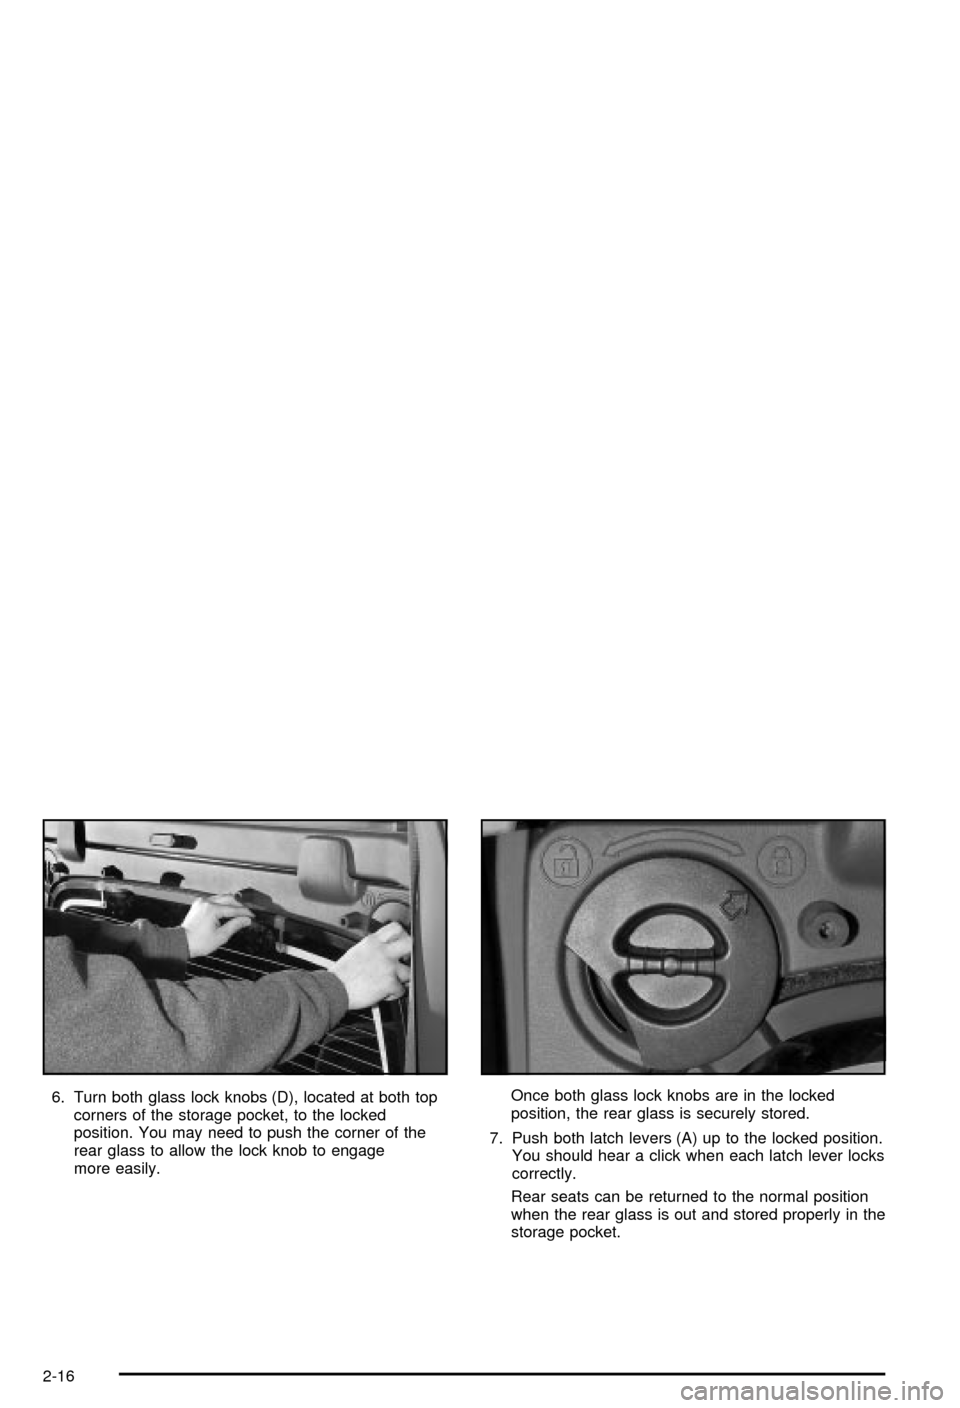
6. Turn both glass lock knobs (D), located at both top
corners of the storage pocket, to the locked
position. You may need to push the corner of the
rear glass to allow the lock knob to engage
more easily.Once both glass lock knobs are in the locked
position, the rear glass is securely stored.
7. Push both latch levers (A) up to the locked position.
You should hear a click when each latch lever locks
correctly.
Rear seats can be returned to the normal position
when the rear glass is out and stored properly in the
storage pocket.
2-16
Page 95 of 492

Raising the Midgate
To return the Midgate to its normal position, raise the
Midgate up with a ®rm swinging motion (this will help to
ensure that the Midgate closes with enough force to
engage the latches) until it latches into place securely.
If the rear glass is removed and you would like to
put it back, do so using the instructions given previously.
Tailgate
Use the ignition/door key to unlock/lock the tailgate.
Open the tailgate by lifting up on its handle while pulling
the tailgate toward you.
To shut the tailgate, ®rmly push it upward until it
latches.
After you put the tailgate back up, pull it back towards
you to be sure it is latched securely.
Tailgate Removal
The tailgate on your vehicle can be removed to allow for
different loading situations. Although the tailgate can
be removed without assistance, you may want someone
to assist you with the removal to avoid possible
damage to the vehicle.
To remove the tailgate, do the following:
1. Raise the tailgate
slightly and release
both retaining
cable clips. To release
the retaining cable
clips, lift the cable so it
points straight out
and push the cable clip
forward.
2-21
Page 96 of 492

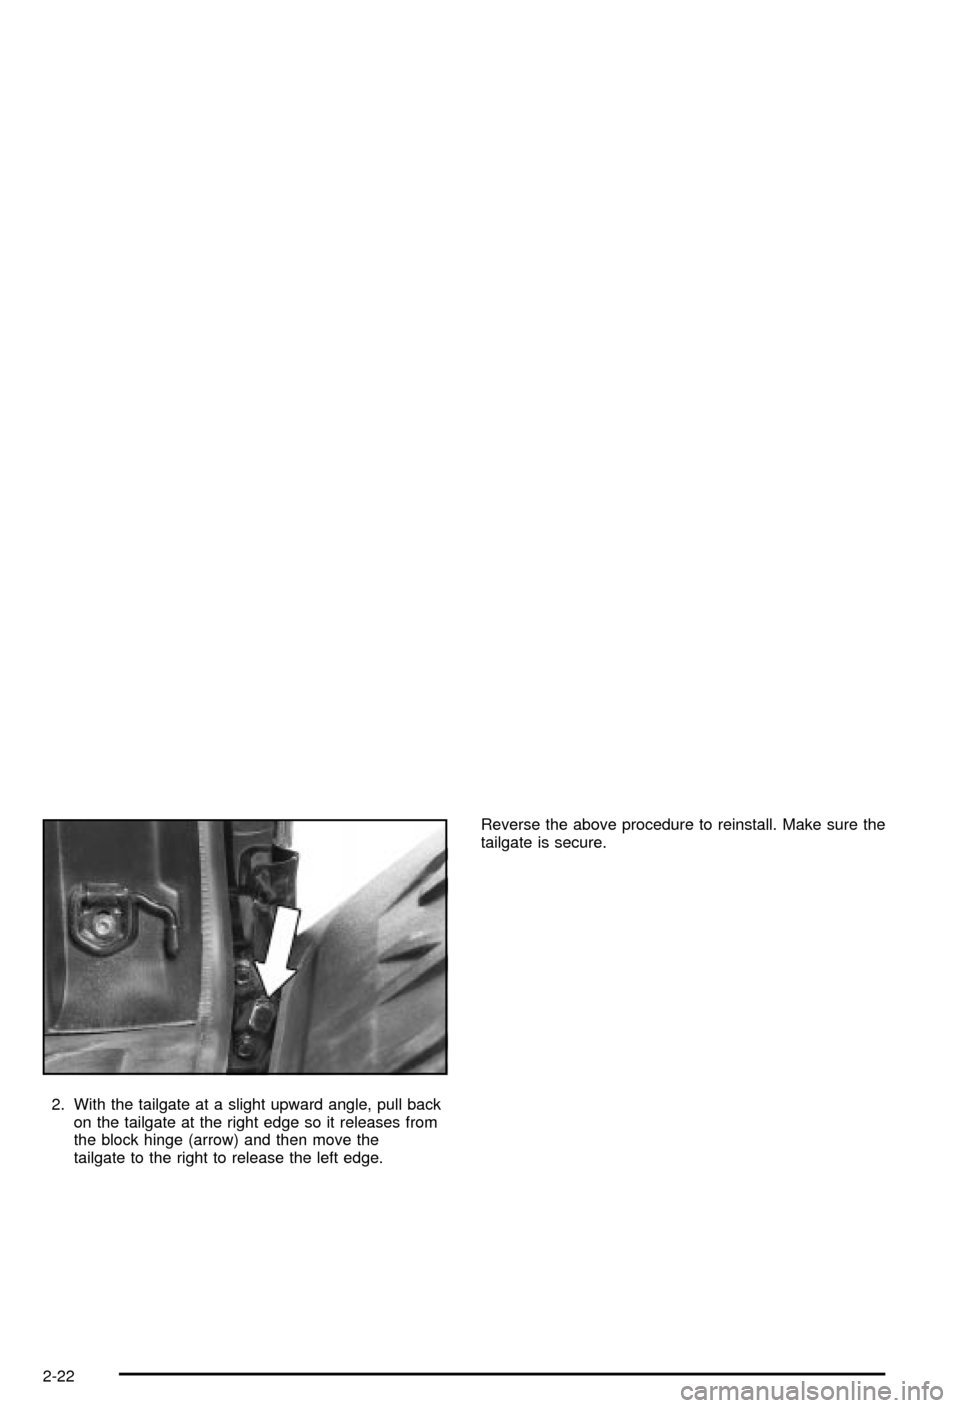
2. With the tailgate at a slight upward angle, pull back
on the tailgate at the right edge so it releases from
the block hinge (arrow) and then move the
tailgate to the right to release the left edge.Reverse the above procedure to reinstall. Make sure the
tailgate is secure.
2-22
Page 99 of 492

Theft-Deterrent Systems
Vehicle theft is big business, especially in some cities.
Although your vehicle has a number of theft-deterrent
features, we know that nothing we put on it can make it
impossible to steal.
Content Theft-Deterrent
Your vehicle is equipped with a content theft-deterrent
alarm system.
With this system, the
security light in the
instrument panel cluster
will ¯ash as you open
the door if your ignition is
off.
This light reminds you to activate the theft-deterrent
system. Here's how to do it:
1. Open the door.
2. Lock the door with the power door lock switch or
the remote keyless entry transmitter. The security
light should come on and stay on.
3. Close all doors. The security light should go off
after about 30 seconds. The alarm is not armed
until the security light goes off.If a locked door is opened without the key or the remote
keyless entry transmitter, the alarm will go off. The
headlamps and parking lamps will ¯ash for two minutes,
and the horn will sound for 30 seconds, then will turn
off to save the battery power. You can choose different
feedback options for the alarm. See
Driver Information
Center (DIC) on page 3-46.
Remember, the theft-deterrent system won't activate if
you lock the doors with a key or use the manual
door lock. It activates only if you use a power door lock
switch with the door open, or with the remote keyless
entry transmitter. You should also remember that
you can start your vehicle with the correct ignition key if
the alarm has been set off.
Here's how to avoid setting off the alarm by accident:
·If you don't want to activate the theft-deterrent
system, the vehicle should be locked with the door
key
afterthe doors are closed.
·Always unlock a door with a key, or use the remote
keyless entry transmitter. Unlocking a door any
other way will set off the alarm.
If you set off the alarm by accident, unlock any door
with the key. You can also turn off the alarm by pressing
unlock on the remote keyless entry transmitter. The
alarm won't stop if you try to unlock a door any other
way.
2-25
Page 100 of 492

Testing the Alarm
The alarm can be tested by following these steps:
1. From inside the vehicle, lower the driver's window
and open the driver's door.
2. Activate the system by locking the doors with the
power door lock switch while the door is open, or
with the remote keyless entry transmitter.
3. Get out of the vehicle, close the door and wait for
the security light to go out.
4. Then reach in through the window, unlock the door
with the manual door lock and open the door. This
should set off the alarm.
While the alarm is set, the power door unlock switch is
not operational.
If the alarm does not sound when it should but the
headlamps ¯ash, check to see if the horn works. The
horn fuse may be blown. To replace the fuse, see
Fuses
and Circuit Breakers on page 5-97.
If the alarm does not sound or the headlamps do not
¯ash, the vehicle should be serviced by your dealer.
Passlockž
Your vehicle is equipped with the Passlockž
theft-deterrent system.
Passlockžis a passive theft-deterrent system. Passlockž
enables fuel if the ignition lock cylinder is turned with
a valid key. If a correct key is not used or the ignition
lock cylinder is tampered with, the fuel system is
disabled and the vehicle will not start.
During normal operation, the security light will turn off
approximately ®ve seconds after the key is turned
to RUN.
If the engine stalls and the security light ¯ashes, wait
about 10 minutes until the light stops ¯ashing before
trying to restart the engine. Remember to release
the key from START as soon as the engine starts.
If the engine does not start after three tries, the vehicle
needs service.
If the engine is running and the security light comes on,
you will be able to restart the engine if you turn the
engine off. However, your Passlock
žsystem is
not working properly and must be serviced by your
dealer. Your vehicle is not protected by Passlock
žat this
time. You may also want to check the fuse. See
Fuses and Circuit Breakers on page 5-97. See your
dealer for service.
In an emergency, call the Roadside Assistance Center.
See
Roadside Assistance Program on page 7-6.
2-26
Page 127 of 492

Outside Automatic Dimming Mirror
with Curb View Assist
Your vehicle may have this feature.
The driver's outside mirror will adjust for the glare of the
headlamps behind you. See
Automatic Dimming
Rearview Mirror with OnStarž, Compass and
Temperature Display on page 2-46.
Your vehicle's mirrors will also be capable of performing
the curb view assist mirror function. This feature will
cause the passenger's and/or driver's mirror to tilt to a
preselected position when the vehicle is in
REVERSE (R). This feature may be useful in allowing
you to view the curb when you are parallel parking.
When the vehicle is shifted out of REVERSE (R) and a
short delay has occurred, the passenger's and/or
driver's mirror will return to its original position.
To change the preselected tilt position, adjust the
mirrors to the desired position while the vehicle is in
REVERSE (R). When the vehicle is shifted out of
REVERSE (R), this new position is saved in memory as
the tilt position.
This feature can be enabled/disabled through the Driver
Information Center. See
Driver Information Center
(DIC) on page 3-46for more information.
OnStaržSystem
OnStaržuses global positioning system (GPS) satellite
technology, wireless communications, and state of
the art call centers to provide you with a wide range of
safety, security, information and convenience services.
An OnStar
žsubscription plan is included in the price
of your vehicle. You can easily upgrade or extend your
OnStar
žservices to meet your personal needs.
A complete OnStar
žuser's guide and the terms and
conditions of the OnStaržSubscription Service
Agreement are included in your OnStarž-equipped
vehicle's glove box literature. For more information, visit
www.onstar.com, contact OnStar
žat 1-888-4-ONSTAR
(1-888-466-7827), or press the blue OnStaržbutton
to speak to an OnStaržadvisor 24 hours a day, 7 days a
week.
2-53