key CHEVROLET AVALANCHE 2003 1.G Workshop Manual
[x] Cancel search | Manufacturer: CHEVROLET, Model Year: 2003, Model line: AVALANCHE, Model: CHEVROLET AVALANCHE 2003 1.GPages: 492, PDF Size: 3.53 MB
Page 352 of 492

How to Reset the CHANGE ENGINE OIL
Message System
The GM Oil Life System calculates when to change
your engine oil and ®lter based on vehicle use. Anytime
your oil is changed, reset the system so it can
calculate when the next oil change is required. If a
situation occurs where you change your oil prior to a
CHANGE ENGINE OIL message being turned on, reset
the system.
To reset the CHANGE ENGINE OIL message, see ªGM
Oil Life Systemº under
DIC Operation and Displays
on page 3-46for vehicles equipped with the DIC, or do
the following:
1. Turn the ignition key to RUN with the engine off.
2. Fully press and release the accelerator pedal three
times within ®ve seconds.
If the OIL LIFE RESET message ¯ashes for 10 seconds,
the system is reset.
If the system does not reset, try the procedure once
again. If it still does not reset, see your dealer for
service.
What to Do with Used Oil
Used engine oil contains certain elements that may be
unhealthy for your skin and could even cause cancer.
Don't let used oil stay on your skin for very long. Clean
your skin and nails with soap and water, or a good
hand cleaner. Wash or properly dispose of clothing or
rags containing used engine oil. See the manufacturer's
warnings about the use and disposal of oil products.
Used oil can be a threat to the environment. If you
change your own oil, be sure to drain all the oil from the
®lter before disposal. Never dispose of oil by putting it in
the trash, pouring it on the ground, into sewers, or into
streams or bodies of water. Instead, recycle it by taking it
to a place that collects used oil. If you have a problem
properly disposing of your used oil, ask your dealer, a
service station or a local recycling center for help.
5-19
Page 370 of 492
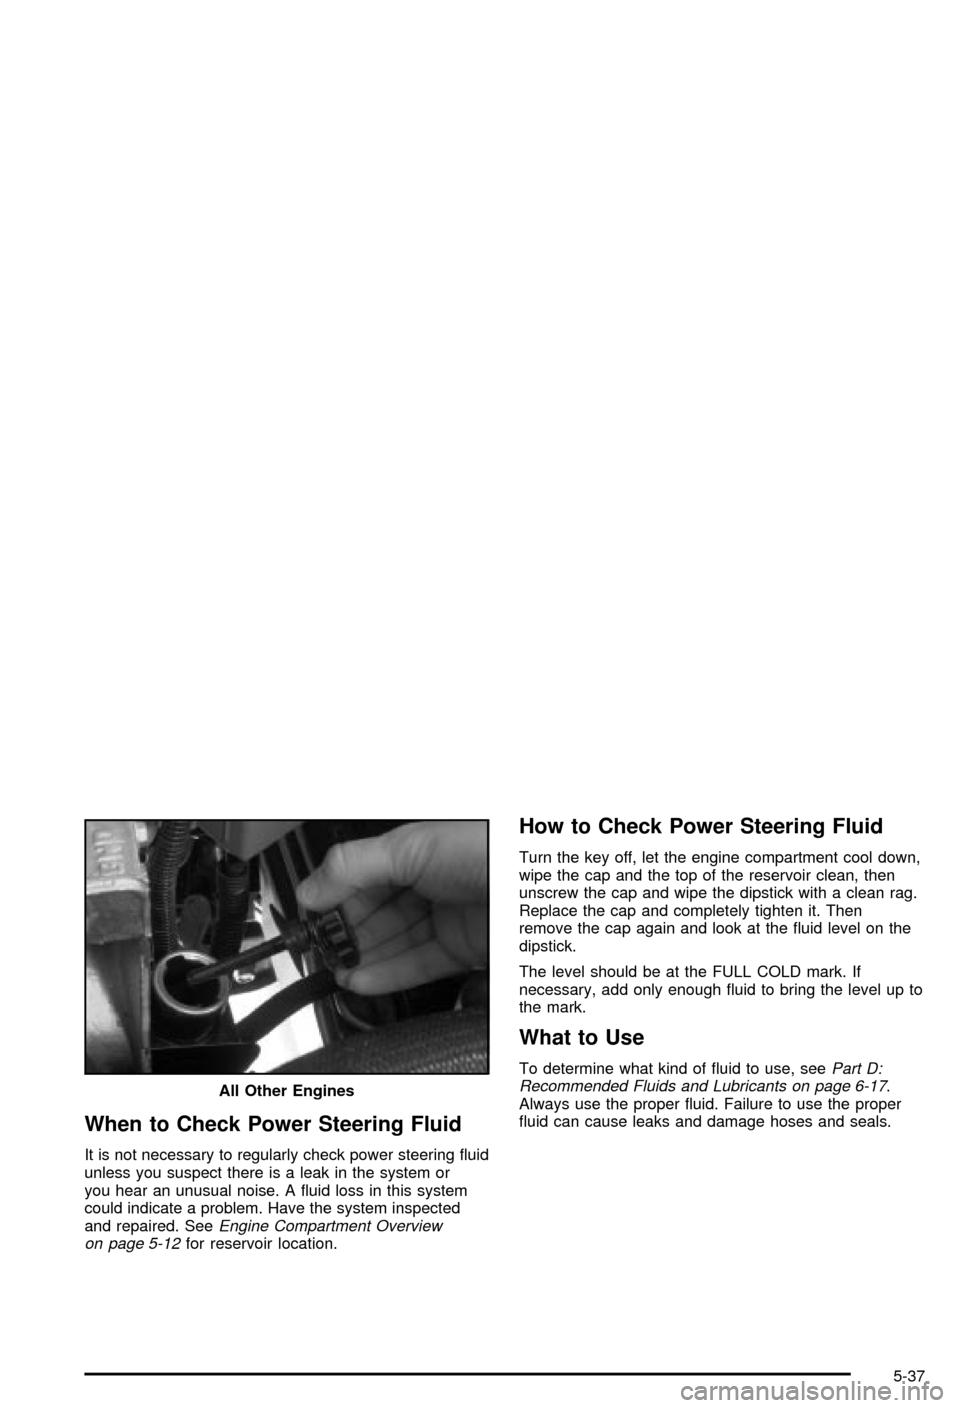
When to Check Power Steering Fluid
It is not necessary to regularly check power steering ¯uid
unless you suspect there is a leak in the system or
you hear an unusual noise. A ¯uid loss in this system
could indicate a problem. Have the system inspected
and repaired. See
Engine Compartment Overview
on page 5-12for reservoir location.
How to Check Power Steering Fluid
Turn the key off, let the engine compartment cool down,
wipe the cap and the top of the reservoir clean, then
unscrew the cap and wipe the dipstick with a clean rag.
Replace the cap and completely tighten it. Then
remove the cap again and look at the ¯uid level on the
dipstick.
The level should be at the FULL COLD mark. If
necessary, add only enough ¯uid to bring the level up to
the mark.
What to Use
To determine what kind of ¯uid to use, seePart D:
Recommended Fluids and Lubricants on page 6-17.
Always use the proper ¯uid. Failure to use the proper
¯uid can cause leaks and damage hoses and seals. All Other Engines
5-37
Page 405 of 492
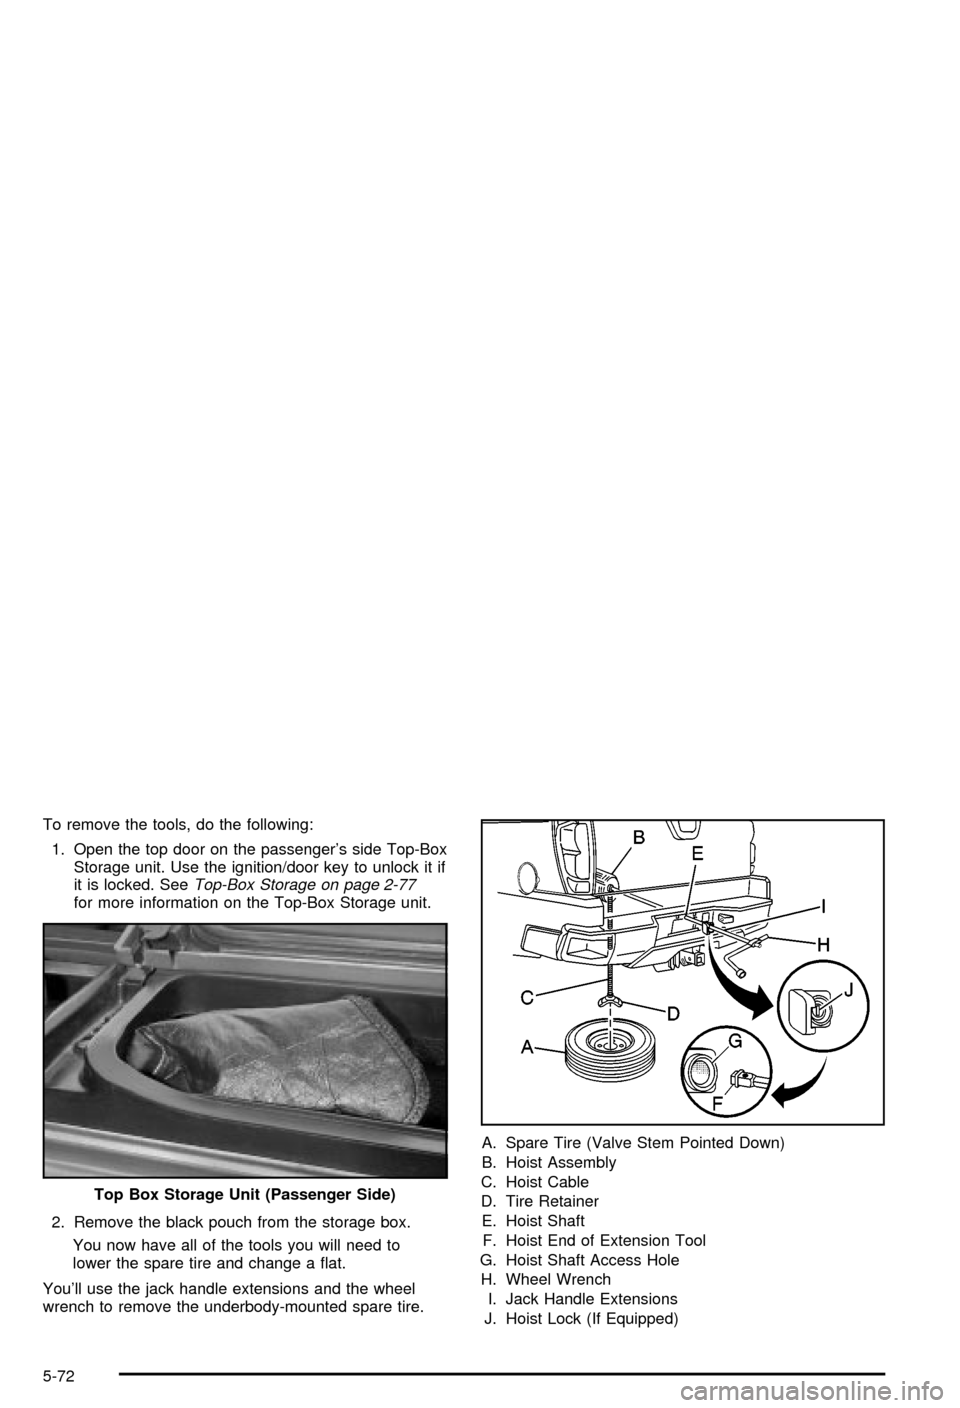
To remove the tools, do the following:
1. Open the top door on the passenger's side Top-Box
Storage unit. Use the ignition/door key to unlock it if
it is locked. See
Top-Box Storage on page 2-77for more information on the Top-Box Storage unit.
2. Remove the black pouch from the storage box.
You now have all of the tools you will need to
lower the spare tire and change a ¯at.
You'll use the jack handle extensions and the wheel
wrench to remove the underbody-mounted spare tire.A. Spare Tire (Valve Stem Pointed Down)
B. Hoist Assembly
C. Hoist Cable
D. Tire Retainer
E. Hoist Shaft
F. Hoist End of Extension Tool
G. Hoist Shaft Access Hole
H. Wheel Wrench
I. Jack Handle Extensions
J. Hoist Lock (If Equipped) Top Box Storage Unit (Passenger Side)
5-72
Page 406 of 492
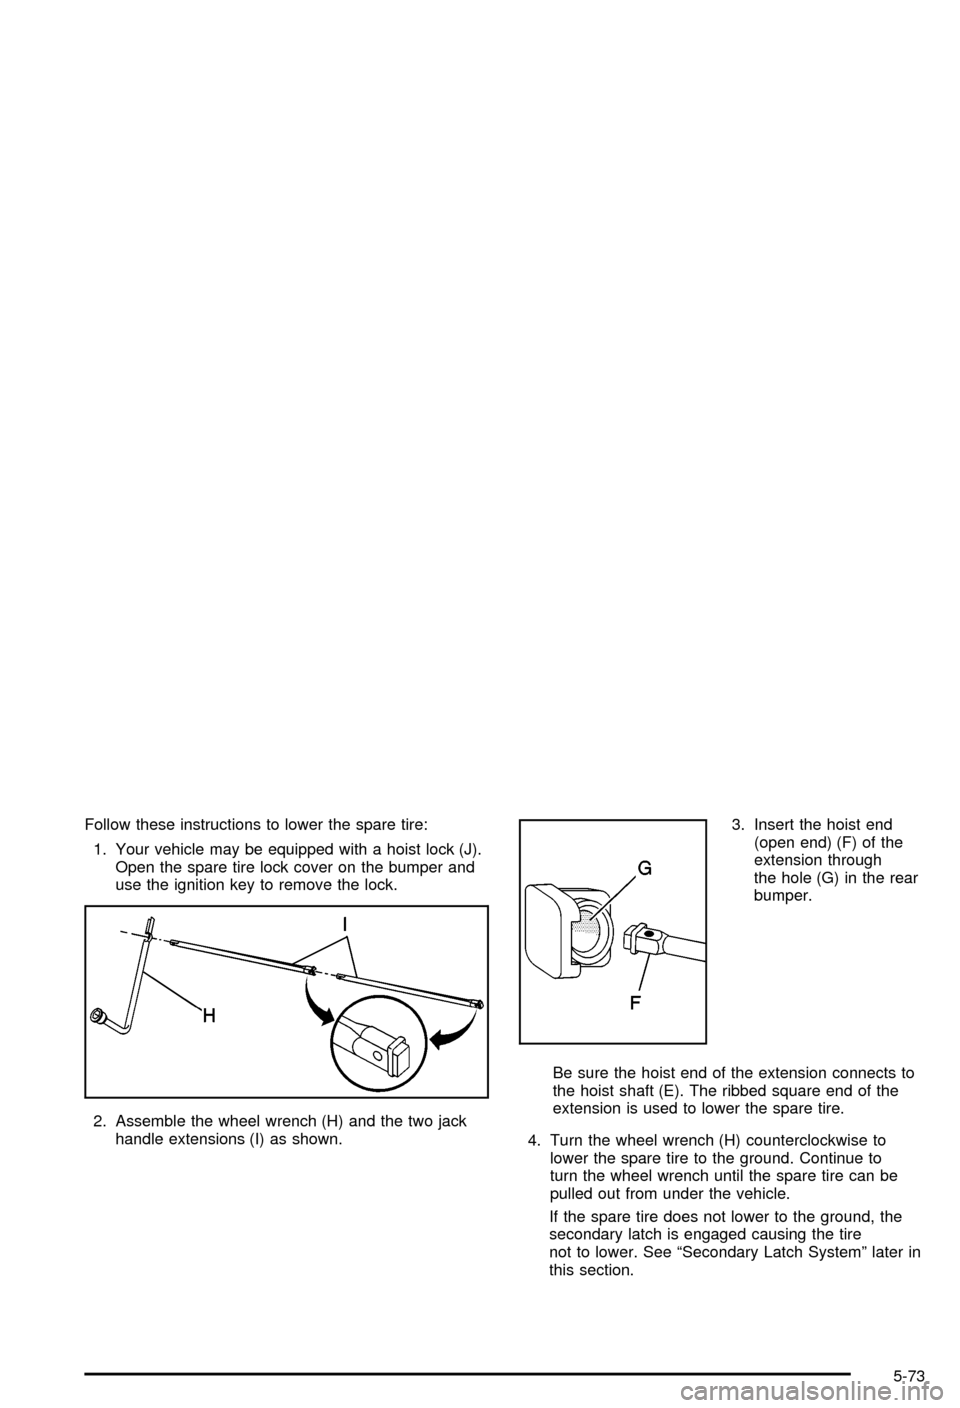
Follow these instructions to lower the spare tire:
1. Your vehicle may be equipped with a hoist lock (J).
Open the spare tire lock cover on the bumper and
use the ignition key to remove the lock.
2. Assemble the wheel wrench (H) and the two jack
handle extensions (I) as shown.3. Insert the hoist end
(open end) (F) of the
extension through
the hole (G) in the rear
bumper.
Be sure the hoist end of the extension connects to
the hoist shaft (E). The ribbed square end of the
extension is used to lower the spare tire.
4. Turn the wheel wrench (H) counterclockwise to
lower the spare tire to the ground. Continue to
turn the wheel wrench until the spare tire can be
pulled out from under the vehicle.
If the spare tire does not lower to the ground, the
secondary latch is engaged causing the tire
not to lower. See ªSecondary Latch Systemº later in
this section.
5-73
Page 453 of 492
Weatherstrip Lubrication
Silicone grease on weatherstrips will make them last
longer, seal better, and not stick or squeak. Apply
silicone grease with a clean cloth. During very cold,
damp weather more frequent application may be
required. See
Part D: Recommended Fluids and
Lubricants on page 6-17.
Automatic Transmission Check
Check the transmission ¯uid level; add if needed. SeeAutomatic Transmission Fluid on page 5-22. A ¯uid loss
may indicate a problem. Check the system and repair
if needed.
At Least Once a Year
Key Lock Cylinders Service
Lubricate the key lock cylinders with the lubricant
speci®ed in Part D.
Body Lubrication Service
Lubricate all hood latch assembly, secondary latch,
pivots, spring anchor, release pawl, midgate hinges, side
storage box door hinges, tailgate hinge, tailgate
linkage, outer tailgate handle pivot points, latch bolt, fuel
door hinge, locks and folding seat hardware. Part D
tells you what to use. More frequent lubrication may be
required when exposed to a corrosive environment.
Starter Switch Check
{CAUTION:
When you are doing this check, the vehicle
could move suddenly. If it does, you or others
could be injured. Follow the steps below.
1. Before you start, be sure you have enough room
around the vehicle.
6-12
Page 454 of 492
2. Firmly apply both the parking brake and the regular
brake. SeeParking Brake on page 2-39if
necessary.
Do not use the accelerator pedal, and be ready to
turn off the engine immediately if it starts.
3. Try to start the engine in each gear. The starter
should work only in PARK (P) or NEUTRAL (N).
If the starter works in any other position, your
vehicle needs service.
Automatic Transmission Shift Lock
Control System Check
{CAUTION:
When you are doing this check, the vehicle
could move suddenly. If it does, you or others
could be injured. Follow the steps below.
1. Before you start, be sure you have enough room
around the vehicle. It should be parked on a level
surface.2. Firmly apply the parking brake. See
Parking Brake
on page 2-39if necessary.
Be ready to apply the regular brake immediately if
the vehicle begins to move.
3. With the engine off, turn the key to the RUN
position, but don't start the engine. Without applying
the regular brake, try to move the shift lever out
of PARK (P) with normal effort. If the shift lever
moves out of PARK (P), your vehicle needs service.
Ignition Transmission Lock Check
While parked, and with the parking brake set, try to turn
the ignition key to LOCK in each shift lever position.
·The key should turn to LOCK only when the
shift lever is in PARK (P).
·The key should come out only in LOCK.
6-13
Page 458 of 492
Part D: Recommended Fluids and
Lubricants
Fluids and lubricants identi®ed below by name, part
number or speci®cation may be obtained from your
dealer.
Usage Fluid/Lubricant
Engine OilEngine oil with the American
Petroleum Institute Certi®ed for
Gasoline Engines starburst symbol
of the proper viscosity. To determine
the preferred viscosity for your
vehicle's engine, see
Engine Oil on
page 5-15.
Engine Coolant50/50 mixture of clean, drinkable
water and use only
DEX-COOL
žCoolant. SeeEngine
Coolant on page 5-24.
Hydraulic Brake
SystemDelco Supreme 11 Brake Fluid or
equivalent DOT-3 brake ¯uid.
Windshield
Washer SolventGM Optikleen
žWasher Solvent or
equivalent.
Usage Fluid/Lubricant
Power Steering
SystemGM Power Steering Fluid (GM Part
No. U.S. 1052884, in Canada
993294, or equivalent).
Automatic
TransmissionDEXRON
ž-III Automatic
Transmission Fluid.
Key Lock
CylindersMulti-Purpose Lubricant, Superlube
(GM Part No. U.S. 12346241, in
Canada 10953474, or equivalent).
Chassis
LubricationChassis Lubricant (GM Part No.
U.S. 12377985, in Canada
88901242, or equivalent) or lubricant
meeting requirements of NLGI #2,
Category LB or GC-LB.
Front AxleSAE 80W-90 Axle Lubricant (GM
Part No. U.S. 1052271, in Canada
10950849 or equivalent).
Rear AxleSAE 75W-90 Synthetic Axle
Lubricant (GM Part No. U.S.
12378261, in Canada 10953455) or
equivalent meeting GM Speci®cation
9986115.
6-17
Page 469 of 492

This program can also provide you with free resource
information, such as area driver assessment centers and
mobility equipment installers. The program is available
for a limited period of time from the date of vehicle
purchase/lease. See your dealer for more details or call
the GM Mobility Assistance Center at 1-800-323-9935.
Text telephone (TTY) users, call 1-800-833-9935.
GM of Canada also has a Mobility Program. Call
1-800-GM-DRIVE (463-7483) for details. All TTY users
call 1-800-263-3830.
Roadside Assistance Program
To enhance Chevrolet's strong commitment to customer
satisfaction, Chevrolet is excited to announce the
establishment of the Chevrolet Roadside Assistance
Center. As the owner of a 2003 Chevrolet, membership
in Roadside Assistance is free.
Roadside Assistance is available 24 hours a day,
365 days a year, by calling 1-800-CHEV-USA
(243-8872). This toll-free number will provide you
over-the-phone roadside assistance with minor
mechanical problems. If your problem cannot be
resolved over the phone, our advisors have access to a
nationwide network of dealer recommended service
providers. Roadside membership is free; however some
services may incur costs.Roadside offers two levels of service to the customer,
Basic CareandCourtesy Care:
RoadsideBasic Careprovides:
·Toll-free number, 1-800-CHEV-USA (243-8872),
text telephone (TTY) users, call 1-888-889-2438
·Free towing for warranty repairs
·Basic over-the-phone technical advice
·Available dealer services at reasonable costs (i.e.,
wrecker services, locksmith/key service, glass
repair, etc.)
Roadside
Courtesy Careprovides:
·RoadsideBasic Careservices (as outlined
previously)
Plus:
·FREE Non-Warranty Towing (to the closest dealer
from a legal roadway)
·FREE Locksmith/Key Service (when keys are lost
on the road or locked inside)
·FREE Flat Tire Service (spare installed on the road)
·FREE Jump Start (at home or on the road)
·FREE Fuel Delivery ($5 of fuel delivered on
the road)
7-6
Page 483 of 492

I
If No Steam Is Coming From Your Engine..........5-29
If Steam Is Coming From Your Engine...............5-28
If the Light is Flashing.....................................3-42
If the Light Is On Steady.................................3-42
If You Are Stuck in Sand, Mud, Ice or Snow.......4-45
If You Do Decide To Pull A Trailer.....................4-59
If You're Caught in a Blizzard...........................4-44
Ignition Positions.............................................2-27
Ignition Transmission Lock Check......................6-13
Illuminated Visor Vanity Mirrors.........................2-24
Infants and Young Children, Restraints...............1-34
In¯ation -- Tire Pressure..................................5-62
Inspection......................................................6-16
Brake System.............................................6-16
Engine Cooling System................................6-16
Exhaust System..........................................6-15
Fuel System...............................................6-15
Part C - Periodic Maintenance.......................6-15
Steering and Suspension..............................6-15
Transfer Case and Front Axle
(Four-Wheel Drive)....................................6-16
Instrument Panel Brightness.............................3-17
Instrument Panel Fuse Block............................5-97
Instrument Panel.............................................3-31
Cluster.......................................................3-31
Overview..................................................... 3-4
Interior Lamps................................................3-17
J
Jump Starting.................................................5-43
K
Key Lock Cylinders Service..............................6-12
Keyless Entry System....................................... 2-4
Keys............................................................... 2-3
L
Lamps On Reminder.......................................3-14
Lamps...........................................................3-13
Exterior......................................................3-13
Interior.......................................................3-17
Lap Belt........................................................1-25
Lap-Shoulder Belt...................................1-16, 1-27
LATCH System...............................................1-43
Child Restraints...........................................1-43
Leaving Your Vehicle With the Engine Running . . . 2-41
LEFT REAR DOOR AJAR................................3-62
Level Control..................................................4-53
Light.............................................................3-33
Air Bag Readiness.......................................3-33
Anti-Lock Brake System Warning...................3-38
Brake System Warning.................................3-37
Charging System.........................................3-36
Cruise Control.............................................3-44
8
Page 487 of 492

Reading Lamps..............................................3-18
Rear Axle......................................................5-49
Locking......................................................4-11
Rear Door Security Locks................................2-11
Rear Safety Belt Comfort Guides......................1-29
Rear Seat Audio Controls...............................3-100
Rear Seat Audio (RSA)....................................3-99
Rear Seat Entertainment System.......................3-90
Rear Seat Operation......................................... 1-8
Rear Seat Passengers, Safety Belts..................1-26
Rear Storage Area..........................................2-61
Rear Window Defogger............................3-25, 3-28
Rearview Mirror, Automatic Dimming with
Compass and Temperature Display................2-48
Rearview Mirror, Automatic Dimming with
OnStar
ž, Compass and Temperature Display . . . 2-46
Rearview Mirrors.............................................2-46
Reclining Seatbacks.......................................... 1-5
Recreational Vehicle Towing.............................4-48
REDUCED ENGINE POWER...........................3-58
Reinstalling the Cargo Cover Panels..................2-68
Remote Control..............................................3-93
Remote Keyless Entry System, Operation............ 2-5
Remote Keyless Entry System............................ 2-4
Removing the Flat Tire and Installing the
Spare Tire..................................................5-74
Removing the Front/Rear Rails and Bows..........2-81Removing the Spare Tire and Tools...................5-70
Removing the Tonneau Cover...........................2-78
Replacement Bulbs.........................................5-59
Replacing Brake System Parts..........................5-42
Replacing Restraint System Parts After a Crash.....1-67
Reporting Safety Defects.................................7-10
Canadian Government..................................7-10
General Motors...........................................7-11
United States Government............................7-10
Reprogramming a Single HomeLink
žButton.......2-58
Resetting Defaults...........................................2-58
Restraint System Check...................................6-11
Checking Your Restraint Systems...................1-67
Replacing Restraint System Parts After
a Crash..................................................1-67
Restraint Systems...........................................1-67
Checking....................................................1-67
Replacing Parts...........................................1-67
Retained Accessory Power (RAP)......................2-28
RFA # BATTERY LOW....................................3-62
Right Front Passenger Position, Safety Belts......1-24
RIGHT REAR DOOR AJAR..............................3-62
Roadside......................................................... 7-6
Assistance Program....................................... 7-6
Rocking Your Vehicle To Get It Out...................4-46
Running Your Engine While You Are Parked.......2-44
12