lights CHEVROLET AVALANCHE 2011 2.G Owners Manual
[x] Cancel search | Manufacturer: CHEVROLET, Model Year: 2011, Model line: AVALANCHE, Model: CHEVROLET AVALANCHE 2011 2.GPages: 528, PDF Size: 7.65 MB
Page 1 of 528

Black plate (1,1)Chevrolet Avalanche Owner Manual - 2011
2011 Chevrolet Avalanche Owner ManualM
In Brief. . . . . . . . . . . . . . . . . . . . . . . . 1-1
Instrument Panel . . . . . . . . . . . . . . 1-2
Initial Drive Information . . . . . . . . 1-4
Vehicle Features . . . . . . . . . . . . . 1-20
Performance and Maintenance . . . . . . . . . . . . . . . . 1-26
Keys, Doors and Windows . . . 2-1
Keys and Locks . . . . . . . . . . . . . . . 2-2
Doors . . . . . . . . . . . . . . . . . . . . . . . . 2-10
Vehicle Security . . . . . . . . . . . . . . 2-17
Exterior Mirrors . . . . . . . . . . . . . . . 2-20
Interior Mirrors . . . . . . . . . . . . . . . . 2-22
Windows . . . . . . . . . . . . . . . . . . . . . 2-24
Roof . . . . . . . . . . . . . . . . . . . . . . . . . . 2-26
Seats and Restraints . . . . . . . . . 3-1
Head Restraints . . . . . . . . . . . . . . . 3-2
Front Seats . . . . . . . . . . . . . . . . . . . . 3-3
Rear Seats . . . . . . . . . . . . . . . . . . . 3-10
Safety Belts . . . . . . . . . . . . . . . . . . 3-12
Airbag System . . . . . . . . . . . . . . . . 3-28
Child Restraints . . . . . . . . . . . . . . 3-46 Storage
. . . . . . . . . . . . . . . . . . . . . . . 4-1
Storage Compartments . . . . . . . . 4-1
Luggage/Load Locations . . . . . . . 4-2
Additional Storage Features . . . 4-6
Roof Rack System . . . . . . . . . . . 4-13
Instruments and Controls . . . . 5-1
Controls . . . . . . . . . . . . . . . . . . . . . . . 5-2
Warning Lights, Gauges, and Indicators . . . . . . . . . . . . . . . . . . . 5-10
Information Displays . . . . . . . . . . 5-28
Vehicle Messages . . . . . . . . . . . . 5-37
Vehicle Personalization . . . . . . . 5-47
Universal Remote System . . . . 5-56
Lighting . . . . . . . . . . . . . . . . . . . . . . . 6-1
Exterior Lighting . . . . . . . . . . . . . . . 6-1
Interior Lighting . . . . . . . . . . . . . . . . 6-6
Lighting Features . . . . . . . . . . . . . . 6-7
Infotainment System . . . . . . . . . 7-1
Introduction . . . . . . . . . . . . . . . . . . . . 7-2
Radio . . . . . . . . . . . . . . . . . . . . . . . . . . 7-8
Audio Players . . . . . . . . . . . . . . . . 7-14
Rear Seat Infotainment . . . . . . . 7-34
Phone . . . . . . . . . . . . . . . . . . . . . . . . 7-46 Climate Controls
. . . . . . . . . . . . . 8-1
Climate Control Systems . . . . . . 8-1
Air Vents . . . . . . . . . . . . . . . . . . . . . 8-10
Driving and Operating . . . . . . . . 9-1
Driving Information . . . . . . . . . . . . . 9-2
Starting and Operating . . . . . . . 9-30
Engine Exhaust . . . . . . . . . . . . . . 9-38
Automatic Transmission . . . . . . 9-39
Drive Systems . . . . . . . . . . . . . . . . 9-44
Brakes . . . . . . . . . . . . . . . . . . . . . . . 9-52
Ride Control Systems . . . . . . . . 9-54
Cruise Control . . . . . . . . . . . . . . . . 9-58
Object Detection Systems . . . . 9-60
Fuel . . . . . . . . . . . . . . . . . . . . . . . . . . 9-68
Towing . . . . . . . . . . . . . . . . . . . . . . . 9-74
Conversions and Add-Ons . . . 9-93
Vehicle Care . . . . . . . . . . . . . . . . . 10-1
General Information . . . . . . . . . . 10-2
Vehicle Checks . . . . . . . . . . . . . . . 10-4
Headlamp Aiming . . . . . . . . . . . 10-35
Bulb Replacement . . . . . . . . . . 10-37
Electrical System . . . . . . . . . . . . 10-40
Page 18 of 528
Black plate (12,1)Chevrolet Avalanche Owner Manual - 2011
1-12 In Brief
Mirror Adjustment
Exterior Mirrors
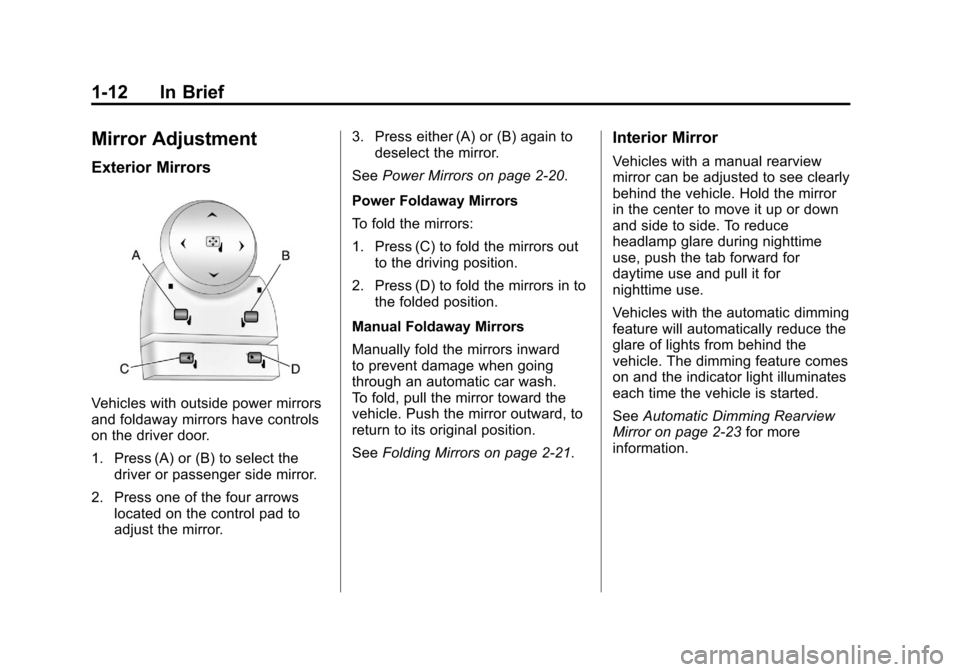
Vehicles with outside power mirrors
and foldaway mirrors have controls
on the driver door.
1. Press (A) or (B) to select thedriver or passenger side mirror.
2. Press one of the four arrows located on the control pad to
adjust the mirror. 3. Press either (A) or (B) again to
deselect the mirror.
See Power Mirrors on page 2‑20.
Power Foldaway Mirrors
To fold the mirrors:
1. Press (C) to fold the mirrors out to the driving position.
2. Press (D) to fold the mirrors in to the folded position.
Manual Foldaway Mirrors
Manually fold the mirrors inward
to prevent damage when going
through an automatic car wash.
To fold, pull the mirror toward the
vehicle. Push the mirror outward, to
return to its original position.
See Folding Mirrors on page 2‑21.
Interior Mirror
Vehicles with a manual rearview
mirror can be adjusted to see clearly
behind the vehicle. Hold the mirror
in the center to move it up or down
and side to side. To reduce
headlamp glare during nighttime
use, push the tab forward for
daytime use and pull it for
nighttime use.
Vehicles with the automatic dimming
feature will automatically reduce the
glare of lights from behind the
vehicle. The dimming feature comes
on and the indicator light illuminates
each time the vehicle is started.
SeeAutomatic Dimming Rearview
Mirror on page 2‑23 for more
information.
Page 21 of 528
Black plate (15,1)Chevrolet Avalanche Owner Manual - 2011
In Brief 1-15
AUTO :Automatically turns on
the headlamps, parking lamps,
instrument panel lights, license plate
lamps, and taillamps.
;: Turns on the parking lamps,
instrument panel lights, license plate
lamps, and taillamps.
2: Turns on the headlamps,
parking lamps, instrument panel
lights, license plate lamps,
and taillamps.
For more information, see:
.Exterior Lamp Controls on
page 6‑1.
.Daytime Running Lamps (DRL)
on page 6‑3.
.Fog Lamps on page 6‑5.
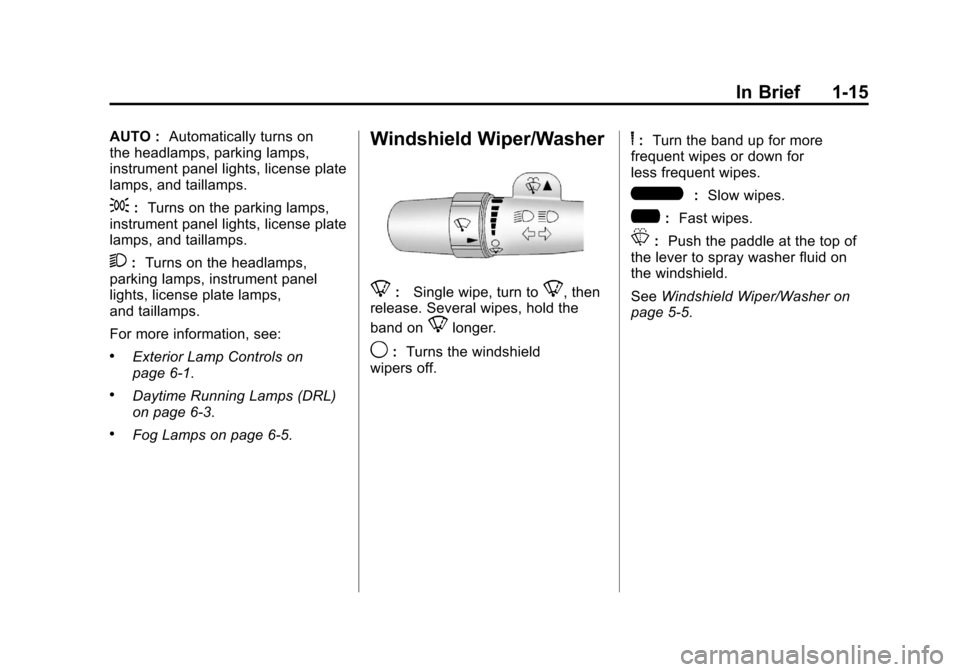
Windshield Wiper/Washer
8: Single wipe, turn to8, then
release. Several wipes, hold the
band on
8longer.
9: Turns the windshield
wipers off.
6: Turn the band up for more
frequent wipes or down for
less frequent wipes.
6: Slow wipes.
?:Fast wipes.
L:Push the paddle at the top of
the lever to spray washer fluid on
the windshield.
See Windshield Wiper/Washer on
page 5‑5.
Page 40 of 528
Black plate (4,1)Chevrolet Avalanche Owner Manual - 2011
2-4 Keys, Doors and Windows
SeeVehicle Personalization
(With DIC Buttons) on page 5‑47.
If enabled through the DIC, the
exterior lights may turn on. See
“APPROACH LIGHTING” under
Vehicle Personalization (With DIC
Buttons) on page 5‑47.
Pressing
Kon the RKE transmitter
disarms the content theft‐deterrent
system. See Anti-Theft Alarm
System on page 2‑17.
L(Vehicle Locator/Panic
Alarm): Press and release to
locate the vehicle. The turn signal
lamps flash and the horn sounds
three times.
Press and hold
Lfor more than
two seconds to activate the panic
alarm. The turn signal lamps flash
and the horn sounds repeatedly for
30 seconds. The alarm turns off
when the ignition is moved to
ON/RUN or
Lis pressed again. The ignition must be in LOCK/OFF
for the panic alarm to work.
The vehicle comes with two
transmitters. Each transmitter will
have a number on it,
“1”or“2”.
These numbers correspond to the
driver of the vehicle. For example,
the memory seat position for driver
1 will be recalled when using the
transmitter labeled “1”, if enabled
through the DIC. See “Memory
Seat, Mirrors, and Pedals” under
Power Seat Adjustment on page 3‑4
and Vehicle Personalization
(With DIC Buttons) on page 5‑47 for
more information.
Programming Transmitters to
the Vehicle
Only RKE transmitters programmed
to this vehicle will work. If a
transmitter is lost or stolen, a
replacement can be purchased and
programmed through your dealer.
When the replacement transmitter is
programmed to this vehicle, all
remaining transmitters must also be
reprogrammed. Any lost or stolen
transmitters will no longer work
once the new transmitter is
programmed. Each vehicle can
have up to eight transmitters
programmed to it. See your dealer
to program transmitters to the
vehicle.
Page 53 of 528
Black plate (17,1)Chevrolet Avalanche Owner Manual - 2011
Keys, Doors and Windows 2-17
Vehicle Security
This vehicle has theft-deterrent
features; however, they do not make
it impossible to steal.
Anti-Theft Alarm System
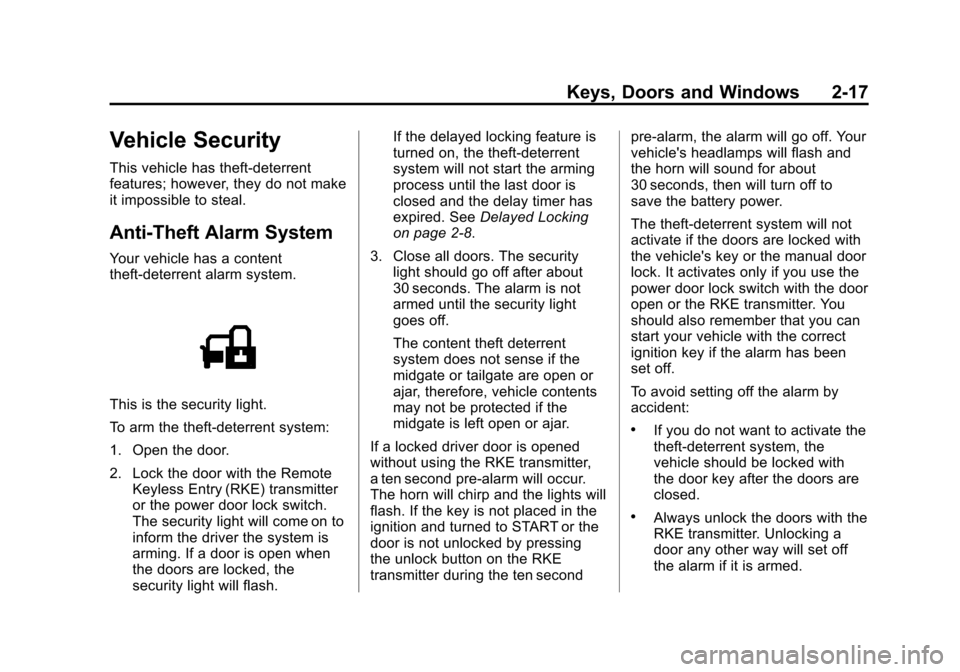
Your vehicle has a content
theft-deterrent alarm system.
This is the security light.
To arm the theft-deterrent system:
1. Open the door.
2. Lock the door with the RemoteKeyless Entry (RKE) transmitter
or the power door lock switch.
The security light will come on to
inform the driver the system is
arming. If a door is open when
the doors are locked, the
security light will flash. If the delayed locking feature is
turned on, the theft‐deterrent
system will not start the arming
process until the last door is
closed and the delay timer has
expired. See
Delayed Locking
on page 2‑8.
3. Close all doors. The security light should go off after about
30 seconds. The alarm is not
armed until the security light
goes off.
The content theft deterrent
system does not sense if the
midgate or tailgate are open or
ajar, therefore, vehicle contents
may not be protected if the
midgate is left open or ajar.
If a locked driver door is opened
without using the RKE transmitter,
a ten second pre-alarm will occur.
The horn will chirp and the lights will
flash. If the key is not placed in the
ignition and turned to START or the
door is not unlocked by pressing
the unlock button on the RKE
transmitter during the ten second pre-alarm, the alarm will go off. Your
vehicle's headlamps will flash and
the horn will sound for about
30 seconds, then will turn off to
save the battery power.
The theft-deterrent system will not
activate if the doors are locked with
the vehicle's key or the manual door
lock. It activates only if you use the
power door lock switch with the door
open or the RKE transmitter. You
should also remember that you can
start your vehicle with the correct
ignition key if the alarm has been
set off.
To avoid setting off the alarm by
accident:
.If you do not want to activate the
theft-deterrent system, the
vehicle should be locked with
the door key after the doors are
closed.
.Always unlock the doors with the
RKE transmitter. Unlocking a
door any other way will set off
the alarm if it is armed.
Page 73 of 528
Black plate (9,1)Chevrolet Avalanche Owner Manual - 2011
Seats and Restraints 3-9
Power Reclining Seatbacks
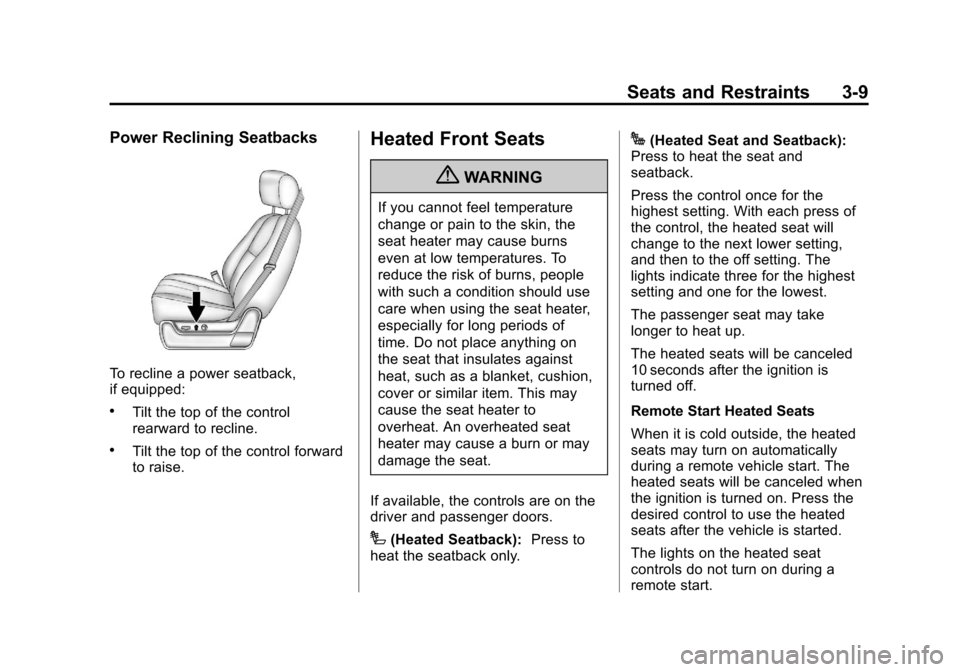
To recline a power seatback,
if equipped:
.Tilt the top of the control
rearward to recline.
.Tilt the top of the control forward
to raise.
Heated Front Seats
{WARNING
If you cannot feel temperature
change or pain to the skin, the
seat heater may cause burns
even at low temperatures. To
reduce the risk of burns, people
with such a condition should use
care when using the seat heater,
especially for long periods of
time. Do not place anything on
the seat that insulates against
heat, such as a blanket, cushion,
cover or similar item. This may
cause the seat heater to
overheat. An overheated seat
heater may cause a burn or may
damage the seat.
If available, the controls are on the
driver and passenger doors.
I(Heated Seatback): Press to
heat the seatback only.
J(Heated Seat and Seatback):
Press to heat the seat and
seatback.
Press the control once for the
highest setting. With each press of
the control, the heated seat will
change to the next lower setting,
and then to the off setting. The
lights indicate three for the highest
setting and one for the lowest.
The passenger seat may take
longer to heat up.
The heated seats will be canceled
10 seconds after the ignition is
turned off.
Remote Start Heated Seats
When it is cold outside, the heated
seats may turn on automatically
during a remote vehicle start. The
heated seats will be canceled when
the ignition is turned on. Press the
desired control to use the heated
seats after the vehicle is started.
The lights on the heated seat
controls do not turn on during a
remote start.
Page 133 of 528
Black plate (1,1)Chevrolet Avalanche Owner Manual - 2011
Storage 4-1
Storage
Storage Compartments
Glove Box . . . . . . . . . . . . . . . . . . . . 4-1
Cupholders . . . . . . . . . . . . . . . . . . . 4-1
Overhead Console . . . . . . . . . . . . 4-1
Armrest Storage . . . . . . . . . . . . . . 4-2
Center Console Storage . . . . . . 4-2
Top-Box Storage . . . . . . . . . . . . . . 4-2
Luggage/Load Locations
Cargo Area . . . . . . . . . . . . . . . . . . . 4-2
Additional Storage Features
Cargo Cover Panels . . . . . . . . . . 4-6
Cargo Tie Downs . . . . . . . . . . . . 4-13
Roof Rack System
Roof Rack System . . . . . . . . . . . 4-13
Storage
Compartments
Glove Box
Lift up on the glove box lever to
open it.
Cupholders
For vehicles with cupholders for
front and rear passengers, the
cupholders are located in the center
console and on the back of the
center console.
Press down and release the access
door to open and use the front
cupholders.
Pull down on the door located on
the back of the console to use the
rear cupholders. Push on the door
to close it.Push down and then back to
remove the front cupholder for
cleaning.
For vehicles with a rear armrest/
cupholder, pull up and out on the
tab on the top center of the armrest.
Pull the armrest down to access the
cupholder.Overhead Console
For vehicles with an overhead
console, it contains reading lights
and a small storage area.
Press the button next to each light
to turn it on and off.
Page 147 of 528
Black plate (1,1)Chevrolet Avalanche Owner Manual - 2011
Instruments and Controls 5-1
Instruments and
Controls
Controls
Steering Wheel Adjustment . . . 5-2
Steering Wheel Controls . . . . . . 5-3
Horn . . . . . . . . . . . . . . . . . . . . . . . . . . 5-5
Windshield Wiper/Washer . . . . . 5-5
Compass . . . . . . . . . . . . . . . . . . . . . 5-6
Clock . . . . . . . . . . . . . . . . . . . . . . . . . 5-8
Power Outlets . . . . . . . . . . . . . . . . . 5-9
Cigarette Lighter . . . . . . . . . . . . . . 5-9
Ashtrays . . . . . . . . . . . . . . . . . . . . . 5-10
Warning Lights, Gauges, and
Indicators
Warning Lights, Gauges, andIndicators . . . . . . . . . . . . . . . . . . 5-10
Instrument Cluster . . . . . . . . . . . 5-11
Speedometer . . . . . . . . . . . . . . . . 5-12
Odometer . . . . . . . . . . . . . . . . . . . . 5-12
Trip Odometer . . . . . . . . . . . . . . . 5-12
Tachometer . . . . . . . . . . . . . . . . . . 5-12
Fuel Gauge . . . . . . . . . . . . . . . . . . 5-13 Engine Oil Pressure
Gauge . . . . . . . . . . . . . . . . . . . . . . 5-14
Engine Coolant Temperature Gauge . . . . . . . . . . . . . . . . . . . . . . 5-15
Voltmeter Gauge . . . . . . . . . . . . . 5-16
Safety Belt Reminders . . . . . . . 5-16
Airbag Readiness Light . . . . . . 5-18
Passenger Airbag Status
Indicator . . . . . . . . . . . . . . . . . . . . 5-18
Charging System Light . . . . . . 5-20
Malfunction Indicator Lamp . . . . . . . . . . . . . 5-20
Brake System Warning Light . . . . . . . . . . . . . . . . . . . . . . . 5-23
Antilock Brake System (ABS) Warning Light . . . . . . . . . . . . . . 5-24
Tow/Haul Mode Light . . . . . . . . 5-24
StabiliTrak
®Indicator Light . . . 5-24
Tire Pressure Light . . . . . . . . . . 5-25
Engine Oil Pressure Light . . . . 5-26
Low Fuel Warning Light . . . . . . 5-26
Security Light . . . . . . . . . . . . . . . . 5-26
High-Beam on Light . . . . . . . . . 5-27
Front Fog Lamp Light . . . . . . . . 5-27
Cruise Control Light . . . . . . . . . 5-27
Information Displays
Driver Information Center (DIC) . . . . . . . . . . . . . . . 5-28
Vehicle Messages
Vehicle Messages . . . . . . . . . . . 5-37
Battery Voltage and ChargingMessages . . . . . . . . . . . . . . . . . . 5-37
Brake System Messages . . . . 5-37
Door Ajar Messages . . . . . . . . . 5-38
Engine Cooling System Messages . . . . . . . . . . . . . . . . . . 5-39
Engine Oil Messages . . . . . . . . 5-40
Engine Power Messages . . . . 5-40
Fuel System Messages . . . . . . 5-41
Key and Lock Messages . . . . . 5-41
Lamp Messages . . . . . . . . . . . . . 5-41
Object Detection System Messages . . . . . . . . . . . . . . . . . . 5-41
Ride Control System Messages . . . . . . . . . . . . . . . . . . 5-42
Airbag System Messages . . . . 5-43
Anti-Theft Alarm System Messages . . . . . . . . . . . . . . . . . . 5-43
Tire Messages . . . . . . . . . . . . . . . 5-44
Transmission Messages . . . . . 5-45
Vehicle Reminder Messages . . . . . . . . . . . . . . . . . . 5-45
Washer Fluid Messages . . . . . 5-46
Page 156 of 528
Black plate (10,1)Chevrolet Avalanche Owner Manual - 2011
5-10 Instruments and Controls
Ashtrays
For vehicles with an ashtray it is
located in the center console or on
the instrument panel. Pull up on the
ashtray door to open it if it is in the
console or pull the door open it if it
is on the instrument panel.
Notice:If papers, pins, or other
flammable items are put in the
ashtray, hot cigarettes or other
smoking materials could ignite
them and possibly damage the
vehicle. Never put flammable
items in the ashtray.
To remove the ashtray, pull it out
from the console or from the slide
out door. To reinstall the ashtray,
slide it back to the original position.
Warning Lights,
Gauges, and
Indicators
Warning lights and gauges can
signal that something is wrong
before it becomes serious enough
to cause an expensive repair or
replacement. Paying attention to the
warning lights and gauges could
prevent injury.
Warning lights come on when there
could be a problem with a vehicle
function. Some warning lights come
on briefly when the engine is started
to indicate they are working. Gauges can indicate when there
could be a problem with a vehicle
function. Often gauges and warning
lights work together to indicate a
problem with the vehicle.
When one of the warning lights
comes on and stays on while
driving, or when one of the gauges
shows there may be a problem,
check the section that explains what
to do. Follow this manual's advice.
Waiting to do repairs can be costly
and even dangerous.
Page 165 of 528
Black plate (19,1)Chevrolet Avalanche Owner Manual - 2011
Instruments and Controls 5-19
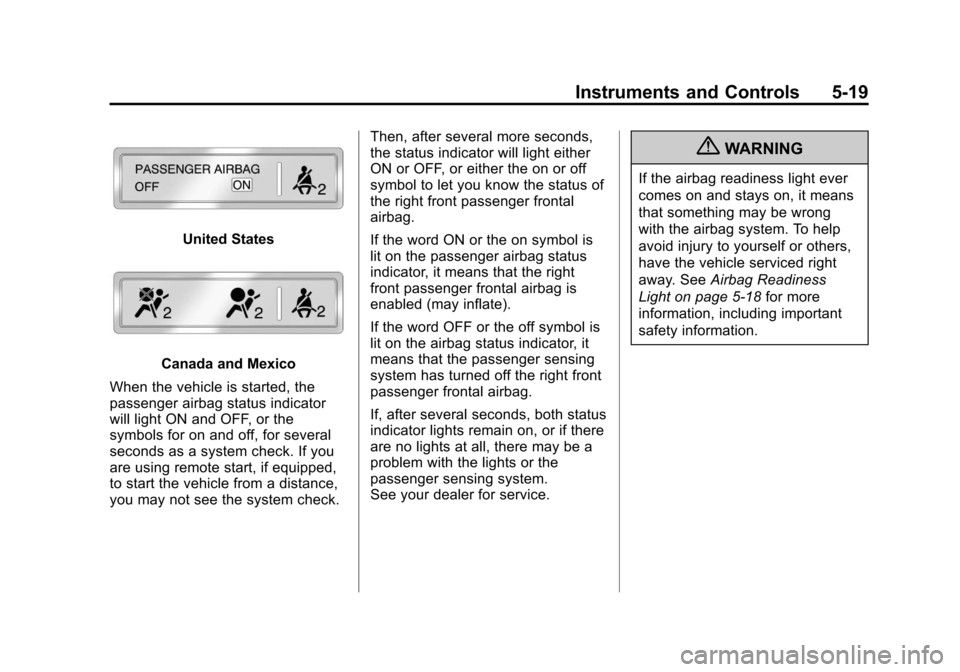
United States
Canada and Mexico
When the vehicle is started, the
passenger airbag status indicator
will light ON and OFF, or the
symbols for on and off, for several
seconds as a system check. If you
are using remote start, if equipped,
to start the vehicle from a distance,
you may not see the system check. Then, after several more seconds,
the status indicator will light either
ON or OFF, or either the on or off
symbol to let you know the status of
the right front passenger frontal
airbag.
If the word ON or the on symbol is
lit on the passenger airbag status
indicator, it means that the right
front passenger frontal airbag is
enabled (may inflate).
If the word OFF or the off symbol is
lit on the airbag status indicator, it
means that the passenger sensing
system has turned off the right front
passenger frontal airbag.
If, after several seconds, both status
indicator lights remain on, or if there
are no lights at all, there may be a
problem with the lights or the
passenger sensing system.
See your dealer for service.
{WARNING
If the airbag readiness light ever
comes on and stays on, it means
that something may be wrong
with the airbag system. To help
avoid injury to yourself or others,
have the vehicle serviced right
away. See
Airbag Readiness
Light on page 5‑18 for more
information, including important
safety information.