seats CHEVROLET AVALANCHE 2011 2.G Owners Manual
[x] Cancel search | Manufacturer: CHEVROLET, Model Year: 2011, Model line: AVALANCHE, Model: CHEVROLET AVALANCHE 2011 2.GPages: 528, PDF Size: 7.65 MB
Page 1 of 528

Black plate (1,1)Chevrolet Avalanche Owner Manual - 2011
2011 Chevrolet Avalanche Owner ManualM
In Brief. . . . . . . . . . . . . . . . . . . . . . . . 1-1
Instrument Panel . . . . . . . . . . . . . . 1-2
Initial Drive Information . . . . . . . . 1-4
Vehicle Features . . . . . . . . . . . . . 1-20
Performance and Maintenance . . . . . . . . . . . . . . . . 1-26
Keys, Doors and Windows . . . 2-1
Keys and Locks . . . . . . . . . . . . . . . 2-2
Doors . . . . . . . . . . . . . . . . . . . . . . . . 2-10
Vehicle Security . . . . . . . . . . . . . . 2-17
Exterior Mirrors . . . . . . . . . . . . . . . 2-20
Interior Mirrors . . . . . . . . . . . . . . . . 2-22
Windows . . . . . . . . . . . . . . . . . . . . . 2-24
Roof . . . . . . . . . . . . . . . . . . . . . . . . . . 2-26
Seats and Restraints . . . . . . . . . 3-1
Head Restraints . . . . . . . . . . . . . . . 3-2
Front Seats . . . . . . . . . . . . . . . . . . . . 3-3
Rear Seats . . . . . . . . . . . . . . . . . . . 3-10
Safety Belts . . . . . . . . . . . . . . . . . . 3-12
Airbag System . . . . . . . . . . . . . . . . 3-28
Child Restraints . . . . . . . . . . . . . . 3-46 Storage
. . . . . . . . . . . . . . . . . . . . . . . 4-1
Storage Compartments . . . . . . . . 4-1
Luggage/Load Locations . . . . . . . 4-2
Additional Storage Features . . . 4-6
Roof Rack System . . . . . . . . . . . 4-13
Instruments and Controls . . . . 5-1
Controls . . . . . . . . . . . . . . . . . . . . . . . 5-2
Warning Lights, Gauges, and Indicators . . . . . . . . . . . . . . . . . . . 5-10
Information Displays . . . . . . . . . . 5-28
Vehicle Messages . . . . . . . . . . . . 5-37
Vehicle Personalization . . . . . . . 5-47
Universal Remote System . . . . 5-56
Lighting . . . . . . . . . . . . . . . . . . . . . . . 6-1
Exterior Lighting . . . . . . . . . . . . . . . 6-1
Interior Lighting . . . . . . . . . . . . . . . . 6-6
Lighting Features . . . . . . . . . . . . . . 6-7
Infotainment System . . . . . . . . . 7-1
Introduction . . . . . . . . . . . . . . . . . . . . 7-2
Radio . . . . . . . . . . . . . . . . . . . . . . . . . . 7-8
Audio Players . . . . . . . . . . . . . . . . 7-14
Rear Seat Infotainment . . . . . . . 7-34
Phone . . . . . . . . . . . . . . . . . . . . . . . . 7-46 Climate Controls
. . . . . . . . . . . . . 8-1
Climate Control Systems . . . . . . 8-1
Air Vents . . . . . . . . . . . . . . . . . . . . . 8-10
Driving and Operating . . . . . . . . 9-1
Driving Information . . . . . . . . . . . . . 9-2
Starting and Operating . . . . . . . 9-30
Engine Exhaust . . . . . . . . . . . . . . 9-38
Automatic Transmission . . . . . . 9-39
Drive Systems . . . . . . . . . . . . . . . . 9-44
Brakes . . . . . . . . . . . . . . . . . . . . . . . 9-52
Ride Control Systems . . . . . . . . 9-54
Cruise Control . . . . . . . . . . . . . . . . 9-58
Object Detection Systems . . . . 9-60
Fuel . . . . . . . . . . . . . . . . . . . . . . . . . . 9-68
Towing . . . . . . . . . . . . . . . . . . . . . . . 9-74
Conversions and Add-Ons . . . 9-93
Vehicle Care . . . . . . . . . . . . . . . . . 10-1
General Information . . . . . . . . . . 10-2
Vehicle Checks . . . . . . . . . . . . . . . 10-4
Headlamp Aiming . . . . . . . . . . . 10-35
Bulb Replacement . . . . . . . . . . 10-37
Electrical System . . . . . . . . . . . . 10-40
Page 7 of 528
Black plate (1,1)Chevrolet Avalanche Owner Manual - 2011
In Brief 1-1
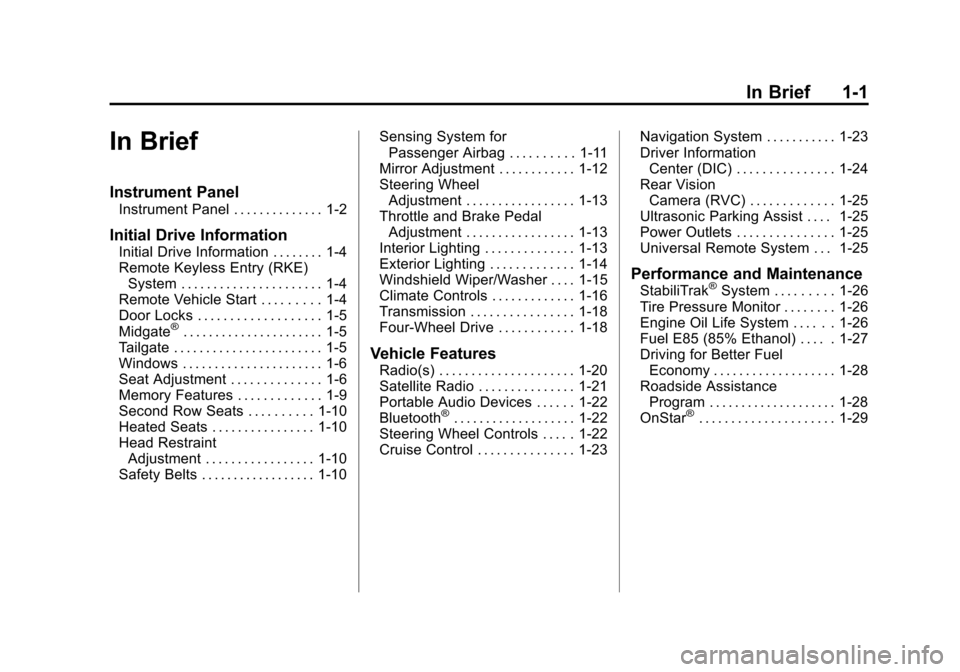
In Brief
Instrument Panel
Instrument Panel . . . . . . . . . . . . . . 1-2
Initial Drive Information
Initial Drive Information . . . . . . . . 1-4
Remote Keyless Entry (RKE)System . . . . . . . . . . . . . . . . . . . . . . 1-4
Remote Vehicle Start . . . . . . . . . 1-4
Door Locks . . . . . . . . . . . . . . . . . . . 1-5
Midgate
®. . . . . . . . . . . . . . . . . . . . . . 1-5
Tailgate . . . . . . . . . . . . . . . . . . . . . . . 1-5
Windows . . . . . . . . . . . . . . . . . . . . . . 1-6
Seat Adjustment . . . . . . . . . . . . . . 1-6
Memory Features . . . . . . . . . . . . . 1-9
Second Row Seats . . . . . . . . . . 1-10
Heated Seats . . . . . . . . . . . . . . . . 1-10
Head Restraint Adjustment . . . . . . . . . . . . . . . . . 1-10
Safety Belts . . . . . . . . . . . . . . . . . . 1-10 Sensing System for
Passenger Airbag . . . . . . . . . . 1-11
Mirror Adjustment . . . . . . . . . . . . 1-12
Steering Wheel Adjustment . . . . . . . . . . . . . . . . . 1-13
Throttle and Brake Pedal Adjustment . . . . . . . . . . . . . . . . . 1-13
Interior Lighting . . . . . . . . . . . . . . 1-13
Exterior Lighting . . . . . . . . . . . . . 1-14
Windshield Wiper/Washer . . . . 1-15
Climate Controls . . . . . . . . . . . . . 1-16
Transmission . . . . . . . . . . . . . . . . 1-18
Four-Wheel Drive . . . . . . . . . . . . 1-18
Vehicle Features
Radio(s) . . . . . . . . . . . . . . . . . . . . . 1-20
Satellite Radio . . . . . . . . . . . . . . . 1-21
Portable Audio Devices . . . . . . 1-22
Bluetooth
®. . . . . . . . . . . . . . . . . . . 1-22
Steering Wheel Controls . . . . . 1-22
Cruise Control . . . . . . . . . . . . . . . 1-23 Navigation System . . . . . . . . . . . 1-23
Driver Information
Center (DIC) . . . . . . . . . . . . . . . 1-24
Rear Vision Camera (RVC) . . . . . . . . . . . . . 1-25
Ultrasonic Parking Assist . . . . 1-25
Power Outlets . . . . . . . . . . . . . . . 1-25
Universal Remote System . . . 1-25
Performance and Maintenance
StabiliTrak®System . . . . . . . . . 1-26
Tire Pressure Monitor . . . . . . . . 1-26
Engine Oil Life System . . . . . . 1-26
Fuel E85 (85% Ethanol) . . . . . 1-27
Driving for Better Fuel Economy . . . . . . . . . . . . . . . . . . . 1-28
Roadside Assistance
Program . . . . . . . . . . . . . . . . . . . . 1-28
OnStar
®. . . . . . . . . . . . . . . . . . . . . 1-29
Page 12 of 528
Black plate (6,1)Chevrolet Avalanche Owner Manual - 2011
1-6 In Brief
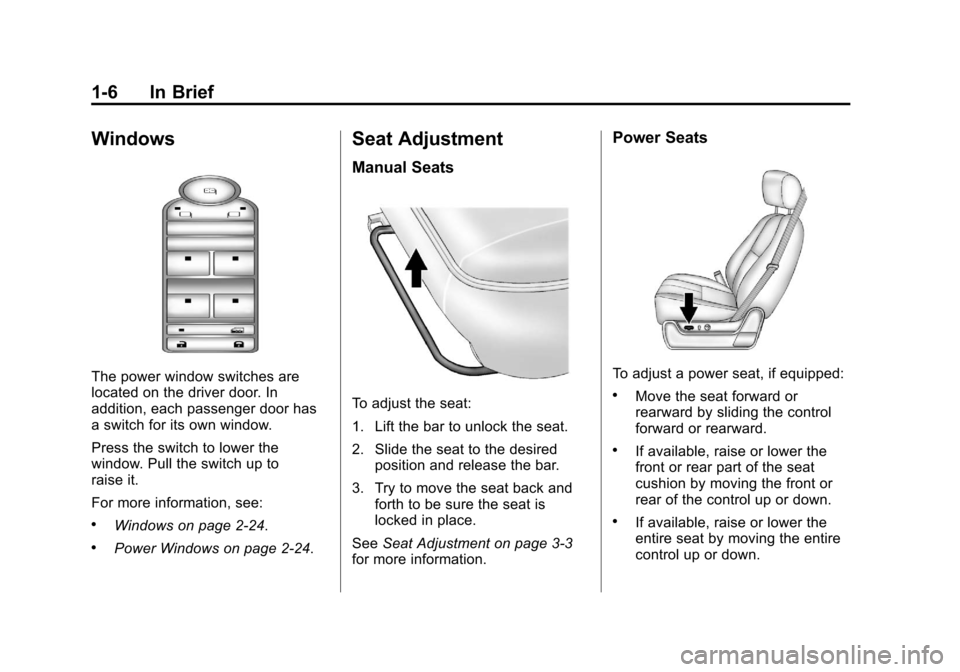
Windows
The power window switches are
located on the driver door. In
addition, each passenger door has
a switch for its own window.
Press the switch to lower the
window. Pull the switch up to
raise it.
For more information, see:
.Windows on page 2‑24.
.Power Windows on page 2‑24.
Seat Adjustment
Manual Seats
To adjust the seat:
1. Lift the bar to unlock the seat.
2. Slide the seat to the desiredposition and release the bar.
3. Try to move the seat back and forth to be sure the seat is
locked in place.
See Seat Adjustment on page 3‑3
for more information.
Power Seats
To adjust a power seat, if equipped:
.Move the seat forward or
rearward by sliding the control
forward or rearward.
.If available, raise or lower the
front or rear part of the seat
cushion by moving the front or
rear of the control up or down.
.If available, raise or lower the
entire seat by moving the entire
control up or down.
Page 16 of 528
Black plate (10,1)Chevrolet Avalanche Owner Manual - 2011
1-10 In Brief
Second Row Seats
The rear seatbacks can be folded to
provide more cargo space and
access to the midgate.
For detailed instructions seeRear
Seats on page 3‑10.
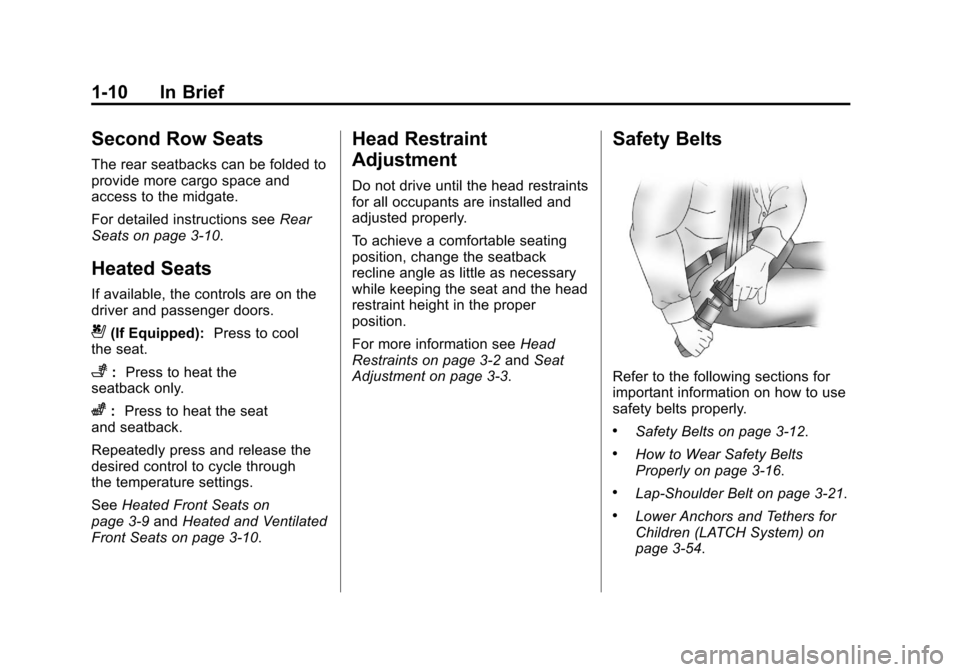
Heated Seats
If available, the controls are on the
driver and passenger doors.
{(If Equipped): Press to cool
the seat.
+: Press to heat the
seatback only.
z: Press to heat the seat
and seatback.
Repeatedly press and release the
desired control to cycle through
the temperature settings.
See Heated Front Seats on
page 3‑9 andHeated and Ventilated
Front Seats on page 3‑10.
Head Restraint
Adjustment
Do not drive until the head restraints
for all occupants are installed and
adjusted properly.
To achieve a comfortable seating
position, change the seatback
recline angle as little as necessary
while keeping the seat and the head
restraint height in the proper
position.
For more information see Head
Restraints on page 3‑2 andSeat
Adjustment on page 3‑3.
Safety Belts
Refer to the following sections for
important information on how to use
safety belts properly.
.Safety Belts on page 3‑12.
.How to Wear Safety Belts
Properly on page 3‑16.
.Lap-Shoulder Belt on page 3‑21.
.Lower Anchors and Tethers for
Children (LATCH System) on
page 3‑54.
Page 42 of 528
Black plate (6,1)Chevrolet Avalanche Owner Manual - 2011
2-6 Keys, Doors and Windows
During a remote start, if the vehicle
has an automatic climate control
system and heated seats, the
heated seats will turn on during
colder outside temperatures and will
shut off when the key is turned to
ON/RUN. If the vehicle does not
have an automatic climate control
system, during remote start,
manually turn the heated seats on
and off. SeeHeated Front Seats on
page 3‑9 for additional information.
Laws in some communities may
restrict the use of remote starters.
For example, some laws may
require a person using the remote
start to have the vehicle in view
when doing so. Check local
regulations for any requirements on
remote starting of vehicles.
Do not use the remote start
feature if the vehicle is low on fuel.
The vehicle may run out of fuel. If the vehicle has the remote start
feature, the RKE transmitter
functions will have an increased
range of operation. However, the
range may be less while the vehicle
is running.
There are other conditions which
can affect the performance of the
transmitter. See
Remote Keyless
Entry (RKE) System on page 2‑2 for
additional information.
/(Remote Start): This button will
be on the RKE transmitter if the
vehicle has remote start.
To start the vehicle using the remote
start feature:
1. Aim the transmitter at the
vehicle.
2. Press and release
Q. The
vehicle's doors will lock.
Immediately press and hold
/
until the turn signal lamps flash. If you cannot see the vehicle's
lamps, press and hold
/for
two to four seconds. Pressing
/
again after the vehicle has
started will turn the engine off.
When the vehicle starts, the
parking lamps will turn on
and remain on while the vehicle
is running.
If the vehicle is left running, it
will automatically shut off after
10 minutes unless a time
extension has been done.
3. If it is the first remote start since the vehicle has been driven,
repeat these steps, while the
engine is still running, to extend
the engine running time by
10 minutes. Remote start can be
extended one time.
After entering the vehicle during a
remote start, insert and turn the key
to ON/RUN to drive the vehicle.
Page 47 of 528
Black plate (11,1)Chevrolet Avalanche Owner Manual - 2011
Keys, Doors and Windows 2-11
Rear Glass Removal and
Storage
{WARNING
If the removable rear glass is not
stored properly, it could be thrown
about the vehicle in a crash or
sudden maneuver. People in the
vehicle could be injured.
Whenever you store the rear
glass in the vehicle, always be
sure that it is stored securely in
the Midgate
®storage pocket.
Do not remove the rear glass when
the rear defroster is on. If you do,
you may see a discharge spark
coming from the latch area.
To remove the rear glass do the
following:
1. Fold the rear seats. See Rear
Seats on page 3‑10. The front
seats may have to be moved
forward slightly to allow the rear
seats to fold completely. Although the rear glass can be
removed without folding the rear
seats, you will not be able to
access the rear glass storage
pocket. Be sure to fold the seats
before removing the rear glass.
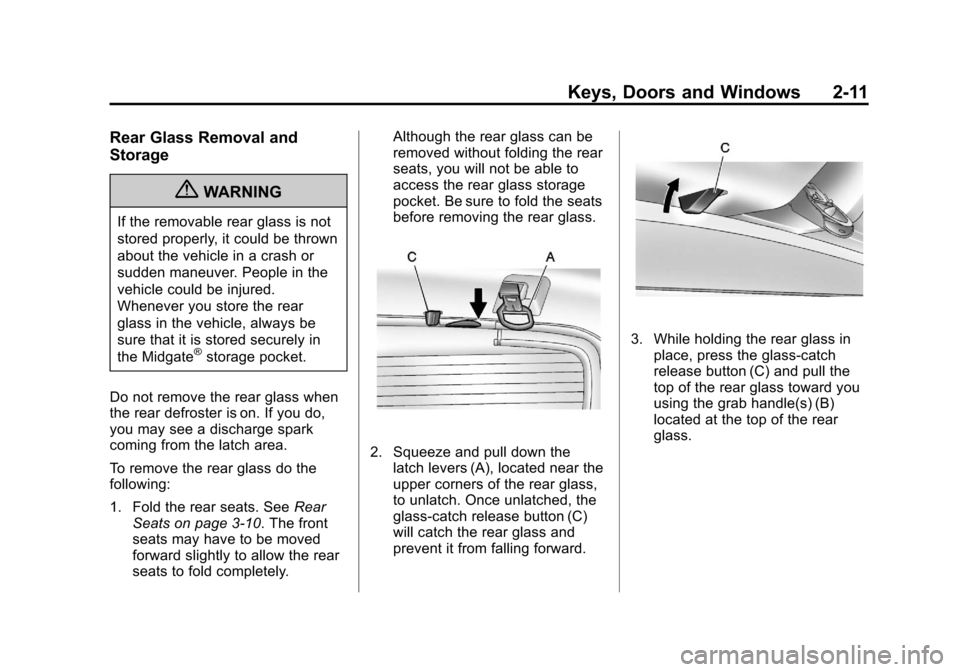
2. Squeeze and pull down the
latch levers (A), located near the
upper corners of the rear glass,
to unlatch. Once unlatched, the
glass-catch release button (C)
will catch the rear glass and
prevent it from falling forward.
3. While holding the rear glass in
place, press the glass-catch
release button (C) and pull the
top of the rear glass toward you
using the grab handle(s) (B)
located at the top of the rear
glass.
Page 49 of 528
Black plate (13,1)Chevrolet Avalanche Owner Manual - 2011
Keys, Doors and Windows 2-13
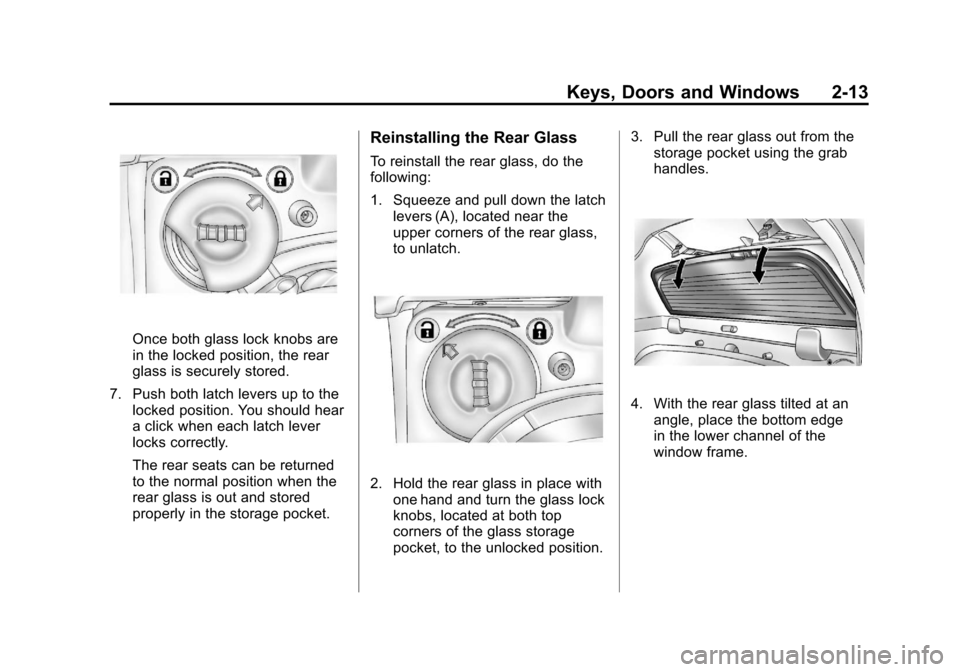
Once both glass lock knobs are
in the locked position, the rear
glass is securely stored.
7. Push both latch levers up to the locked position. You should hear
a click when each latch lever
locks correctly.
The rear seats can be returned
to the normal position when the
rear glass is out and stored
properly in the storage pocket.
Reinstalling the Rear Glass
To reinstall the rear glass, do the
following:
1. Squeeze and pull down the latchlevers (A), located near the
upper corners of the rear glass,
to unlatch.
2. Hold the rear glass in place withone hand and turn the glass lock
knobs, located at both top
corners of the glass storage
pocket, to the unlocked position. 3. Pull the rear glass out from the
storage pocket using the grab
handles.
4. With the rear glass tilted at an
angle, place the bottom edge
in the lower channel of the
window frame.
Page 50 of 528
Black plate (14,1)Chevrolet Avalanche Owner Manual - 2011
2-14 Keys, Doors and Windows
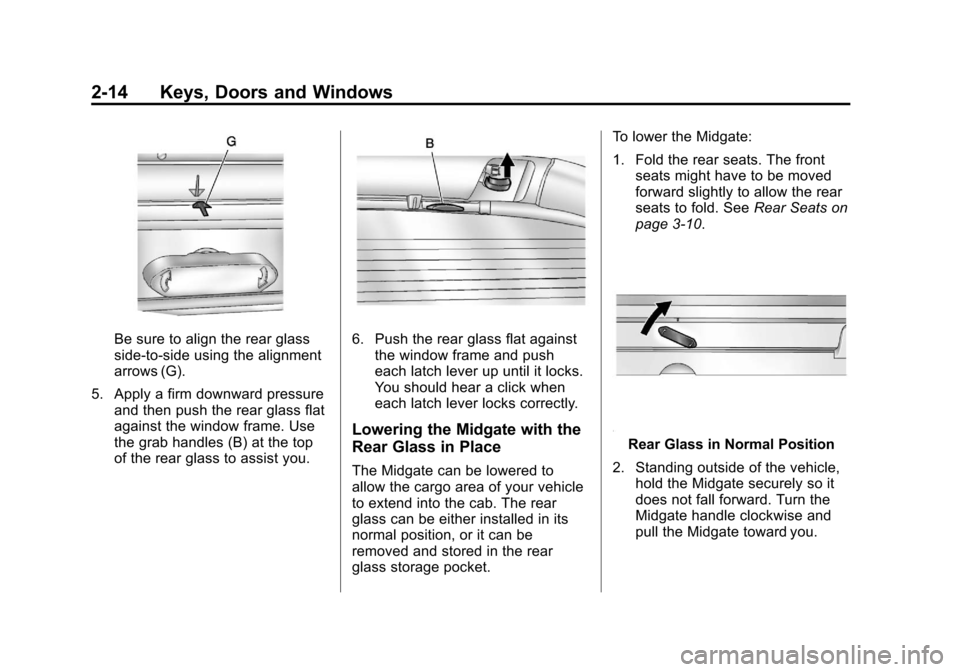
Be sure to align the rear glass
side-to-side using the alignment
arrows (G).
5. Apply a firm downward pressure and then push the rear glass flat
against the window frame. Use
the grab handles (B) at the top
of the rear glass to assist you.6. Push the rear glass flat againstthe window frame and push
each latch lever up until it locks.
You should hear a click when
each latch lever locks correctly.
Lowering the Midgate with the
Rear Glass in Place
The Midgate can be lowered to
allow the cargo area of your vehicle
to extend into the cab. The rear
glass can be either installed in its
normal position, or it can be
removed and stored in the rear
glass storage pocket. To lower the Midgate:
1. Fold the rear seats. The front
seats might have to be moved
forward slightly to allow the rear
seats to fold. See Rear Seats on
page 3‑10.
Rear Glass in Normal Position
2. Standing outside of the vehicle, hold the Midgate securely so it
does not fall forward. Turn the
Midgate handle clockwise and
pull the Midgate toward you.
Page 65 of 528
Black plate (1,1)Chevrolet Avalanche Owner Manual - 2011
Seats and Restraints 3-1
Seats and
Restraints
Head Restraints
Head Restraints . . . . . . . . . . . . . . . 3-2
Front Seats
Seat Adjustment . . . . . . . . . . . . . . 3-3
Center Seat . . . . . . . . . . . . . . . . . . . 3-3
Power Seat Adjustment . . . . . . . 3-4
Lumbar Adjustment . . . . . . . . . . . 3-6
Reclining Seatbacks . . . . . . . . . . 3-7
Heated Front Seats . . . . . . . . . . . 3-9
Heated and Ventilated FrontSeats . . . . . . . . . . . . . . . . . . . . . . . 3-10
Rear Seats
Rear Seats . . . . . . . . . . . . . . . . . . 3-10
Safety Belts
Safety Belts . . . . . . . . . . . . . . . . . . 3-12
How to Wear Safety BeltsProperly . . . . . . . . . . . . . . . . . . . . 3-16
Lap-Shoulder Belt . . . . . . . . . . . 3-21
Safety Belt Use During Pregnancy . . . . . . . . . . . . . . . . . . 3-26
Lap Belt . . . . . . . . . . . . . . . . . . . . . 3-26 Safety Belt Extender . . . . . . . . . 3-27
Safety System Check . . . . . . . . 3-27
Safety Belt Care . . . . . . . . . . . . . 3-27
Replacing Safety Belt System
Parts After a Crash . . . . . . . . . 3-28
Airbag System
Airbag System . . . . . . . . . . . . . . . 3-28
Where Are the Airbags? . . . . . 3-31
When Should an Airbag
Inflate? . . . . . . . . . . . . . . . . . . . . . 3-33
What Makes an Airbag Inflate? . . . . . . . . . . . . . . . . . . . . . 3-35
How Does an Airbag Restrain? . . . . . . . . . . . . . . . . . . . 3-35
What Will You See After an Airbag Inflates? . . . . . . . . . . . . 3-36
Passenger Sensing System . . . . . . . . . . . . . . . . . . . . . 3-38
Servicing the Airbag-Equipped Vehicle . . . . . . . . . . . . . . . . . . . . . 3-43
Adding Equipment to the Airbag-Equipped Vehicle . . . 3-44
Airbag System Check . . . . . . . . 3-45
Replacing Airbag System Parts After a Crash . . . . . . . . . 3-45
Child Restraints
Older Children . . . . . . . . . . . . . . . 3-46
Infants and YoungChildren . . . . . . . . . . . . . . . . . . . . 3-48
Child Restraint Systems . . . . . 3-51
Where to Put the Restraint . . . 3-53
Lower Anchors and Tethers for Children (LATCH
System) . . . . . . . . . . . . . . . . . . . . 3-54
Replacing LATCH System Parts After a Crash . . . . . . . . . 3-61
Securing Child Restraints (Rear Seat Position) . . . . . . . . 3-62
Securing Child Restraints (Center Front Seat
Position) . . . . . . . . . . . . . . . . . . . 3-64
Securing Child Restraints (Right Front Seat
Position) . . . . . . . . . . . . . . . . . . . 3-64
Page 66 of 528
Black plate (2,1)Chevrolet Avalanche Owner Manual - 2011
3-2 Seats and Restraints
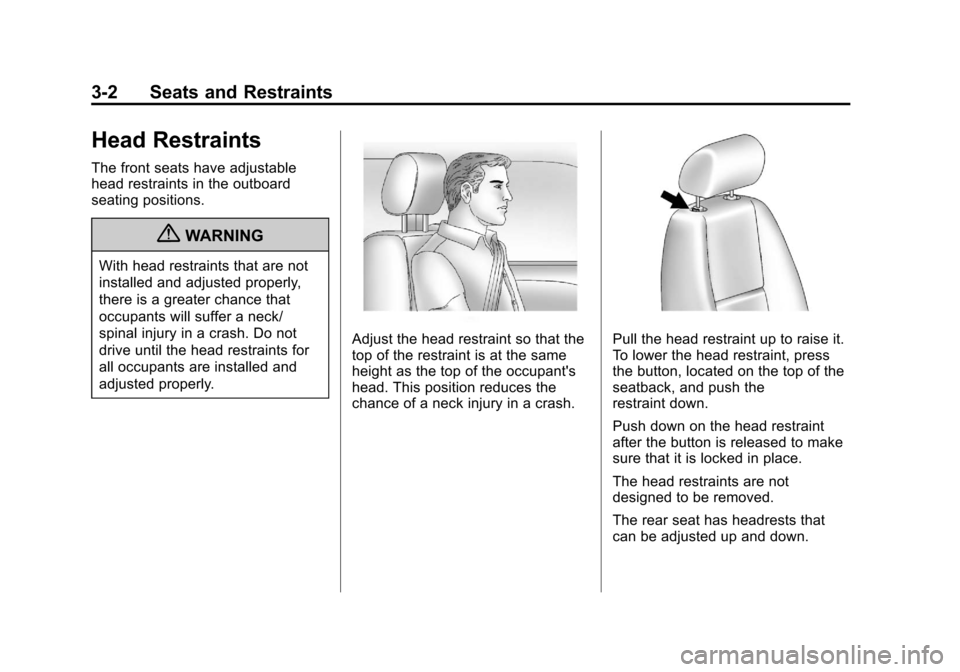
Head Restraints
The front seats have adjustable
head restraints in the outboard
seating positions.
{WARNING
With head restraints that are not
installed and adjusted properly,
there is a greater chance that
occupants will suffer a neck/
spinal injury in a crash. Do not
drive until the head restraints for
all occupants are installed and
adjusted properly.
Adjust the head restraint so that the
top of the restraint is at the same
height as the top of the occupant's
head. This position reduces the
chance of a neck injury in a crash.Pull the head restraint up to raise it.
To lower the head restraint, press
the button, located on the top of the
seatback, and push the
restraint down.
Push down on the head restraint
after the button is released to make
sure that it is locked in place.
The head restraints are not
designed to be removed.
The rear seat has headrests that
can be adjusted up and down.