spare wheel CHEVROLET AVALANCHE 2011 2.G Owners Manual
[x] Cancel search | Manufacturer: CHEVROLET, Model Year: 2011, Model line: AVALANCHE, Model: CHEVROLET AVALANCHE 2011 2.GPages: 528, PDF Size: 7.65 MB
Page 286 of 528
Black plate (8,1)Chevrolet Avalanche Owner Manual - 2011
9-8 Driving and Operating
Before You Go Off-Roading
.Have all necessary maintenance
and service work done.
.Make sure there is enough fuel,
that fluid levels are where they
should be, and that the spare
tire is fully inflated.
.Be sure to read all the
information about
four-wheel-drive vehicles in
this manual.
.Make sure all underbody
shields, if the vehicle has them,
are properly attached.
.Know the local laws that apply to
off-roading where you will be
driving or check with law
enforcement people in the area.
.Be sure to get the necessary
permission if you will be on
private land.
If you think you will need some
more ground clearance at the front
of your vehicle, you can remove the
front fascia lower air dam. The air dam is held in place by
two bolts and 10 snaps accessible
from underneath the front fascia.
To remove the air dam:
1. Remove the two outboard air
dam bolts.
2. With a flat‐blade tool, disengage the snaps.
3. After the bolts are removed and the snaps are disengaged, push
forward on the air dam until it
is free.
Notice: Operating your vehicle
for extended periods without
the front fascia lower air dam
installed can cause improper air
flow to the engine. Always be
sure to replace the front fascia
air dam when you are finished
off-road driving. After off-roading, be sure to reinstall
the air dam:
1. Line up the snaps and push
the air dam rearward to engage
the snaps.
2. Install the two outboard bolts.
Loading Your Vehicle for
Off-Road Driving
{WARNING
.Cargo on the load floor piled
higher than the seatbacks
can be thrown forward during
a sudden stop. You or your
passengers could be injured.
Keep cargo below the top of
the seatbacks.
.Unsecured cargo on the load
floor can be tossed about
when driving over rough
terrain. You or your
passengers can be struck by
flying objects. Secure the
cargo properly. (Continued)
Page 374 of 528
Black plate (2,1)Chevrolet Avalanche Owner Manual - 2011
10-2 Vehicle Care
Tire Pressure MonitorOperation . . . . . . . . . . . . . . . . . 10-61
Tire Inspection . . . . . . . . . . . . . . 10-64
Tire Rotation . . . . . . . . . . . . . . . 10-64
When It Is Time for New Tires . . . . . . . . . . . . . . . . . . . . . . 10-66
Buying New Tires . . . . . . . . . . . 10-66
Different Size Tires and Wheels . . . . . . . . . . . . . . . . . . . 10-68
Uniform Tire Quality Grading . . . . . . . . . . . . . . . . . . . 10-69
Wheel Alignment and Tire Balance . . . . . . . . . . . . . . . . . . . 10-70
Wheel Replacement . . . . . . . . 10-71
Tire Chains . . . . . . . . . . . . . . . . . 10-72
If a Tire Goes Flat . . . . . . . . . . 10-73
Tire Changing . . . . . . . . . . . . . . 10-75
Secondary Latch System . . . 10-85
Full-Size Spare Tire . . . . . . . . 10-87Jump Starting
Jump Starting . . . . . . . . . . . . . . 10-88
Towing
Towing the Vehicle . . . . . . . . . 10-93
Recreational Vehicle Towing . . . . . . . . . . . . . . . . . . . . 10-93
Appearance Care
Exterior Care . . . . . . . . . . . . . . . 10-98
Interior Care . . . . . . . . . . . . . . . 10-102
Floor Mats . . . . . . . . . . . . . . . . 10-106
General Information
For service and parts needs, visit
your dealer. You will receive
genuine GM parts and GM-trained
and supported service people.
Genuine GM parts have one of
these marks:
Page 433 of 528
Black plate (61,1)Chevrolet Avalanche Owner Manual - 2011
Vehicle Care 10-61
Tire Pressure Monitor
Operation
This vehicle may have a Tire
Pressure Monitor System (TPMS).
The TPMS is designed to warn the
driver when a low tire pressure
condition exists. TPMS sensors are
mounted onto each tire and wheel
assembly, excluding the spare tire
and wheel assembly. The TPMS
sensors monitor the air pressure in
the vehicle's tires and transmit the
tire pressure readings to a receiver
located in the vehicle.
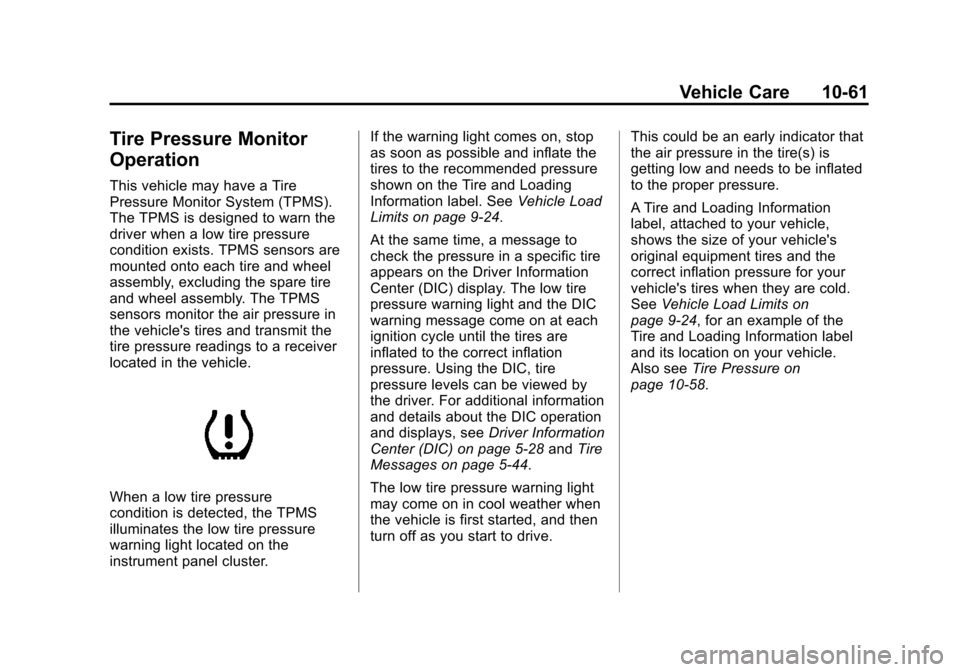
When a low tire pressure
condition is detected, the TPMS
illuminates the low tire pressure
warning light located on the
instrument panel cluster.If the warning light comes on, stop
as soon as possible and inflate the
tires to the recommended pressure
shown on the Tire and Loading
Information label. See
Vehicle Load
Limits on page 9‑24.
At the same time, a message to
check the pressure in a specific tire
appears on the Driver Information
Center (DIC) display. The low tire
pressure warning light and the DIC
warning message come on at each
ignition cycle until the tires are
inflated to the correct inflation
pressure. Using the DIC, tire
pressure levels can be viewed by
the driver. For additional information
and details about the DIC operation
and displays, see Driver Information
Center (DIC) on page 5‑28 andTire
Messages on page 5‑44.
The low tire pressure warning light
may come on in cool weather when
the vehicle is first started, and then
turn off as you start to drive. This could be an early indicator that
the air pressure in the tire(s) is
getting low and needs to be inflated
to the proper pressure.
A Tire and Loading Information
label, attached to your vehicle,
shows the size of your vehicle's
original equipment tires and the
correct inflation pressure for your
vehicle's tires when they are cold.
See
Vehicle Load Limits on
page 9‑24, for an example of the
Tire and Loading Information label
and its location on your vehicle.
Also see Tire Pressure on
page 10‑58.
Page 434 of 528
Black plate (62,1)Chevrolet Avalanche Owner Manual - 2011
10-62 Vehicle Care
Your vehicle's TPMS can warn you
about a low tire pressure condition
but it does not replace normal tire
maintenance. SeeTire Inspection
on page 10‑64, Tire Rotation on
page 10‑64, and Tires on
page 10‑49.
Notice: Tire sealant materials are
not all the same. A non-approved
tire sealant could damage the Tire
Pressure Monitor System (TPMS)
sensors. TPMS sensor damage
caused by using an incorrect tire
sealant is not covered by the
vehicle warranty. Always use only
the GM approved tire sealant
available through your dealer or
included in the vehicle.TPMS Malfunction Light and
Message
The TPMS will not function properly
if one or more of the TPMS sensors
are missing or inoperable. When the
system detects a malfunction, the
low tire pressure warning light
flashes for about one minute and
then stays on for the remainder of
the ignition cycle. A DIC warning
message is also displayed. The low
tire pressure warning light and DIC
warning message come on at each
ignition cycle until the problem is
corrected. Some of the conditions
that can cause the malfunction light
and DIC message to come on are:
.One of the road tires has been
replaced with the spare tire.
The spare tire does not have a
TPMS sensor. The TPMS
malfunction light and DIC
message should go off once you
re‐install the road tire containing
the TPMS sensor.
.The TPMS sensor matching
process was started but not
completed or not completed
successfully after rotating the
vehicle's tires. The DIC message
and TPMS malfunction light
should go off once the TPMS
sensor matching process is
performed successfully. See
“TPMS Sensor Matching
Process” later in this section.
.One or more TPMS sensors are
missing or damaged. The DIC
message and the TPMS
malfunction light should go off
when the TPMS sensors are
installed and the sensor
matching process is performed
successfully. See your dealer
for service.
.Replacement tires or wheels do
not match your vehicle's original
equipment tires or wheels. Tires
and wheels other than those
recommended for your vehicle
could prevent the TPMS from
functioning properly. See Buying
New Tires on page 10‑66.
Page 436 of 528
Black plate (64,1)Chevrolet Avalanche Owner Manual - 2011
10-64 Vehicle Care
7. Proceed to the passenger siderear tire, and repeat the
procedure in Step 5.
8. Proceed to the driver side rear tire, and repeat the procedure in
Step 5. The horn sounds two
times to indicate the sensor
identification code has been
matched to the driver side rear
tire, and the TPMS sensor
matching process is no longer
active. The TIRE LEARNING
ACTIVE message on the DIC
display screen goes off.
9. Turn the ignition switch to LOCK/OFF.
10. Set all four tires to the recommended air pressure
level as indicated on the Tire
and Loading Information label.
11. Put the valve caps back on the valve stems.Tire Inspection
We recommend that you
regularly inspect your vehicle's
tires, including the spare tire,
if the vehicle has one, for signs
of wear or damage at least once
a month.
Always remove the tires if any of
the following statements
are true:
.You can see the indicators at
three or more places around
the tire.
.You can see cord or fabric
showing through the tire's
rubber.
.The tread or sidewall is
cracked, cut, or snagged
deep enough to show cord or
fabric.
.The tire has a bump, bulge,
or split.
.The tire has a puncture, cut,
or other damage that cannot
be repaired well because of
the size or location of the
damage.
Tire Rotation
Tires should be rotated every
12 000 km (7,500 miles). See
Scheduled Maintenance on
page 11‑2.
The purpose of a regular tire
rotation is to achieve a uniform
wear for all tires on the vehicle.
This will ensure that the vehicle
continues to perform most like it
did when the tires were new.
Any time you notice unusual
wear, rotate the tires as soon as
possible and check wheel
alignment. Also check for
damaged tires or wheels.
Page 437 of 528
Black plate (65,1)Chevrolet Avalanche Owner Manual - 2011
Vehicle Care 10-65
SeeWhen It Is Time for New
Tires on page 10‑66 andWheel
Replacement on page 10‑71.
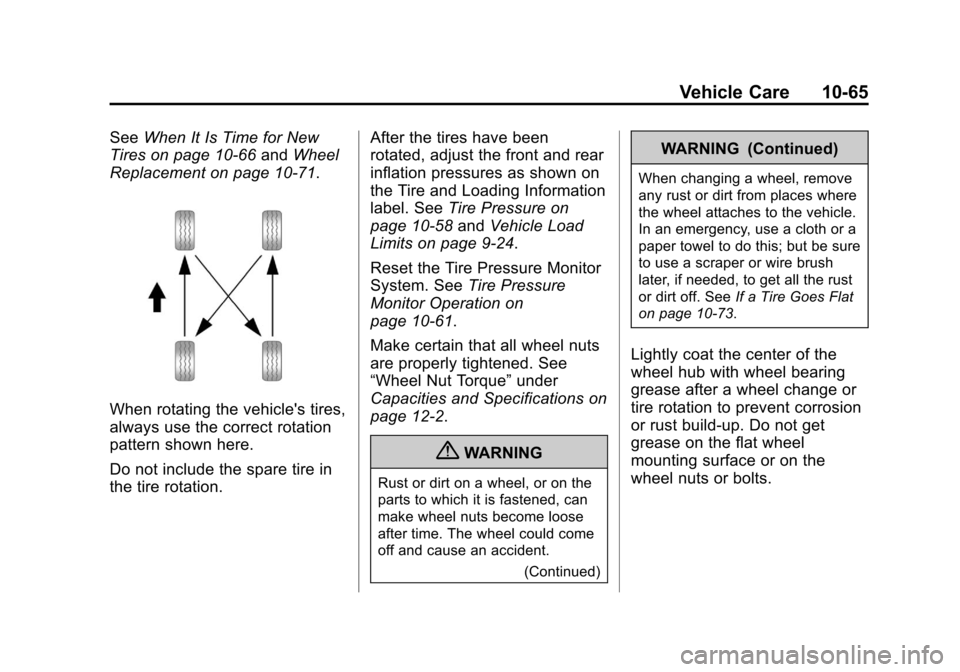
When rotating the vehicle's tires,
always use the correct rotation
pattern shown here.
Do not include the spare tire in
the tire rotation. After the tires have been
rotated, adjust the front and rear
inflation pressures as shown on
the Tire and Loading Information
label. See
Tire Pressure on
page 10‑58 andVehicle Load
Limits on page 9‑24.
Reset the Tire Pressure Monitor
System. See Tire Pressure
Monitor Operation on
page 10‑61.
Make certain that all wheel nuts
are properly tightened. See
“Wheel Nut Torque” under
Capacities and Specifications on
page 12‑2.
{WARNING
Rust or dirt on a wheel, or on the
parts to which it is fastened, can
make wheel nuts become loose
after time. The wheel could come
off and cause an accident.
(Continued)
WARNING (Continued)
When changing a wheel, remove
any rust or dirt from places where
the wheel attaches to the vehicle.
In an emergency, use a cloth or a
paper towel to do this; but be sure
to use a scraper or wire brush
later, if needed, to get all the rust
or dirt off. SeeIf a Tire Goes Flat
on page 10‑73.
Lightly coat the center of the
wheel hub with wheel bearing
grease after a wheel change or
tire rotation to prevent corrosion
or rust build-up. Do not get
grease on the flat wheel
mounting surface or on the
wheel nuts or bolts.
Page 439 of 528
Black plate (67,1)Chevrolet Avalanche Owner Manual - 2011
Vehicle Care 10-67
GM's exclusive TPC Spec system
considers over a dozen critical
specifications that impact the overall
performance of your vehicle,
including brake system
performance, ride and handling,
traction control, and tire pressure
monitoring performance. GM's TPC
Spec number is molded onto the
tire's sidewall near the tire size.
If the tires have an all‐season tread
design, the TPC spec number will
be followed by an MS for mud and
snow. SeeTire Sidewall Labeling on
page 10‑50 for additional
information.
GM recommends replacing tires in
sets of four. This is because uniform
tread depth on all tires will help
keep your vehicle performing most
like it did when the tires were new.
Replacing less than a full set of tires
can affect the braking and handling
performance of your vehicle. See
Tire Inspection on page 10‑64 and
Tire Rotation on page 10‑64 for
information on proper tire rotation.{WARNING
Tires could explode during
improper service. You or others
could be injured or killed if you
attempt to mount or dismount a
tire. Only your dealer or an
authorized tire service center
should mount and dismount
the tires.
{WARNING
Mixing tires could cause you to
lose control while driving. If you
mix tires of different sizes,
brands, or types (radial and
bias-belted tires), the vehicle
might not handle properly, and
you could have a crash. Using
tires of different sizes, brands,
or types could also cause
(Continued)
WARNING (Continued)
damage to your vehicle. Be sure
to use the same size, brand, and
type of tires on all wheels.
Your vehicle may have a different
size spare than the road tires
(those originally installed on your
vehicle). When new, your vehicle
included a spare tire and wheel
assembly with a similar overall
diameter as your vehicle's road
tires and wheels, so it is all right
to drive on it. Because this spare
was developed for use on your
vehicle, it will not affect vehicle
handling.
Page 447 of 528
Black plate (75,1)Chevrolet Avalanche Owner Manual - 2011
Vehicle Care 10-75
Tire Changing
Removing the Spare Tire
and Tools
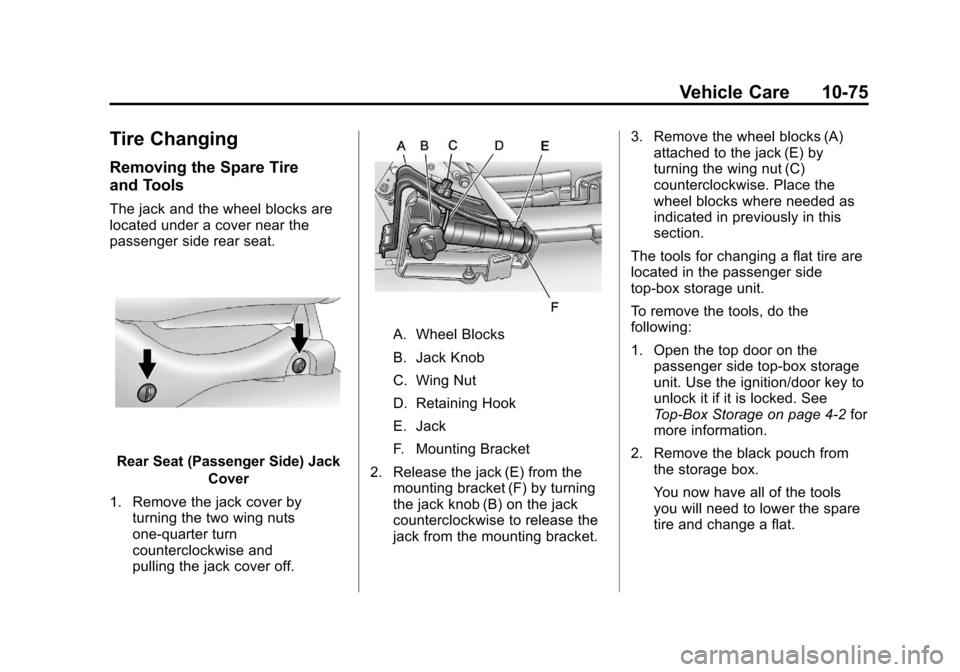
The jack and the wheel blocks are
located under a cover near the
passenger side rear seat.
Rear Seat (Passenger Side) JackCover
1. Remove the jack cover by turning the two wing nuts
one-quarter turn
counterclockwise and
pulling the jack cover off.
A. Wheel Blocks
B. Jack Knob
C. Wing Nut
D. Retaining Hook
E. Jack
F. Mounting Bracket
2. Release the jack (E) from the mounting bracket (F) by turning
the jack knob (B) on the jack
counterclockwise to release the
jack from the mounting bracket. 3. Remove the wheel blocks (A)
attached to the jack (E) by
turning the wing nut (C)
counterclockwise. Place the
wheel blocks where needed as
indicated in previously in this
section.
The tools for changing a flat tire are
located in the passenger side
top-box storage unit.
To remove the tools, do the
following:
1. Open the top door on the passenger side top-box storage
unit. Use the ignition/door key to
unlock it if it is locked. See
Top-Box Storage on page 4‑2 for
more information.
2. Remove the black pouch from the storage box.
You now have all of the tools
you will need to lower the spare
tire and change a flat.
Page 448 of 528
Black plate (76,1)Chevrolet Avalanche Owner Manual - 2011
10-76 Vehicle Care
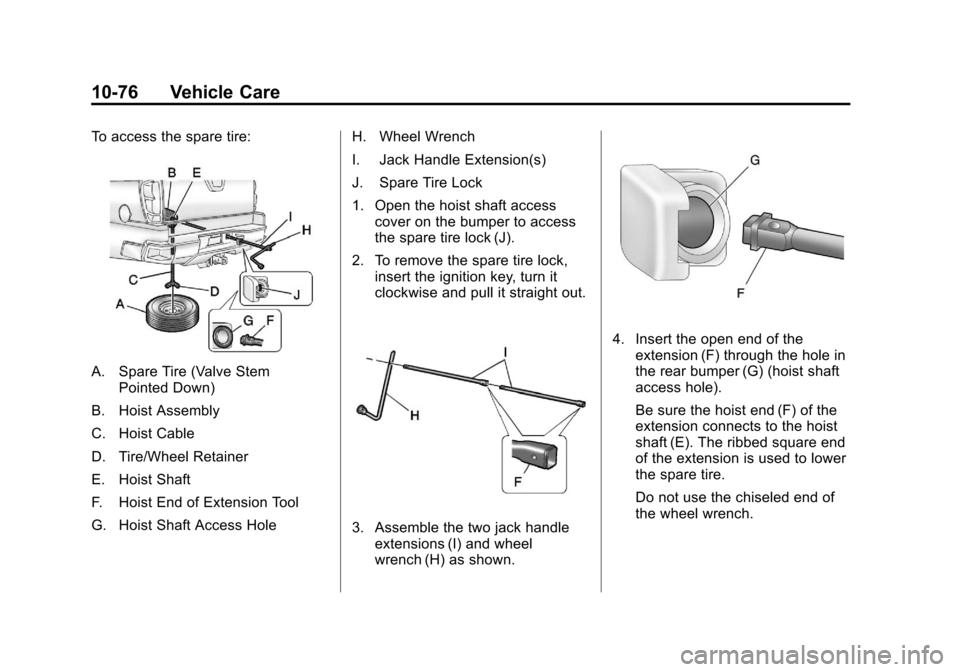
To access the spare tire:
A. Spare Tire (Valve StemPointed Down)
B. Hoist Assembly
C. Hoist Cable
D. Tire/Wheel Retainer
E. Hoist Shaft
F. Hoist End of Extension Tool
G. Hoist Shaft Access Hole H. Wheel Wrench
I. Jack Handle Extension(s)
J. Spare Tire Lock
1. Open the hoist shaft access
cover on the bumper to access
the spare tire lock (J).
2. To remove the spare tire lock, insert the ignition key, turn it
clockwise and pull it straight out.
3. Assemble the two jack handleextensions (I) and wheel
wrench (H) as shown.
4. Insert the open end of theextension (F) through the hole in
the rear bumper (G) (hoist shaft
access hole).
Be sure the hoist end (F) of the
extension connects to the hoist
shaft (E). The ribbed square end
of the extension is used to lower
the spare tire.
Do not use the chiseled end of
the wheel wrench.
Page 449 of 528
Black plate (77,1)Chevrolet Avalanche Owner Manual - 2011
Vehicle Care 10-77
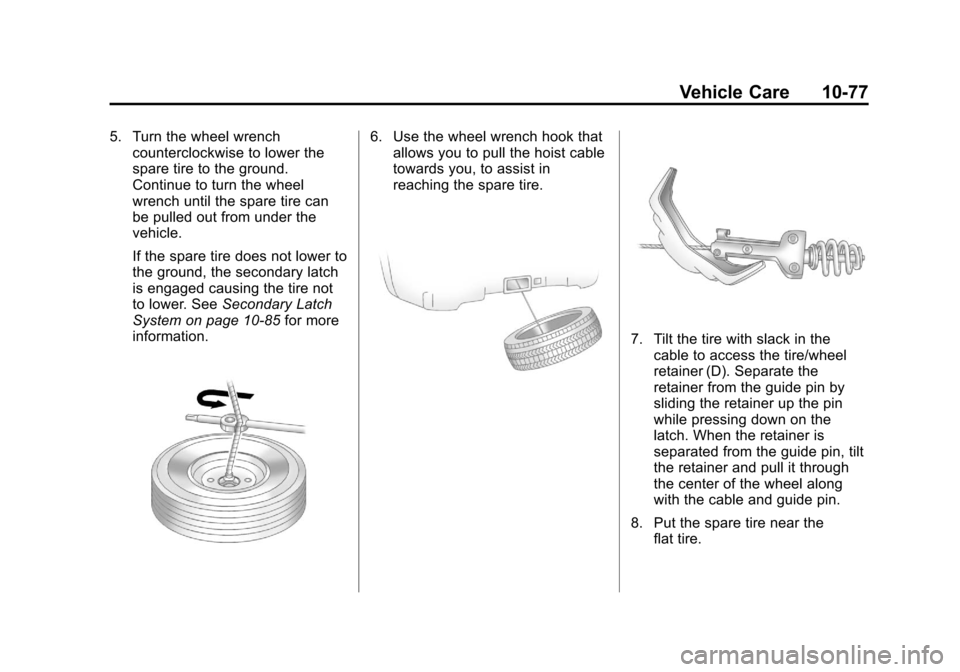
5. Turn the wheel wrenchcounterclockwise to lower the
spare tire to the ground.
Continue to turn the wheel
wrench until the spare tire can
be pulled out from under the
vehicle.
If the spare tire does not lower to
the ground, the secondary latch
is engaged causing the tire not
to lower. See Secondary Latch
System on page 10‑85 for more
information.6. Use the wheel wrench hook that allows you to pull the hoist cable
towards you, to assist in
reaching the spare tire.
7. Tilt the tire with slack in the
cable to access the tire/wheel
retainer (D). Separate the
retainer from the guide pin by
sliding the retainer up the pin
while pressing down on the
latch. When the retainer is
separated from the guide pin, tilt
the retainer and pull it through
the center of the wheel along
with the cable and guide pin.
8. Put the spare tire near the flat tire.