towing CHEVROLET AVALANCHE 2011 2.G Owners Manual
[x] Cancel search | Manufacturer: CHEVROLET, Model Year: 2011, Model line: AVALANCHE, Model: CHEVROLET AVALANCHE 2011 2.GPages: 528, PDF Size: 7.65 MB
Page 1 of 528

Black plate (1,1)Chevrolet Avalanche Owner Manual - 2011
2011 Chevrolet Avalanche Owner ManualM
In Brief. . . . . . . . . . . . . . . . . . . . . . . . 1-1
Instrument Panel . . . . . . . . . . . . . . 1-2
Initial Drive Information . . . . . . . . 1-4
Vehicle Features . . . . . . . . . . . . . 1-20
Performance and Maintenance . . . . . . . . . . . . . . . . 1-26
Keys, Doors and Windows . . . 2-1
Keys and Locks . . . . . . . . . . . . . . . 2-2
Doors . . . . . . . . . . . . . . . . . . . . . . . . 2-10
Vehicle Security . . . . . . . . . . . . . . 2-17
Exterior Mirrors . . . . . . . . . . . . . . . 2-20
Interior Mirrors . . . . . . . . . . . . . . . . 2-22
Windows . . . . . . . . . . . . . . . . . . . . . 2-24
Roof . . . . . . . . . . . . . . . . . . . . . . . . . . 2-26
Seats and Restraints . . . . . . . . . 3-1
Head Restraints . . . . . . . . . . . . . . . 3-2
Front Seats . . . . . . . . . . . . . . . . . . . . 3-3
Rear Seats . . . . . . . . . . . . . . . . . . . 3-10
Safety Belts . . . . . . . . . . . . . . . . . . 3-12
Airbag System . . . . . . . . . . . . . . . . 3-28
Child Restraints . . . . . . . . . . . . . . 3-46 Storage
. . . . . . . . . . . . . . . . . . . . . . . 4-1
Storage Compartments . . . . . . . . 4-1
Luggage/Load Locations . . . . . . . 4-2
Additional Storage Features . . . 4-6
Roof Rack System . . . . . . . . . . . 4-13
Instruments and Controls . . . . 5-1
Controls . . . . . . . . . . . . . . . . . . . . . . . 5-2
Warning Lights, Gauges, and Indicators . . . . . . . . . . . . . . . . . . . 5-10
Information Displays . . . . . . . . . . 5-28
Vehicle Messages . . . . . . . . . . . . 5-37
Vehicle Personalization . . . . . . . 5-47
Universal Remote System . . . . 5-56
Lighting . . . . . . . . . . . . . . . . . . . . . . . 6-1
Exterior Lighting . . . . . . . . . . . . . . . 6-1
Interior Lighting . . . . . . . . . . . . . . . . 6-6
Lighting Features . . . . . . . . . . . . . . 6-7
Infotainment System . . . . . . . . . 7-1
Introduction . . . . . . . . . . . . . . . . . . . . 7-2
Radio . . . . . . . . . . . . . . . . . . . . . . . . . . 7-8
Audio Players . . . . . . . . . . . . . . . . 7-14
Rear Seat Infotainment . . . . . . . 7-34
Phone . . . . . . . . . . . . . . . . . . . . . . . . 7-46 Climate Controls
. . . . . . . . . . . . . 8-1
Climate Control Systems . . . . . . 8-1
Air Vents . . . . . . . . . . . . . . . . . . . . . 8-10
Driving and Operating . . . . . . . . 9-1
Driving Information . . . . . . . . . . . . . 9-2
Starting and Operating . . . . . . . 9-30
Engine Exhaust . . . . . . . . . . . . . . 9-38
Automatic Transmission . . . . . . 9-39
Drive Systems . . . . . . . . . . . . . . . . 9-44
Brakes . . . . . . . . . . . . . . . . . . . . . . . 9-52
Ride Control Systems . . . . . . . . 9-54
Cruise Control . . . . . . . . . . . . . . . . 9-58
Object Detection Systems . . . . 9-60
Fuel . . . . . . . . . . . . . . . . . . . . . . . . . . 9-68
Towing . . . . . . . . . . . . . . . . . . . . . . . 9-74
Conversions and Add-Ons . . . 9-93
Vehicle Care . . . . . . . . . . . . . . . . . 10-1
General Information . . . . . . . . . . 10-2
Vehicle Checks . . . . . . . . . . . . . . . 10-4
Headlamp Aiming . . . . . . . . . . . 10-35
Bulb Replacement . . . . . . . . . . 10-37
Electrical System . . . . . . . . . . . . 10-40
Page 2 of 528

Black plate (2,1)Chevrolet Avalanche Owner Manual - 2011
2011 Chevrolet Avalanche Owner ManualM
Wheels and Tires . . . . . . . . . . . 10-49
Jump Starting . . . . . . . . . . . . . . . 10-88
Towing . . . . . . . . . . . . . . . . . . . . . . 10-93
Appearance Care . . . . . . . . . . . 10-98
Service and Maintenance . . . 11-1
General Information . . . . . . . . . . 11-1
Scheduled Maintenance . . . . . . 11-2
Recommended Fluids, Lubricants, and Parts . . . . . . . 11-6
Maintenance Records . . . . . . . . 11-9
Technical Data . . . . . . . . . . . . . . . 12-1
Vehicle Identification . . . . . . . . . 12-1
Vehicle Data . . . . . . . . . . . . . . . . . . 12-2
Customer Information . . . . . . . 13-1
Customer Information . . . . . . . . 13-1
Reporting Safety Defects . . . . 13-16
Vehicle Data Recording and Privacy . . . . . . . . . . . . . . . . . . . . 13-17
Index . . . . . . . . . . . . . . . . . . . . . i-1
Page 25 of 528
Black plate (19,1)Chevrolet Avalanche Owner Manual - 2011
In Brief 1-19
The transfer case knob is located to
the left of the instrument panel
cluster. Use this knob to shift into
and out of the different Four-Wheel
Drive modes.
2
m:This setting is used for driving
in most street and highway
situations.
AUTO: This setting is ideal for use
when road surface traction
conditions are variable.
4
m: Use the Four-Wheel-Drive
High position when extra traction is
needed, such as on snowy or icy
roads or in most off-road situations. 4
n:
Vehicles with a two speed
transfer case have a
Four-Wheel-Drive Low position.
This setting sends maximum power
to all four wheels. You might choose
Four-Wheel-Drive Low if you are
driving off-road in deep sand, deep
mud, deep snow, and while climbing
or descending steep hills.
N (Neutral): Vehicles with a
two speed transfer case have a
N (Neutral) position. Shift the
transfer case to N (Neutral) only
when towing the vehicle. See
Recreational Vehicle Towing on
page 10‑93 orTowing the Vehicle
on page 10‑93. See
Four-Wheel Drive (Two Speed
Automatic Transfer Case) on
page 9‑44 orFour-Wheel Drive
(Single Speed Automatic Transfer
Case) on page 9‑50.
Page 34 of 528
Black plate (28,1)Chevrolet Avalanche Owner Manual - 2011
1-28 In Brief
Driving for Better Fuel
Economy
Driving habits can affect fuel
mileage. Here are some driving tips
to get the best fuel economy
possible.
.Avoid fast starts and accelerate
smoothly.
.Brake gradually and avoid
abrupt stops.
.Avoid idling the engine for long
periods of time.
.When road and weather
conditions are appropriate, use
cruise control.
.Always follow posted speed
limits or drive more slowly when
conditions require.
.Keep vehicle tires properly
inflated.
.Combine several trips into a
single trip.
.Replace the vehicle's tires with
the same TPC Spec number
molded into the tire's sidewall
near the size.
.Follow recommended scheduled
maintenance.
Roadside Assistance
Program
U.S.:1-800-243-8872
TTY Users (U.S.): 1-888-889-2438
Canada: 1-800-268-6800
Mexico: 01-800-466-0800
As the owner of a new Chevrolet,
you are automatically enrolled in the
Roadside Assistance program. This
program provides technically trained
advisors who are available 24 hours
a day, 365 days a year, to give
minor repair information or make
towing arrangements. For more information see
Roadside
Assistance Program (U.S. and
Canada) on page 13‑8 orRoadside
Assistance Program (Mexico) on
page 13‑10.
Roadside Assistance and OnStar
(U.S. and Canada)
If you have a current OnStar
subscription, press theQbutton
and the current GPS location will be
sent to an OnStar advisor who will
assess your problem, contact
Roadside Assistance, and relay
your exact location to get the help
you need.
Online Owner Center (U.S. and
Canada)
The Online Owner Center is a
complimentary service that includes
online service reminders, vehicle
maintenance tips, online owner
manual, special privileges,
and more.
Sign up today at:
www.chevyownercenter.com
(U.S.) or www.gm.ca (Canada).
Page 107 of 528
Black plate (43,1)Chevrolet Avalanche Owner Manual - 2011
Seats and Restraints 3-43
A thick layer of additional material,
such as a blanket or cushion,
or aftermarket equipment such as
seat covers, seat heaters, and seat
massagers, can affect how well the
passenger sensing system
operates. We recommend that you
not use seat covers or other
aftermarket equipment except when
approved by GM for your specific
vehicle. SeeAdding Equipment to
the Airbag-Equipped Vehicle on
page 3‑44 for more information
about modifications that can affect
how the system operates.
The on indicator may be lit if an
object, such as a briefcase,
handbag, grocery bag, laptop,
or other electronic device, is put on
an unoccupied seat. If this is not
desired, remove the object from
the seat.{WARNING
Stowing of articles under the
passenger seat or between the
passenger seat cushion and
seatback may interfere with the
proper operation of the passenger
sensing system.
Servicing the
Airbag-Equipped Vehicle
Airbags affect how the vehicle
should be serviced. There are
parts of the airbag system in
several places around the vehicle. Your dealer and the service manual
have information about servicing
the vehicle and the airbag system.
To purchase a service manual, see
Service Publications Ordering
Information on page 13‑15.
{WARNING
For up to 10 seconds after the
ignition is turned off and the
battery is disconnected, an airbag
can still inflate during improper
service. You can be injured if you
are close to an airbag when it
inflates. Avoid yellow connectors.
They are probably part of the
airbag system. Be sure to follow
proper service procedures, and
make sure the person performing
work for you is qualified to do so.
Page 167 of 528
Black plate (21,1)Chevrolet Avalanche Owner Manual - 2011
Instruments and Controls 5-21
Notice:If the vehicle is
continually driven with this light
on, after a while, the emission
controls might not work as well,
the vehicle fuel economy might
not be as good, and the engine
might not run as smoothly. This
could lead to costly repairs that
might not be covered by the
vehicle warranty.
Notice: Modifications made to the
engine, transmission, exhaust,
intake, or fuel system of the
vehicle or the replacement of the
original tires with other than
those of the same Tire
Performance Criteria (TPC) can
affect the vehicle's emission
controls and can cause this light
to come on. Modifications to
these systems could lead to
costly repairs not covered by the
vehicle warranty. This could also
result in a failure to pass a
required Emission Inspection/
Maintenance test.
See Accessories and
Modifications on page 10‑3. This light comes on during a
malfunction in one of two ways:
Light Flashing:
A misfire condition
has been detected. A misfire
increases vehicle emissions and
could damage the emission control
system on the vehicle. Diagnosis
and service might be required.
To prevent more serious damage to
the vehicle:
.Reduce vehicle speed.
.Avoid hard accelerations.
.Avoid steep uphill grades.
.If towing a trailer, reduce the
amount of cargo being hauled as
soon as it is possible.
If the light continues to flash, when
it is safe to do so, stop the vehicle.
Find a safe place to park the
vehicle. Turn the vehicle off, wait at
least 10 seconds, and restart the
engine. If the light is still flashing,
follow the previous steps and see
your dealer for service as soon as
possible. Light On Steady:
An emission
control system malfunction has
been detected on the vehicle.
Diagnosis and service might
be required.
The following may correct an
emissions system malfunction:
.Make sure the fuel cap is fully
installed. See Filling the Tank on
page 9‑72. The diagnostic
system can determine if the
fuel cap has been left off or
improperly installed. A loose or
missing fuel cap allows fuel to
evaporate into the atmosphere.
A few driving trips with the cap
properly installed should turn the
light off.
.Make sure the electrical system
is not wet. The system could be
wet if the vehicle was driven
through a deep puddle of water.
The condition is usually
corrected when the electrical
system dries out. A few driving
trips should turn the light off.
Page 169 of 528
Black plate (23,1)Chevrolet Avalanche Owner Manual - 2011
Instruments and Controls 5-23
Brake System Warning
Light
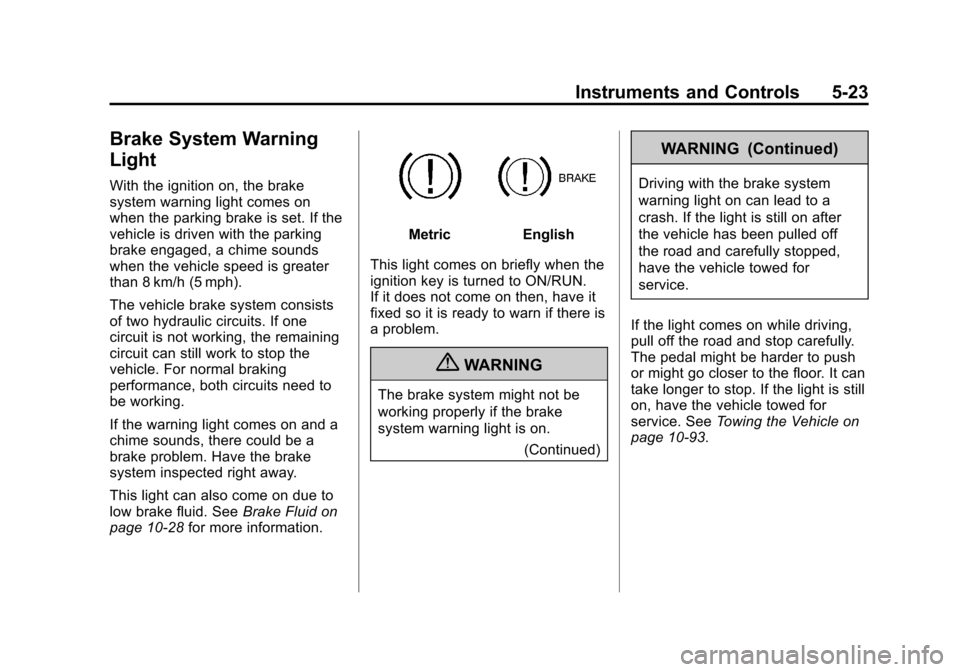
With the ignition on, the brake
system warning light comes on
when the parking brake is set. If the
vehicle is driven with the parking
brake engaged, a chime sounds
when the vehicle speed is greater
than 8 km/h (5 mph).
The vehicle brake system consists
of two hydraulic circuits. If one
circuit is not working, the remaining
circuit can still work to stop the
vehicle. For normal braking
performance, both circuits need to
be working.
If the warning light comes on and a
chime sounds, there could be a
brake problem. Have the brake
system inspected right away.
This light can also come on due to
low brake fluid. SeeBrake Fluid on
page 10‑28 for more information.
MetricEnglish
This light comes on briefly when the
ignition key is turned to ON/RUN.
If it does not come on then, have it
fixed so it is ready to warn if there is
a problem.
{WARNING
The brake system might not be
working properly if the brake
system warning light is on. (Continued)
WARNING (Continued)
Driving with the brake system
warning light on can lead to a
crash. If the light is still on after
the vehicle has been pulled off
the road and carefully stopped,
have the vehicle towed for
service.
If the light comes on while driving,
pull off the road and stop carefully.
The pedal might be harder to push
or might go closer to the floor. It can
take longer to stop. If the light is still
on, have the vehicle towed for
service. See Towing the Vehicle on
page 10‑93.
Page 179 of 528
Black plate (33,1)Chevrolet Avalanche Owner Manual - 2011
Instruments and Controls 5-33
To adjust this setting, see
“Integrated Trailer Brake Control
System”underTowing Equipment
on page 9‑84 for more information.
OUTPUT shows the power output to
the trailer anytime a trailer with
electric brakes is connected. Output
is displayed in 0 to 10 bars. Dashes
may appear in the OUTPUT display.
See “Integrated Trailer Brake
Control System” underTowing
Equipment on page 9‑84 for more
information.
Engine Hours
Press the vehicle information button
until ENGINE HOURS displays. This
display shows the total number of
hours the engine has run.
Compass Zone Setting
This display allows for setting the
compass zone. See Compass on
page 5‑6. Compass Recalibration
This display allows for calibrating
the compass. See
Compass on
page 5‑6.
Blank Display
This display shows no information.
Trip Odometer Reset Stem
Menu Items (with DIC Buttons)
Use the trip odometer reset stem
to view the odometer and trip
odometer. The Language selection
and Engine Hours display can also
be accessed with the trip odometer
reset stem.
Odometer
Press the trip odometer reset stem
until ODOMETER displays. This
display shows the distance the
vehicle has been driven in either
kilometers (km) or miles (mi). Trip Odometer
Press the trip odometer reset stem
until TRIP displays. This display
shows the current distance traveled
in either kilometers (km) or
miles (mi) since the last reset
for the trip odometer.
The trip odometer can be reset to
zero by pressing and holding the trip
odometer reset stem while the trip
odometer is displayed.
The trip odometer has a feature
called the retro-active reset. This
can be used to set the trip odometer
to the number of kilometers (miles)
driven since the ignition was last
turned on. This can be used if the
trip odometer is not reset at the
beginning of the trip.
To use the retro-active reset feature,
press and hold the trip odometer
reset stem for at least four seconds.
Page 181 of 528
Black plate (35,1)Chevrolet Avalanche Owner Manual - 2011
Instruments and Controls 5-35
4. Once the desired language isdisplayed, release the trip
odometer reset stem to set
your choice.
Trip Odometer
Press the trip odometer reset stem
until TRIP displays. This display
shows the current distance traveled
in either kilometers (km) or
miles (mi) since the last reset
for the trip odometer.
The trip odometer can be reset to
zero by pressing and holding the trip
odometer reset stem while the trip
odometer is displayed.
The trip odometer has a feature
called the retro-active reset. This
can be used to set the trip odometer
to the number of kilometers (miles)
driven since the ignition was last
turned on. This can be used if the
trip odometer is not reset at the
beginning of the trip. To use the retro-active reset feature,
press and hold the trip odometer
reset stem for at least four seconds.
The trip odometer will display the
number of kilometers (km) or
miles (mi) driven since the ignition
was last turned on and the vehicle
was moving. Once the vehicle
begins moving, the trip odometer
will accumulate mileage. For
example, if the vehicle was driven
8 km (5 miles) before it is started
again, and then the retro-active
reset feature is activated, the
display will show 8 km (5 miles).
As the vehicle begins moving, the
display will then increase to 8.2 km
(5.1 miles), 8.4 km (5.2 miles), etc.
Transmission Temperature
Press the trip odometer reset stem
until TRANS TEMP displays. This
display shows the temperature of
the automatic transmission fluid in
either degrees Celsius (°C) or
degrees Fahrenheit (°F).Trailer Gain and Output
On vehicles with the Integrated
Trailer Brake Control (ITBC) system,
the trailer brake display appears in
the DIC. Press the trip odometer
reset stem until TRAILER GAIN and
OUTPUT display.
TRAILER GAIN shows the trailer
gain setting. This setting can be
adjusted from 0.0 to 10.0 with either
a trailer connected or disconnected.
To adjust this setting, see
“Integrated Trailer Brake Control
System”
underTowing Equipment
on page 9‑84 for more information.
OUTPUT shows the power output to
the trailer anytime a trailer with
electric brakes is connected. Output
is displayed in 0 to 10 bars. Dashes
may appear in the OUTPUT display.
See “Integrated Trailer Brake
Control System” underTowing
Equipment on page 9‑84 for more
information.
Page 184 of 528
Black plate (38,1)Chevrolet Avalanche Owner Manual - 2011
5-38 Instruments and Controls
SERVICE BRAKES SOON
This message displays if there is a
problem with the brake system.
If this message appears, stop as
soon as possible and turn off the
vehicle. Restart the vehicle and
check for the message on the DIC
display. If the message is still
displayed or appears again when
you begin driving, the brake system
needs service. See your dealer.
SERVICE TRAILER BRAKE
SYSTEM
On vehicles with the Integrated
Trailer Brake Control (ITBC) system,
this message displays and a chime
sounds when there is a problem
with the ITBC system.When this message displays, power
is no longer available to the trailer
brakes.
As soon as it is safe to do so,
carefully pull your vehicle over to
the side of the road and turn the
ignition off. Check the wiring
connection to the trailer and turn the
ignition back on. If this message still
displays, either your vehicle or the
trailer needs service. See your
dealer.
See
“Integrated Trailer Brake
Control System” underTowing
Equipment on page 9‑84 for more
information.
Door Ajar Messages
DRIVER DOOR OPEN
This message displays and a chime
sounds if the driver door is not fully
closed and the vehicle is shifted out
of P (Park). Stop and turn off the
vehicle, check the door for
obstructions, and close the door
again. Check to see if the message
still appears on the DIC.
HOOD OPEN
This message displays and a
chime sounds if the hood is not fully
closed. Stop and turn off the
vehicle, check the hood for
obstructions, and close the hood
again. Check to see if the message
still appears on the DIC.