hood release CHEVROLET AVEO 2005 1.G Owners Manual
[x] Cancel search | Manufacturer: CHEVROLET, Model Year: 2005, Model line: AVEO, Model: CHEVROLET AVEO 2005 1.GPages: 316, PDF Size: 2.12 MB
Page 101 of 316
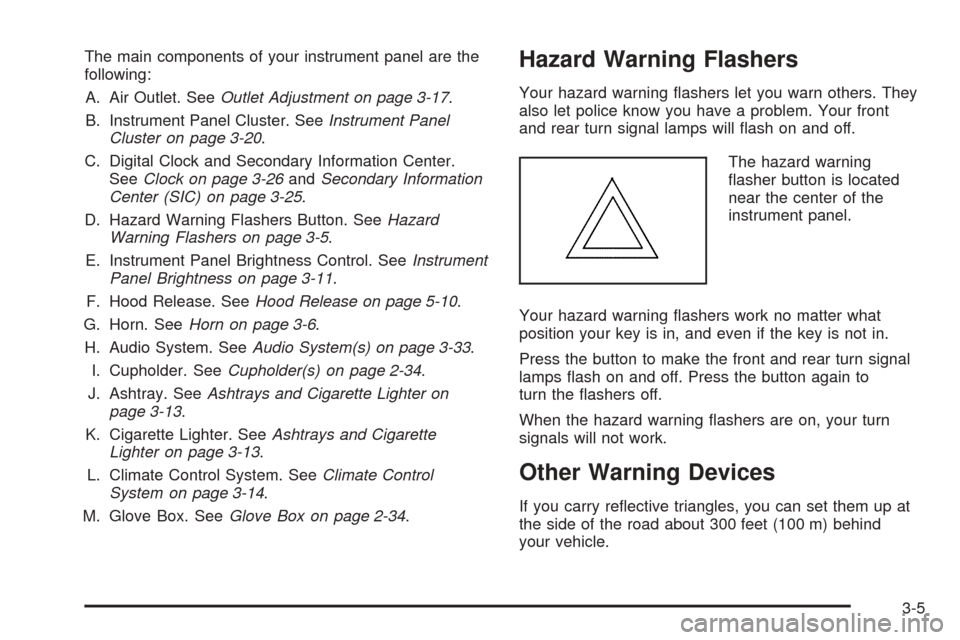
The main components of your instrument panel are the
following:
A. Air Outlet. SeeOutlet Adjustment on page 3-17.
B. Instrument Panel Cluster. SeeInstrument Panel
Cluster on page 3-20.
C. Digital Clock and Secondary Information Center.
SeeClock on page 3-26andSecondary Information
Center (SIC) on page 3-25.
D. Hazard Warning Flashers Button. SeeHazard
Warning Flashers on page 3-5.
E. Instrument Panel Brightness Control. SeeInstrument
Panel Brightness on page 3-11.
F. Hood Release. SeeHood Release on page 5-10.
G. Horn. SeeHorn on page 3-6.
H. Audio System. SeeAudio System(s) on page 3-33.
I. Cupholder. SeeCupholder(s) on page 2-34.
J. Ashtray. SeeAshtrays and Cigarette Lighter on
page 3-13.
K. Cigarette Lighter. SeeAshtrays and Cigarette
Lighter on page 3-13.
L. Climate Control System. SeeClimate Control
System on page 3-14.
M. Glove Box. SeeGlove Box on page 2-34.Hazard Warning Flashers
Your hazard warning flashers let you warn others. They
also let police know you have a problem. Your front
and rear turn signal lamps will flash on and off.
The hazard warning
flasher button is located
near the center of the
instrument panel.
Your hazard warning flashers work no matter what
position your key is in, and even if the key is not in.
Press the button to make the front and rear turn signal
lamps flash on and off. Press the button again to
turn the flashers off.
When the hazard warning flashers are on, your turn
signals will not work.
Other Warning Devices
If you carry reflective triangles, you can set them up at
the side of the road about 300 feet (100 m) behind
your vehicle.
3-5
Page 179 of 316
Service............................................................5-3
Doing Your Own Service Work.........................5-4
Adding Equipment to the Outside
of Your Vehicle...........................................5-4
Fuel................................................................5-5
Gasoline Octane............................................5-5
Gasoline Specifications....................................5-5
California Fuel...............................................5-5
Additives.......................................................5-6
Fuels in Foreign Countries...............................5-6
Filling the Tank..............................................5-7
Filling a Portable Fuel Container.......................5-9
Checking Things Under the Hood....................5-10
Hood Release..............................................5-10
Engine Compartment Overview.......................5-12
Engine Oil...................................................5-13
Engine Air Cleaner/Filter................................5-17
Automatic Transaxle Fluid..............................5-18
Manual Transaxle Fluid..................................5-20
Hydraulic Clutch...........................................5-20
Engine Coolant.............................................5-21
Coolant Surge Tank Pressure Cap..................5-24
Engine Overheating.......................................5-24
Cooling System............................................5-26
Power Steering Fluid.....................................5-30
Windshield Washer Fluid................................5-31Brakes........................................................5-32
Battery........................................................5-35
Jump Starting...............................................5-36
Headlamp Aiming...........................................5-39
Bulb Replacement..........................................5-40
Halogen Bulbs..............................................5-40
Headlamps..................................................5-40
Front Turn Signal and Parking Lamps..............5-42
Turn Signal Lamps (Side)..............................5-42
Fog Lamps..................................................5-43
Sidemarker Lamps (Front)..............................5-44
Sidemarker Lamps (Rear)..............................5-44
Taillamps, Turn Signal, Stoplamps and
Back-up Lamps.........................................5-45
Replacement Bulbs.......................................5-46
Windshield Wiper Blade Replacement..............5-46
Tires..............................................................5-47
Tire Sidewall Labelling...................................5-48
Tire Terminology and Definitions.....................5-50
Inflation - Tire Pressure.................................5-53
Tire Inspection and Rotation...........................5-54
When It Is Time for New Tires.......................5-55
Buying New Tires.........................................5-56
Uniform Tire Quality Grading..........................5-56
Wheel Alignment and Tire Balance..................5-58
Section 5 Service and Appearance Care
5-1
Page 188 of 316
Checking Things Under
the Hood
{CAUTION:
An electric fan under the hood can start up
and injure you even when the engine is not
running. Keep hands, clothing and tools away
from any underhood electric fan.
{CAUTION:
Things that burn can get on hot engine parts
and start a �re. These include liquids like fuel,
oil, coolant, brake �uid, windshield washer
and other �uids, and plastic or rubber. You or
others could be burned. Be careful not to drop
or spill things that will burn onto a hot engine.
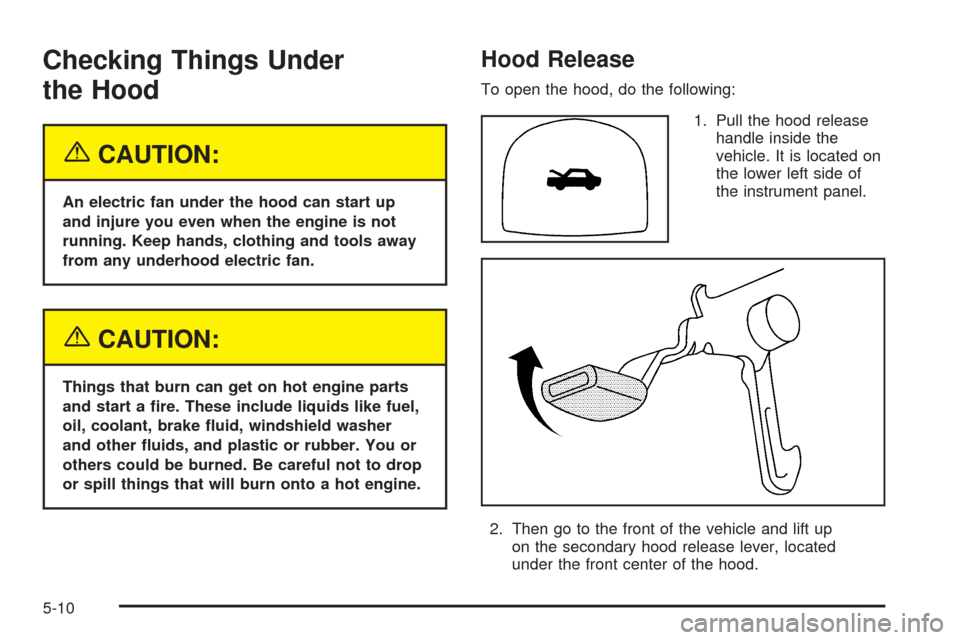
Hood Release
To open the hood, do the following:
1. Pull the hood release
handle inside the
vehicle. It is located on
the lower left side of
the instrument panel.
2. Then go to the front of the vehicle and lift up
on the secondary hood release lever, located
under the front center of the hood.
5-10
Page 189 of 316
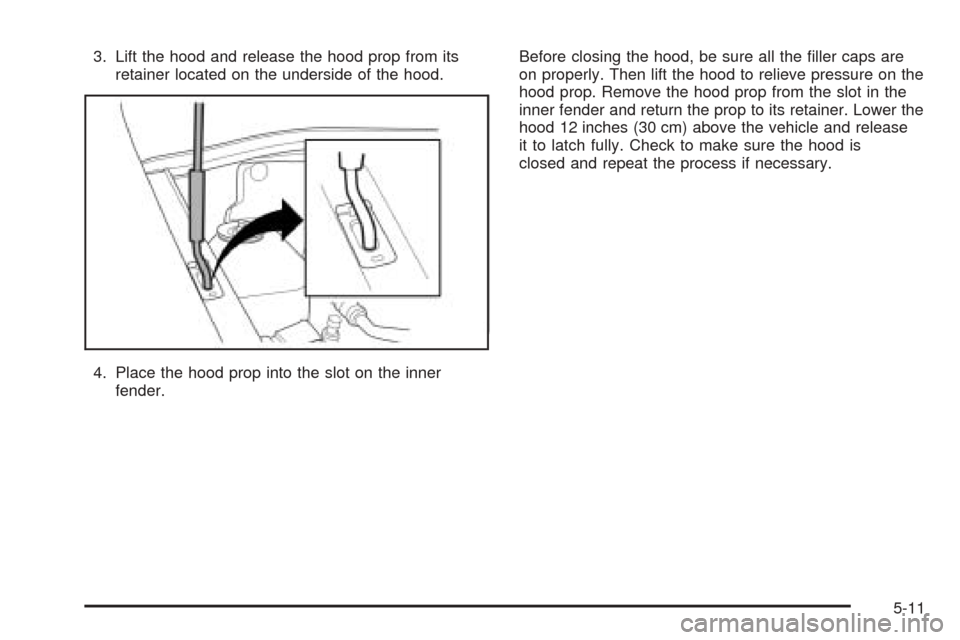
3. Lift the hood and release the hood prop from its
retainer located on the underside of the hood.
4. Place the hood prop into the slot on the inner
fender.Before closing the hood, be sure all the filler caps are
on properly. Then lift the hood to relieve pressure on the
hood prop. Remove the hood prop from the slot in the
inner fender and return the prop to its retainer. Lower the
hood 12 inches (30 cm) above the vehicle and release
it to latch fully. Check to make sure the hood is
closed and repeat the process if necessary.
5-11
Page 218 of 316
Bulb Replacement
For the proper type of replacement bulbs, see
Replacement Bulbs on page 5-46.
For any bulb changing procedure not listed in this
section, contact your dealer.
Halogen Bulbs
{CAUTION:
Halogen bulbs have pressurized gas inside
and can burst if you drop or scratch the bulb.
You or others could be injured. Be sure to
read and follow the instructions on the bulb
package.
Headlamps
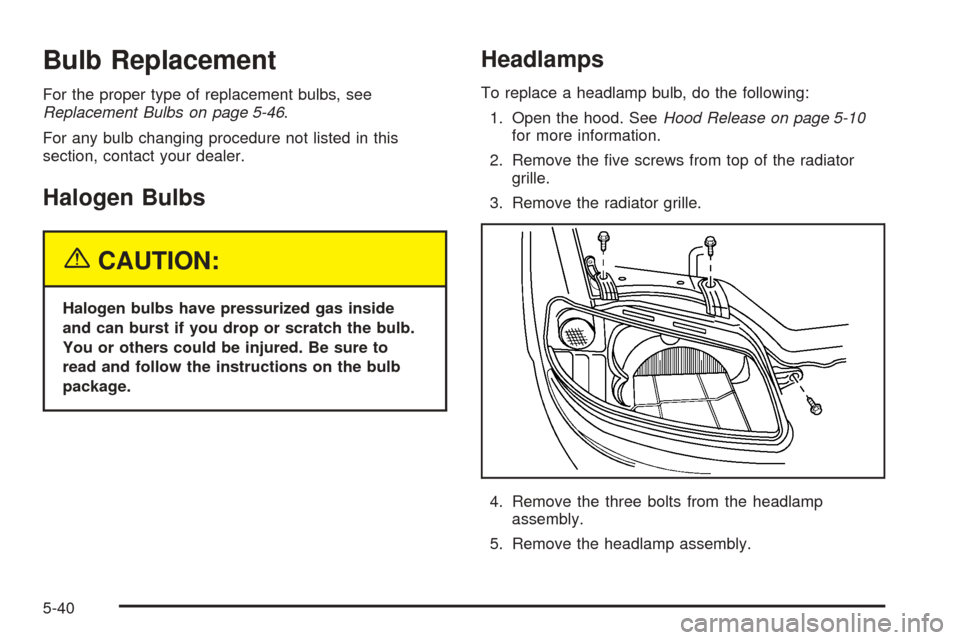
To replace a headlamp bulb, do the following:
1. Open the hood. SeeHood Release on page 5-10
for more information.
2. Remove the five screws from top of the radiator
grille.
3. Remove the radiator grille.
4. Remove the three bolts from the headlamp
assembly.
5. Remove the headlamp assembly.
5-40
Page 222 of 316
Sidemarker Lamps (Front)
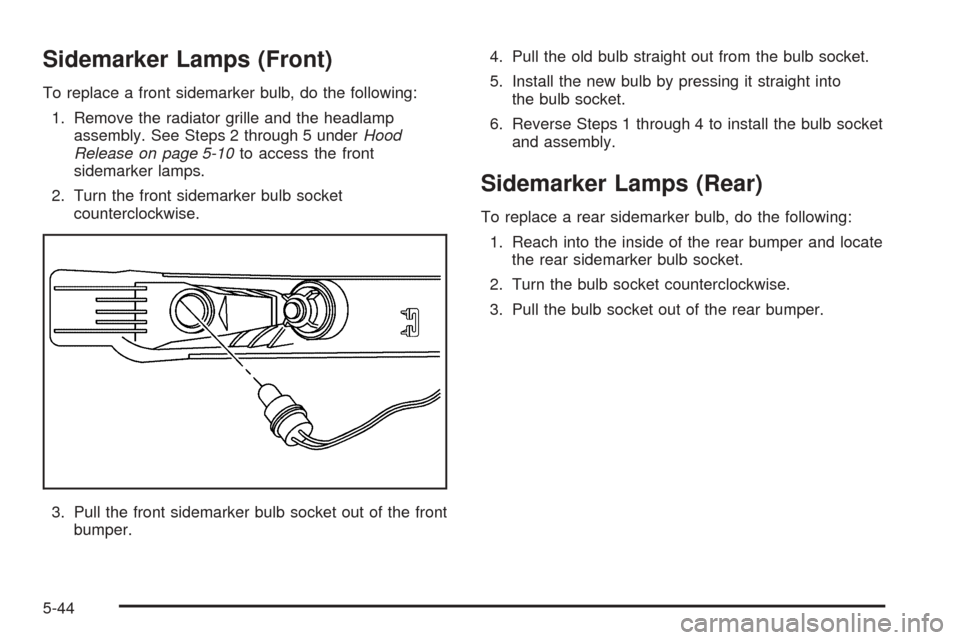
To replace a front sidemarker bulb, do the following:
1. Remove the radiator grille and the headlamp
assembly. See Steps 2 through 5 underHood
Release on page 5-10to access the front
sidemarker lamps.
2. Turn the front sidemarker bulb socket
counterclockwise.
3. Pull the front sidemarker bulb socket out of the front
bumper.4. Pull the old bulb straight out from the bulb socket.
5. Install the new bulb by pressing it straight into
the bulb socket.
6. Reverse Steps 1 through 4 to install the bulb socket
and assembly.
Sidemarker Lamps (Rear)
To replace a rear sidemarker bulb, do the following:
1. Reach into the inside of the rear bumper and locate
the rear sidemarker bulb socket.
2. Turn the bulb socket counterclockwise.
3. Pull the bulb socket out of the rear bumper.
5-44
Page 282 of 316
At Least Once a Year
Key Lock Cylinders Service
Lubricate the key lock cylinders with the lubricant
specified in Part D.
Body Lubrication Service
Lubricate all hood latch assemblies, secondary latch,
pivots, spring anchor, release pawl, hood and body
door hinges, rear compartment and any folding
seat hardware. Part D tells you what to use.
More frequent lubrication may be required when
exposed to a corrosive environment.
Starter Switch Check
{CAUTION:
When you are doing this inspection, the
vehicle could move suddenly. If the vehicle
moves, you or others could be injured.
1. Before you start, be sure you have enough room
around the vehicle.
2. Firmly apply both the parking brake and the regular
brake. SeeParking Brake on page 2-26if necessary.
Do not use the accelerator pedal, and be ready to
turn off the engine immediately if it starts.
3. On automatic transaxle vehicles, try to start the
engine in each gear. The starter should work only in
PARK (P) or NEUTRAL (N). If the starter works in
any other position, your vehicle needs service.
On manual transaxle vehicles, put the shift lever in
NEUTRAL, push the clutch down halfway and try to
start the engine. The starter should work only when
the clutch is pushed down all the way to the floor.
If the starter works when the clutch is not pushed all
the way down, your vehicle needs service.
6-20
Page 288 of 316
Usage Fluid/Lubricant
Key Lock
CylindersMulti-Purpose Lubricant, Superlube
(GM Part No. U.S. 12346241,
in Canada 10953474).
Manual
Transaxle Shift
LinkageChassis Lubricant (GM Part No.
U.S. 12377985, in Canada
88901242) or lubricant meeting
requirements of NLGI #2, Category
LB or GC-LB.
Chassis
LubricationChassis Lubricant (GM Part No.
U.S. 12377985, in Canada
88901242) or lubricant meeting
requirements of NLGI #2, Category
LB or GC-LB.Usage Fluid/Lubricant
Hood Latch
Assembly,
Secondary
Latch, Pivots,
Spring Anchor
and Release
PawlLubriplate Lubricant Aerosol
(GM Part No. U.S. 12346293,
in Canada 992723) or lubricant
meeting requirements of NLGI #2,
Category LB or GC-LB.
Hood and Door
HingesMulti-Purpose Lubricant, Superlube
(GM Part No. U.S. 12346241,
in Canada 10953474).
Weatherstrip
ConditioningDielectric Silicone Grease
(GM Part No. U.S. 12345579,
in Canada 992887).
6-26
Page 310 of 316
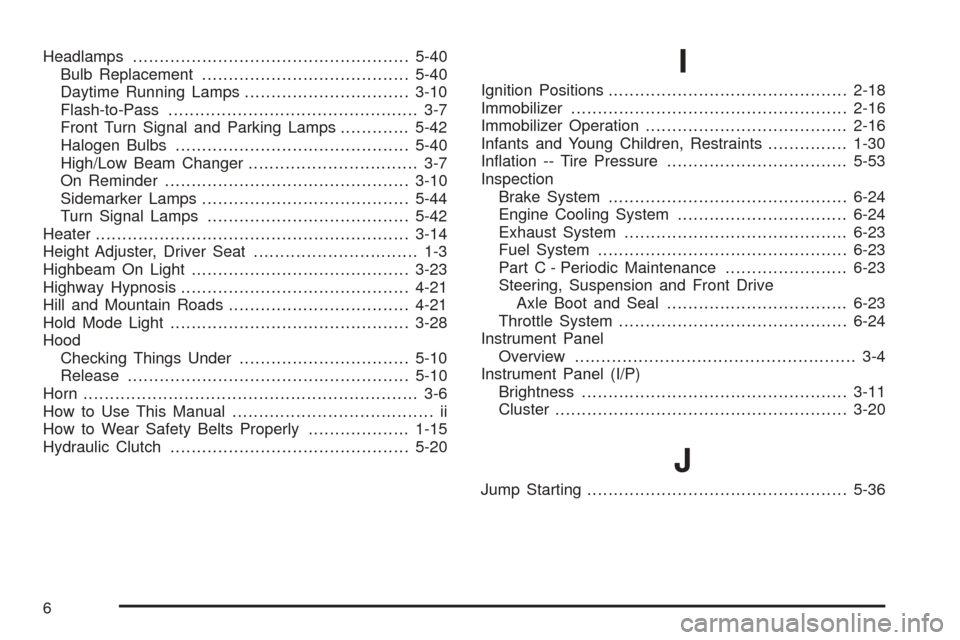
Headlamps....................................................5-40
Bulb Replacement.......................................5-40
Daytime Running Lamps...............................3-10
Flash-to-Pass............................................... 3-7
Front Turn Signal and Parking Lamps.............5-42
Halogen Bulbs............................................5-40
High/Low Beam Changer................................ 3-7
On Reminder..............................................3-10
Sidemarker Lamps.......................................5-44
Turn Signal Lamps......................................5-42
Heater...........................................................3-14
Height Adjuster, Driver Seat............................... 1-3
Highbeam On Light.........................................3-23
Highway Hypnosis...........................................4-21
Hill and Mountain Roads..................................4-21
Hold Mode Light.............................................3-28
Hood
Checking Things Under................................5-10
Release.....................................................5-10
Horn............................................................... 3-6
How to Use This Manual...................................... ii
How to Wear Safety Belts Properly...................1-15
Hydraulic Clutch.............................................5-20I
Ignition Positions.............................................2-18
Immobilizer....................................................2-16
Immobilizer Operation......................................2-16
Infants and Young Children, Restraints...............1-30
Inflation -- Tire Pressure..................................5-53
Inspection
Brake System.............................................6-24
Engine Cooling System................................6-24
Exhaust System..........................................6-23
Fuel System...............................................6-23
Part C - Periodic Maintenance.......................6-23
Steering, Suspension and Front Drive
Axle Boot and Seal..................................6-23
Throttle System...........................................6-24
Instrument Panel
Overview..................................................... 3-4
Instrument Panel (I/P)
Brightness..................................................3-11
Cluster.......................................................3-20
J
Jump Starting.................................................5-36
6