CHEVROLET AVEO 2006 1.G Owners Manual
Manufacturer: CHEVROLET, Model Year: 2006, Model line: AVEO, Model: CHEVROLET AVEO 2006 1.GPages: 362, PDF Size: 2.24 MB
Page 241 of 362
Automatic Transaxle Fluid
When to Check Automatic Transaxle
Fluid
Check your automatic transaxle fluid level at least twice
a year. Add fluid if needed. SeeAt Least Twice a
Year on page 6-19.
How to Check Automatic Transaxle
Fluid
Because this operation can be a little difficult, you may
choose to have this done at the dealership service
department.
If you do it yourself, be sure to follow all the instructions
here, or you could get a false reading on the dipstick.
Notice:Too much or too little �uid can damage the
transaxle. Too much can mean that some of the �uid
could come out and fall on hot engine or exhaust
system parts, starting a �re. Too little �uid could
cause the transaxle to overheat. Be sure to get an
accurate reading if you check the transaxle �uid.Wait at least 30 minutes before checking the transaxle
fluid level if you have been driving:
•When outside temperatures are above 90°F (32°C).
•At high speed for quite a while.
•In heavy traffic — especially in hot weather.
To get the right reading, the fluid should be at normal
operating temperature, which is 158°F to 176°F
(70°C to 80°C).
Get the vehicle warmed up by driving about
15 miles (24 km) when outside temperatures are
above 50°F (10°C). If it is colder than 50°F (10°C),
you may have to drive longer.
Checking the Fluid Level
Prepare your vehicle as follows:
1. Park your vehicle on a level place. Keep the engine
running.
2. With the parking brake applied, place the shift lever
in PARK (P).
3. With your foot on the brake pedal, move the shift
lever through each gear range, pausing for about
three seconds in each range. Then, position
the shift lever in PARK (P).
4. Let the engine run at idle for three to five minutes.
5-19
Page 242 of 362
Then, without shutting off the engine, follow these steps:
The automatic transaxle dipstick is located toward the
front of the engine compartment, near the power
steering fluid reservoir. SeeEngine Compartment
Overview on page 5-12for more information on location.
1. Pull out the dipstick and wipe it with a clean rag
or paper towel.
2. Push the dipstick back in all the way, wait three
seconds and then pull it back out again.
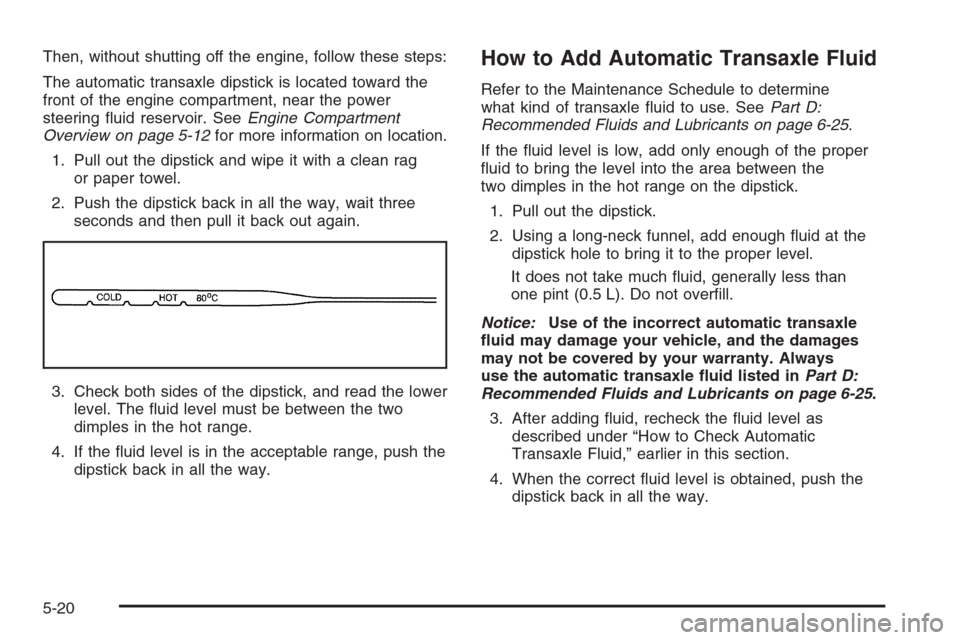
3. Check both sides of the dipstick, and read the lower
level. The fluid level must be between the two
dimples in the hot range.
4. If the fluid level is in the acceptable range, push the
dipstick back in all the way.How to Add Automatic Transaxle Fluid
Refer to the Maintenance Schedule to determine
what kind of transaxle fluid to use. SeePart D:
Recommended Fluids and Lubricants on page 6-25.
If the fluid level is low, add only enough of the proper
fluid to bring the level into the area between the
two dimples in the hot range on the dipstick.
1. Pull out the dipstick.
2. Using a long-neck funnel, add enough fluid at the
dipstick hole to bring it to the proper level.
It does not take much fluid, generally less than
one pint (0.5 L). Do not overfill.
Notice:Use of the incorrect automatic transaxle
�uid may damage your vehicle, and the damages
may not be covered by your warranty. Always
use the automatic transaxle �uid listed inPart D:
Recommended Fluids and Lubricants on page 6-25.
3. After adding fluid, recheck the fluid level as
described under “How to Check Automatic
Transaxle Fluid,” earlier in this section.
4. When the correct fluid level is obtained, push the
dipstick back in all the way.
5-20
Page 243 of 362
Manual Transaxle Fluid
It is not necessary to check the transaxle fluid level.
A transaxle fluid leak is the only reason for fluid loss.
If a leak occurs, take the vehicle to the dealership
service department and have it repaired as soon as
possible. SeePart D: Recommended Fluids and
Lubricants on page 6-25for the proper fluid to use.
Hydraulic Clutch
There is one reservoir for both the brake and the
hydraulic clutch fluid. SeeBrakes on page 5-32for more
information.
The hydraulic clutch linkage in your vehicle is
self-adjusting. The master cylinder reservoir is filled with
hydraulic fluid.
A fluid loss in this system could indicate a problem.
Have the system inspected and repaired.
When to Check and What to Use
Refer to the Maintenance Schedule to determine how
often you should check the fluid level in your master
cylinder reservoir and for the proper fluid. SeePart B:
Owner Checks and Services on page 6-18andPart D:
Recommended Fluids and Lubricants on page 6-25.
How to Check and Add Fluid
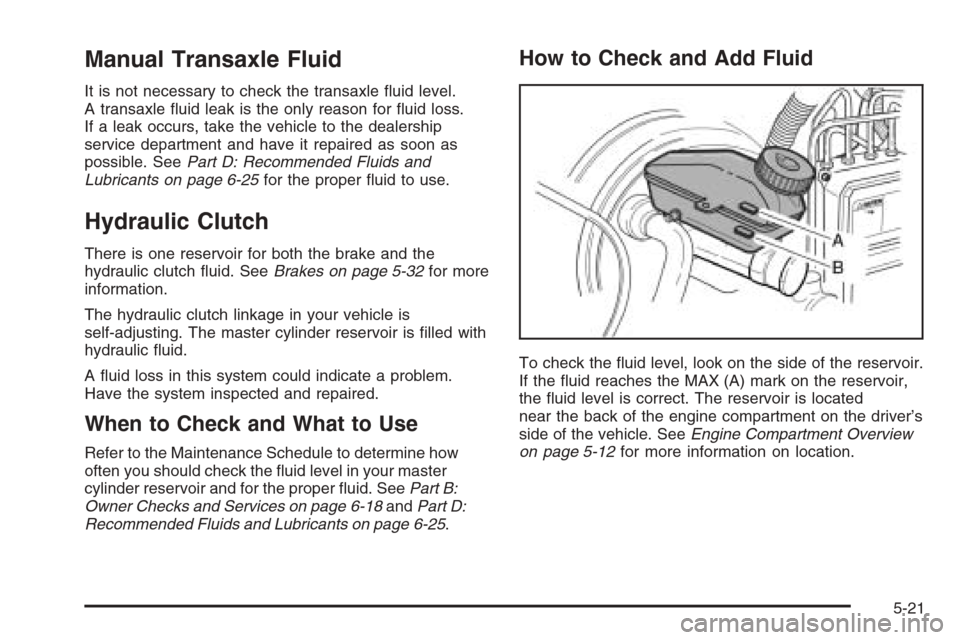
To check the fluid level, look on the side of the reservoir.
If the fluid reaches the MAX (A) mark on the reservoir,
the fluid level is correct. The reservoir is located
near the back of the engine compartment on the driver’s
side of the vehicle. SeeEngine Compartment Overview
on page 5-12for more information on location.
5-21
Page 244 of 362
Engine Coolant
The following explains your cooling system and how to
add coolant when it is low. If you have a problem
with engine overheating, seeEngine Overheating on
page 5-24.
A 50/50 mixture of clean, drinkable water and proper
coolant will:
•Give freezing protection down to−34°F (−37°C).
•Give boiling protection up to 265°F (129°C).
•Protect against rust and corrosion.
•Help keep the proper engine temperature.
•Let the warning lights and gages work as they
should.
What to Use
Use a 50/50 mixture of clean, drinkable water and coolant
that meets GM Specification 1825M, which will not
damage aluminum parts. You can also use a recycled
coolant conforming to GM Specification 1825M with a
complete coolant flush and refill. If you use this coolant
mixture, you do not need to add anything else.
{CAUTION:
Adding only plain water to your cooling
system can be dangerous. Plain water, or
some other liquid such as alcohol, can boil
before the proper coolant mixture will. Your
vehicle’s coolant warning system is set for the
proper coolant mixture. With plain water or the
wrong mixture, your engine could get too hot
but you would not get the overheat warning.
Your engine could catch �re and you or others
could be burned. Use a 50/50 mixture of clean,
drinkable water and the proper coolant.
Notice:If you use an improper coolant mixture, your
engine could overheat and be badly damaged. The
repair cost would not be covered by your warranty.
Too much water in the mixture can freeze and crack
the engine, radiator, heater core, and other parts.
If you have to add coolant more than four times a year,
have your dealer check your cooling system.
5-22
Page 245 of 362
Notice:If you use extra inhibitors and/or additives in
your vehicle’s cooling system, you could damage
your vehicle. Use only the proper mixture of the
engine coolant listed in this manual for the cooling
system. SeePart D: Recommended Fluids and
Lubricants on page 6-25for more information.
Checking Coolant
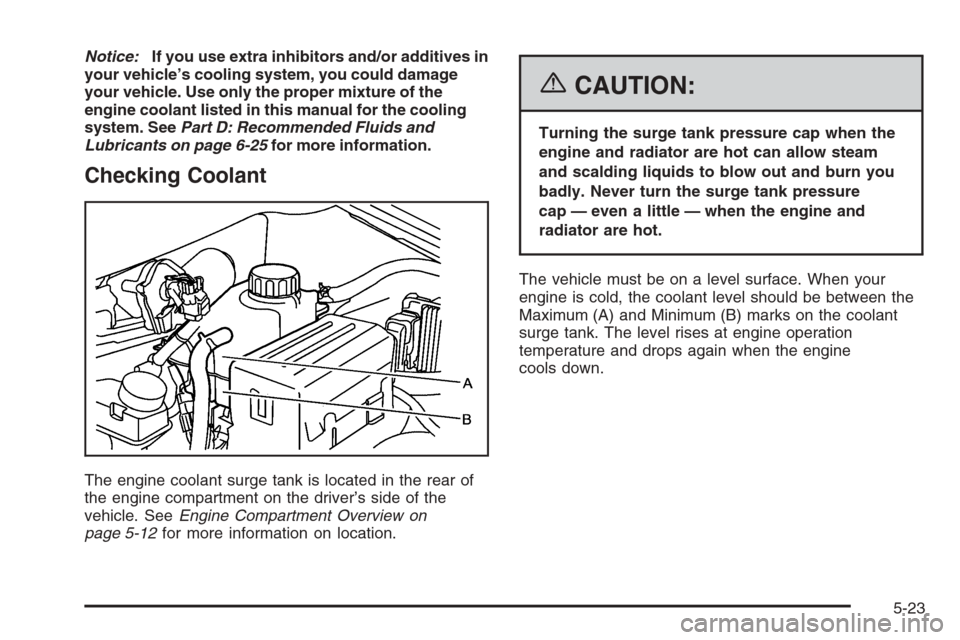
The engine coolant surge tank is located in the rear of
the engine compartment on the driver’s side of the
vehicle. SeeEngine Compartment Overview on
page 5-12for more information on location.
{CAUTION:
Turning the surge tank pressure cap when the
engine and radiator are hot can allow steam
and scalding liquids to blow out and burn you
badly. Never turn the surge tank pressure
cap — even a little — when the engine and
radiator are hot.
The vehicle must be on a level surface. When your
engine is cold, the coolant level should be between the
Maximum (A) and Minimum (B) marks on the coolant
surge tank. The level rises at engine operation
temperature and drops again when the engine
cools down.
5-23
Page 246 of 362
Adding Coolant
If the level falls below the Minimum (B) mark, add the
proper coolant mixture at the surge tank, but only when
the engine is cool. If the surge tank is empty, a
special fill procedure is necessary. SeeCooling System
on page 5-26for instructions on “How to Add Coolant
to the Coolant Surge Tank.”
{CAUTION:
You can be burned if you spill coolant on hot
engine parts. Coolant contains ethylene glycol,
and it will burn if the engine parts are hot
enough. Do not spill coolant on a hot engine.
When replacing the pressure cap, make sure it is
hand-tight and fully seated.
Coolant Surge Tank Pressure Cap
Notice:If the pressure cap is not tightly installed,
coolant loss and possible engine damage may
occur. Be sure the cap is properly and tightly
secured.
Engine Overheating
You will find a coolant temperature gage on your
vehicle’s instrument panel cluster. SeeEngine Coolant
Temperature Gage on page 3-28.
If Steam Is Coming From Your Engine
{CAUTION:
Steam from an overheated engine can burn
you badly, even if you just open the hood. Stay
away from the engine if you see or hear steam
coming from it. Just turn it off and get
everyone away from the vehicle until it cools
down. Wait until there is no sign of steam or
coolant before you open the hood.
If you keep driving when your engine is
overheated, the liquids in it can catch �re. You
or others could be badly burned. Stop your
engine if it overheats, and get out of the
vehicle until the engine is cool.
5-24
Page 247 of 362
Notice:If your engine catches �re because you
keep driving with no coolant, your vehicle can
be badly damaged. The costly repairs would not be
covered by your warranty.
If No Steam Is Coming From Your
Engine
If you get an engine overheat warning, but see or hear
no steam, the problem may not be too serious.
Sometimes the engine can get a little too hot when you:
•Climb a long hill on a hot day.
•Stop after high-speed driving.
•Idle for long periods in traffic.
If you get the overheat warning with no sign of steam,
try this for a minute or so:
1. In heavy traffic, let the engine idle in NEUTRAL (N)
while stopped. If it is safe to do so, pull off the road,
shift to PARK (P) or NEUTRAL (N) and let the
engine idle.
2. Turn on your heater to full hot at the highest fan
speed and open the windows as necessary.If you no longer have the overheat warning, you can
drive. Just to be safe, drive slower for about 10 minutes.
If the warning does not come back on, you can drive
normally.
If the warning continues and you have not stopped, pull
over, stop, and park your vehicle right away.
If there is still no sign of steam, you can idle the engine
for three minutes while you are parked. If you still
have the warning, turn off the engine and get everyone
out of the vehicle until it cools down.
You may decide not to lift the hood, but to get service
help right away.
5-25
Page 248 of 362
Cooling System
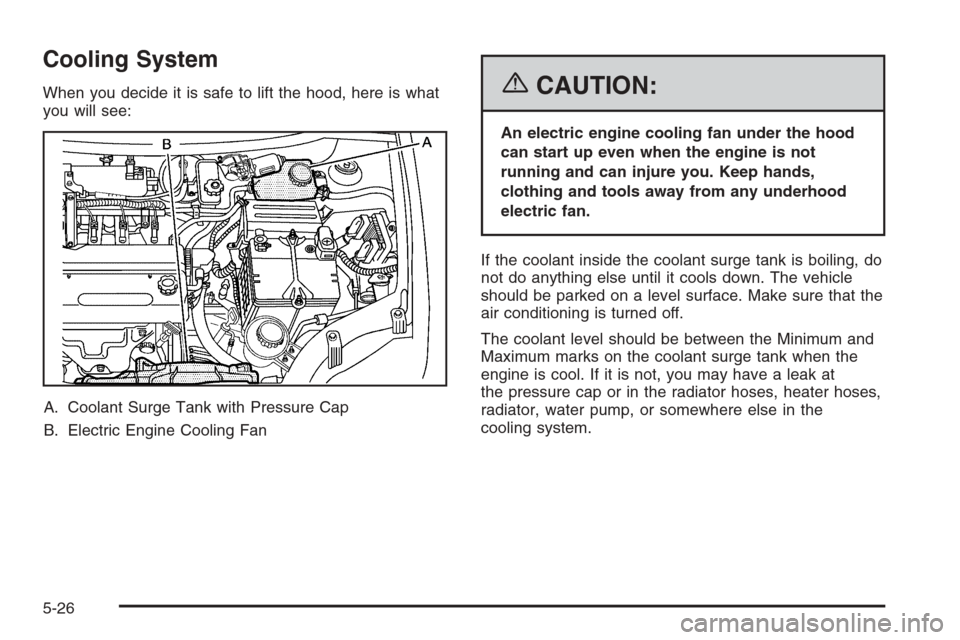
When you decide it is safe to lift the hood, here is what
you will see:
A. Coolant Surge Tank with Pressure Cap
B. Electric Engine Cooling Fan{CAUTION:
An electric engine cooling fan under the hood
can start up even when the engine is not
running and can injure you. Keep hands,
clothing and tools away from any underhood
electric fan.
If the coolant inside the coolant surge tank is boiling, do
not do anything else until it cools down. The vehicle
should be parked on a level surface. Make sure that the
air conditioning is turned off.
The coolant level should be between the Minimum and
Maximum marks on the coolant surge tank when the
engine is cool. If it is not, you may have a leak at
the pressure cap or in the radiator hoses, heater hoses,
radiator, water pump, or somewhere else in the
cooling system.
5-26
Page 249 of 362
{CAUTION:
Heater and radiator hoses, and other engine
parts, can be very hot. Do not touch them. If
you do, you can be burned.
Do not run the engine if there is a leak. If you
run the engine, it could lose all coolant. That
could cause an engine �re, and you could be
burned. Get any leak �xed before you drive the
vehicle.
If there seems to be no leak, with the engine on, check
to see if the electric engine cooling fan is running. If
the engine is overheating, the fan should be running. If
it is not, your vehicle needs service.
Notice:Engine damage from running your engine
without coolant is not covered by your warranty.
How to Add Coolant to the Coolant
Surge Tank
Notice:This vehicle has a speci�c coolant �ll
procedure. Failure to follow this procedure could
cause your engine to overheat and be severely
damaged.
If you have not found a problem yet, check to see if
coolant is visible in the surge tank. If coolant is visible
but the coolant level is not between the Minimum
and Maximum marks, add a 50/50 mixture of clean,
drinkable water and proper coolant at the coolant surge
tank, but be sure the cooling system, including the
coolant surge tank pressure cap, is cool before you do
it. SeeEngine Coolant on page 5-22for more
information.
5-27
Page 250 of 362
If no coolant is visible in the surge tank, add coolant as
follows:
{CAUTION:
Steam and scalding liquids from a hot cooling
system can blow out and burn you badly. They
are under pressure, and if you turn the coolant
surge tank pressure cap — even a little — they
can come out at high speed. Never turn the
cap when the cooling system, including the
coolant surge tank pressure cap, is hot. Wait
for the cooling system and coolant surge tank
pressure cap to cool if you ever have to turn
the pressure cap.
{CAUTION:
Adding only plain water to your cooling
system can be dangerous. Plain water, or
some other liquid such as alcohol, can boil
before the proper coolant mixture will. Your
vehicle’s coolant warning system is set for the
proper coolant mixture. With plain water or the
wrong mixture, your engine could get too hot
but you would not get the overheat warning.
Your engine could catch �re and you or others
could be burned. Use a 50/50 mixture of clean,
drinkable water and a proper coolant.
Notice:In cold weather, water can freeze and crack
the engine, radiator, heater core and other parts.
Use the recommended coolant and the proper
coolant mixture.
5-28