ECO mode CHEVROLET AVEO 2008 1.G Owners Manual
[x] Cancel search | Manufacturer: CHEVROLET, Model Year: 2008, Model line: AVEO, Model: CHEVROLET AVEO 2008 1.GPages: 384, PDF Size: 6.67 MB
Page 52 of 384
2. If the child restraint manufacturer recommends that
the top tether be attached, attach and tighten the
top tether to the top tether anchor, if equipped.
Refer to the child restraint instructions and
the following steps:
2.1. Find the top tether anchor.
2.2. Flip the cover to access the top tether
anchors.
2.3. For hatchback models, remove the cargo
shade before installing the top tether.
The cargo shade should remain off while
the top tether is in use.
2.4. Raise the headrest or head restraint if the
desired seating position has an adjustable
headrest or head restraint. SeeHead
Restraints on page 1-6.2.5. Route and tighten the top tether according
to your child restraint instructions and the
following instructions:
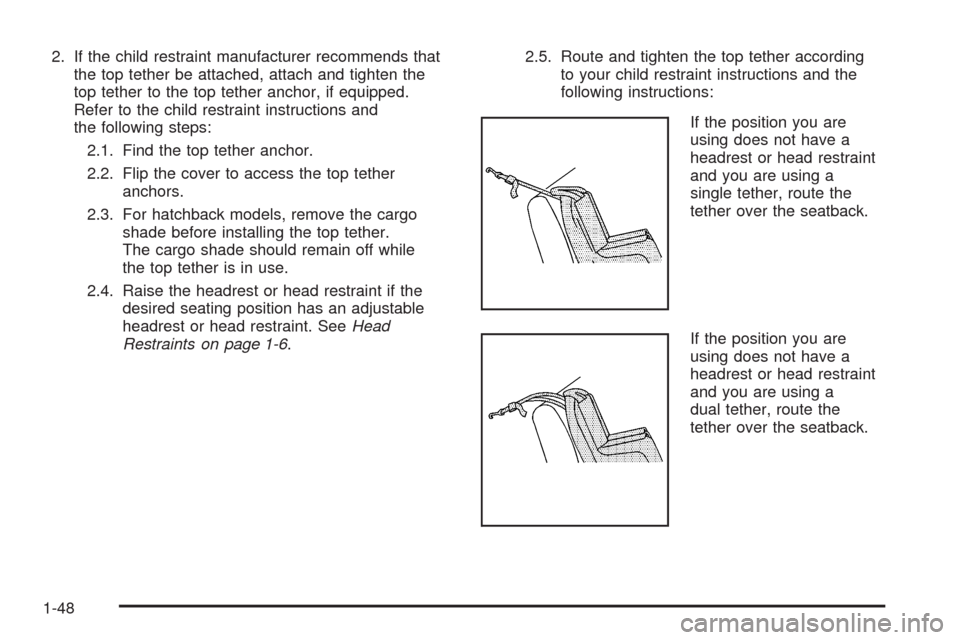
If the position you are
using does not have a
headrest or head restraint
and you are using a
single tether, route the
tether over the seatback.
If the position you are
using does not have a
headrest or head restraint
and you are using a
dual tether, route the
tether over the seatback.
1-48
Page 93 of 384
3. Lock the doors by pressing the lock button on the
remote keyless entry transmitter.
•The LED light on the transmitter will flash once.
•All of the doors will lock.
•The hazard warning lamps will flash once and
the horn will sound.
•The security light will flash to indicate that the
theft-deterrent system is armed. For hatchback
models, the security light is located on the
secondary information center (SIC) on the
center of the instrument panel. SeeSecondary
Information Center (SIC) (Hatchback Only) on
page 3-43. For sedan models, the security light is
located on the center of the instrument panel near
the clock. SeeInstrument Panel Overview on
page 3-4.
To avoid activating the alarm by accident, do one of the
following:
•Unlock the driver’s or passenger’s front door using
the key.
•Press the unlock button on the remote keyless
entry transmitter.
Unlocking a door any other way will activate the alarm
when a door or the trunk or liftgate is opened.
If you do not want to arm the theft-deterrent system,
lock the vehicle using the key or the manual door locks.
Disarming the System
To disarm the system, do one of the following:
•Unlock the driver’s or passenger’s front door using
the key.
•Press the unlock button on the remote keyless
entry transmitter.
- The LED light on the transmitter will
flash once.
- All of the doors will unlock.
- The hazard warning lamps will flash twice.
If the door is not opened or if the engine is not started
within 30 seconds after disarming the system using
the transmitter, all of the doors will automatically lock
and the theft-deterrent mode will rearm.
How the System Alarm is Activated
If a door or the trunk or liftgate is opened without using
the key or the remote keyless entry transmitter, the
horn will sound and the lamps will flash for up to
30 seconds.
2-15
Page 101 of 384
Notice:If your vehicle seems to start up rather
slowly or not shift gears when you go faster, and
you continue to drive your vehicle that way, you
could damage the transmission. Have your vehicle
serviced right away. You can drive in SECOND (2)
when you are driving less than 35 mph (55 km/h)
and AUTOMATIC OVERDRIVE (D) for higher speeds
until then.
SECOND (2):This position gives you more power but
lower fuel economy. You can use SECOND (2) on
hills. It can help control your speed as you go down
steep mountain roads, but then you would also want
to use your brakes off and on.
Notice:Do not drive in SECOND (2) at speeds
over 65 mph (105 km/h), or you can damage
the transmission. Use AUTOMATIC OVERDRIVE (D4)
as much as possible. Do not shift into SECOND (2)
unless you are going slower than 65 mph (105 km/h)
or you can damage your engine.FIRST (1):This position gives you even more power but
lower fuel economy than SECOND (2). You can use it on
very steep hills, or in deep snow or mud. If the shift lever
is put in FIRST (1), the transmission will not shift into first
gear until the vehicle is going slowly enough.
Notice:Spinning the tires or holding the vehicle
in one place on a hill using only the accelerator
pedal may damage the transmission. The repair will
not be covered by your warranty. If you are stuck,
do not spin the tires. When stopping on a hill,
use the brakes to hold the vehicle in place.
If there is a malfunction with the automatic transmission,
the malfunction indicator lamp (MIL) or the HOLD
indicator light will turn on or flash. SeeMalfunction
Indicator Lamp on page 3-49orHold Mode Light
on page 3-48.
Have your vehicle fixed as soon as possible.
2-23
Page 102 of 384
Hold Mode
If your vehicle’s transmission has hold mode, you can
select this mode to drive with some characteristics
of a manual transmission. With hold mode turned on,
the automatic transmission will stay in a specific
gear range.
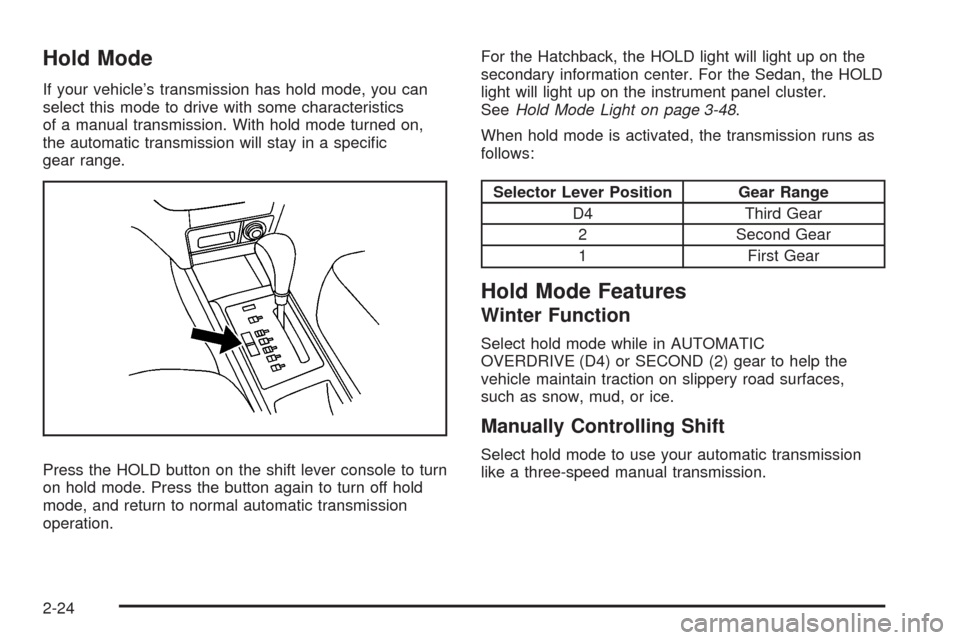
Press the HOLD button on the shift lever console to turn
on hold mode. Press the button again to turn off hold
mode, and return to normal automatic transmission
operation.For the Hatchback, the HOLD light will light up on the
secondary information center. For the Sedan, the HOLD
light will light up on the instrument panel cluster.
SeeHold Mode Light on page 3-48.
When hold mode is activated, the transmission runs as
follows:
Selector Lever Position Gear Range
D4 Third Gear
2 Second Gear
1 First Gear
Hold Mode Features
Winter Function
Select hold mode while in AUTOMATIC
OVERDRIVE (D4) or SECOND (2) gear to help the
vehicle maintain traction on slippery road surfaces,
such as snow, mud, or ice.
Manually Controlling Shift
Select hold mode to use your automatic transmission
like a three-speed manual transmission.
2-24
Page 116 of 384
Highbeam On Light.......................................3-40
Daytime Running Lamps (DRL) Indicator Light.....3-40
Door Ajar Light.............................................3-41
Fuel Gage...................................................3-41
Low Fuel Warning Light.................................3-42
Secondary Information Center (SIC).................3-43
Secondary Information Center (SIC)
(Hatchback Only).......................................3-43
Clock (Hatchback Only).................................3-44
Safety Belt Reminders...................................3-44
Airbag Readiness Light..................................3-45
Passenger Airbag Status Indicator
(Hatchback)..............................................3-46
Charging System Light..................................3-47
Antilock Brake System Warning Light...............3-48
Hold Mode Light...........................................3-48
Malfunction Indicator Lamp.............................3-49Oil Pressure Light.........................................3-52
Fog Lamp Light............................................3-53
Cruise Control Light......................................3-53
Door Ajar Light.............................................3-53
Audio System(s).............................................3-54
AM-FM Radio (Single Display, Base Level).......3-55
AM-FM Radio (Double Display, Base Level).....3-56
Radio with CD (MP3/WMA)............................3-60
Radio with Six-Disc CD (MP3/WMA)................3-66
Using an MP3 (Radio with CD Player).............3-72
Using an MP3 (Radio with Six-Disc Player)......3-75
Audio Steering Wheel Controls.......................3-78
Radio Reception...........................................3-79
Care of Your CDs.........................................3-79
Care of the CD Player...................................3-79
Fixed Mast Antenna (Hatchback).....................3-80
Backglass Antenna (Sedan)...........................3-80
Section 3 Instrument Panel
3-2
Page 136 of 384
If your vehicle has a lever (base model), move the lever
to choose the recirculation mode.
Using the recirculation mode for extended periods may
cause your windows to fog. If this happens, select
the defrost mode.
:(Outside Air):This mode brings outside air into
the vehicle.
If your vehicle has a recirculation button (uplevel
model), press the button until the recirculation mode
is turned off. Your vehicle will then return to outside
air mode.
If your vehicle has a lever (base model), move the lever
to choose the outside air mode.
A/C (Air Conditioning):If your vehicle has air
conditioning, follow these steps to use the system.
Start the engine and set the fan control knob to
the desired speed. The air conditioning compressor
does not operate when the fan control knob is in the
off position. Press the A/C button to turn the air
conditioning compressor on and off. When the A/C
button is pressed, an indicator light in the button
comes on to show that air conditioning is activated.On hot days, open the windows to let hot inside air
escape; then close them. This helps to reduce the time
it takes for your vehicle to cool down. It also helps
the system to operate more efficiently.
For quick cool down on hot days, do the following:
1. Select the vent mode.
2. Select the highest fan speed.
3. Press the A/C button.
4. Select the recirculation mode.
5. Select the coolest temperature.
Using these settings together for long periods of time
may cause the air inside of the vehicle to become too dry.
To prevent this from happening, after the air in the vehicle
has cooled, turn the recirculation mode off.
The air conditioning system removes moisture from the
air, so a small amount of water might drip underneath
the vehicle while idling or after turning off the engine.
This is normal.
3-22
Page 179 of 384
Using the Auxiliary Input Jack
The radio system has an auxiliary input jack located on
the lower right side of the faceplate. This is not an audio
output. Do not plug the headphone set into the front
auxiliary input jack. An external audio device such as
an iPod, laptop computer, MP3 player, CD changer,
or cassette tape player, etc. can be connected to the
auxiliary input jack for use as another source for audio
listening.
The auxiliary input jack also accepts cell phone
connectors. Plug the cell phone connector into the
auxiliary input jack to hear a person speaking on a cell
phone during conversation through the vehicle sound
system.
Drivers are encouraged to set up any auxiliary device
while the vehicle is in PARK (P). SeeDefensive Driving
on page 4-2for more information on driver distraction.To use a portable audio player, connect a 3.5 mm
(1/8 inch) cable to the radio’s front auxiliary input jack.
While a device is connected, turn the portable audio
player on and press the radio CD/AUX button to
hear audio from the device over the vehicle speakers.
CD/AUX (CD/Auxiliary):Press this button once to
play a CD while a portable audio device is playing.
Press this button a second time for the system to begin
playing audio from the connected portable audio player.
Once in this mode, Auxinput appears on the display. If the
auxiliary jack does not detect the presence of an output
jack, the auxiliary mode does not display.
O(Power/Volume):Turn theOknob clockwise or
counterclockwise to increase or decrease the volume
of the portable player. Additional adjustments on a
portable device might be needed to get the desired
volume.
3-65
Page 185 of 384
If any error occurs repeatedly or if an error cannot be
corrected, contact your dealer/retailer. If the radio
displays an error message, write it down and provide it
to your dealer/retailer when reporting the problem.
Using the Auxiliary Input Jack
AUX IN (Auxiliary Input):The radio system has an
auxiliary input jack located on the lower right side of
the faceplate. This is not an audio output. Do not plug
the headphone set into the front auxiliary input jack.
An external audio device such as an iPod, laptop
computer, MP3 player, CD changer, or XM™ receiver,
etc. can be connected to the auxiliary input jack for
use as another source for audio listening.
The auxiliary input jack also accepts cell phone
connectors. Plug the cell phone connector into the
auxiliary input jack to hear a person speck on a
cell phone during a conversation through the vehicle
sound system.Drivers are encouraged to set up any auxiliary device
while the vehicle is in PARK (P). SeeDefensive Driving
on page 4-2for more information on driver distraction.
To use a portable audio player, connect a 3.5 mm
(1/8 inch) cable to the radio’s front auxiliary input jack.
While a device is connected, turn the portable audio
player on and press the radio CD/AUX button to
hear audio from the device over the vehicle speakers.
O(Power/Volume):Turn this knob clockwise or
counterclockwise to increase or decrease the volume of
the portable player. Additional adjustments on a portable
device might be needed to get the desired volume.
CD/AUX (CD/Auxiliary):Press this button once to play
a CD while a portable audio device is playing. Press
this button a second time for the system to begin playing
audio from the connected portable audio player. Once
in this mode, Auxinput displays. If the auxiliary jack does
not detect the presence of an output jack, the auxiliary
mode does not display.
3-71
Page 188 of 384
If playing a CD-R, the sound quality can be reduced due
to CD-R quality, the method of recording, the quality of
the music that has been recorded, and the way the CD-R
has been handled. There can be an increase in skipping,
difficulty in finding tracks, and/or difficulty in loading and
ejecting. If these problems occur, check the bottom
surface of the CD. If the surface of the CD is damaged,
such as cracked, broken, or scratched, the CD does not
play properly. If the surface of the CD is soiled, seeCare
of Your CDs on page 3-79for more information.
If there is no apparent damage, try a known good CD.
Do not add any label to a CD, it could get caught in the
CD player. If a CD is recorded on a personal computer
and a description label is needed, try labeling the top
of the recorded CD with a marking pen.
Notice:If a label is added to a CD, or more than
one CD is inserted into the slot at a time, or an
attempt is made to play scratched or damaged CDs,
the CD player could be damaged. While using the
CD player, use only CDs in good condition without
any label, load one CD at a time, and keep the
CD player and the loading slot free of foreign
materials, liquids, and debris.
If an error displays, see “CD Messages” later in this
section.
All of the CD functions work the same while playing an
MP3/WMA, except for those listed here. See “Playing
a CD” earlier for more information.SCROLL (MP3/WMA Mode Only):Press the SOUND
button for longer than two seconds. The song title or
other available information of a song scrolls on/off.
The offset is scroll on. The scroll mode can be changed
only when the SOUND button is pressed for longer
than two seconds.
DIR (Directory):Press this button to repeat the tracks
in the current directory. DIR displays.
Press this button again to repeat the tracks in all of the
directories. ALL displays.
Press this button again to turn off repeat play.
¦¥SEEK (Previous/Next Folder) (in MP3/WMA
Mode):Press the SEEK arrows to change the folder.
If CD-R does not have any folder, “ROOT” flashes on the
display for a short time.
()TUNE (Previous/Next Track):Press the up
TUNE arrow to go to the next track. The track number
displays. Press the down TUNE arrow to go to the
start of the current track. The player continues moving
forward or backward through the CD with each press of
the TUNE arrows.
INFO/DISP (Information/Display):Press this button to
display additional text information related to the current
MP3/WMA song. A choice of additional information such
as: Song Title, Album Title, and Artist. Bit rate might also
display.
3-74
Page 189 of 384
When information is not available, No Info (information)
displays.
Press this button for longer than two seconds to change
display mode.
Using an MP3 (Radio with
Six-Disc Player)
MP3/WMA CD-R Disc
MP3 Format
If you burn your own MP3/WMA disc on a personal
computer:
•Make sure the MP3/WMA files are recorded on a
CD-R disc.
•Do not mix standard audio and MP3/WMA files on
one disc.
•Make sure each MP3/WMA file has a .m3u or .wma
extension, other file extensions might not work.
•Files can be recorded with a variety of fixed or
variable bit rates. Song title, artist name, and
album are available for display by the radio
when recorded using ID3 tags version 1 and 2.
•Create a folder structure that makes it easy to find
songs while driving. Organize songs by albums
using one folder for each album. Each folder
or album should contain 18 songs or less.
•Make sure to finalize the disc when burning an
MP3/WMA disc, using multiple sessions. It is usually
better to burn the disc all at once.
The player is able to read and play a maximum of
50 folders, five sessions, and 999 files. Long file
names and folder names might use more disc memory
space than necessary. To conserve space on the
disc, minimize the length of the file and folder names.
An MP3/WMA CD that was recorded using no file folders
can also be played. The system can support up to
eight folders in depth, though, keep the depth of the
folders to a minimum in order to keep down the difficulty
and confusion in trying to locate a particular folder
during playback. If a CD contains more than the
maximum of 50 folders, five sessions, and 999 files,
the player lets you access and navigate up to the
maximum, but all items over the maximum is ignored.
Root Directory
The root directory is treated as a folder. If the root
directory has compressed audio files, the directory is
displayed as ROOT. All files contained directly under the
root directory are accessed prior to any other directory.
3-75