display CHEVROLET AVEO 2008 1.G Owners Manual
[x] Cancel search | Manufacturer: CHEVROLET, Model Year: 2008, Model line: AVEO, Model: CHEVROLET AVEO 2008 1.GPages: 384, PDF Size: 6.67 MB
Page 96 of 384
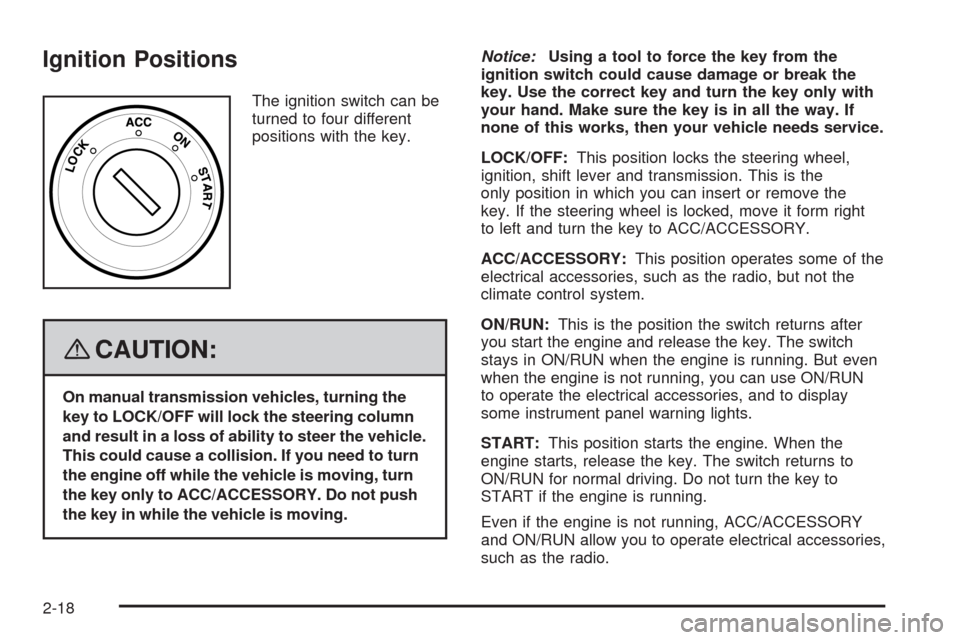
Ignition Positions
The ignition switch can be
turned to four different
positions with the key.
{CAUTION:
On manual transmission vehicles, turning the
key to LOCK/OFF will lock the steering column
and result in a loss of ability to steer the vehicle.
This could cause a collision. If you need to turn
the engine off while the vehicle is moving, turn
the key only to ACC/ACCESSORY. Do not push
the key in while the vehicle is moving.Notice:Using a tool to force the key from the
ignition switch could cause damage or break the
key. Use the correct key and turn the key only with
your hand. Make sure the key is in all the way. If
none of this works, then your vehicle needs service.
LOCK/OFF:This position locks the steering wheel,
ignition, shift lever and transmission. This is the
only position in which you can insert or remove the
key. If the steering wheel is locked, move it form right
to left and turn the key to ACC/ACCESSORY.
ACC/ACCESSORY:This position operates some of the
electrical accessories, such as the radio, but not the
climate control system.
ON/RUN:This is the position the switch returns after
you start the engine and release the key. The switch
stays in ON/RUN when the engine is running. But even
when the engine is not running, you can use ON/RUN
to operate the electrical accessories, and to display
some instrument panel warning lights.
START:This position starts the engine. When the
engine starts, release the key. The switch returns to
ON/RUN for normal driving. Do not turn the key to
START if the engine is running.
Even if the engine is not running, ACC/ACCESSORY
and ON/RUN allow you to operate electrical accessories,
such as the radio.
2-18
Page 116 of 384
Highbeam On Light.......................................3-40
Daytime Running Lamps (DRL) Indicator Light.....3-40
Door Ajar Light.............................................3-41
Fuel Gage...................................................3-41
Low Fuel Warning Light.................................3-42
Secondary Information Center (SIC).................3-43
Secondary Information Center (SIC)
(Hatchback Only).......................................3-43
Clock (Hatchback Only).................................3-44
Safety Belt Reminders...................................3-44
Airbag Readiness Light..................................3-45
Passenger Airbag Status Indicator
(Hatchback)..............................................3-46
Charging System Light..................................3-47
Antilock Brake System Warning Light...............3-48
Hold Mode Light...........................................3-48
Malfunction Indicator Lamp.............................3-49Oil Pressure Light.........................................3-52
Fog Lamp Light............................................3-53
Cruise Control Light......................................3-53
Door Ajar Light.............................................3-53
Audio System(s).............................................3-54
AM-FM Radio (Single Display, Base Level).......3-55
AM-FM Radio (Double Display, Base Level).....3-56
Radio with CD (MP3/WMA)............................3-60
Radio with Six-Disc CD (MP3/WMA)................3-66
Using an MP3 (Radio with CD Player).............3-72
Using an MP3 (Radio with Six-Disc Player)......3-75
Audio Steering Wheel Controls.......................3-78
Radio Reception...........................................3-79
Care of Your CDs.........................................3-79
Care of the CD Player...................................3-79
Fixed Mast Antenna (Hatchback).....................3-80
Backglass Antenna (Sedan)...........................3-80
Section 3 Instrument Panel
3-2
Page 134 of 384

Clock
If you have a sedan there is a digital clock located in
the center of the instrument panel, above the center air
outlets. When the ignition is turned to ACC/ACCESSORY
or ON/RUN, the time is displayed in the digital clock.
There are three adjusting buttons for the digital clock:
H (Hour):To go forward one hour, press the H button
once. To go forward more than one hour, press and hold
the button until the correct hour is reached.
M (Minute):To go forward one minute, press the
M button once. To go forward more than one minute,
press and hold the button until the correct minute
is reached.
S (Set):To reset the time to the nearest hour, press the
S button.
For example, if the set button is pressed while the time
is between 8:00 and 8:29, the display is set to 8:00.
If this button is pressed while the time is between 8:30
and 8:59, the display is set to 9:00.
After disconnecting the battery or replacing the fuse,
reset the clock.
If you have a hatchback there is a clock located in the
Secondary Information Center (SIC), seeSecondary
Information Center (SIC) (Hatchback Only) on
page 3-43.
Climate Controls
Climate Control System
The heating, cooling, and ventilation for your vehicle
can be controlled with this system.
Uplevel shown, Base similar, Hatchback only
3-20
Page 143 of 384
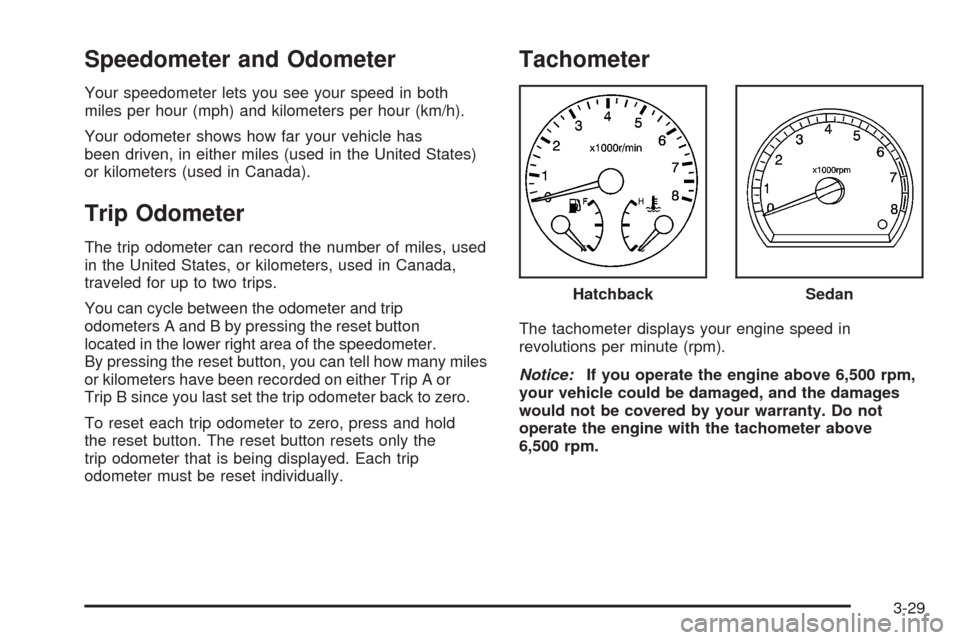
Speedometer and Odometer
Your speedometer lets you see your speed in both
miles per hour (mph) and kilometers per hour (km/h).
Your odometer shows how far your vehicle has
been driven, in either miles (used in the United States)
or kilometers (used in Canada).
Trip Odometer
The trip odometer can record the number of miles, used
in the United States, or kilometers, used in Canada,
traveled for up to two trips.
You can cycle between the odometer and trip
odometers A and B by pressing the reset button
located in the lower right area of the speedometer.
By pressing the reset button, you can tell how many miles
or kilometers have been recorded on either Trip A or
Trip B since you last set the trip odometer back to zero.
To reset each trip odometer to zero, press and hold
the reset button. The reset button resets only the
trip odometer that is being displayed. Each trip
odometer must be reset individually.
Tachometer
The tachometer displays your engine speed in
revolutions per minute (rpm).
Notice:If you operate the engine above 6,500 rpm,
your vehicle could be damaged, and the damages
would not be covered by your warranty. Do not
operate the engine with the tachometer above
6,500 rpm.Hatchback
Sedan
3-29
Page 157 of 384

Secondary Information Center (SIC)
Secondary Information Center (SIC) (Hatchback Only)
The Secondary Information Center (SIC) displays some of the warning lights and indicators. The SIC is located in
the center of the instrument panel, above the center air outlets. The digital clock is also located in the center of the
SIC. SeeClock (Hatchback Only) on page 3-44andInstrument Panel Overview on page 3-4for more information. United States shown, Canada similar
3-43
Page 158 of 384
Clock (Hatchback Only)
Your vehicle has a digital clock. The clock is located
in the secondary instrument cluster on the center of the
instrument panel, above the center air outlets. When
the ignition is turned to ACC/ACCESSORY or ON/RUN,
the time is displayed in the digital clock. There are
two adjusting buttons for the digital clock:
H (Hour):To go forward one hour, press the H button
once. To go forward more than one hour, press and
hold the button until the correct hour is reached.
M (Minute):To go forward one minute, press the
M button once. To go forward more than one minute,
press and hold the button until the correct minute
is reached.
After disconnecting the battery or replacing the fuse,
reset the clock.
Safety Belt Reminders
Safety Belt Reminder Light
The safety belt light will
come on and stay on until
the driver’s safety belt
is buckled.
This light will come on briefly when you turn on the
ignition as a check to show you it is working.
3-44
Page 169 of 384
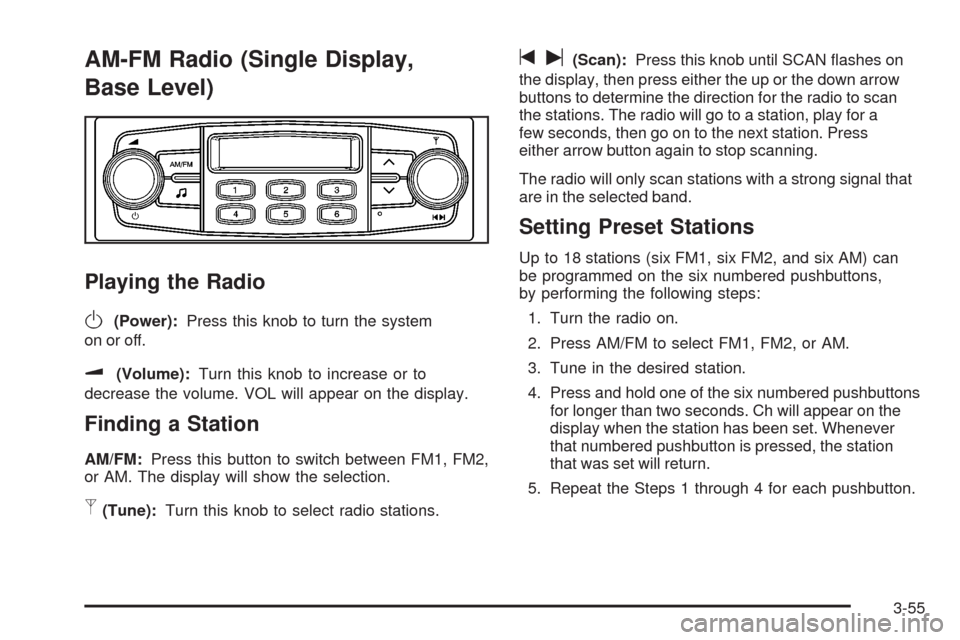
AM-FM Radio (Single Display,
Base Level)
Playing the Radio
O
(Power):Press this knob to turn the system
on or off.
u(Volume):Turn this knob to increase or to
decrease the volume. VOL will appear on the display.
Finding a Station
AM/FM:Press this button to switch between FM1, FM2,
or AM. The display will show the selection.
p(Tune):Turn this knob to select radio stations.
tu(Scan):Press this knob until SCAN flashes on
the display, then press either the up or the down arrow
buttons to determine the direction for the radio to scan
the stations. The radio will go to a station, play for a
few seconds, then go on to the next station. Press
either arrow button again to stop scanning.
The radio will only scan stations with a strong signal that
are in the selected band.
Setting Preset Stations
Up to 18 stations (six FM1, six FM2, and six AM) can
be programmed on the six numbered pushbuttons,
by performing the following steps:
1. Turn the radio on.
2. Press AM/FM to select FM1, FM2, or AM.
3. Tune in the desired station.
4. Press and hold one of the six numbered pushbuttons
for longer than two seconds. Ch will appear on the
display when the station has been set. Whenever
that numbered pushbutton is pressed, the station
that was set will return.
5. Repeat the Steps 1 through 4 for each pushbutton.
3-55
Page 170 of 384
Setting the Tone (Bass/Treble)
f
(Bass/Treble):Press this button until BAS appears
on the display. Then turn the volume knob to increase
or to decrease the bass. The display will show the bass
level.
Press this button until TRE appears on the display.
Then turn the volume knob to increase or to decrease
the treble. The display will show the treble level.
If a station is weak or noisy, decrease the treble.
Adjusting the Speakers (Balance/Fade)
f
(Balance/Fade):To adjust the balance between
the right and the left speakers, press this button
until BAL appears on the display. Then turn the volume
knob to increase or to decrease the balance between
the right and the left speakers. The display will show
the balance level.
To adjust the fade between the front and the rear
speakers, press this button until FAD appears on the
display. Then turn the volume knob to increase or
to decrease the fade between the front and the rear
speakers. The display will show the fade level.
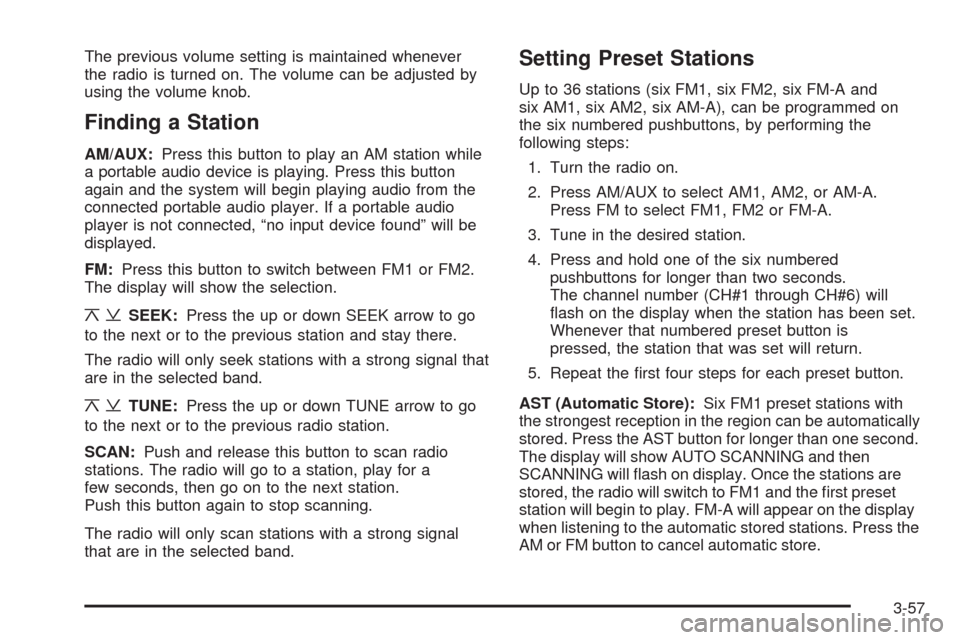
AM-FM Radio (Double Display,
Base Level)
Playing the Radio
O
(Power/Volume):Press and release this knob
to turn the system on. Press and hold this knob for
more than two seconds to turn the system off.
Turn this knob clockwise or counterclockwise to increase
or decrease the volume.
When the system is on, press and release this knob to
mute the system. Press and release this knob again
to turn the sound back on.
3-56
Page 171 of 384
The previous volume setting is maintained whenever
the radio is turned on. The volume can be adjusted by
using the volume knob.
Finding a Station
AM/AUX:Press this button to play an AM station while
a portable audio device is playing. Press this button
again and the system will begin playing audio from the
connected portable audio player. If a portable audio
player is not connected, “no input device found” will be
displayed.
FM:Press this button to switch between FM1 or FM2.
The display will show the selection.
¦¥SEEK:Press the up or down SEEK arrow to go
to the next or to the previous station and stay there.
The radio will only seek stations with a strong signal that
are in the selected band.
¦¥TUNE:Press the up or down TUNE arrow to go
to the next or to the previous radio station.
SCAN:Push and release this button to scan radio
stations. The radio will go to a station, play for a
few seconds, then go on to the next station.
Push this button again to stop scanning.
The radio will only scan stations with a strong signal
that are in the selected band.
Setting Preset Stations
Up to 36 stations (six FM1, six FM2, six FM-A and
six AM1, six AM2, six AM-A), can be programmed on
the six numbered pushbuttons, by performing the
following steps:
1. Turn the radio on.
2. Press AM/AUX to select AM1, AM2, or AM-A.
Press FM to select FM1, FM2 or FM-A.
3. Tune in the desired station.
4. Press and hold one of the six numbered
pushbuttons for longer than two seconds.
The channel number (CH#1 through CH#6) will
flash on the display when the station has been set.
Whenever that numbered preset button is
pressed, the station that was set will return.
5. Repeat the first four steps for each preset button.
AST (Automatic Store):Six FM1 preset stations with
the strongest reception in the region can be automatically
stored. Press the AST button for longer than one second.
The display will show AUTO SCANNING and then
SCANNING will flash on display. Once the stations are
stored, the radio will switch to FM1 and the first preset
station will begin to play. FM-A will appear on the display
when listening to the automatic stored stations. Press the
AM or FM button to cancel automatic store.
3-57
Page 172 of 384
Order of Sound Function
The order for displayed sound function is BASS, MID,
TRE, FAD, BAL, EQ OFF, and VOL.
Setting the Tone
(Bass/Midrange/Treble)
SOUND (Bass/Midrange/Treble):Press this button
until BAS appears on the display. Turn the power/volume
knob to increase or to decrease the bass. The display will
show the bass level. When finished making the selection,
press this button to select the bass level.
Press this button until MID appears on the display.
Turn the power/volume knob to increase or to decrease
the midrange. The display will show the midrange level.
When finished making the selection, press this button to
select the midrange level.
Press this button until TRE appears on the display.
Turn the power/volume knob to increase or to decrease
the treble. The display will show the treble level. When
finished making the selection, press this button to select
the treble level. If a station is weak or there is static,
decrease the treble.
Adjusting the Speakers (Balance/Fade)
SOUND (Balance/Fade):To adjust the balance
between the right and the left speakers, press this button
until BAL appears on the display. Turn the power/volume
knob to increase or to decrease. The display will show the
balance level. When finished making the selection, press
this button to select the balance level.
To adjust the fade between the front and the rear
speakers, press this button until FAD appears on the
display. Turn the power/volume knob to increase or
to decrease the fade between the front and the rear
speakers. The display will show the fade level. When
finished making the selection, press this button to select
the fade level.
Setting the EQ (Equalization)
SOUND (Equalization):Press this button until EQ OFF
appears on the display to select customized equalization
settings designed for classic, dance, rock, jazz, pop,
voice, and techno. Turn the power/volume knob until
the desired equalization setting appears on the display.
When finished making the selection, press the
SOUND button to select the equalization setting.
To cancel an equalization setting, press the SOUND
button until EQ OFF appears on the display, turn the
power/volume knob until OFF appears on the display,
then press the SOUND button again to select the
equalization setting.
3-58