wiper blades CHEVROLET AVEO 2009 1.G Owners Manual
[x] Cancel search | Manufacturer: CHEVROLET, Model Year: 2009, Model line: AVEO, Model: CHEVROLET AVEO 2009 1.GPages: 354, PDF Size: 2.07 MB
Page 129 of 354
The lever is located on the right side of the steering
column. The ignition must be turned to ON/RUN
to operate the windshield wipers.
Move the lever to one of the following positions:
HI (High Speed):For steady wiping at high speed.
LO (Low Speed):For steady wiping at low speed.
INT (Intermittent):Move to this position for a delayed
wiping cycle. Turn the band on the windshield wiper
toward FAST or SLOW for a shorter or longer
delay between wipes. The wiper speed can only be
adjusted when the lever is in the INT position.
OFF:Turns the windshield wipers off.
Misting Function
Move the lever toward INT for a single wiping cycle.
Hold it there until the windshield wipers start; then let go.
The windshield wipers will stop after one wipe. If more
wipes are needed, hold the band toward INT longer.
Clear ice and snow from the wiper blades before using
them. If they are frozen to the windshield, carefully
loosen or thaw them. If the blades become damaged,
get new blades or blade inserts. SeeWindshield
Wiper Blade Replacement on page 5-50.
Heavy snow or ice can overload the wipers. A circuit
breaker stops them until the motor cools.
Windshield Washer
To use this feature the ignition must be turned to
ON/RUN. Pull the windshield washer/wiper lever toward
you to spray washer �uid on the windshield.
The spray continues until the lever is released.
The wipers will run a few times and either stop or
will resume at the speed being used previously.
SeeWindshield Washer Fluid on page 5-33for
information on �lling the windshield washer �uid.
{CAUTION:
In freezing weather, do not use your washer until
the windshield is warmed. Otherwise the washer
�uid can form ice on the windshield, blocking your
vision.
3-9
Page 191 of 354
Hydroplaning
Hydroplaning is dangerous. Water can build up under
your vehicle’s tires so they actually ride on the
water. This can happen if the road is wet enough and
you are going fast enough. When your vehicle is
hydroplaning, it has little or no contact with the road.
There is no hard and fast rule about hydroplaning.
The best advice is to slow down when the road is wet.
Other Rainy Weather Tips
Besides slowing down, other wet weather driving tips
include:
Allow extra following distance.
Pass with caution.
Keep windshield wiping equipment in good shape.
Keep the windshield washer �uid reservoir �lled.
Have good tires with proper tread depth. SeeTires
on page 5-51.
Turn off cruise control.
Before Leaving on a Long Trip
To prepare your vehicle for a long trip, consider having
it serviced by your dealer/retailer before departing.
Things to check on your own include:
Windshield Washer Fluid:Reservoir full?
Windows clean — inside and outside?
Wiper Blades:In good shape?
Fuel, Engine Oil, Other Fluids:All levels checked?
Lamps:Do they all work and are lenses clean?
Tires:Are treads good? Are tires in�ated to
recommended pressure?
Weather and Maps:Safe to travel?
Have up-to-date maps?
4-11
Page 210 of 354
Tire Pressure Monitor Operation.....................5-60
Tire Inspection and Rotation...........................5-62
When It Is Time for New Tires.......................5-63
Buying New Tires.........................................5-64
Different Size Tires and Wheels......................5-65
Uniform Tire Quality Grading..........................5-66
Wheel Alignment and Tire Balance..................5-67
Wheel Replacement......................................5-67
Tire Chains..................................................5-68
If a Tire Goes Flat........................................5-69
Changing a Flat Tire.....................................5-70
Removing the Spare Tire and Tools................5-71
Removing the Flat Tire and Installing the
Spare Tire................................................5-73
Storing a Flat or Spare Tire and Tools............5-78
Compact Spare Tire......................................5-78
Appearance Care............................................5-79
Interior Cleaning...........................................5-79
Fabric/Carpet...............................................5-80
Leather.......................................................5-81
Instrument Panel, Vinyl, and Other Plastic
Surfaces..................................................5-81
Care of Safety Belts......................................5-82
Weatherstrips...............................................5-82Washing Your Vehicle...................................5-82
Cleaning Exterior Lamps/Lenses.....................5-83
Finish Care..................................................5-83
Windshield and Wiper Blades.........................5-84
Aluminum Wheels.........................................5-84
Tires...........................................................5-85
Sheet Metal Damage.....................................5-85
Finish Damage.............................................5-85
Underbody Maintenance................................5-85
Chemical Paint Spotting.................................5-85
Vehicle Identi�cation......................................5-86
Vehicle Identi�cation Number (VIN).................5-86
Service Parts Identi�cation Label.....................5-86
Electrical System............................................5-86
Add-On Electrical Equipment..........................5-86
Headlamp Wiring..........................................5-87
Windshield Wiper Fuses................................5-87
Power Windows and Other Power Options.......5-87
Fuses and Circuit Breakers............................5-87
Instrument Panel Fuse Block..........................5-88
Engine Compartment Fuse Block....................5-89
Capacities and Speci�cations..........................5-93
Section 5 Service and Appearance Care
5-2
Page 258 of 354
Windshield Wiper Blade
Replacement
Windshield wiper blades should be inspected for wear
or cracking. See “Wiper Blade Check” for more
information.
Replacement blades come in different types and are
removed in different ways. For the proper type,
seeMaintenance Replacement Parts on page 6-15.Here is how to remove and replace the windshield wiper
blade:
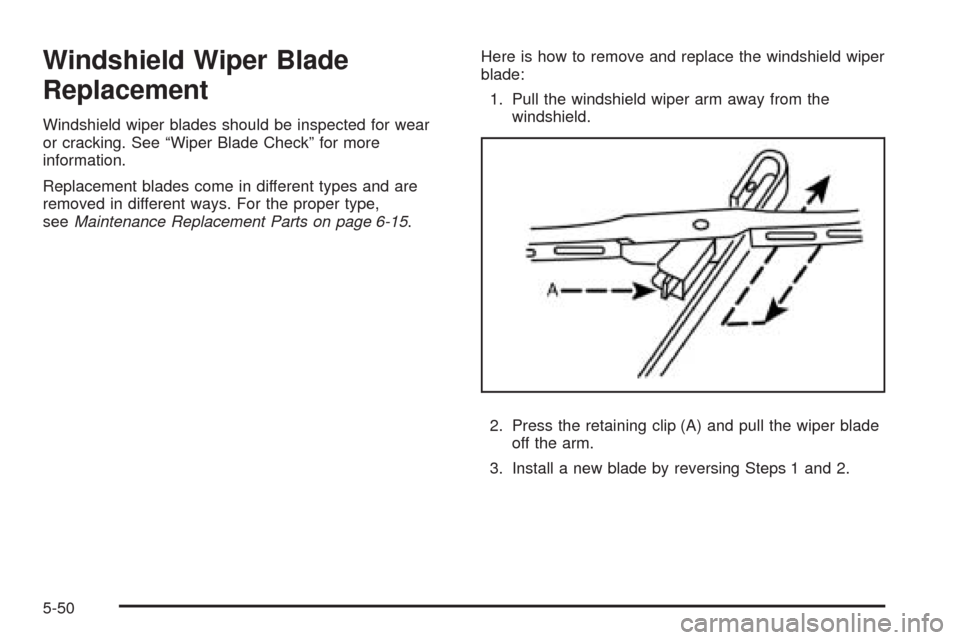
1. Pull the windshield wiper arm away from the
windshield.
2. Press the retaining clip (A) and pull the wiper blade
off the arm.
3. Install a new blade by reversing Steps 1 and 2.
5-50
Page 292 of 354
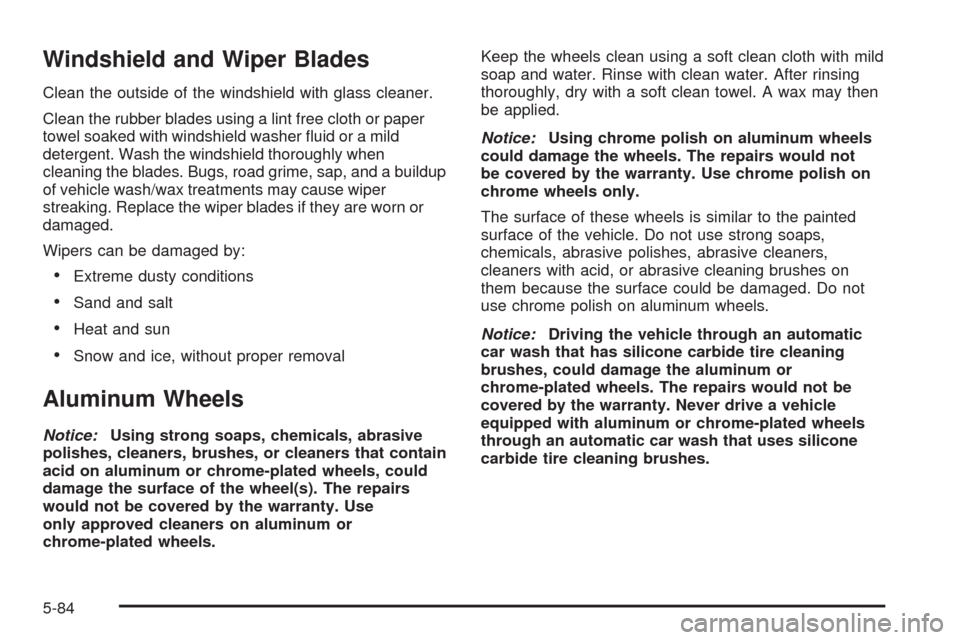
Windshield and Wiper Blades
Clean the outside of the windshield with glass cleaner.
Clean the rubber blades using a lint free cloth or paper
towel soaked with windshield washer �uid or a mild
detergent. Wash the windshield thoroughly when
cleaning the blades. Bugs, road grime, sap, and a buildup
of vehicle wash/wax treatments may cause wiper
streaking. Replace the wiper blades if they are worn or
damaged.
Wipers can be damaged by:
Extreme dusty conditions
Sand and salt
Heat and sun
Snow and ice, without proper removal
Aluminum Wheels
Notice:Using strong soaps, chemicals, abrasive
polishes, cleaners, brushes, or cleaners that contain
acid on aluminum or chrome-plated wheels, could
damage the surface of the wheel(s). The repairs
would not be covered by the warranty. Use
only approved cleaners on aluminum or
chrome-plated wheels.Keep the wheels clean using a soft clean cloth with mild
soap and water. Rinse with clean water. After rinsing
thoroughly, dry with a soft clean towel. A wax may then
be applied.
Notice:Using chrome polish on aluminum wheels
could damage the wheels. The repairs would not
be covered by the warranty. Use chrome polish on
chrome wheels only.
The surface of these wheels is similar to the painted
surface of the vehicle. Do not use strong soaps,
chemicals, abrasive polishes, abrasive cleaners,
cleaners with acid, or abrasive cleaning brushes on
them because the surface could be damaged. Do not
use chrome polish on aluminum wheels.
Notice:Driving the vehicle through an automatic
car wash that has silicone carbide tire cleaning
brushes, could damage the aluminum or
chrome-plated wheels. The repairs would not be
covered by the warranty. Never drive a vehicle
equipped with aluminum or chrome-plated wheels
through an automatic car wash that uses silicone
carbide tire cleaning brushes.
5-84
Page 307 of 354
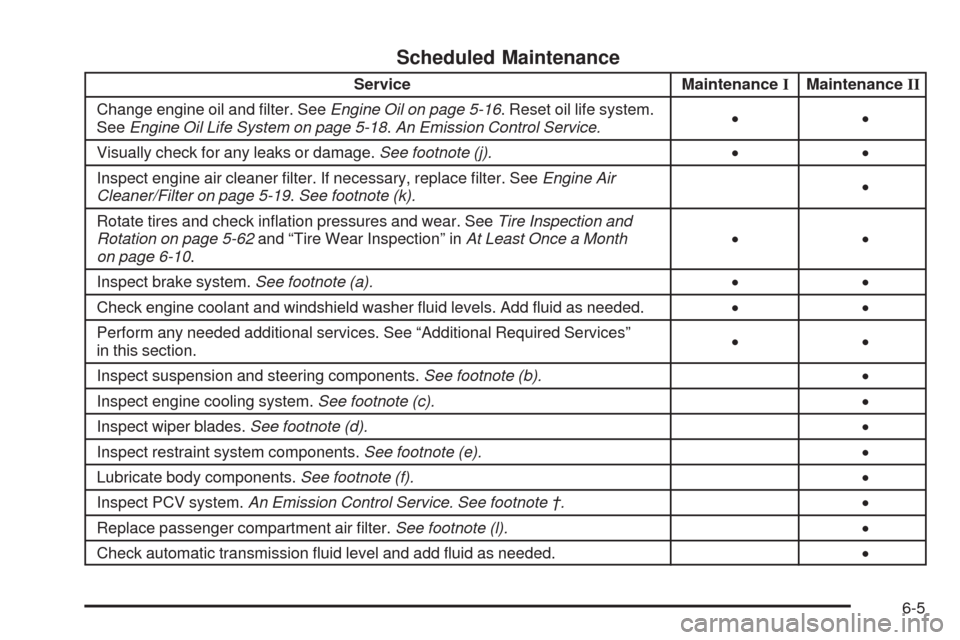
Scheduled Maintenance
Service MaintenanceIMaintenanceII
Change engine oil and �lter. SeeEngine Oil on page 5-16. Reset oil life system.
SeeEngine Oil Life System on page 5-18.An Emission Control Service.••
Visually check for any leaks or damage.See footnote (j).••
Inspect engine air cleaner �lter. If necessary, replace �lter. SeeEngine Air
Cleaner/Filter on page 5-19.See footnote (k).•
Rotate tires and check in�ation pressures and wear. SeeTire Inspection and
Rotation on page 5-62and “Tire Wear Inspection” inAt Least Once a Month
on page 6-10.••
Inspect brake system.See footnote (a).••
Check engine coolant and windshield washer �uid levels. Add �uid as needed.••
Perform any needed additional services. See “Additional Required Services”
in this section.••
Inspect suspension and steering components.See footnote (b).•
Inspect engine cooling system.See footnote (c).•
Inspect wiper blades.See footnote (d).•
Inspect restraint system components.See footnote (e).•
Lubricate body components.See footnote (f).•
Inspect PCV system.An Emission Control Service. See footnote †.•
Replace passenger compartment air �lter.See footnote (l).•
Check automatic transmission �uid level and add �uid as needed.•
6-5
Page 310 of 354
Maintenance Footnotes
†The U.S. Environmental Protection Agency or the
California Air Resources Board has determined that the
failure to perform this maintenance item will not nullify
the emission warranty or limit recall liability prior to
the completion of the vehicle’s useful life. We, however,
urge that all recommended maintenance services be
performed at the indicated intervals and the
maintenance be recorded.
(a)Visually inspect brake lines and hoses for proper
hook-up, binding, leaks, cracks, chafing, etc. Inspect
disc brake pads for wear and rotors for surface
condition. Inspect drum brake linings/shoes for wear or
cracks. Inspect other brake parts, including drums,
wheel cylinders, calipers, parking brake, etc.
(b)Visually inspect front and rear suspension and
steering system for damaged, loose, or missing parts
or signs of wear. Inspect power steering cables for
proper hook-up, binding, cracks, chafing, etc.
(c)Visually inspect hoses and have them replaced if
they are cracked, swollen, or deteriorated. Inspect
all pipes, fittings and clamps; replace with genuine
parts as needed. To help ensure proper operation,
a pressure test of the cooling system and pressure cap
and cleaning the outside of the radiator and air
conditioning condenser is recommended at least
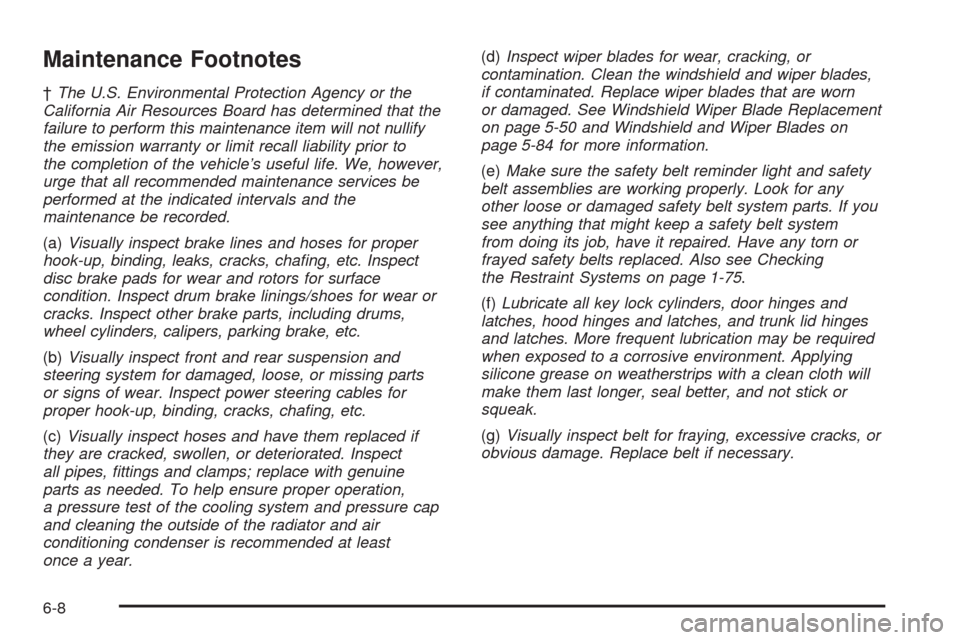
once a year.(d)Inspect wiper blades for wear, cracking, or
contamination. Clean the windshield and wiper blades,
if contaminated. Replace wiper blades that are worn
or damaged. See Windshield Wiper Blade Replacement
on page 5-50 and Windshield and Wiper Blades on
page 5-84 for more information.
(e)Make sure the safety belt reminder light and safety
belt assemblies are working properly. Look for any
other loose or damaged safety belt system parts. If you
see anything that might keep a safety belt system
from doing its job, have it repaired. Have any torn or
frayed safety belts replaced. Also see Checking
the Restraint Systems on page 1-75.
(f)Lubricate all key lock cylinders, door hinges and
latches, hood hinges and latches, and trunk lid hinges
and latches. More frequent lubrication may be required
when exposed to a corrosive environment. Applying
silicone grease on weatherstrips with a clean cloth will
make them last longer, seal better, and not stick or
squeak.
(g)Visually inspect belt for fraying, excessive cracks, or
obvious damage. Replace belt if necessary.
6-8
Page 317 of 354
Maintenance Replacement Parts
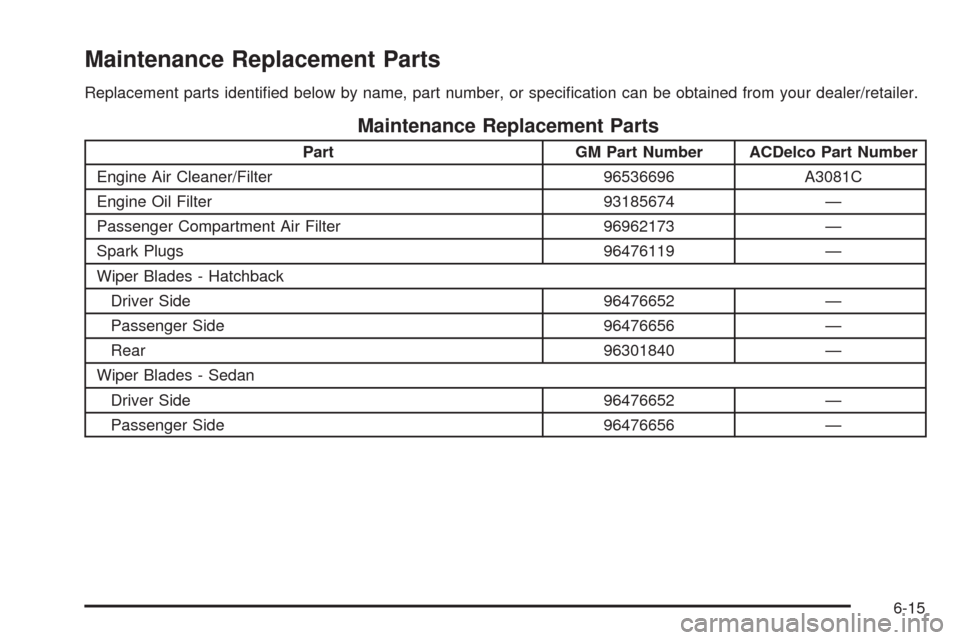
Replacement parts identi�ed below by name, part number, or speci�cation can be obtained from your dealer/retailer.
Maintenance Replacement Parts
Part GM Part Number ACDelco Part Number
Engine Air Cleaner/Filter 96536696 A3081C
Engine Oil Filter 93185674 —
Passenger Compartment Air Filter 96962173 —
Spark Plugs 96476119 —
Wiper Blades - Hatchback
Driver Side 96476652 —
Passenger Side 96476656 —
Rear 96301840 —
Wiper Blades - Sedan
Driver Side 96476652 —
Passenger Side 96476656 —
6-15
Page 343 of 354
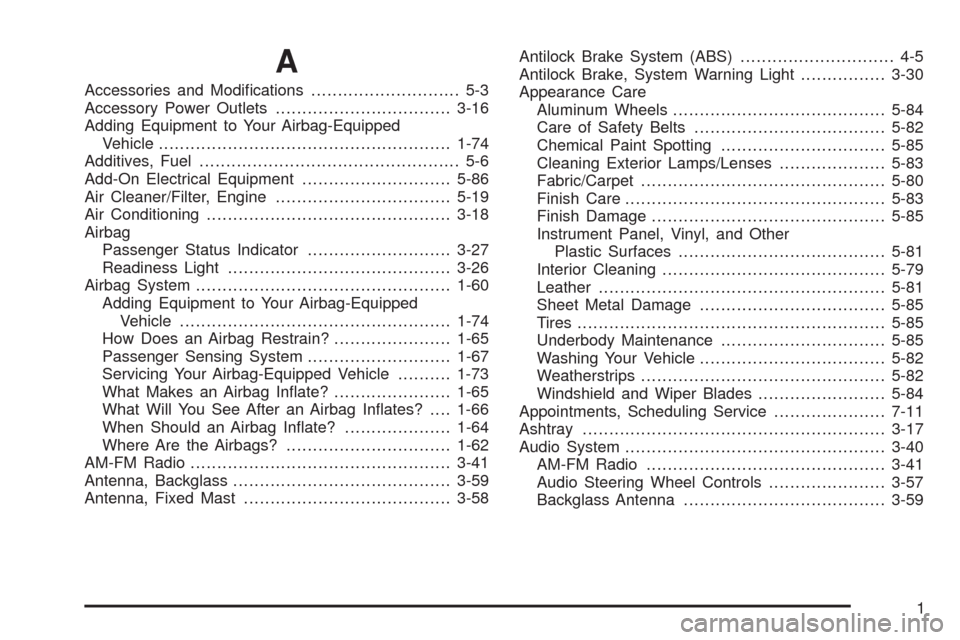
A
Accessories and Modi�cations............................ 5-3
Accessory Power Outlets.................................3-16
Adding Equipment to Your Airbag-Equipped
Vehicle.......................................................1-74
Additives, Fuel................................................. 5-6
Add-On Electrical Equipment............................5-86
Air Cleaner/Filter, Engine.................................5-19
Air Conditioning..............................................3-18
Airbag
Passenger Status Indicator...........................3-27
Readiness Light..........................................3-26
Airbag System................................................1-60
Adding Equipment to Your Airbag-Equipped
Vehicle...................................................1-74
How Does an Airbag Restrain?......................1-65
Passenger Sensing System...........................1-67
Servicing Your Airbag-Equipped Vehicle..........1-73
What Makes an Airbag In�ate?......................1-65
What Will You See After an Airbag In�ates?....1-66
When Should an Airbag In�ate?....................1-64
Where Are the Airbags?...............................1-62
AM-FM Radio.................................................3-41
Antenna, Backglass.........................................3-59
Antenna, Fixed Mast.......................................3-58Antilock Brake System (ABS)............................. 4-5
Antilock Brake, System Warning Light................3-30
Appearance Care
Aluminum Wheels........................................5-84
Care of Safety Belts....................................5-82
Chemical Paint Spotting...............................5-85
Cleaning Exterior Lamps/Lenses....................5-83
Fabric/Carpet..............................................5-80
Finish Care.................................................5-83
Finish Damage............................................5-85
Instrument Panel, Vinyl, and Other
Plastic Surfaces.......................................5-81
Interior Cleaning..........................................5-79
Leather......................................................5-81
Sheet Metal Damage...................................5-85
Tires..........................................................5-85
Underbody Maintenance...............................5-85
Washing Your Vehicle...................................5-82
Weatherstrips..............................................5-82
Windshield and Wiper Blades........................5-84
Appointments, Scheduling Service.....................7-11
Ashtray.........................................................3-17
Audio System.................................................3-40
AM-FM Radio.............................................3-41
Audio Steering Wheel Controls......................3-57
Backglass Antenna......................................3-59
1
Page 345 of 354
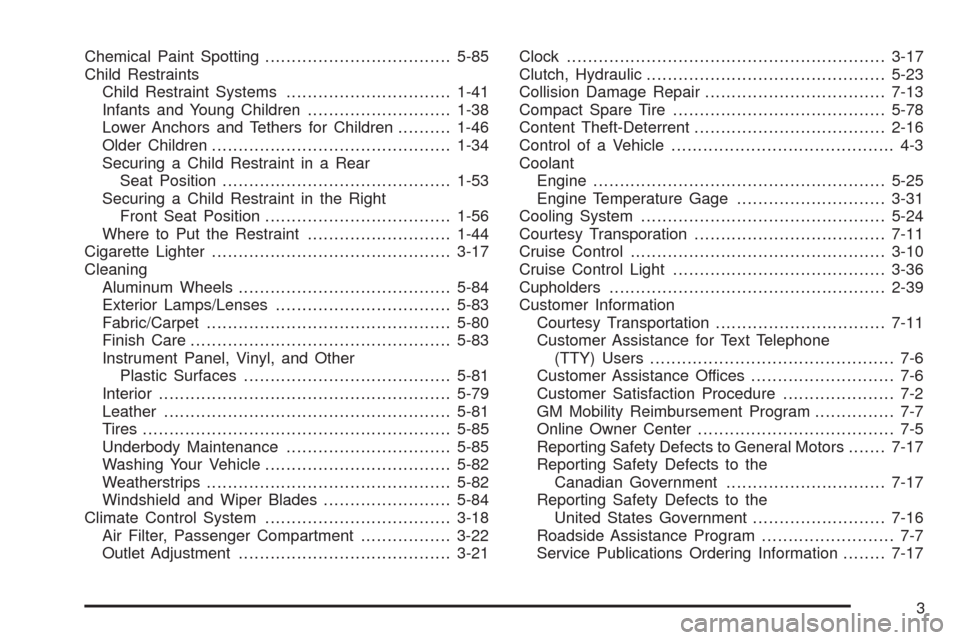
Chemical Paint Spotting...................................5-85
Child Restraints
Child Restraint Systems...............................1-41
Infants and Young Children...........................1-38
Lower Anchors and Tethers for Children..........1-46
Older Children.............................................1-34
Securing a Child Restraint in a Rear
Seat Position...........................................1-53
Securing a Child Restraint in the Right
Front Seat Position...................................1-56
Where to Put the Restraint...........................1-44
Cigarette Lighter.............................................3-17
Cleaning
Aluminum Wheels........................................5-84
Exterior Lamps/Lenses.................................5-83
Fabric/Carpet..............................................5-80
Finish Care.................................................5-83
Instrument Panel, Vinyl, and Other
Plastic Surfaces.......................................5-81
Interior.......................................................5-79
Leather......................................................5-81
Tires..........................................................5-85
Underbody Maintenance...............................5-85
Washing Your Vehicle...................................5-82
Weatherstrips..............................................5-82
Windshield and Wiper Blades........................5-84
Climate Control System...................................3-18
Air Filter, Passenger Compartment.................3-22
Outlet Adjustment........................................3-21Clock............................................................3-17
Clutch, Hydraulic.............................................5-23
Collision Damage Repair..................................7-13
Compact Spare Tire........................................5-78
Content Theft-Deterrent....................................2-16
Control of a Vehicle.......................................... 4-3
Coolant
Engine.......................................................5-25
Engine Temperature Gage............................3-31
Cooling System..............................................5-24
Courtesy Transporation....................................7-11
Cruise Control................................................3-10
Cruise Control Light........................................3-36
Cupholders....................................................2-39
Customer Information
Courtesy Transportation................................7-11
Customer Assistance for Text Telephone
(TTY) Users.............................................. 7-6
Customer Assistance Offices........................... 7-6
Customer Satisfaction Procedure..................... 7-2
GM Mobility Reimbursement Program............... 7-7
Online Owner Center..................................... 7-5
Reporting Safety Defects to General Motors.......7-17
Reporting Safety Defects to the
Canadian Government..............................7-17
Reporting Safety Defects to the
United States Government.........................7-16
Roadside Assistance Program......................... 7-7
Service Publications Ordering Information........7-17
3