light CHEVROLET AVEO 2011 1.G Owners Manual
[x] Cancel search | Manufacturer: CHEVROLET, Model Year: 2011, Model line: AVEO, Model: CHEVROLET AVEO 2011 1.GPages: 328, PDF Size: 5.37 MB
Page 1 of 328

Black plate (1,1)Chevrolet Aveo Owner Manual - 2011
2011 Chevrolet Aveo Owner ManualM
In Brief. . . . . . . . . . . . . . . . . . . . . . . . 1-1
Instrument Panel . . . . . . . . . . . . . . 1-2
Initial Drive Information . . . . . . . . 1-3
Vehicle Features . . . . . . . . . . . . . 1-16
Performance and Maintenance . . . . . . . . . . . . . . . . 1-21
Keys, Doors and Windows . . . 2-1
Keys and Locks . . . . . . . . . . . . . . . 2-2
Doors . . . . . . . . . . . . . . . . . . . . . . . . . . 2-7
Vehicle Security . . . . . . . . . . . . . . 2-10
Exterior Mirrors . . . . . . . . . . . . . . . 2-13
Interior Mirrors . . . . . . . . . . . . . . . . 2-14
Windows . . . . . . . . . . . . . . . . . . . . . 2-14
Roof . . . . . . . . . . . . . . . . . . . . . . . . . . 2-16
Seats and Restraints . . . . . . . . . 3-1
Head Restraints . . . . . . . . . . . . . . . 3-2
Front Seats . . . . . . . . . . . . . . . . . . . . 3-3
Rear Seats . . . . . . . . . . . . . . . . . . . . 3-6
Safety Belts . . . . . . . . . . . . . . . . . . 3-11
Airbag System . . . . . . . . . . . . . . . . 3-24
Child Restraints . . . . . . . . . . . . . . 3-38 Storage
. . . . . . . . . . . . . . . . . . . . . . . 4-1
Storage Compartments . . . . . . . . 4-1
Instruments and Controls . . . . 5-1
Controls . . . . . . . . . . . . . . . . . . . . . . . 5-1
Warning Lights, Gauges, and Indicators . . . . . . . . . . . . . . . . . . . . 5-7
Trip Computer . . . . . . . . . . . . . . . . 5-21
Lighting . . . . . . . . . . . . . . . . . . . . . . . 6-1
Exterior Lighting . . . . . . . . . . . . . . . 6-1
Interior Lighting . . . . . . . . . . . . . . . . 6-4
Lighting Features . . . . . . . . . . . . . . 6-5
Infotainment System . . . . . . . . . 7-1
Introduction . . . . . . . . . . . . . . . . . . . . 7-1
Radio . . . . . . . . . . . . . . . . . . . . . . . . . . 7-3
Audio Players . . . . . . . . . . . . . . . . 7-10
Climate Controls . . . . . . . . . . . . . 8-1
Climate Control Systems . . . . . . 8-1
Air Vents . . . . . . . . . . . . . . . . . . . . . . . 8-4
Maintenance . . . . . . . . . . . . . . . . . . . 8-5 Driving and Operating
. . . . . . . . 9-1
Driving Information . . . . . . . . . . . . . 9-2
Starting and Operating . . . . . . . 9-17
Engine Exhaust . . . . . . . . . . . . . . 9-24
Automatic Transmission . . . . . . 9-25
Manual Transmission . . . . . . . . . 9-29
Brakes . . . . . . . . . . . . . . . . . . . . . . . 9-30
Cruise Control . . . . . . . . . . . . . . . . 9-32
Fuel . . . . . . . . . . . . . . . . . . . . . . . . . . 9-34
Towing . . . . . . . . . . . . . . . . . . . . . . . 9-39
Conversions and Add-Ons . . . 9-40
Vehicle Care . . . . . . . . . . . . . . . . . 10-1
General Information . . . . . . . . . . 10-3
Vehicle Checks . . . . . . . . . . . . . . . 10-5
Headlamp Aiming . . . . . . . . . . . 10-30
Bulb Replacement . . . . . . . . . . 10-31
Electrical System . . . . . . . . . . . . 10-36
Wheels and Tires . . . . . . . . . . . 10-42
Jump Starting . . . . . . . . . . . . . . . 10-70
Towing . . . . . . . . . . . . . . . . . . . . . . 10-74
Appearance Care . . . . . . . . . . . 10-76
Page 5 of 328

Black plate (5,1)Chevrolet Aveo Owner Manual - 2011
Introduction v
Vehicle Symbol Chart
Here are some additional symbols
that may be found on the vehicle
and what they mean. For more
information on the symbol, refer to
the Index.
9:Airbag Readiness Light
#:Air Conditioning
!:Antilock Brake System (ABS)
g:Audio Steering Wheel Controls
or OnStar®
$: Brake System Warning Light
":Charging System
I:Cruise Control
B: Engine Coolant Temperature
O:Exterior Lamps
#:Fog Lamps
.: Fuel Gauge
+:Fuses
3: Headlamp High/Low-Beam
Changer
j: LATCH System Child
Restraints
*: Malfunction Indicator Lamp
::Oil Pressure
}:Power
/:Remote Vehicle Start
>:Safety Belt Reminders
7:Tire Pressure Monitor
d:Traction Control
M:Windshield Washer Fluid
Page 7 of 328
Black plate (1,1)Chevrolet Aveo Owner Manual - 2011
In Brief 1-1
In Brief
Instrument Panel
Instrument Panel . . . . . . . . . . . . . . 1-2
Initial Drive Information
Initial Drive Information . . . . . . . . 1-3
Starting the Engine . . . . . . . . . . . 1-4
Remote Keyless Entry (RKE)System . . . . . . . . . . . . . . . . . . . . . . 1-4
Door Locks . . . . . . . . . . . . . . . . . . . 1-5
Liftgate . . . . . . . . . . . . . . . . . . . . . . . . 1-5
Trunk Release . . . . . . . . . . . . . . . . 1-6
Windows . . . . . . . . . . . . . . . . . . . . . . 1-6
Seat Adjustment . . . . . . . . . . . . . . 1-7
Second Row Seats . . . . . . . . . . . 1-8
Head Restraint Adjustment . . . . 1-8
Safety Belts . . . . . . . . . . . . . . . . . . . 1-9 Sensing System for Passenger
Airbag . . . . . . . . . . . . . . . . . . . . . . . 1-9
Mirror Adjustment . . . . . . . . . . . . 1-10
Steering Wheel Adjustment . . . . . . . . . . . . . . . . . 1-11
Interior Lighting . . . . . . . . . . . . . . 1-11
Exterior Lighting . . . . . . . . . . . . . 1-11
Windshield Wiper/Washer . . . . 1-12
Climate Controls . . . . . . . . . . . . . 1-13
Transmission . . . . . . . . . . . . . . . . 1-14
Vehicle Features
Radio(s) . . . . . . . . . . . . . . . . . . . . . 1-16
Satellite Radio . . . . . . . . . . . . . . . 1-17
Portable Audio Devices . . . . . . 1-18
Steering Wheel Controls . . . . . 1-18
Cruise Control . . . . . . . . . . . . . . . 1-19
Trip Computer (US Only) . . . . 1-19
Power Outlets . . . . . . . . . . . . . . . 1-20
Sunroof . . . . . . . . . . . . . . . . . . . . . . 1-20
Performance and Maintenance
Tire Pressure Monitor . . . . . . . . 1-21
Engine Oil Life System . . . . . . 1-21
Hood Release . . . . . . . . . . . . . . . 1-22
Driving for Better Fuel Economy . . . . . . . . . . . . . . . . . . . 1-22
Roadside Assistance Program . . . . . . . . . . . . . . . . . . . . 1-23
OnStar
®. . . . . . . . . . . . . . . . . . . . . 1-24
Page 9 of 328
Black plate (3,1)Chevrolet Aveo Owner Manual - 2011
In Brief 1-3
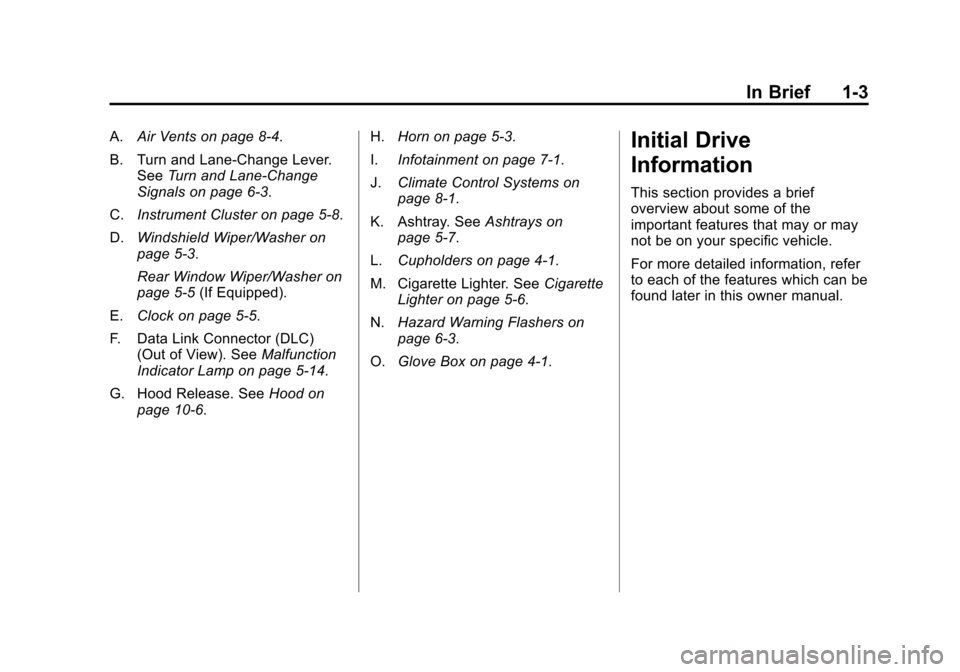
A.Air Vents on page 8‑4.
B. Turn and Lane‐Change Lever. See Turn and Lane-Change
Signals on page 6‑3.
C. Instrument Cluster on page 5‑8.
D. Windshield Wiper/Washer on
page 5‑3.
Rear Window Wiper/Washer on
page 5‑5 (If Equipped).
E. Clock on page 5‑5.
F. Data Link Connector (DLC) (Out of View). See Malfunction
Indicator Lamp on page 5‑14.
G. Hood Release. See Hood on
page 10‑6. H.
Horn on page 5‑3.
I. Infotainment on page 7‑1.
J. Climate Control Systems on
page 8‑1.
K. Ashtray. See Ashtrays on
page 5‑7.
L. Cupholders on page 4‑1.
M. Cigarette Lighter. See Cigarette
Lighter on page 5‑6.
N. Hazard Warning Flashers on
page 6‑3.
O. Glove Box on page 4‑1.Initial Drive
Information
This section provides a brief
overview about some of the
important features that may or may
not be on your specific vehicle.
For more detailed information, refer
to each of the features which can be
found later in this owner manual.
Page 11 of 328
Black plate (5,1)Chevrolet Aveo Owner Manual - 2011
In Brief 1-5
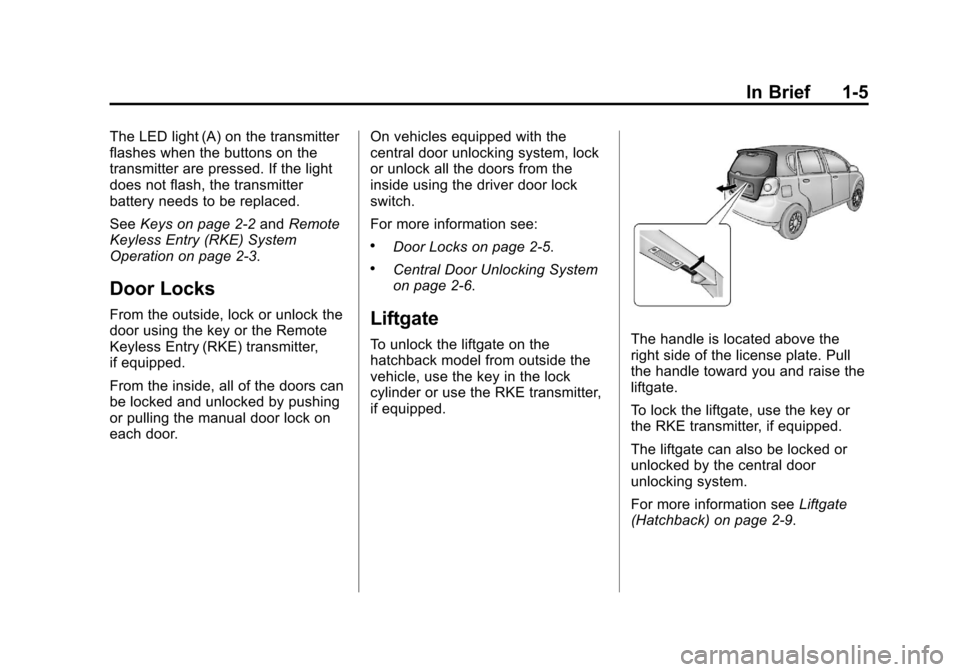
The LED light (A) on the transmitter
flashes when the buttons on the
transmitter are pressed. If the light
does not flash, the transmitter
battery needs to be replaced.
SeeKeys on page 2‑2 andRemote
Keyless Entry (RKE) System
Operation on page 2‑3.
Door Locks
From the outside, lock or unlock the
door using the key or the Remote
Keyless Entry (RKE) transmitter,
if equipped.
From the inside, all of the doors can
be locked and unlocked by pushing
or pulling the manual door lock on
each door. On vehicles equipped with the
central door unlocking system, lock
or unlock all the doors from the
inside using the driver door lock
switch.
For more information see:
.Door Locks on page 2‑5.
.Central Door Unlocking System
on page 2‑6.
Liftgate
To unlock the liftgate on the
hatchback model from outside the
vehicle, use the key in the lock
cylinder or use the RKE transmitter,
if equipped.The handle is located above the
right side of the license plate. Pull
the handle toward you and raise the
liftgate.
To lock the liftgate, use the key or
the RKE transmitter, if equipped.
The liftgate can also be locked or
unlocked by the central door
unlocking system.
For more information see
Liftgate
(Hatchback) on page 2‑9.
Page 17 of 328
Black plate (11,1)Chevrolet Aveo Owner Manual - 2011
In Brief 1-11
Steering Wheel
Adjustment
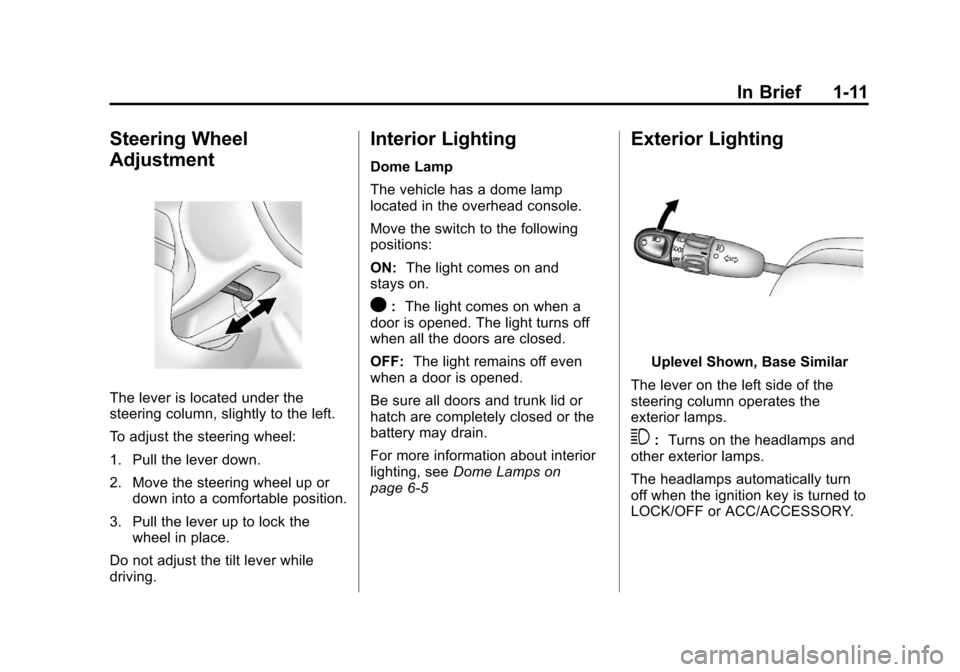
The lever is located under the
steering column, slightly to the left.
To adjust the steering wheel:
1. Pull the lever down.
2. Move the steering wheel up ordown into a comfortable position.
3. Pull the lever up to lock the wheel in place.
Do not adjust the tilt lever while
driving.
Interior Lighting
Dome Lamp
The vehicle has a dome lamp
located in the overhead console.
Move the switch to the following
positions:
ON: The light comes on and
stays on.
O: The light comes on when a
door is opened. The light turns off
when all the doors are closed.
OFF: The light remains off even
when a door is opened.
Be sure all doors and trunk lid or
hatch are completely closed or the
battery may drain.
For more information about interior
lighting, see Dome Lamps on
page 6‑5
Exterior Lighting
Uplevel Shown, Base Similar
The lever on the left side of the
steering column operates the
exterior lamps.
3: Turns on the headlamps and
other exterior lamps.
The headlamps automatically turn
off when the ignition key is turned to
LOCK/OFF or ACC/ACCESSORY.
Page 18 of 328
Black plate (12,1)Chevrolet Aveo Owner Manual - 2011
1-12 In Brief
;:Turns on the parking lamps,
together with the taillamps, license
plate lamp, and instrument panel
lights.
OFF: Turns all the lamps off,
except the Daytime Running
Lamps (DRL).
For more information, see:
.Exterior Lamp Controls on
page 6‑1.
.Daytime Running Lamps (DRL)
on page 6‑2.
.Fog Lamps on page 6‑4.
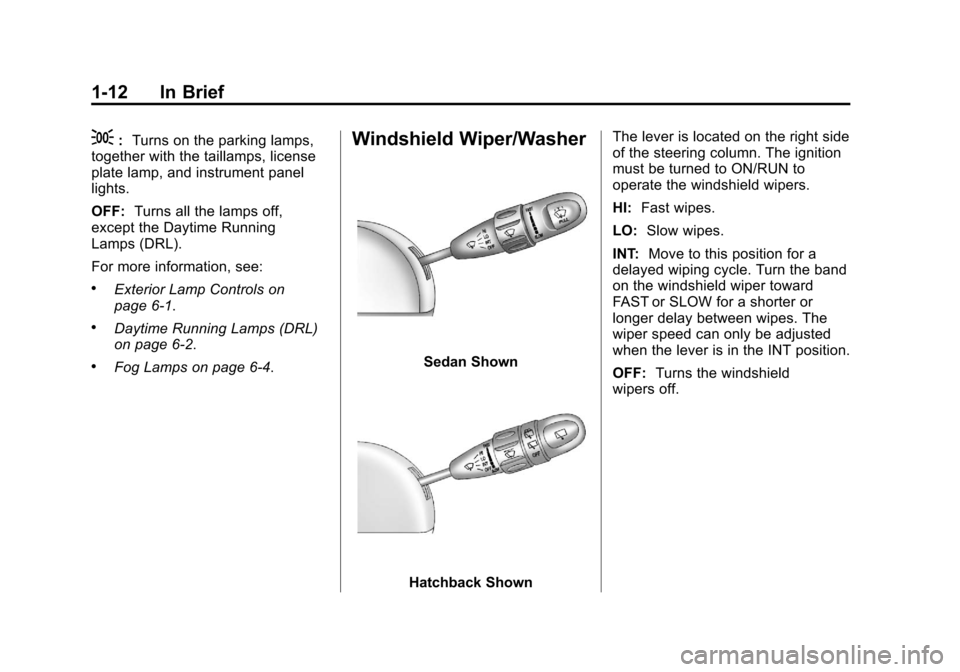
Windshield Wiper/Washer
Sedan Shown
Hatchback Shown The lever is located on the right side
of the steering column. The ignition
must be turned to ON/RUN to
operate the windshield wipers.
HI:
Fast wipes.
LO: Slow wipes.
INT: Move to this position for a
delayed wiping cycle. Turn the band
on the windshield wiper toward
FAST or SLOW for a shorter or
longer delay between wipes. The
wiper speed can only be adjusted
when the lever is in the INT position.
OFF: Turns the windshield
wipers off.
Page 21 of 328
Black plate (15,1)Chevrolet Aveo Owner Manual - 2011
In Brief 1-15
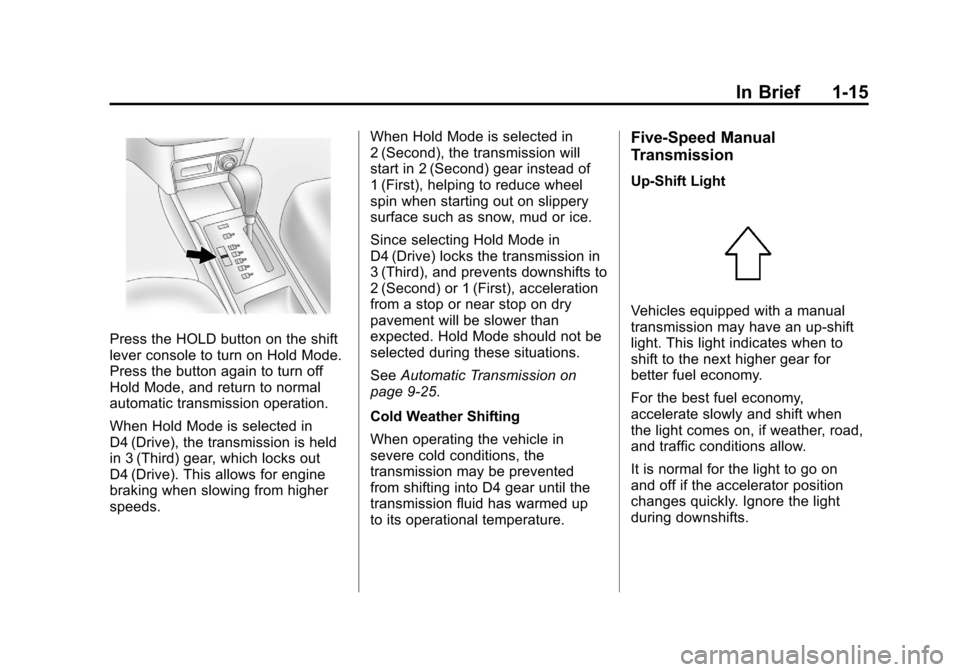
Press the HOLD button on the shift
lever console to turn on Hold Mode.
Press the button again to turn off
Hold Mode, and return to normal
automatic transmission operation.
When Hold Mode is selected in
D4 (Drive), the transmission is held
in 3 (Third) gear, which locks out
D4 (Drive). This allows for engine
braking when slowing from higher
speeds.When Hold Mode is selected in
2 (Second), the transmission will
start in 2 (Second) gear instead of
1 (First), helping to reduce wheel
spin when starting out on slippery
surface such as snow, mud or ice.
Since selecting Hold Mode in
D4 (Drive) locks the transmission in
3 (Third), and prevents downshifts to
2 (Second) or 1 (First), acceleration
from a stop or near stop on dry
pavement will be slower than
expected. Hold Mode should not be
selected during these situations.
See
Automatic Transmission on
page 9‑25.
Cold Weather Shifting
When operating the vehicle in
severe cold conditions, the
transmission may be prevented
from shifting into D4 gear until the
transmission fluid has warmed up
to its operational temperature.
Five-Speed Manual
Transmission
Up‐Shift Light
Vehicles equipped with a manual
transmission may have an up-shift
light. This light indicates when to
shift to the next higher gear for
better fuel economy.
For the best fuel economy,
accelerate slowly and shift when
the light comes on, if weather, road,
and traffic conditions allow.
It is normal for the light to go on
and off if the accelerator position
changes quickly. Ignore the light
during downshifts.
Page 27 of 328
Black plate (21,1)Chevrolet Aveo Owner Manual - 2011
In Brief 1-21
Performance and
Maintenance
Tire Pressure Monitor
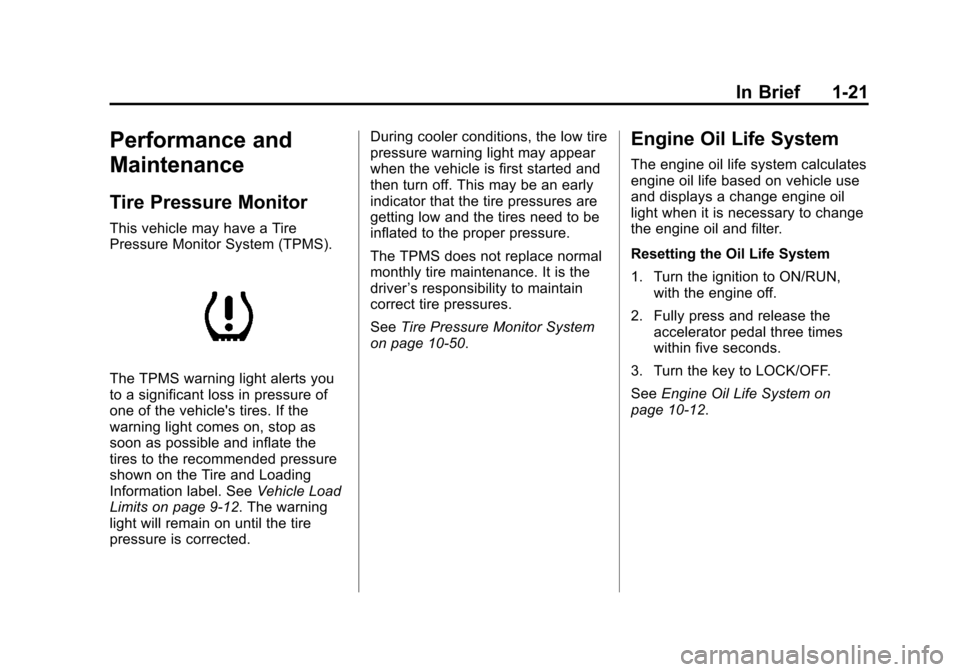
This vehicle may have a Tire
Pressure Monitor System (TPMS).
The TPMS warning light alerts you
to a significant loss in pressure of
one of the vehicle's tires. If the
warning light comes on, stop as
soon as possible and inflate the
tires to the recommended pressure
shown on the Tire and Loading
Information label. SeeVehicle Load
Limits on page 9‑12. The warning
light will remain on until the tire
pressure is corrected. During cooler conditions, the low tire
pressure warning light may appear
when the vehicle is first started and
then turn off. This may be an early
indicator that the tire pressures are
getting low and the tires need to be
inflated to the proper pressure.
The TPMS does not replace normal
monthly tire maintenance. It is the
driver
’s responsibility to maintain
correct tire pressures.
See Tire Pressure Monitor System
on page 10‑50.
Engine Oil Life System
The engine oil life system calculates
engine oil life based on vehicle use
and displays a change engine oil
light when it is necessary to change
the engine oil and filter.
Resetting the Oil Life System
1. Turn the ignition to ON/RUN, with the engine off.
2. Fully press and release the accelerator pedal three times
within five seconds.
3. Turn the key to LOCK/OFF.
See Engine Oil Life System on
page 10‑12.
Page 31 of 328
Black plate (25,1)Chevrolet Aveo Owner Manual - 2011
In Brief 1-25
OnStar service can’t work unless
your vehicle is in a place where
OnStar has an agreement with a
wireless service provider for service
in that area, and the wireless
service provider has coverage,
network capacity, reception, and
technology compatible with OnStar's
service. Service involving location
information about your vehicle can’t
work unless GPS signals are
available, unobstructed, and
compatible with the OnStar
hardware. The vehicle has to have
a working electrical system and
adequate battery power for the
OnStar equipment to operate.
OnStar service may not work if the
OnStar equipment isn’t properly
installed or you haven’t maintained
it and your vehicle is in good
working order and in compliance
with all government regulations.If you try to add, connect, or modify
any equipment or software in your
vehicle, OnStar service may not
work. Other problems OnStar can’t
control may prevent service to you,
such as hills, tall buildings, tunnels,
weather, electrical system design
and architecture of your vehicle,
damage to important parts of your
vehicle in a crash, or wireless phone
network congestion or jamming.
See
Radio Frequency Statement on
page 13‑16 for information
regarding Part 15 of the Federal
Communications Commission (FCC)
rules and Industry Canada
Standards RSS-210/220/310.Your Responsibility
Increase the volume of the radio if
the OnStar advisor cannot be heard.
If the light next to the OnStar
buttons is red, the system may not
be functioning properly. Push the
Qbutton and request a vehicle
diagnostic. If the light appears clear
(no light appears), your OnStar
subscription has expired and all
services have been deactivated.
Push the
Qbutton to confirm that
the OnStar equipment is active.