change wheel CHEVROLET BLAZER 2021 Owner's Guide
[x] Cancel search | Manufacturer: CHEVROLET, Model Year: 2021, Model line: BLAZER, Model: CHEVROLET BLAZER 2021Pages: 380, PDF Size: 9.1 MB
Page 238 of 380
Chevrolet Blazer Owner Manual (GMNA-Localizing-U.S./Canada/Mexico-
14608203) - 2021 - CRC - 10/29/20
Driving and Operating 237
When the vehicle is started, both outside
mirror LCA displays will briefly come on to
indicate the system is operating. When the
vehicle is in a forward gear, the left or right
outside mirror display will light up if a
moving vehicle is detected in the next lane
over in that blind zone or rapidly
approaching that zone. If the turn signal is
activated in the same direction as a
detected vehicle, this display will flash as an
extra warning not to change lanes.
LCA can be disabled through vehicle
personalization. When you disable LCA, Side
Blind Zone Alert is also disabled. See
“Collision/Detection Systems”underVehicle
Personalization 0113. If LCA is disabled by
the driver, the LCA mirror displays will not
light up.
When the System Does Not Seem to
Work Properly
The LCA system requires some driving for
the system to calibrate to maximum
performance. This calibration may occur
more quickly if the vehicle is driving on a
straight highway road with traffic and
roadside objects (e.g., guardrails, barriers). LCA displays may not come on when
passing a vehicle quickly, for a stopped
vehicle, or when towing a trailer. The LCA
detection zones that extend back from the
side of the vehicle do not move further back
when a trailer is towed. Use caution while
changing lanes when towing a trailer. LCA
may alert to objects attached to the vehicle,
such as a trailer, bicycle, or object extending
out to either side of the vehicle. Attached
objects may also interfere with the
detection of vehicles. This is normal system
operation; the vehicle does not need service.
LCA may not always alert the driver to
vehicles in the next lane over, especially in
wet conditions or when driving on sharp
curves. The system does not need to be
serviced. The system may light up due to
guardrails, signs, trees, shrubs, and other
non-moving objects. This is normal system
operation; the vehicle does not need service.
LCA may not operate when the LCA sensors
in the left or right corners of the rear
bumper are covered with mud, dirt, snow,
ice, or slush, or in heavy rainstorms. For
cleaning instructions, see "Washing the
Vehicle" under
Exterior Care0323. If the DIC
still displays the system unavailable message after cleaning both sides of the
vehicle toward the rear corners of the
vehicle, see your dealer.
If the LCA displays do not light up when
moving vehicles are in the side blind zone or
are rapidly approaching this zone and the
system is clean, the system may need
service. Take the vehicle to your dealer.
Radio Frequency Information
See
Radio Frequency Statement 0357.
Lane Keep Assist (LKA)
If equipped, LKA may help avoid crashes due
to unintentional lane departures. This
system uses a camera to detect lane
markings between 60 km/h (37 mph) and
180 km/h (112 mph). It may assist by gently
turning the steering wheel if the vehicle
approaches a detected lane marking. It may
also provide a Lane Departure Warning
(LDW) alert if the vehicle crosses a detected
lane marking. LKA can be overridden by
turning the steering wheel. This system is
not intended to keep the vehicle centered in
the lane. LKA will not assist and alert if the
turn signal is active in the direction of lane
departure, or if it detects that you are
accelerating, braking or actively steering.
Page 265 of 380
Chevrolet Blazer Owner Manual (GMNA-Localizing-U.S./Canada/Mexico-
14608203) - 2021 - CRC - 10/29/20
264 Vehicle Care
What to Do with Used Oil
Used engine oil contains certain elements
that can be unhealthy for your skin and
could even cause cancer. Do not let used oil
stay on your skin for very long. Clean your
skin and nails with soap and water, or a
good hand cleaner. Wash or properly
dispose of clothing or rags containing used
engine oil. See the manufacturer's warnings
about the use and disposal of oil products.
Used oil can be a threat to the environment.
If you change your own oil, be sure to drain
all the oil from the filter before disposal.
Never dispose of oil by putting it in the
trash or pouring it on the ground, into
sewers, or into streams or bodies of water.
Recycle it by taking it to a place that
collects used oil.
Engine Oil Life System
When to Change Engine Oil
This vehicle has a computer system that
indicates when to change the engine oil and
filter. This is based on a combination of
factors which include engine revolutions,
engine temperature, and miles driven. Based
on driving conditions, the mileage at which
an oil change is indicated can varyconsiderably. For the oil life system to work
properly, the system must be reset every
time the oil is changed.
When the system has calculated that oil life
has been diminished, it indicates that an oil
change is necessary. A CHANGE ENGINE OIL
SOON message comes on. Change the oil as
soon as possible within the next 1 000 km
(600 mi). It is possible that, if driving under
the best conditions, the oil life system
might indicate that an oil change is not
necessary for up to a year. The engine oil
and filter must be changed at least once a
year and, at this time, the system must be
reset. Your dealer has trained service people
who will perform this work and reset the
system. It is also important to check the oil
regularly over the course of an oil drain
interval and keep it at the proper level.
If the system is ever reset accidentally, the
oil must be changed at 5 000 km (3,000 mi)
since the last oil change. Remember to reset
the oil life system whenever the oil is
changed.
How to Reset the Engine Oil Life System
Reset the system whenever the engine oil is
changed so that the system can calculate
the next engine oil change. To reset the
system:
1. Display the REMAINING OIL LIFE on the DIC. See Driver Information Center (DIC)
(Base and Midlevel) 0107 or
Driver Information Center (DIC) (Uplevel)
0 110.
2. Press and hold the thumbwheel on the DIC while the Oil Life display is active.
3. Confirm yes, and the oil life will change to 100%.
The oil life system can also be reset as
follows: 1. Place the ignition in Service Mode. See Ignition Positions 0200.
2. Display REMAINING OIL LIFE on the DIC menu. See Driver Information Center
(DIC) (Base and Midlevel) 0107 or
Driver Information Center (DIC) (Uplevel)
0 110.
3. Fully press and release the accelerator pedal three times within five seconds.
4. If the display changes to 100%, the system is reset.
Page 266 of 380
Chevrolet Blazer Owner Manual (GMNA-Localizing-U.S./Canada/Mexico-
14608203) - 2021 - CRC - 10/29/20
Vehicle Care 265
If the CHANGE ENGINE OIL SOON message
comes back on when the vehicle is started,
the engine oil life system has not been
reset. Repeat the procedure.
Automatic Transmission Fluid
It is not necessary to check the transmission
fluid level. A transmission fluid leak is the
only reason for fluid loss. If a leak occurs,
take the vehicle to the dealer and have it
repaired as soon as possible.
Change the fluid at the intervals listed in
Maintenance Schedule0332, and be sure to
use the transmission fluid listed in
Recommended Fluids and Lubricants 0340.
Caution
Use of the incorrect automatic
transmission fluid may damage the
vehicle, and the damage may not be
covered by the vehicle warranty. Always
use the correct automatic transmission
fluid. See Recommended Fluids and
Lubricants 0340.
If you need to check the transmission fluid
level, take the vehicle to your dealer.
Engine Air Filter Life System
If equipped, this feature provides the engine
air filter’s remaining life and best timing for
a change. The timing to change an engine
air filter depends on driving and
environmental conditions.
When to Change the Engine Air Filter
When the Driver Information Center (DIC)
displays a message to replace the engine air
filter at the next oil change, follow this
timing.
When the DIC displays a message to replace
the engine air filter soon, replace the engine
air filter at the earliest convenience.
The system must be reset after the engine
air filter is changed.
If the DIC displays a message to check the
engine air filter system, see your dealer.
How to Reset the Engine Air Filter Life
System
To reset: 1. Place the vehicle in P (Park). 2. Display the Air Filter Life on the DIC. See
Driver Information Center (DIC) (Base and
Midlevel) 0107 or
Driver Information Center (DIC) (Uplevel)
0 110.
3. Press
Tto move to the Reset/Disable
display area. Select Reset then press the
thumbwheel.
4. Press the thumbwheel to confirm the reset.
Engine Air Cleaner/Filter
The engine air cleaner/filter is in the engine
compartment. See Engine Compartment
Overview 0257.
When to Inspect the Engine Air Cleaner/
Filter
If the vehicle is not equipped with the
engine air filter life system, see
Maintenance Schedule 0332 for intervals on
inspecting and replacing the engine air
cleaner/filter.
How to Inspect/Replace the Engine Air
Cleaner/Filter
Do not start the engine or have the engine
running with the engine air cleaner/filter
housing open. Before removing the engine
Page 274 of 380
Chevrolet Blazer Owner Manual (GMNA-Localizing-U.S./Canada/Mexico-
14608203) - 2021 - CRC - 10/29/20
Vehicle Care 273
Caution (Continued)
.When using concentrated washer fluid,
follow the manufacturer instructions
for adding water.
.Fill the washer fluid tank only
three-quarters full when it is very cold.
This allows for fluid expansion if
freezing occurs, which could damage
the tank if it is completely full.
Brakes
Disc brake linings have built-in wear
indicators that make a high-pitched warning
sound when the brake linings are worn and
new linings are needed. The sound can come
and go or can be heard all the time when
the vehicle is moving, except when applying
the brake pedal firmly.
{Warning
The brake wear warning sound means
that soon the brakes will not work well.
That could lead to a crash. When the
brake wear warning sound is heard, have
the vehicle serviced.
Caution
Continuing to drive with worn-out brake
linings could result in costly brake
repairs.
Some driving conditions or climates can
cause a brake squeal when the brakes are
first applied, clearing up following several
applications. This does not mean something
is wrong with the brakes.
Properly torqued wheel nuts are necessary
to help prevent brake pulsation. When tires
are rotated, inspect brake linings for wear
and evenly tighten wheel nuts in the proper
sequence to torque specifications. See
Capacities and Specifications 0345.
Brake pads should be replaced as complete
axle sets.
Brake Pedal Travel
See your dealer if the brake pedal does not
return to normal height, or if there is a
rapid increase in pedal travel. This could be
a sign that brake service may be required.
Replacing Brake System Parts
Always replace brake system parts with
new, approved replacement parts. If this is
not done, the brakes may not work
properly. The braking performance can
change in many ways if the wrong brake
parts are installed or if parts are improperly
installed.
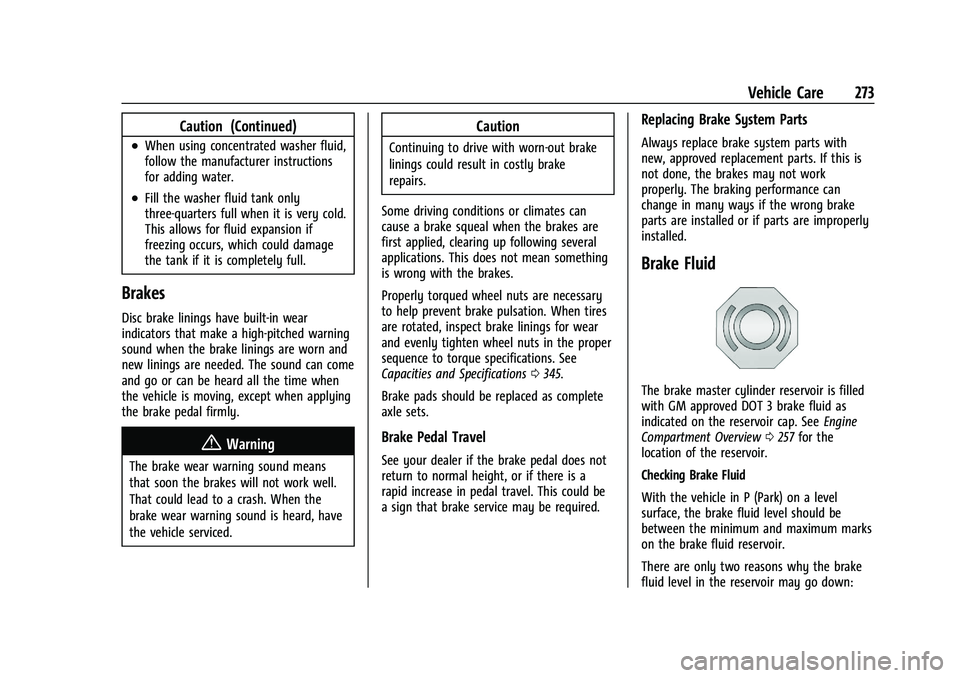
Brake Fluid
The brake master cylinder reservoir is filled
with GM approved DOT 3 brake fluid as
indicated on the reservoir cap. See Engine
Compartment Overview 0257 for the
location of the reservoir.
Checking Brake Fluid
With the vehicle in P (Park) on a level
surface, the brake fluid level should be
between the minimum and maximum marks
on the brake fluid reservoir.
There are only two reasons why the brake
fluid level in the reservoir may go down:
Page 290 of 380
Chevrolet Blazer Owner Manual (GMNA-Localizing-U.S./Canada/Mexico-
14608203) - 2021 - CRC - 10/29/20
Vehicle Care 289
With winter tires, there may be decreased
dry road traction, increased road noise, and
shorter tread life. After changing to winter
tires, be alert for changes in vehicle
handling and braking.
If using winter tires:
.Use tires of the same brand and tread
type on all four wheel positions.
.Use only radial ply tires of the same size,
load range, and speed rating as the
original equipment tires.
Winter tires with the same speed rating as
the original equipment tires may not be
available for H, V, W, Y, and ZR speed rated
tires. If winter tires with a lower speed
rating are chosen, never exceed the tire's
maximum speed capability.
Summer Tires
This vehicle may come with 235/55R20 high
performance summer tires. These tires have
a special tread and compound that are
optimized for maximum dry and wet road
performance. This special tread and
compound will have decreased performance
in cold climates, and on ice and snow. It is
recommended that winter tires be installed
on the vehicle if frequent driving at temperatures below approximately 5 °C
(40 °F) or on ice or snow covered roads is
expected. See
Winter Tires0288.
Caution
High performance summer tires have
rubber compounds that lose flexibility
and may develop surface cracks in the
tread area at temperatures below −7 °C
(20 °F). Always store high performance
summer tires indoors and at
temperatures above −7 °C (20 °F) when
not in use. If the tires have been
subjected to −7 °C (20 °F) or less, let them
warm up in a heated space to at least
5 °C (40 °F) for 24 hours or more before
being installed or driving a vehicle on
which they are installed. Do not apply
heat or blow heated air directly on the
tires. Always inspect tires before use. See
Tire Inspection 0300.
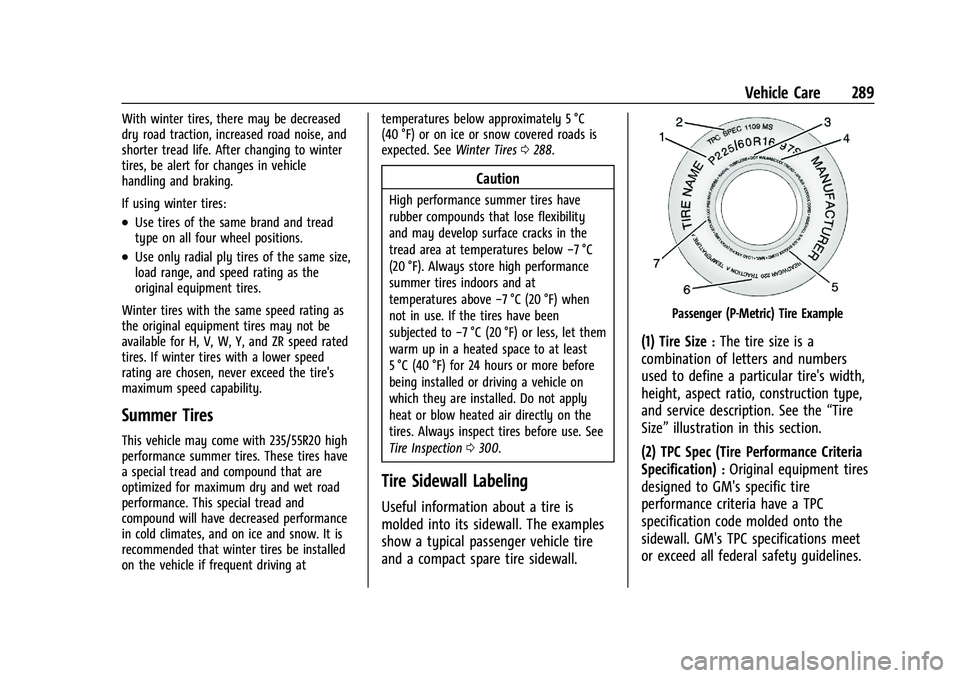
Tire Sidewall Labeling
Useful information about a tire is
molded into its sidewall. The examples
show a typical passenger vehicle tire
and a compact spare tire sidewall.
Passenger (P-Metric) Tire Example
(1) Tire Size:The tire size is a
combination of letters and numbers
used to define a particular tire's width,
height, aspect ratio, construction type,
and service description. See the “Tire
Size” illustration in this section.
(2) TPC Spec (Tire Performance Criteria
Specification)
:Original equipment tires
designed to GM's specific tire
performance criteria have a TPC
specification code molded onto the
sidewall. GM's TPC specifications meet
or exceed all federal safety guidelines.
Page 302 of 380
Chevrolet Blazer Owner Manual (GMNA-Localizing-U.S./Canada/Mexico-
14608203) - 2021 - CRC - 10/29/20
Vehicle Care 301
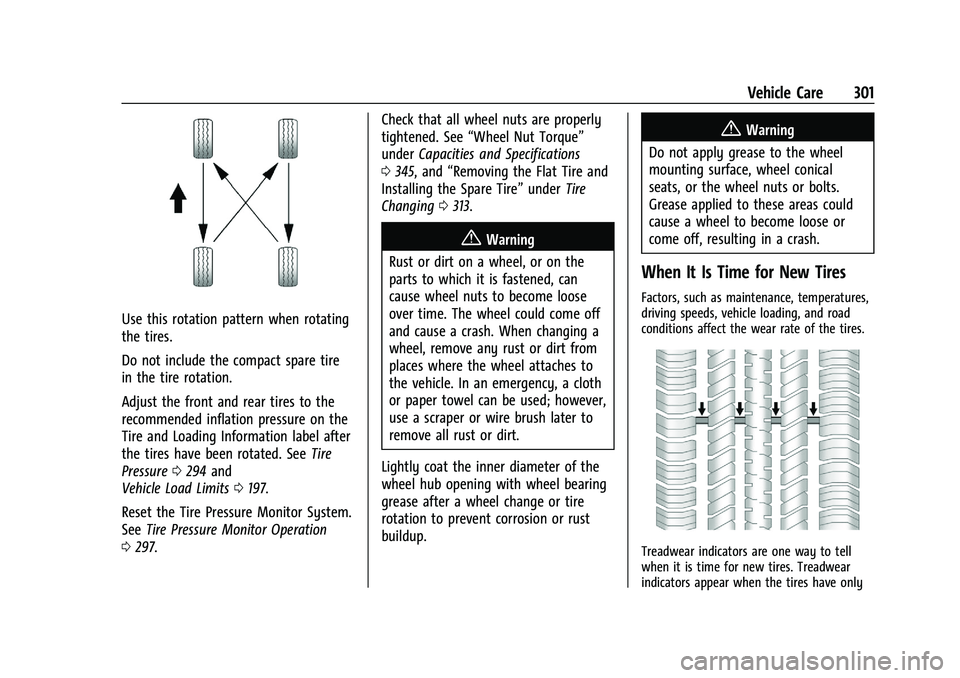
Use this rotation pattern when rotating
the tires.
Do not include the compact spare tire
in the tire rotation.
Adjust the front and rear tires to the
recommended inflation pressure on the
Tire and Loading Information label after
the tires have been rotated. SeeTire
Pressure 0294 and
Vehicle Load Limits 0197.
Reset the Tire Pressure Monitor System.
See Tire Pressure Monitor Operation
0 297. Check that all wheel nuts are properly
tightened. See
“Wheel Nut Torque”
under Capacities and Specifications
0 345, and “Removing the Flat Tire and
Installing the Spare Tire” underTire
Changing 0313.
{Warning
Rust or dirt on a wheel, or on the
parts to which it is fastened, can
cause wheel nuts to become loose
over time. The wheel could come off
and cause a crash. When changing a
wheel, remove any rust or dirt from
places where the wheel attaches to
the vehicle. In an emergency, a cloth
or paper towel can be used; however,
use a scraper or wire brush later to
remove all rust or dirt.
Lightly coat the inner diameter of the
wheel hub opening with wheel bearing
grease after a wheel change or tire
rotation to prevent corrosion or rust
buildup.
{Warning
Do not apply grease to the wheel
mounting surface, wheel conical
seats, or the wheel nuts or bolts.
Grease applied to these areas could
cause a wheel to become loose or
come off, resulting in a crash.
When It Is Time for New Tires
Factors, such as maintenance, temperatures,
driving speeds, vehicle loading, and road
conditions affect the wear rate of the tires.
Treadwear indicators are one way to tell
when it is time for new tires. Treadwear
indicators appear when the tires have only
Page 308 of 380
Chevrolet Blazer Owner Manual (GMNA-Localizing-U.S./Canada/Mexico-
14608203) - 2021 - CRC - 10/29/20
Vehicle Care 307
{Warning
Changing a tire can be dangerous. The
vehicle can slip off the jack and roll over
or fall causing injury or death. Find a
level place to change the tire. To help
prevent the vehicle from moving:1. Set the parking brake firmly.
2. Put an automatic transmission in P (Park) or a manual transmission in
1 (First) or R (Reverse).
3. Turn off the engine and do not restart while the vehicle is raised.
4. Do not allow passengers to remain in the vehicle.
5. Place wheel blocks, if equipped, on both sides of the tire at the opposite
corner of the tire being changed.
This vehicle may come with a jack and spare
tire or a tire sealant and compressor kit. To
use the jacking equipment to change a spare
tire safely, follow the instructions below.
Then see Tire Changing 0313. To use the
tire sealant and compressor kit, see Tire
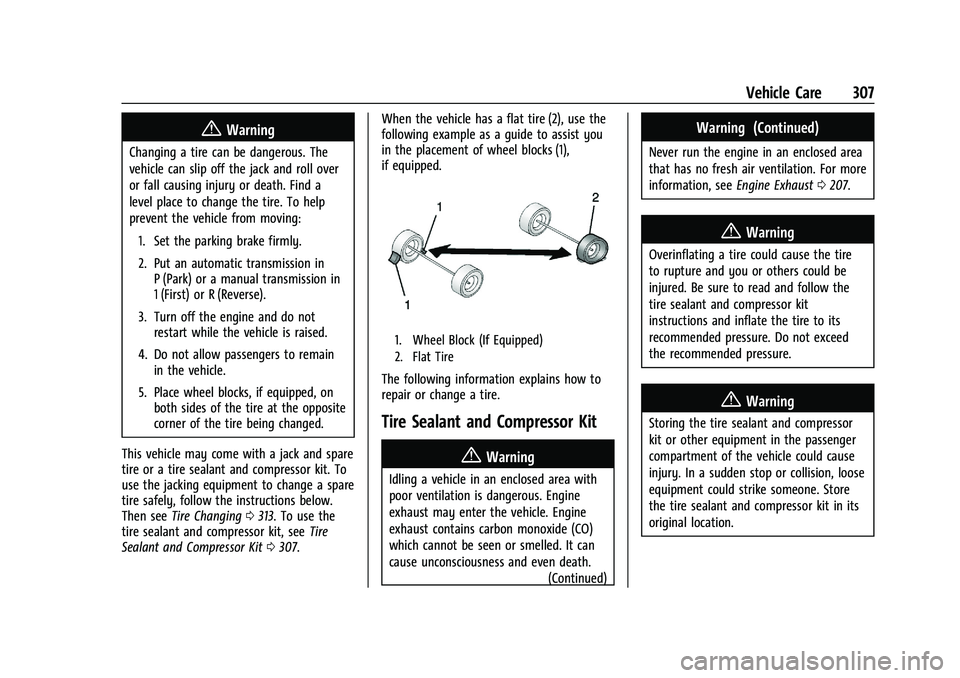
Sealant and Compressor Kit 0307. When the vehicle has a flat tire (2), use the
following example as a guide to assist you
in the placement of wheel blocks (1),
if equipped.
1. Wheel Block (If Equipped)
2. Flat Tire
The following information explains how to
repair or change a tire.
Tire Sealant and Compressor Kit
{Warning
Idling a vehicle in an enclosed area with
poor ventilation is dangerous. Engine
exhaust may enter the vehicle. Engine
exhaust contains carbon monoxide (CO)
which cannot be seen or smelled. It can
cause unconsciousness and even death.
(Continued)
Warning (Continued)
Never run the engine in an enclosed area
that has no fresh air ventilation. For more
information, seeEngine Exhaust0207.
{Warning
Overinflating a tire could cause the tire
to rupture and you or others could be
injured. Be sure to read and follow the
tire sealant and compressor kit
instructions and inflate the tire to its
recommended pressure. Do not exceed
the recommended pressure.
{Warning
Storing the tire sealant and compressor
kit or other equipment in the passenger
compartment of the vehicle could cause
injury. In a sudden stop or collision, loose
equipment could strike someone. Store
the tire sealant and compressor kit in its
original location.
Page 314 of 380
Chevrolet Blazer Owner Manual (GMNA-Localizing-U.S./Canada/Mexico-
14608203) - 2021 - CRC - 10/29/20
Vehicle Care 313
Storing the Tire Sealant and
Compressor Kit
To store the tire sealant and compressor kit,
reverse the steps for removing it.
Tire Changing
Removing the Spare Tire and Tools
To access the spare tire and tools:1. Open the liftgate. See Liftgate018.
2. Remove the cargo management system divider, if equipped. See “Rail and Divider
Option” underCargo Management
System 079.
3. Lift the load floor. Use the hook to hold the load floor open. See Cargo
Management System 079.
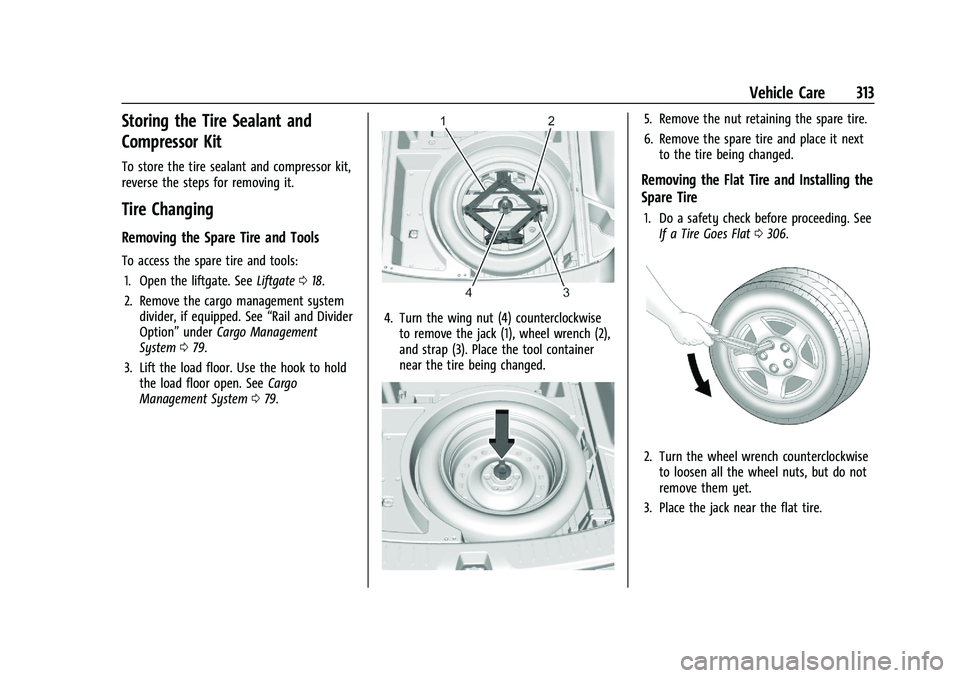
4. Turn the wing nut (4) counterclockwise
to remove the jack (1), wheel wrench (2),
and strap (3). Place the tool container
near the tire being changed.
5. Remove the nut retaining the spare tire.
6. Remove the spare tire and place it nextto the tire being changed.
Removing the Flat Tire and Installing the
Spare Tire
1. Do a safety check before proceeding. SeeIf a Tire Goes Flat 0306.
2. Turn the wheel wrench counterclockwise
to loosen all the wheel nuts, but do not
remove them yet.
3. Place the jack near the flat tire.
Page 353 of 380
Chevrolet Blazer Owner Manual (GMNA-Localizing-U.S./Canada/Mexico-
14608203) - 2021 - CRC - 10/29/20
352 Customer Information
H:Manage your profile and payment
information. View your GM Rewards Card
earnings and My Chevrolet Rewards points.
F: Chat with online help representatives.
Visit my.chevrolet.com and create an
account today.
Chevrolet Owner Centre (Canada)
mychevrolet.ca
Visit the Chevrolet Owner Centre at
mychevrolet.ca (English) or my.chevrolet.ca
(French) to access similar benefits to the
U.S. site.
GM Mobility Reimbursement
Program
This program is available to qualified
applicants for cost reimbursement, up to
certain limits, of eligible aftermarket adaptive equipment required for the vehicle,
such as hand controls or a wheelchair/
scooter lift for the vehicle.
To learn about the GM Mobility program,
see www.gmmobility.com or call the GM
Mobility Assistance Center at 1-800-323-9935.
Text Telephone (TTY) users, call
1-800-833-9935.
General Motors of Canada also has a
Mobility program. See www.gm.ca, or call
1-800-GM-DRIVE (800-463-7483) for details.
TTY users call 1-800-263-3830.
Roadside Assistance Program
For U.S.-purchased vehicles, call
1-800-243-8872. (Text Telephone (TTY):
1-888-889-2438.)
For Canadian-purchased vehicles, call
1-800-268-6800.
Service is available 24 hours a day, 365 days
a year.
Calling for Assistance
When calling Roadside Assistance, have the
following information ready:
.Your name, home address, and home
telephone number
.Telephone number of your location
.Location of the vehicle
.Model, year, color, and license plate
number of the vehicle
.Odometer reading, Vehicle Identification
Number (VIN), and delivery date of the
vehicle
.Description of the problem
Coverage
Services are provided for the duration of the
vehicle’s powertrain warranty.
In the U.S., anyone driving the vehicle is
covered. In Canada, a person driving the
vehicle without permission from the owner
is not covered.
Roadside Assistance is not a part of the New
Vehicle Limited Warranty. General Motors
North America and Chevrolet reserve the
right to make any changes or discontinue
the Roadside Assistance program at any
time without notification.
General Motors North America and Chevrolet
reserve the right to limit services or
payment to an owner or driver if they
decide the claims are made too often, or the
same type of claim is made many times.
Page 369 of 380
Chevrolet Blazer Owner Manual (GMNA-Localizing-U.S./Canada/Mexico-
14608203) - 2021 - CRC - 10/29/20
368 Index
IndexA
Accessories and Modifications . . . . . . . . . . . 254
Accessory Power . . . . . . . . . . . . . . . . . . . . . . . . . 205
Active Fuel Management . . . . . . . . . . . . . . . . 206
Adaptive Cruise Control . . . . . . . . . . . . . . . . . . . 217
Add-On Electrical Equipment . . . . . . . . . . . . . 252
Additional InformationOnStar . . . . . . . . . . . . . . . . . . . . . . . . . . . . . . . . . 361
Additional Maintenance and Care . . . . . . . . 337
Adjustments Lumbar, Front Seats . . . . . . . . . . . . . . . . . . . . 36
Agreements Trademarks and License . . . . . . . . . . . . . . . . 173
Air Cleaner/Filter, Engine . . . . . . . . . . . . . . . . 265
Air Conditioning . . . . . . . . . . . . . . . . . . . . . . . . . .182
Air Filter
Life System . . . . . . . . . . . . . . . . . . . . . . . . . . . . 265
Air Filter, Passenger Compartment . . . . . . . 186
Air Vents . . . . . . . . . . . . . . . . . . . . . . . . . . . . . . . . 186
Airbag System Check . . . . . . . . . . . . . . . . . . . . . . . . . . . . . . . . . . . 59
How Does an Airbag Restrain? . . . . . . . . . . 54
Passenger Sensing System . . . . . . . . . . . . . . 55
What Makes an Airbag Inflate? . . . . . . . . . 54
What Will You See after an AirbagInflates? . . . . . . . . . . . . . . . . . . . . . . . . . . . . . . 54
When Should an Airbag Inflate? . . . . . . . . 53
Where Are the Airbags? . . . . . . . . . . . . . . . . 52 Airbags
Adding Equipment to the Vehicle . . . . . . . 59
Passenger Status Indicator . . . . . . . . . . . . . . 99
Readiness Light . . . . . . . . . . . . . . . . . . . . . . . . . 98
Servicing Airbag-Equipped Vehicles . . . . . . 58
System Check . . . . . . . . . . . . . . . . . . . . . . . . . . . 50
Alarm
Vehicle Security . . . . . . . . . . . . . . . . . . . . . . . . 23
Alert Lane Change . . . . . . . . . . . . . . . . . . . . . . . . . . . 236
Side Blind Zone (SBZA) . . . . . . . . . . . . . . . . . 236
All-Season Tires . . . . . . . . . . . . . . . . . . . . . . . . . . 288
All-Wheel Drive . . . . . . . . . . . . . . . . . . . . . . 210, 275
AM-FM Radio . . . . . . . . . . . . . . . . . . . . . . . . . . . . .134
Antenna Multi-band . . . . . . . . . . . . . . . . . . . . . . . . . . . . . . 137
Antilock Brake System (ABS) . . . . . . . . . . . . . 210 Warning Light . . . . . . . . . . . . . . . . . . . . . . . . . 102
Appearance Care Exterior . . . . . . . . . . . . . . . . . . . . . . . . . . . . . . . . 323
Interior . . . . . . . . . . . . . . . . . . . . . . . . . . . . . . . . 327
Apple CarPlay and Android Auto . . . . . . . . . 163
Armrest Storage . . . . . . . . . . . . . . . . . . . . . . . . . . .77
Assistance Program, Roadside . . . . . . . . . . . . 352
Assistance Systems for Driving . . . . . . . . . . 230
Assistance Systems for Parking and Backing . . . . . . . . . . . . . . . . . . . . . . . . . . . . . . . . 227