fold seats CHEVROLET BLAZER 2022 Owners Manual
[x] Cancel search | Manufacturer: CHEVROLET, Model Year: 2022, Model line: BLAZER, Model: CHEVROLET BLAZER 2022Pages: 386, PDF Size: 13.37 MB
Page 27 of 386
Chevrolet Blazer Owner Manual (GMNA-Localizing-U.S./Canada/Mexico-
15165663) - 2022 - CRC - 4/27/21
26 Keys, Doors, and Windows
2. Press the arrows on the control pad tomove the mirror in the desired direction.
3. Adjust each outside mirror so that a little of the vehicle and the area behind it can
be seen.
4. Press
jor|again to deselect the
mirror.
Memory Mirrors
The vehicle may have memory mirrors. See
Memory Seats 038.
Lane Change Alert (LCA)
The vehicle may have LCA. See Lane Change
Alert (LCA) 0241.
Side Blind Zone Alert
The vehicle may have Side Blind Zone Alert.
See Side Blind Zone Alert (SBZA) 0241.
Folding Mirrors
Manual Folding Mirrors
The mirrors can be folded inward toward
the vehicle to prevent damage when going
through an automatic car wash. Push the
mirror outward to return it to the original
position.
Heated Mirrors
If equipped, the heated outside mirrors turn
on when the rear window defogger is on
and help to clear fog or frost from the
surface of the mirrors.
1:This button is on the climate control
panel.
See “Rear Window Defogger” underDual
Automatic Climate Control System 0186.
Automatic Dimming Mirror
The vehicle has an automatic dimming
outside mirror on the driver side. The mirror
will adjust for the glare of headlamps
behind you.
Reverse Tilt Mirrors
If equipped with reverse tilt mirrors and
memory seats, the passenger and/or driver
mirror tilts to a preselected position when
the vehicle is in R (Reverse). This allows the
curb to be seen when parallel parking.
The mirror(s) may move from their tilted
position when:
.The vehicle is shifted out of R (Reverse),
or remains in R (Reverse) for about
30 seconds.
.The vehicle is turned off.
.The vehicle is driven in R (Reverse) above
a set speed.
To turn this feature on or off, see Vehicle
Personalization 0117.
Interior Mirrors
Interior Rearview Mirrors
Adjust the rearview mirror for a clear view
of the area behind your vehicle.
Do not spray glass cleaner directly on the
mirror. Use a soft towel dampened with
water.
Manual Rearview Mirror
If equipped, push the tab forward for
daytime use and pull it rearward for
nighttime use to avoid glare of the
headlamps from behind.
Automatic Dimming Rearview
Mirror
If equipped, automatic dimming reduces the
glare of headlamps from behind. The
dimming feature comes on when the vehicle
is started.
Page 34 of 386

Chevrolet Blazer Owner Manual (GMNA-Localizing-U.S./Canada/Mexico-
15165663) - 2022 - CRC - 4/27/21
Seats and Restraints 33
Seats and Restraints
Head Restraints
Head Restraints . . . . . . . . . . . . . . . . . . . . . . . . . 33
Front Seats
Seat Adjustment . . . . . . . . . . . . . . . . . . . . . . . . 35
Power Seat Adjustment . . . . . . . . . . . . . . . . 36
Reclining Seatbacks . . . . . . . . . . . . . . . . . . . . . 36
Lumbar Adjustment . . . . . . . . . . . . . . . . . . . . 38
Memory Seats . . . . . . . . . . . . . . . . . . . . . . . . . . 38
Heated and Ventilated Front Seats . . . . . 41
Rear Seats
Rear Seats . . . . . . . . . . . . . . . . . . . . . . . . . . . . . . 42
Heated Rear Seats . . . . . . . . . . . . . . . . . . . . . . 44
Seat Belts
Seat Belts . . . . . . . . . . . . . . . . . . . . . . . . . . . . . . 44
Buckle To Drive . . . . . . . . . . . . . . . . . . . . . . . . . 45
How to Wear Seat Belts Properly . . . . . . 46
Lap-Shoulder Belt . . . . . . . . . . . . . . . . . . . . . . . 48
Seat Belt Use During Pregnancy . . . . . . . . 50
Seat Belt Extender . . . . . . . . . . . . . . . . . . . . . . 50
Safety System Check . . . . . . . . . . . . . . . . . . . . 51
Seat Belt Care . . . . . . . . . . . . . . . . . . . . . . . . . . 51
Replacing Seat Belt System Parts after aCrash . . . . . . . . . . . . . . . . . . . . . . . . . . . . . . . . . . 51
Airbag System
Airbag System . . . . . . . . . . . . . . . . . . . . . . . . . . 52
Where Are the Airbags? . . . . . . . . . . . . . . . . 53
When Should an Airbag Inflate? . . . . . . . . 54
What Makes an Airbag Inflate? . . . . . . . . . 55
How Does an Airbag Restrain? . . . . . . . . . . 55
What Will You See after an AirbagInflates? . . . . . . . . . . . . . . . . . . . . . . . . . . . . . . 56
Passenger Sensing System . . . . . . . . . . . . . . 57
Servicing the Airbag-Equipped Vehicle . . . . . . . . . . . . . . . . . . . . . . . . . . . . . . . 60
Adding Equipment to the Airbag-Equipped Vehicle . . . . . . . . . . . . . . 60
Airbag System Check . . . . . . . . . . . . . . . . . . . 61
Replacing Airbag System Parts after a Crash . . . . . . . . . . . . . . . . . . . . . . . . . . . . . . . . . 61
Child Restraints
Older Children . . . . . . . . . . . . . . . . . . . . . . . . . . 62
Infants and Young Children . . . . . . . . . . . . . 63
Child Restraint Systems . . . . . . . . . . . . . . . . 65
Where to Put the Restraint . . . . . . . . . . . . . 67
Lower Anchors and Tethers for Children(LATCH System) . . . . . . . . . . . . . . . . . . . . . . 68
Replacing LATCH System Parts After a Crash . . . . . . . . . . . . . . . . . . . . . . . . . . . . . . . . . 74
Securing Child Restraints (With the Seat Belts in the Rear Seat) . . . . . . . . . . . . . . . . 74
Securing Child Restraints (With the Seat Belts in the Front Seat) . . . . . . . . . . . . . . . 75
Head Restraints
The vehicle’s front seats have adjustable
head restraints in the outboard seating
positions.
{Warning
With head restraints that are not
installed and adjusted properly, there is a
greater chance that occupants will suffer
a neck/spinal injury in a crash. Do not
drive until the head restraints for all
occupants are installed and adjusted
properly.
If your vehicle has rear head restraints
that fold down, always return them to
the full upright position whenever an
occupant is seated in the seat.
Page 35 of 386
Chevrolet Blazer Owner Manual (GMNA-Localizing-U.S./Canada/Mexico-
15165663) - 2022 - CRC - 4/27/21
34 Seats and Restraints
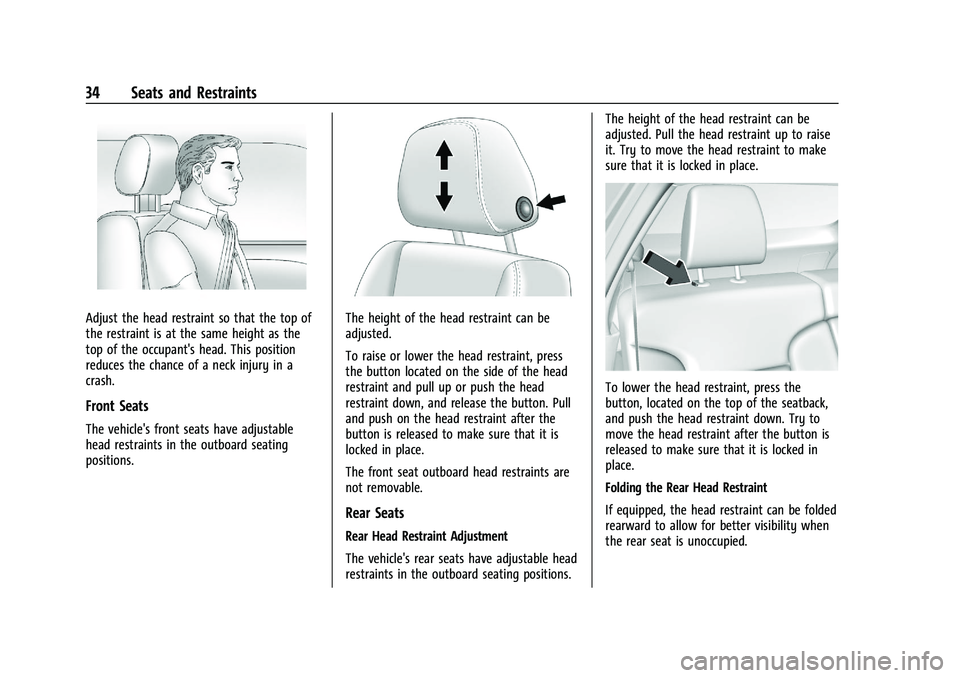
Adjust the head restraint so that the top of
the restraint is at the same height as the
top of the occupant's head. This position
reduces the chance of a neck injury in a
crash.
Front Seats
The vehicle's front seats have adjustable
head restraints in the outboard seating
positions.
The height of the head restraint can be
adjusted.
To raise or lower the head restraint, press
the button located on the side of the head
restraint and pull up or push the head
restraint down, and release the button. Pull
and push on the head restraint after the
button is released to make sure that it is
locked in place.
The front seat outboard head restraints are
not removable.
Rear Seats
Rear Head Restraint Adjustment
The vehicle's rear seats have adjustable head
restraints in the outboard seating positions.The height of the head restraint can be
adjusted. Pull the head restraint up to raise
it. Try to move the head restraint to make
sure that it is locked in place.
To lower the head restraint, press the
button, located on the top of the seatback,
and push the head restraint down. Try to
move the head restraint after the button is
released to make sure that it is locked in
place.
Folding the Rear Head Restraint
If equipped, the head restraint can be folded
rearward to allow for better visibility when
the rear seat is unoccupied.
Page 36 of 386

Chevrolet Blazer Owner Manual (GMNA-Localizing-U.S./Canada/Mexico-
15165663) - 2022 - CRC - 4/27/21
Seats and Restraints 35
To fold the head restraint, press the button
on the side of the head restraint.
The head restraint will fold rearward
automatically.When an occupant or child restraint is in the
seat, always return the head restraint to the
full upright position. Pull the head restraint
up and forward until it locks into place. Push
and pull on the head restraint to make sure
that it is locked.
Always adjust the head restraint so that the
top of the restraint is at the same height as
the top of the occupant's head.
Rear outboard head restraints are not
removable.
Front Seats
Seat Adjustment
{Warning
You can lose control of the vehicle if you
try to adjust a driver seat while the
vehicle is moving. Adjust the driver seat
only when the vehicle is not moving.
To adjust a manual seat:
1. Lift the handle at the front of the seat cushion.
2. Move the seat forward or rearward to adjust the seat position.
3. Release the handle to stop the seat from moving.
4. Try to move the seat back and forth to be sure it is locked in place.
Page 44 of 386
Chevrolet Blazer Owner Manual (GMNA-Localizing-U.S./Canada/Mexico-
15165663) - 2022 - CRC - 4/27/21
Seats and Restraints 43
Reclining the Seatback
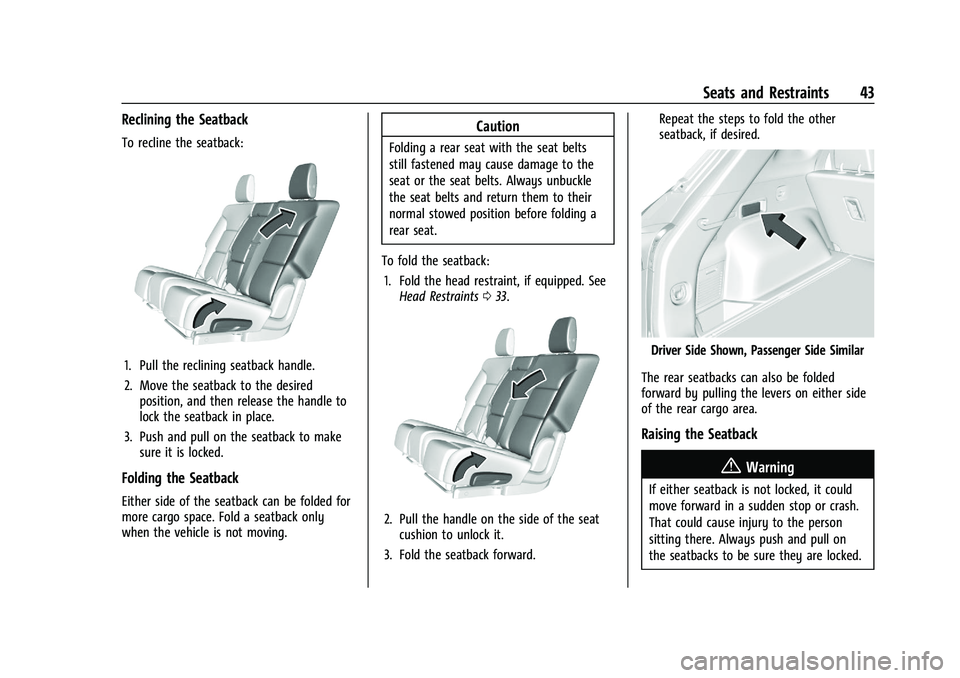
To recline the seatback:
1. Pull the reclining seatback handle.
2. Move the seatback to the desiredposition, and then release the handle to
lock the seatback in place.
3. Push and pull on the seatback to make sure it is locked.
Folding the Seatback
Either side of the seatback can be folded for
more cargo space. Fold a seatback only
when the vehicle is not moving.
Caution
Folding a rear seat with the seat belts
still fastened may cause damage to the
seat or the seat belts. Always unbuckle
the seat belts and return them to their
normal stowed position before folding a
rear seat.
To fold the seatback: 1. Fold the head restraint, if equipped. See Head Restraints 033.
2. Pull the handle on the side of the seat
cushion to unlock it.
3. Fold the seatback forward. Repeat the steps to fold the other
seatback, if desired.
Driver Side Shown, Passenger Side Similar
The rear seatbacks can also be folded
forward by pulling the levers on either side
of the rear cargo area.
Raising the Seatback
{Warning
If either seatback is not locked, it could
move forward in a sudden stop or crash.
That could cause injury to the person
sitting there. Always push and pull on
the seatbacks to be sure they are locked.
Page 48 of 386

Chevrolet Blazer Owner Manual (GMNA-Localizing-U.S./Canada/Mexico-
15165663) - 2022 - CRC - 4/27/21
Seats and Restraints 47
Never allow the lap or shoulder belt to
become loose or twisted.Never wear the shoulder belt under both
arms or behind your back.
Always use the correct buckle for your
seating position.
Never route the lap or shoulder belt over an
armrest.
{Warning
The seat belt can be pinched if it is
routed under plastic trim on the seat,
such as trim around the rear seatback
folding handle or side airbag. In a crash,
pinched seat belts might not provide
adequate protection. Never allow seat
belts to be routed under plastic trim
pieces.
Page 73 of 386
Chevrolet Blazer Owner Manual (GMNA-Localizing-U.S./Canada/Mexico-
15165663) - 2022 - CRC - 4/27/21
72 Seats and Restraints
{Warning
Children can be seriously injured or
strangled if a shoulder belt is wrapped
around their neck. The shoulder belt can
tighten but cannot be loosened if it is
locked. The shoulder belt locks when it is
pulled all the way out of the retractor.
It unlocks when the shoulder belt is
allowed to go all the way back into the
retractor, but it cannot do this if it is
wrapped around a child’s neck. If the
shoulder belt is locked and tightened
around a child’s neck, the only way to
loosen the belt is to cut it.
Buckle any unused seat belts behind the
child restraint so children cannot reach
them. Pull the shoulder belt all the way
out of the retractor to set the lock, and
tighten the belt behind the child restraint
after the child restraint has been
installed.
Caution
Do not let the LATCH attachments rub
against the vehicle’s seat belts. This may
damage these parts. If necessary, move
buckled seat belts to avoid rubbing the
LATCH attachments.
Do not fold the rear seatback when the
seat is occupied. Do not fold the empty
rear seat with a seat belt buckled. This
could damage the seat belt or the seat.
Unbuckle and return the seat belt to its
stowed position, before folding the seat.
Do not attach more than one child restraint
to a single anchor. Attaching more than one
child restraint to a single anchor could cause
the anchor or attachment to come loose or
even break during a crash. A child or others
could be injured. To reduce the risk of
serious or fatal injuries during a crash,
attach only one child restraint per anchor.
If you need to secure more than one child
restraint in the rear seat, see Where to Put
the Restraint 067.
1. Attach and tighten the lower attachments to the lower anchors. If the
child restraint does not have lower
attachments or the desired seating position does not have lower anchors,
secure the child restraint with the top
tether and the seat belt. Refer to the
child restraint manufacturer instructions
and the instructions in this manual.
1.1. Find the lower anchors for the
desired seating position.
1.2. Put the child restraint on the seat.
1.3. Attach and tighten the lower attachments on the child restraint
to the lower anchors.
2. If the child restraint manufacturer recommends that the top tether be
attached, attach and tighten the top
tether to the top tether anchor,
if equipped. Refer to the child restraint
instructions and the following steps:
2.1. Find the top tether anchor.
2.2. Route, attach, and tighten the top tether according to your child
restraint instructions and the
following instructions:
Page 205 of 386
Chevrolet Blazer Owner Manual (GMNA-Localizing-U.S./Canada/Mexico-
15165663) - 2022 - CRC - 4/27/21
204 Driving and Operating
Certification/Tire Label
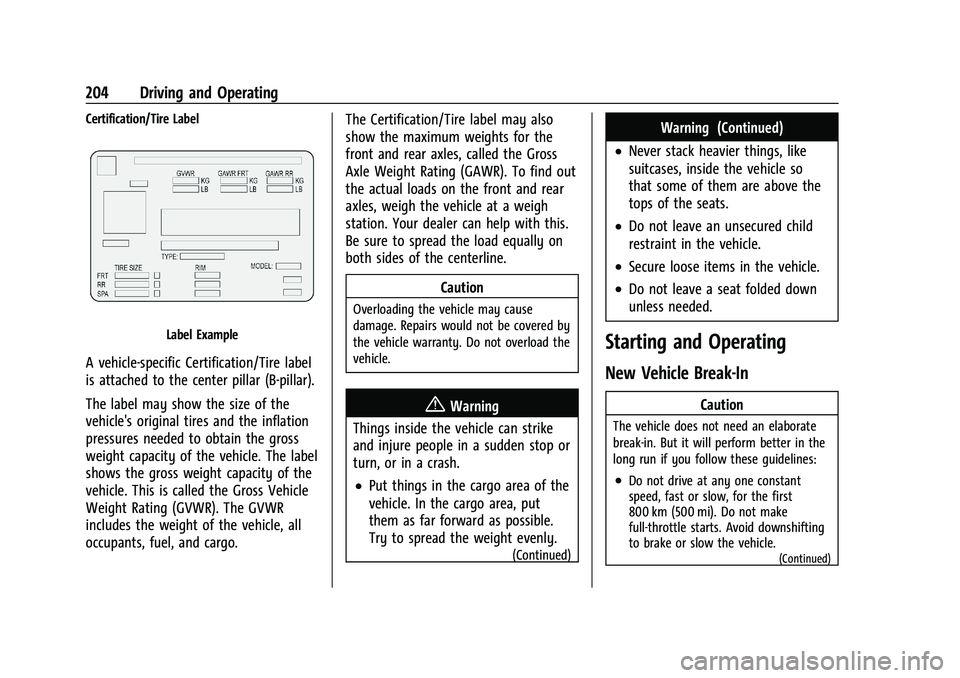
Label Example
A vehicle-specific Certification/Tire label
is attached to the center pillar (B-pillar).
The label may show the size of the
vehicle's original tires and the inflation
pressures needed to obtain the gross
weight capacity of the vehicle. The label
shows the gross weight capacity of the
vehicle. This is called the Gross Vehicle
Weight Rating (GVWR). The GVWR
includes the weight of the vehicle, all
occupants, fuel, and cargo.The Certification/Tire label may also
show the maximum weights for the
front and rear axles, called the Gross
Axle Weight Rating (GAWR). To find out
the actual loads on the front and rear
axles, weigh the vehicle at a weigh
station. Your dealer can help with this.
Be sure to spread the load equally on
both sides of the centerline.
Caution
Overloading the vehicle may cause
damage. Repairs would not be covered by
the vehicle warranty. Do not overload the
vehicle.
{Warning
Things inside the vehicle can strike
and injure people in a sudden stop or
turn, or in a crash.
.Put things in the cargo area of the
vehicle. In the cargo area, put
them as far forward as possible.
Try to spread the weight evenly.
(Continued)
Warning (Continued)
.Never stack heavier things, like
suitcases, inside the vehicle so
that some of them are above the
tops of the seats.
.Do not leave an unsecured child
restraint in the vehicle.
.Secure loose items in the vehicle.
.Do not leave a seat folded down
unless needed.
Starting and Operating
New Vehicle Break-In
Caution
The vehicle does not need an elaborate
break-in. But it will perform better in the
long run if you follow these guidelines:
.Do not drive at any one constant
speed, fast or slow, for the first
800 km (500 mi). Do not make
full-throttle starts. Avoid downshifting
to brake or slow the vehicle.
(Continued)
Page 336 of 386
Chevrolet Blazer Owner Manual (GMNA-Localizing-U.S./Canada/Mexico-
15165663) - 2022 - CRC - 4/27/21
Vehicle Care 335
.For solid soils, remove as much as
possible prior to vacuuming.
To clean: 1. Saturate a clean, lint-free colorfast cloth with water. Microfiber cloth is
recommended to prevent lint transfer to
the fabric or carpet.
2. Remove excess moisture by gently wringing until water does not drip from
the cleaning cloth.
3. Start on the outside edge of the soil and gently rub toward the center. Fold the
cleaning cloth to a clean area frequently
to prevent forcing the soil into the
fabric.
4. Continue gently rubbing the soiled area until there is no longer any color
transfer from the soil to the cleaning
cloth.
5. If the soil is not completely removed, use a mild soap solution followed only
by plain water.
If the soil is not completely removed, it may
be necessary to use a commercial upholstery
cleaner or spot lifter. Test a small hidden
area for colorfastness before using a commercial upholstery cleaner or spot lifter.
If ring formation occurs, clean the entire
fabric or carpet.
After cleaning, use a paper towel to blot
excess moisture.
Cleaning High Gloss Surfaces and Vehicle
Information and Radio Displays
Use a microfiber cloth on high gloss surfaces
or vehicle displays. First, use a soft bristle
brush to remove dirt that can scratch the
surface. Then gently clean by rubbing with a
microfiber cloth. Never use window cleaners
or solvents. Periodically hand wash the
microfiber cloth separately, using mild soap.
Do not use bleach or fabric softener. Rinse
thoroughly and air dry before next use.
Caution
Do not attach a device with a suction cup
to the display. This may cause damage
and would not be covered by the vehicle
warranty.
Instrument Panel, Leather, Vinyl, Other
Plastic Surfaces, Low Gloss Paint
Surfaces, and Natural Open Pore Wood
Surfaces
Use a soft bristle brush to remove dust from
knobs and crevices on the instrument
cluster. Use a soft microfiber cloth
dampened with water to remove dust and
loose dirt. For a more thorough cleaning,
use a soft microfiber cloth dampened with a
mild soap and water solution.
Caution
Soaking or saturating leather, especially
perforated leather, as well as other
interior surfaces, may cause permanent
damage. Wipe excess moisture from
these surfaces after cleaning and allow
them to dry naturally. Never use heat,
steam, or spot removers. Do not use
liquids that contain alcohol or solvents on
leather seats. Do not use cleaners that
contain silicone or wax-based products.
Cleaners containing these solvents can
permanently change the appearance and
feel of leather or soft trim, and are not
recommended.
Page 378 of 386
Chevrolet Blazer Owner Manual (GMNA-Localizing-U.S./Canada/Mexico-
15165663) - 2022 - CRC - 4/27/21
Index 377
Driver Mode Control . . . . . . . . . . . . . . . . . . . . . 219
Driver Mode Control Light . . . . . . . . . . . . . . . 108
DrivingAssistance Systems . . . . . . . . . . . . . . . . . . . . 236
Better Fuel Economy . . . . . . . . . . . . . . . . . . . 192
Characteristics and Towing Tips . . . . . . . . 247
Defensive . . . . . . . . . . . . . . . . . . . . . . . . . . . . . . 193
Hill and Mountain Roads . . . . . . . . . . . . . . 199
If the Vehicle is Stuck . . . . . . . . . . . . . . . . . 201
Impaired . . . . . . . . . . . . . . . . . . . . . . . . . . . . . . . 193
Loss of Control . . . . . . . . . . . . . . . . . . . . . . . . 195
Off-Road . . . . . . . . . . . . . . . . . . . . . . . . . . . . . . . 195
Off-Road Recovery . . . . . . . . . . . . . . . . . . . . . 195
Vehicle Load Limits . . . . . . . . . . . . . . . . . . . . 201
Wet Roads . . . . . . . . . . . . . . . . . . . . . . . . . . . . . 199
Winter . . . . . . . . . . . . . . . . . . . . . . . . . . . . . . . . . 200
Dual Automatic Climate Control System . . . . . . . . . . . . . . . . . . . . . . . . . . . . . . . . 186
E
Electric Brake Boost . . . . . . . . . . . . . . . . . . . . . . . 215
Electric Parking Brake . . . . . . . . . . . . . . . . . . . . . 215
Electric Parking Brake Light . . . . . . . . . . . . . . 105
Electrical Equipment, Add-On . . . . . . . . . . . . 257
Electrical SystemEngine Compartment Fuse Block . . . . . . . 285
Fuses and Circuit Breakers . . . . . . . . . . . . . 284
Instrument Panel Fuse Block . . . . . . . . . . . 288 Electrical System (cont'd)
Overload . . . . . . . . . . . . . . . . . . . . . . . . . . . . . . . 282
Rear Compartment Fuse Block . . . . . . . . . 290
Emergency OnStar . . . . . . . . . . . . . . . . . . . . . . . . . . . . . . . . . 367
Engine Air Cleaner/Filter . . . . . . . . . . . . . . . . . . . . . . 270
Check Light (Malfunction Indicator) . . . . 103
Compartment Overview . . . . . . . . . . . . . . . . 263
Coolant Temperature Gauge . . . . . . . . . . . . 99
Coolant Temperature WarningLight . . . . . . . . . . . . . . . . . . . . . . . . . . . . . . . . . 108
Cooling System . . . . . . . . . . . . . . . . . . . . . . . . . 271
Drive Belt Routing . . . . . . . . . . . . . . . . . . . . . 354
Exhaust . . . . . . . . . . . . . . . . . . . . . . . . . . . . . . . . . 211
Heater . . . . . . . . . . . . . . . . . . . . . . . . . . . . . . . . . 208
Oil Life System . . . . . . . . . . . . . . . . . . . . . . . . 268
Oil Pressure Light . . . . . . . . . . . . . . . . . . . . . . 109
Overheating . . . . . . . . . . . . . . . . . . . . . . . . . . . 274
Power Messages . . . . . . . . . . . . . . . . . . . . . . . . 116
Running While Parked . . . . . . . . . . . . . . . . . . 211
Starting . . . . . . . . . . . . . . . . . . . . . . . . . . . . . . . . 206
Engine Air Filter Life System . . . . . . . . . . . . . 269
Engine Oil Temperature Gauge . . . . . . . . . . . . . . . . . . . . . 99
Entry Lighting . . . . . . . . . . . . . . . . . . . . . . . . . . . 129
Equipment, Towing . . . . . . . . . . . . . . . . . . . . . . 254
Event Data Recorders . . . . . . . . . . . . . . . . . . . . 365 Exit Lighting . . . . . . . . . . . . . . . . . . . . . . . . . . . . . 129
Extended Parking . . . . . . . . . . . . . . . . . . . . . . . . . 211
Extender, Seat Belt . . . . . . . . . . . . . . . . . . . . . . . 50
Exterior Lamp Controls . . . . . . . . . . . . . . . . . . . .124
Exterior Lamps Off Reminder . . . . . . . . . . . . . 125
Exterior Lighting Battery Saver . . . . . . . . . . 130
F
Filter,
Engine Air Cleaner . . . . . . . . . . . . . . . . . . . . . 270
Flash-to-Pass . . . . . . . . . . . . . . . . . . . . . . . . . . . . . 126
Flashers, Hazard Warning . . . . . . . . . . . . . . . . . 127
Flat Tire . . . . . . . . . . . . . . . . . . . . . . . . . . . . . . . . . . 311 Changing . . . . . . . . . . . . . . . . . . . . . . . . . . . . . . 318
Floor Mats . . . . . . . . . . . . . . . . . . . . . . . . . . . . . . . 336
Fluid Automatic Transmission . . . . . . . . . . . . . . . 269
Brakes . . . . . . . . . . . . . . . . . . . . . . . . . . . . . . . . . 277
Washer . . . . . . . . . . . . . . . . . . . . . . . . . . . . . . . . 275
Folding Mirrors . . . . . . . . . . . . . . . . . . . . . . . . . . . 26
Forward Collision Alert (FCA) System . . . . 236
Frequency Statement Radio . . . . . . . . . . . . . . . . . . . . . . . . . . . . . . . . . . 363
Front Pedestrian Braking (FPB) System . . . . . . . . . . . . . . . . . . . . . . . . . . . . . . . . 239
Front Seats
Adjustment . . . . . . . . . . . . . . . . . . . . . . . . . . . . . 35
Heated and Ventilated . . . . . . . . . . . . . . . . . . 41