clock CHEVROLET BOLT EV 2018 Owner's Manual
[x] Cancel search | Manufacturer: CHEVROLET, Model Year: 2018, Model line: BOLT EV, Model: CHEVROLET BOLT EV 2018Pages: 370, PDF Size: 5.14 MB
Page 109 of 370
Chevrolet BOLT EV Owner Manual (GMNA-Localizing-U.S./Canada/Mexico-
11434431) - 2018 - crc - 2/14/18
108 Instruments and Controls
Instruments and
Controls
Controls
Steering Wheel Adjustment . . . 109
Steering Wheel Controls . . . . . . 109
Heated Steering Wheel . . . . . . . 110
Horn . . . . . . . . . . . . . . . . . . . . . . . . . . 110
Pedestrian Safety Signal . . . . . 110
Windshield Wiper/Washer . . . . . 111
Rear Window Wiper/Washer . . . . . . . . . . . . . . . . . . . . . . 112
Compass . . . . . . . . . . . . . . . . . . . . . 113
Clock . . . . . . . . . . . . . . . . . . . . . . . . . 114
Power Outlets . . . . . . . . . . . . . . . . 114
Wireless Charging . . . . . . . . . . . . 115
Warning Lights, Gauges, and
Indicators
Warning Lights, Gauges, and Indicators . . . . . . . . . . . . . . . . . . . 118
Instrument Cluster . . . . . . . . . . . . 118
Speedometer . . . . . . . . . . . . . . . . . 121
Odometer . . . . . . . . . . . . . . . . . . . . . 121
Trip Odometer . . . . . . . . . . . . . . . . 121
Battery Gauge (High Voltage) . . . . . . . . . . . . . . . . . . . . . 122
Driver Efficiency Gauge . . . . . . 122 Power Indicator Gauge . . . . . . . 123
Seat Belt Reminders . . . . . . . . . 123
Airbag Readiness Light . . . . . . . 124
Passenger Airbag Status
Indicator . . . . . . . . . . . . . . . . . . . . 125
Charging System Light (12-Volt Battery) . . . . . . . . . . . . . . . . . . . . . 125
Service Vehicle Soon Light . . . 126
Brake System Warning Light . . . . . . . . . . . . . . . . . . . . . . . . 126
Electric Parking Brake Light . . . . . . . . . . . . . . . . . . . . . . . . 126
Service Electric Parking Brake Light . . . . . . . . . . . . . . . . . . . . . . . . 127
Antilock Brake System (ABS) Warning Light . . . . . . . . . . . . . . . 127
Sport Mode Light . . . . . . . . . . . . . 127
Lane Keep Assist (LKA) Light . . . . . . . . . . . . . . . . . . . . . . . . 127
Vehicle Ahead Indicator . . . . . . 128
Pedestrian Ahead Indicator . . . 128
Traction Off Light . . . . . . . . . . . . . 128
StabiliTrak OFF Light . . . . . . . . . 128
Traction Control System (TCS)/ StabiliTrak Light . . . . . . . . . . . . . 129
Tire Pressure Light . . . . . . . . . . . 129
Security Light . . . . . . . . . . . . . . . . . 130
Vehicle Ready Light . . . . . . . . . . 130
High-Beam On Light . . . . . . . . . . 130
Lamps On Reminder . . . . . . . . . 130 Cruise Control Light . . . . . . . . . . 130
Door Ajar Light . . . . . . . . . . . . . . . 131
Information Displays
Power Flows . . . . . . . . . . . . . . . . . 131
Programmable Charging . . . . . . 131
Energy Information . . . . . . . . . . . 138
Energy Settings . . . . . . . . . . . . . . 140
Driver Information
Center (DIC) . . . . . . . . . . . . . . . . 141
Vehicle Messages
Vehicle Messages . . . . . . . . . . . . 142
Propulsion PowerMessages . . . . . . . . . . . . . . . . . . . 143
Vehicle Speed Messages . . . . . 143
Vehicle Personalization
Vehicle Personalization . . . . . . . 143
Page 115 of 370
Chevrolet BOLT EV Owner Manual (GMNA-Localizing-U.S./Canada/Mexico-
11434431) - 2018 - crc - 2/14/18
114 Instruments and Controls
Clock
The infotainment system controls
are used to access the time and
date settings through the menu.
This can also be changed by
touching the clock, then touch
8to
go to the Time and Date
Settings menu.
D: Press to access the
Home Page.
T: Touch to access the Icon View.
Y: Drag the scroll bar to navigate
the list.
RorQ: Touch to set up
items.
0: Touch to exit or return to the
previous screen or menu.
Setting the Time
When Auto Set is enabled, the time
cannot be manually set.
1. Press
D, then touchT.
2. Touch Settings.
3. Touch Time and Date, then touch Set Time. 4. Touch + or
−to adjust the
value.
5. Touch
RorQto adjust
AM or PM for 12 hour format.
6. Touch
0.
Setting the Date
1. PressD, then touchT.
2. Touch Settings.
3. Touch Time and Date, then touch Set Date.
4. Touch + or −to adjust the
value.
5. Touch
0.
Auto Set
1. PressD, then touchT.
2. Touch Settings.
3. Touch Time and Date, then touch Auto Set.
4. Select from the available options.
5. Touch
0.
Setting the 12/24 Hour Format
1. PressD, then touchT.
2. Touch Settings.
3. Touch Time and Date, then touch Set Time.
4. Select 12 hr or 24 hr format.
5. Touch
0.
Power Outlets
The accessory power outlet can be
used to plug in electrical equipment,
such as a mobile phone or MP3
player. The accessory power outlet
only works with the vehicle
turned on.
The vehicle has an accessory
power outlet on the lower center
stack below the climate control.
Open the cover to access and
replace when not in use.
Page 145 of 370
Chevrolet BOLT EV Owner Manual (GMNA-Localizing-U.S./Canada/Mexico-
11434431) - 2018 - crc - 2/14/18
144 Instruments and Controls
Personalization Menu
The following list of menu items may
be available:
.Time and Date
. Rear Seat Reminder
. Language (Language)
. Teen Driver
. Radio Settings
. Vehicle
. Devices
. Device Remote Access
. Bluetooth Phone
. Apple CarPlay
. Android Auto
. KeyPass
. USB Auto Launch
. Wi-Fi
. Display Settings
. Rear Camera
. Return to Factory Settings
. Audible Touch Feedback .
Text Scroll
. Software Information
Each menu is detailed in the
following information.
Time and Date
Manually set the time and date. See
Clock 0114.
Rear Seat Reminder
This message displays under
certain conditions indicating there
may be an item or passenger in the
rear seat. Check before exiting the
vehicle.
This feature allows for a chime and
a message when the rear door has
been opened before or during
operation of the vehicle.
Select Off or On.
Language (Language)
Select Language, then select from
the available language(s).
Teen Driver
See Teen Driver 0181.
Radio Settings
To manage the radio features, see
“Radio Settings” underSettings
0 180.
Vehicle
Select and the following may
display:
.
Climate and Air Quality
. Comfort and Convenience
. Collision / Detection Systems
. Lighting
. Power Door Locks
. Remote Lock / Unlock / Start
Climate and Air Quality
Select and the following may
display:
. Auto Fan Speed
. Auto Heated Seats
. Auto Defog
Auto Fan Speed
This feature will set the maximum
auto fan speed.
Page 160 of 370
Chevrolet BOLT EV Owner Manual (GMNA-Localizing-U.S./Canada/Mexico-
11434431) - 2018 - crc - 2/14/18
Infotainment System 159
Operation
Turning On/Off Automatically
When the vehicle is on, the
infotainment system turns on
automatically.
When the vehicle is off and the
driver door of the vehicle is opened,
the infotainment system turns off
automatically.
If
Ois pressed and held when the
vehicle is off, the infotainment
system will turn on. The system will
turn off automatically after
approximately 10 minutes.
Full Screen Clock
. Touch the time display on the
screen to display a full screen of
the clock.
. Touch
0to return to the
previous screen.
Volume Control
Turn the volume knob to adjust the
volume. The current volume is
indicated. .
If equipped, use the volume
switches on the back of the
steering wheel to adjust the
volume. See Steering Wheel
Controls 0109.
. Turning on the infotainment
system power will set the
volume level to its previous
selection if it is lower than the
maximum starting volume level.
. If the volume level is louder than
the maximum starting volume
level when the infotainment
system is turned on, the
infotainment system is adjusted
automatically to the maximum
starting volume level.
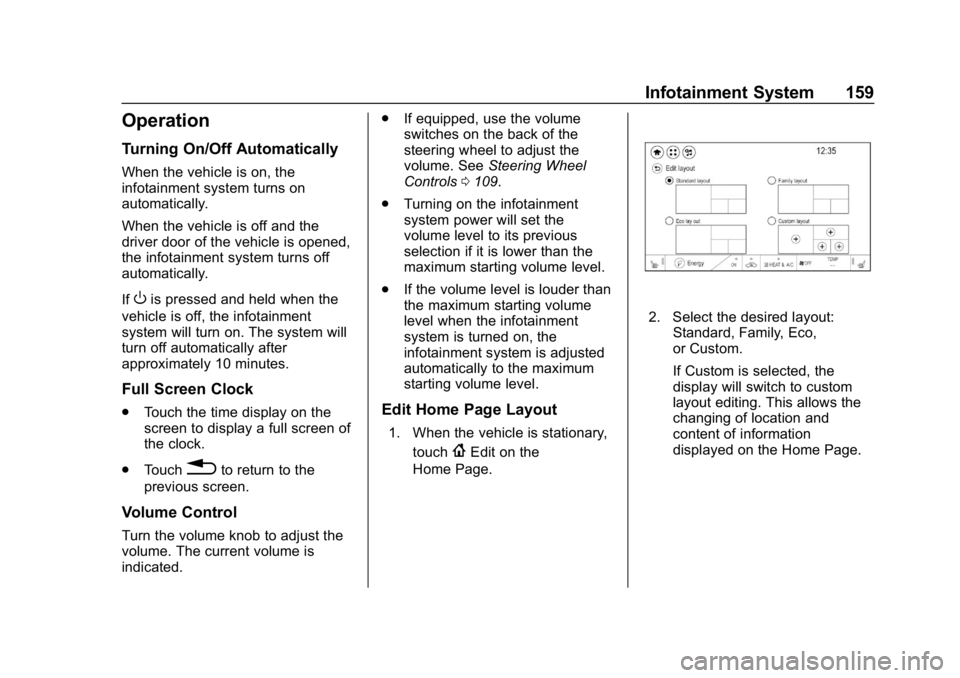
Edit Home Page Layout
1. When the vehicle is stationary,
touch
{Edit on the
Home Page.
2. Select the desired layout: Standard, Family, Eco,
or Custom.
If Custom is selected, the
display will switch to custom
layout editing. This allows the
changing of location and
content of information
displayed on the Home Page.
Page 173 of 370
Chevrolet BOLT EV Owner Manual (GMNA-Localizing-U.S./Canada/Mexico-
11434431) - 2018 - crc - 2/14/18
172 Infotainment System
Viewing a Previous or Next
Picture
From the picture screen, touchSor
Tto view the previous or next
picture.
Rotating a Picture
From the picture screen, touchwto
rotate the picture.
Enlarging a Picture
From the picture screen, touchTto
enlarge the picture.
Using the USB Picture Menu
1. From the picture screen, touch Menu.
2. Touch the desired menu. .Slide Show Time: Select
the slide show interval.
. Clock/Temp Display: To
display the clock and
temperature on the full
screen, select On or Off.
. Display Settings: Adjust the
brightness and contrast. 3. After the setting is complete,
touch
0.
Auxiliary Devices
The AUX port is in the center
console. The infotainment system
can play auxiliary music connected
by the auxiliary device.
Playing Music from an
Auxiliary Device
Connect the auxiliary device
containing the music source to the
AUX port. Once connected with the
infotainment system, music can be
played from the device.
.If the auxiliary device is already
connected, touch
T, Audio,
Source, then AUX to play music
from the auxiliary device.
. Use an AUX cable with a
3.5 mm (1/8 in) type connector.
Tone Settings
From the AUX screen, touch Tone.
See “Tone Settings” under“AM-FM
Radio” previously in this section.
Bluetooth Audio
Bluetooth Music
If equipped, music may be played
from a paired Bluetooth device.
Refer to the Phone section for help
pairing a device.
Before Playing Bluetooth Music
.
The paired bluetooth device
must support Bluetooth profiles:
A2DP or AVRCP.
. Bluetooth music may not be
supported depending on the
mobile phone or Bluetooth
device.
. From the mobile phone or
Bluetooth device, find the
Bluetooth device type to set/
connect the item.
. A♪will appear on the screen to
indicate a successful Audio
Bluetooth connection.
. The sound played by the
Bluetooth device is delivered
through the infotainment system.
Page 188 of 370
Chevrolet BOLT EV Owner Manual (GMNA-Localizing-U.S./Canada/Mexico-
11434431) - 2018 - crc - 2/14/18
Climate Controls 187
Climate Control Display
The heated seats, if equipped,
climate on/off, recirculation, heat,
and air conditioning can be
controlled by touching Climate
Settings on the infotainment
Home Page.
A selection can then be made on
the climate settings page.
Automatic Operation
The system automatically controls
the fan speed, air delivery, air
conditioning, electric heating, and
recirculation to heat or cool the
vehicle to the selected temperature.
When AUTO is lit, all five functions
operate automatically. Each function
can also be manually set and the
selected setting is displayed or the
indicator is lit. Functions not
manually set will continue to be
automatically controlled, even if the
AUTO indicator is not lit.
For automatic operation:1. Press AUTO. 2. Set the temperature. An initial
setting of 22 °C (72 °F) is
recommended. Allow the
system time to stabilize. Adjust
the temperature as needed.
Manual Operation
ON : Touch to turn the climate
control system on and off.
The climate control system will turn
on when any climate control button
is pressed on the center stack or
touched on the climate control
display. To turn the system off,
touch ON again.
DorC: Press the buttons to
increase or decrease the fan speed.
The fan speed setting appears on
the climate control display. Manually
adjusting the fan speed cancels
automatic fan control. Press AUTO
to return to automatic operation.
Touch ON to turn off the fan and the
climate control system.
Temperature Control : Turn the
knob clockwise or counterclockwise
to increase or decrease the
temperature setting. Air Delivery Mode Control :
Press
c,d, or0on the center stack
to change the direction of airflow.
Any combination of the three
buttons can be selected. The
selected air delivery mode button
indicator is lit.
Pressing any button cancels
automatic air delivery control and
the direction of the airflow can be
controlled manually. Press AUTO to
return to automatic operation.
0: Air is directed to the
windshield.
d: Air is directed to the instrument
panel outlets.
c: Air is directed to the floor
outlets.
0MAX : Air is directed to the
windshield and the fan runs at a
higher speed. Fog or frost is cleared
from the windshield more quickly.
When the button is pressed again,
the system returns to the previous
mode setting.
Page 271 of 370
Chevrolet BOLT EV Owner Manual (GMNA-Localizing-U.S./Canada/Mexico-
11434431) - 2018 - crc - 2/14/18
270 Vehicle Care
Taillamps, Turn Signal,
Stoplamps, and Back-Up
Lamps
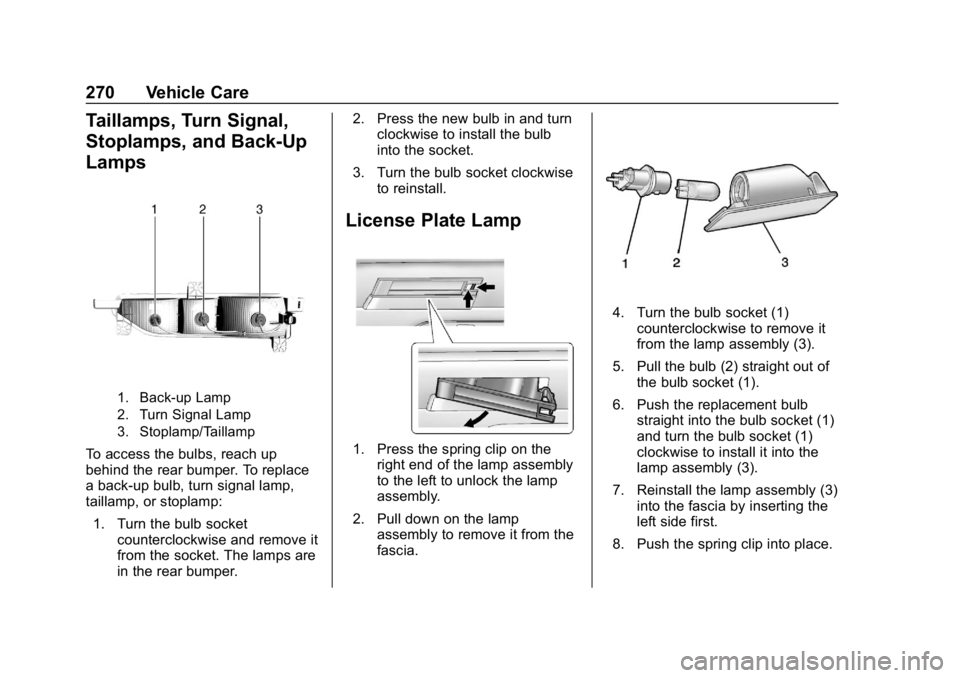
1. Back-up Lamp
2. Turn Signal Lamp
3. Stoplamp/Taillamp
To access the bulbs, reach up
behind the rear bumper. To replace
a back-up bulb, turn signal lamp,
taillamp, or stoplamp:1. Turn the bulb socket counterclockwise and remove it
from the socket. The lamps are
in the rear bumper. 2. Press the new bulb in and turn
clockwise to install the bulb
into the socket.
3. Turn the bulb socket clockwise to reinstall.
License Plate Lamp
1. Press the spring clip on theright end of the lamp assembly
to the left to unlock the lamp
assembly.
2. Pull down on the lamp assembly to remove it from the
fascia.
4. Turn the bulb socket (1)counterclockwise to remove it
from the lamp assembly (3).
5. Pull the bulb (2) straight out of the bulb socket (1).
6. Push the replacement bulb straight into the bulb socket (1)
and turn the bulb socket (1)
clockwise to install it into the
lamp assembly (3).
7. Reinstall the lamp assembly (3) into the fascia by inserting the
left side first.
8. Push the spring clip into place.
Page 300 of 370
Chevrolet BOLT EV Owner Manual (GMNA-Localizing-U.S./Canada/Mexico-
11434431) - 2018 - crc - 2/14/18
Vehicle Care 299
Check the tire sealant expiration
date on the tire sealant canister.
The tire sealant canister (4) should
be replaced before its expiration
date. Replacement tire sealant
canisters are available at your local
dealer.
There is only enough sealant to seal
one tire. After usage, the tire sealant
canister must be replaced.
Using the Tire Sealant and
Compressor Kit to Temporarily
Seal and Inflate a
Punctured Tire
When using the tire sealant and
compressor kit during cold
temperatures, warm the kit in a
heated environment for five minutes.
This will help to inflate the tire
faster.
If a tire goes flat, avoid further tire
and wheel damage by driving slowly
to a level place. Turn on the hazard
warning flashers. SeeHazard
Warning Flashers 0153.
See If a Tire Goes Flat 0296 for
other important safety warnings. Do not remove any objects that
have penetrated the tire.
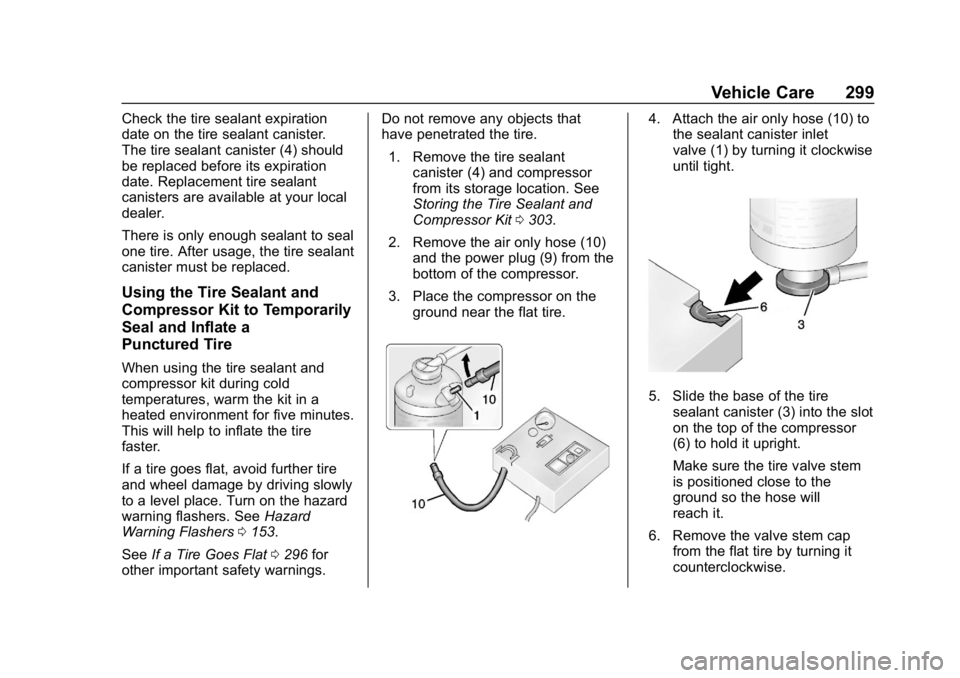
1. Remove the tire sealant canister (4) and compressor
from its storage location. See
Storing the Tire Sealant and
Compressor Kit 0303.
2. Remove the air only hose (10) and the power plug (9) from the
bottom of the compressor.
3. Place the compressor on the ground near the flat tire.
4. Attach the air only hose (10) tothe sealant canister inlet
valve (1) by turning it clockwise
until tight.
5. Slide the base of the tire
sealant canister (3) into the slot
on the top of the compressor
(6) to hold it upright.
Make sure the tire valve stem
is positioned close to the
ground so the hose will
reach it.
6. Remove the valve stem cap from the flat tire by turning it
counterclockwise.
Page 301 of 370
Chevrolet BOLT EV Owner Manual (GMNA-Localizing-U.S./Canada/Mexico-
11434431) - 2018 - crc - 2/14/18
300 Vehicle Care
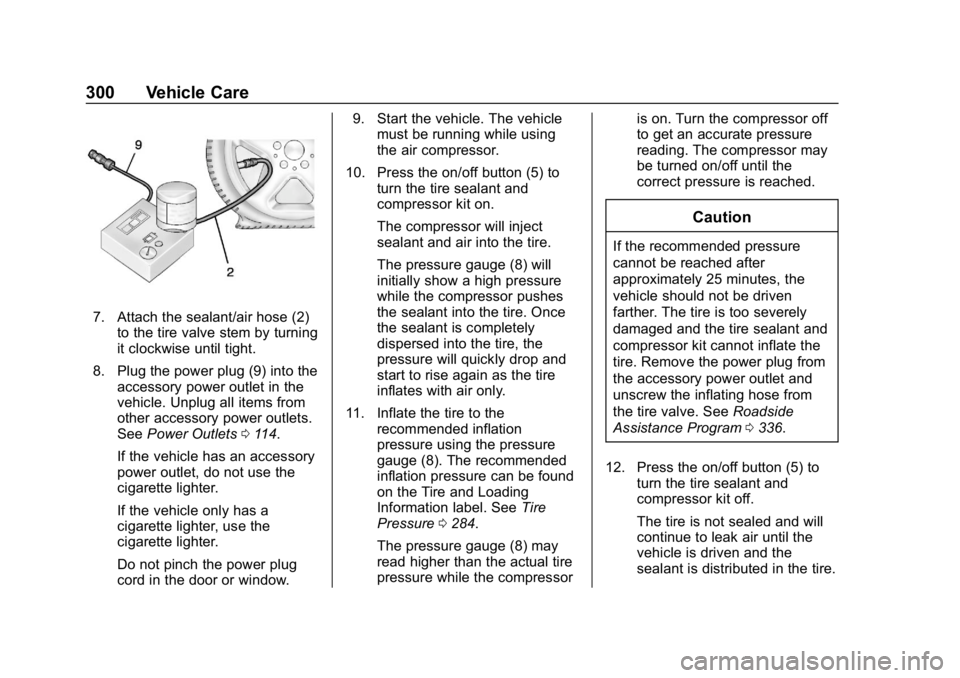
7. Attach the sealant/air hose (2)to the tire valve stem by turning
it clockwise until tight.
8. Plug the power plug (9) into the accessory power outlet in the
vehicle. Unplug all items from
other accessory power outlets.
See Power Outlets 0114.
If the vehicle has an accessory
power outlet, do not use the
cigarette lighter.
If the vehicle only has a
cigarette lighter, use the
cigarette lighter.
Do not pinch the power plug
cord in the door or window. 9. Start the vehicle. The vehicle
must be running while using
the air compressor.
10. Press the on/off button (5) to turn the tire sealant and
compressor kit on.
The compressor will inject
sealant and air into the tire.
The pressure gauge (8) will
initially show a high pressure
while the compressor pushes
the sealant into the tire. Once
the sealant is completely
dispersed into the tire, the
pressure will quickly drop and
start to rise again as the tire
inflates with air only.
11. Inflate the tire to the recommended inflation
pressure using the pressure
gauge (8). The recommended
inflation pressure can be found
on the Tire and Loading
Information label. See Tire
Pressure 0284.
The pressure gauge (8) may
read higher than the actual tire
pressure while the compressor is on. Turn the compressor off
to get an accurate pressure
reading. The compressor may
be turned on/off until the
correct pressure is reached.
Caution
If the recommended pressure
cannot be reached after
approximately 25 minutes, the
vehicle should not be driven
farther. The tire is too severely
damaged and the tire sealant and
compressor kit cannot inflate the
tire. Remove the power plug from
the accessory power outlet and
unscrew the inflating hose from
the tire valve. See
Roadside
Assistance Program 0336.
12. Press the on/off button (5) to turn the tire sealant and
compressor kit off.
The tire is not sealed and will
continue to leak air until the
vehicle is driven and the
sealant is distributed in the tire.
Page 302 of 370
Chevrolet BOLT EV Owner Manual (GMNA-Localizing-U.S./Canada/Mexico-
11434431) - 2018 - crc - 2/14/18
Vehicle Care 301
Therefore, Steps 13–21 must
be done immediately after
Step 12.
Be careful while handling the
tire sealant and compressor kit
as it could be warm after
usage.
13. Unplug the power plug (9) from the accessory power outlet in
the vehicle.
14. Turn the sealant/air hose (2) counterclockwise to remove it
from the tire valve stem.
15. Replace the tire valve stem cap.
16. Remove the tire sealant canister (4) from the slot on top
of the compressor (6).
17. Turn the air only hose (10) counterclockwise to remove it
from the tire sealant canister
inlet valve (1).
18. Turn the sealant/air hose (2) clockwise onto the sealant
canister inlet valve (1) to
prevent sealant leakage. 19. Return the air only hose (10)
and power plug (9) back to
their original storage location.
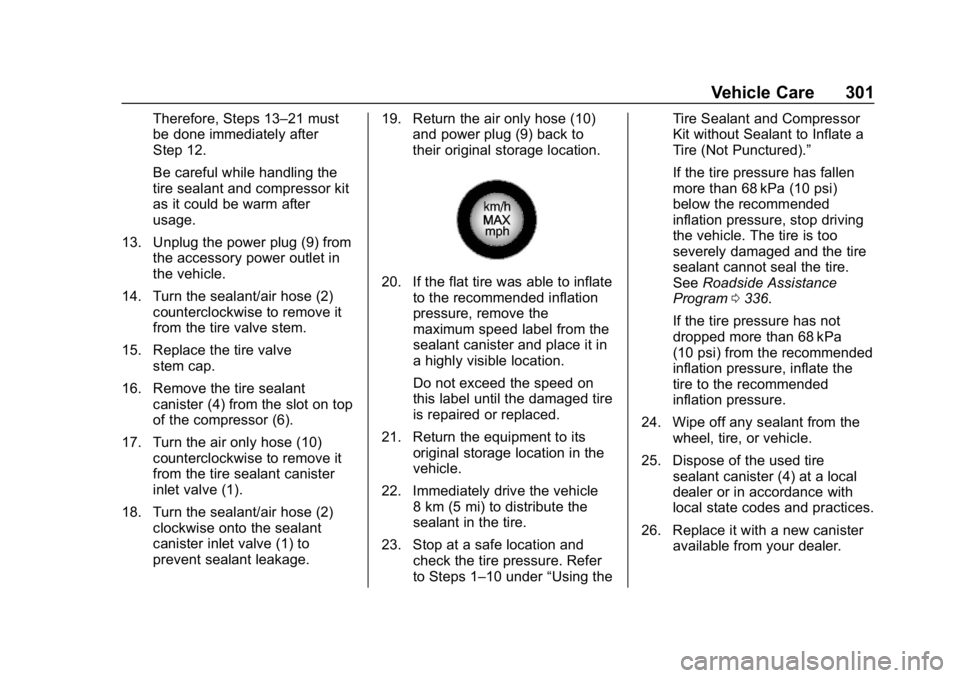
20. If the flat tire was able to inflate
to the recommended inflation
pressure, remove the
maximum speed label from the
sealant canister and place it in
a highly visible location.
Do not exceed the speed on
this label until the damaged tire
is repaired or replaced.
21. Return the equipment to its original storage location in the
vehicle.
22. Immediately drive the vehicle 8 km (5 mi) to distribute the
sealant in the tire.
23. Stop at a safe location and check the tire pressure. Refer
to Steps 1–10 under “Using theTire Sealant and Compressor
Kit without Sealant to Inflate a
Tire (Not Punctured).”
If the tire pressure has fallen
more than 68 kPa (10 psi)
below the recommended
inflation pressure, stop driving
the vehicle. The tire is too
severely damaged and the tire
sealant cannot seal the tire.
See
Roadside Assistance
Program 0336.
If the tire pressure has not
dropped more than 68 kPa
(10 psi) from the recommended
inflation pressure, inflate the
tire to the recommended
inflation pressure.
24. Wipe off any sealant from the wheel, tire, or vehicle.
25. Dispose of the used tire sealant canister (4) at a local
dealer or in accordance with
local state codes and practices.
26. Replace it with a new canister available from your dealer.