battery location CHEVROLET BOLT EV 2019 Owner's Manual
[x] Cancel search | Manufacturer: CHEVROLET, Model Year: 2019, Model line: BOLT EV, Model: CHEVROLET BOLT EV 2019Pages: 371, PDF Size: 5.51 MB
Page 34 of 371
Chevrolet BOLT EV Owner Manual (GMNA-Localizing-U.S./Canada/Mexico-
12163003) - 2019 - crc - 5/18/18
Keys, Doors, and Windows 33
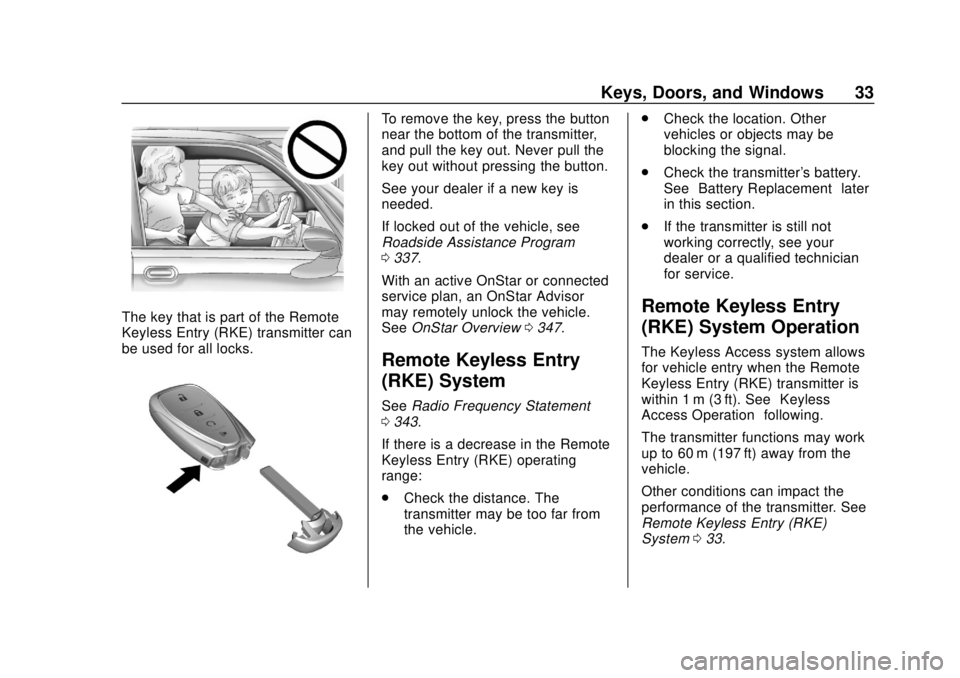
The key that is part of the Remote
Keyless Entry (RKE) transmitter can
be used for all locks.
To remove the key, press the button
near the bottom of the transmitter,
and pull the key out. Never pull the
key out without pressing the button.
See your dealer if a new key is
needed.
If locked out of the vehicle, see
Roadside Assistance Program
0337.
With an active OnStar or connected
service plan, an OnStar Advisor
may remotely unlock the vehicle.
See OnStar Overview 0347.
Remote Keyless Entry
(RKE) System
See Radio Frequency Statement
0 343.
If there is a decrease in the Remote
Keyless Entry (RKE) operating
range:
. Check the distance. The
transmitter may be too far from
the vehicle. .
Check the location. Other
vehicles or objects may be
blocking the signal.
. Check the transmitter's battery.
See “Battery Replacement” later
in this section.
. If the transmitter is still not
working correctly, see your
dealer or a qualified technician
for service.
Remote Keyless Entry
(RKE) System Operation
The Keyless Access system allows
for vehicle entry when the Remote
Keyless Entry (RKE) transmitter is
within 1 m (3 ft). See “Keyless
Access Operation” following.
The transmitter functions may work
up to 60 m (197 ft) away from the
vehicle.
Other conditions can impact the
performance of the transmitter. See
Remote Keyless Entry (RKE)
System 033.
Page 39 of 371
Chevrolet BOLT EV Owner Manual (GMNA-Localizing-U.S./Canada/Mexico-
12163003) - 2019 - crc - 5/18/18
38 Keys, Doors, and Windows
handle and turn the key to the
unlock position five times within
10 seconds.
The DIC displays REMOTE
LEARN PENDING,
PLEASE WAIT.
2. Wait for 10 minutes until the DIC displays PRESS ENGINE
START BUTTON TO LEARN
and then press POWER
O.
The DIC will again show
REMOTE LEARN PENDING,
PLEASE WAIT.
3. Repeat Step 2 two additional times. After the third time, all
previously known transmitters
will no longer work with the
vehicle. Remaining transmitters
can be relearned during the
next steps.
The DIC should now show
READY FOR REMOTE # 1.
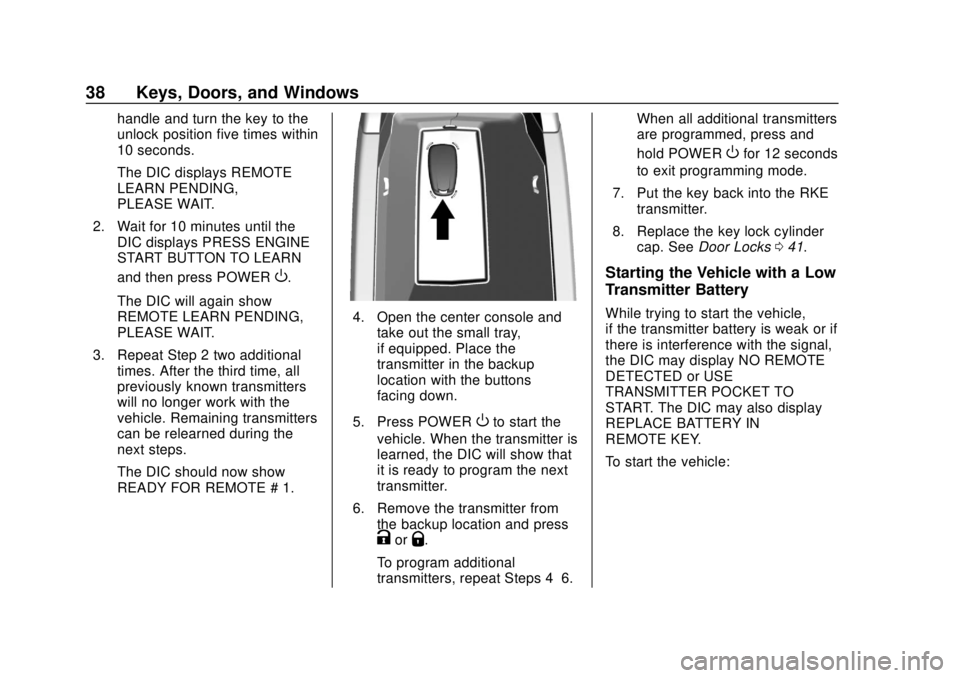
4. Open the center console andtake out the small tray,
if equipped. Place the
transmitter in the backup
location with the buttons
facing down.
5. Press POWER
Oto start the
vehicle. When the transmitter is
learned, the DIC will show that
it is ready to program the next
transmitter.
6. Remove the transmitter from the backup location and press
KorQ.
To program additional
transmitters, repeat Steps 4–6. When all additional transmitters
are programmed, press and
hold POWER
Ofor 12 seconds
to exit programming mode.
7. Put the key back into the RKE transmitter.
8. Replace the key lock cylinder cap. See Door Locks 041.
Starting the Vehicle with a Low
Transmitter Battery
While trying to start the vehicle,
if the transmitter battery is weak or if
there is interference with the signal,
the DIC may display NO REMOTE
DETECTED or USE
TRANSMITTER POCKET TO
START. The DIC may also display
REPLACE BATTERY IN
REMOTE KEY.
To start the vehicle:
Page 40 of 371
Chevrolet BOLT EV Owner Manual (GMNA-Localizing-U.S./Canada/Mexico-
12163003) - 2019 - crc - 5/18/18
Keys, Doors, and Windows 39
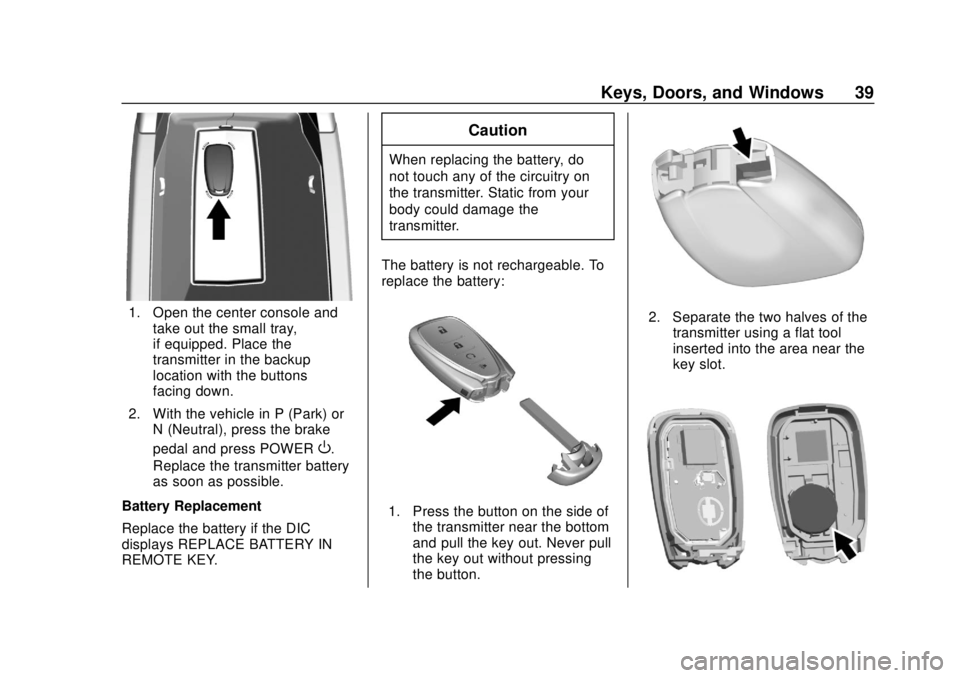
1. Open the center console andtake out the small tray,
if equipped. Place the
transmitter in the backup
location with the buttons
facing down.
2. With the vehicle in P (Park) or N (Neutral), press the brake
pedal and press POWER
O.
Replace the transmitter battery
as soon as possible.
Battery Replacement
Replace the battery if the DIC
displays REPLACE BATTERY IN
REMOTE KEY.
Caution
When replacing the battery, do
not touch any of the circuitry on
the transmitter. Static from your
body could damage the
transmitter.
The battery is not rechargeable. To
replace the battery:
1. Press the button on the side of the transmitter near the bottom
and pull the key out. Never pull
the key out without pressing
the button.
2. Separate the two halves of thetransmitter using a flat tool
inserted into the area near the
key slot.
Page 46 of 371
Chevrolet BOLT EV Owner Manual (GMNA-Localizing-U.S./Canada/Mexico-
12163003) - 2019 - crc - 5/18/18
Keys, Doors, and Windows 45
Safety Locks
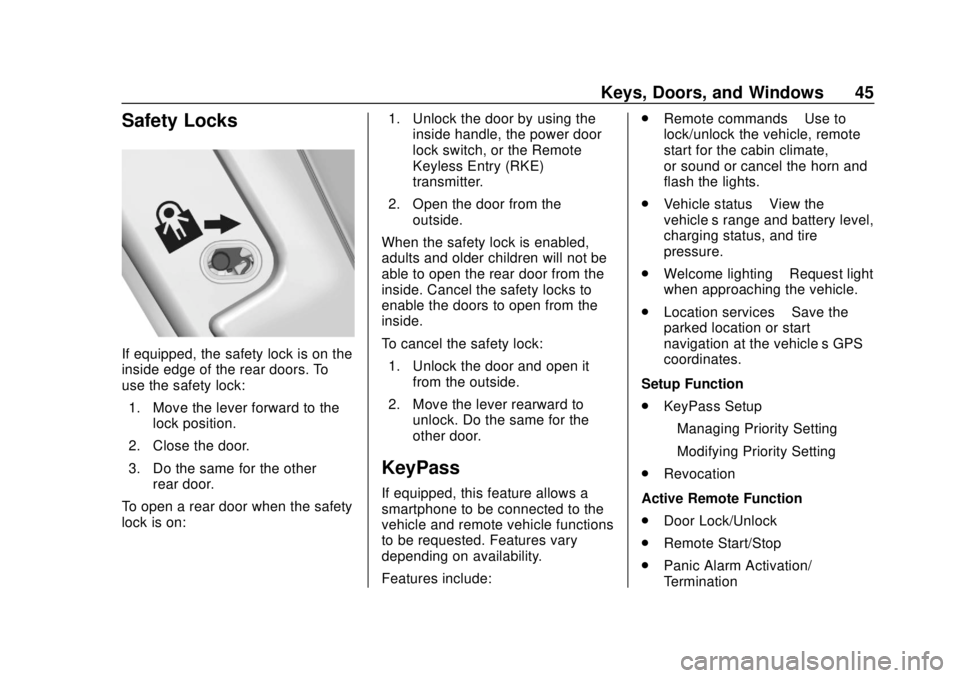
If equipped, the safety lock is on the
inside edge of the rear doors. To
use the safety lock:1. Move the lever forward to the lock position.
2. Close the door.
3. Do the same for the other rear door.
To open a rear door when the safety
lock is on: 1. Unlock the door by using the
inside handle, the power door
lock switch, or the Remote
Keyless Entry (RKE)
transmitter.
2. Open the door from the outside.
When the safety lock is enabled,
adults and older children will not be
able to open the rear door from the
inside. Cancel the safety locks to
enable the doors to open from the
inside.
To cancel the safety lock: 1. Unlock the door and open it from the outside.
2. Move the lever rearward to unlock. Do the same for the
other door.
KeyPass
If equipped, this feature allows a
smartphone to be connected to the
vehicle and remote vehicle functions
to be requested. Features vary
depending on availability.
Features include: .
Remote commands –Use to
lock/unlock the vehicle, remote
start for the cabin climate,
or sound or cancel the horn and
flash the lights.
. Vehicle status –View the
vehicle’s range and battery level,
charging status, and tire
pressure.
. Welcome lighting –Request light
when approaching the vehicle.
. Location services –Save the
parked location or start
navigation at the vehicle’s GPS
coordinates.
Setup Function
. KeyPass Setup
‐Managing Priority Setting
‐ Modifying Priority Setting
. Revocation
Active Remote Function
. Door Lock/Unlock
. Remote Start/Stop
. Panic Alarm Activation/
Termination
Page 135 of 371
Chevrolet BOLT EV Owner Manual (GMNA-Localizing-U.S./Canada/Mexico-
12163003) - 2019 - crc - 5/18/18
134 Instruments and Controls
2. The current programmeddeparture time is displayed on
the tab with the day of the
week. Select the tab for the
day of the week to be edited.
3. Touch +or -to change the
hours and minutes.
4. Touch
yorzto change AM
or PM.
5. Touch
0to exit the screen.
Charge Limit Selection
The Charge Limit setting allows the
vehicle’s charge current to be
selected so it matches the capability
of the charging location. If the
vehicle consistently stops charging
after plugging in, or if a circuit
breaker continues to trip, reducing
to a lower Charge Limit setting may
resolve the issue.
The Charge Limit setting should be
configured to match the electrical
current rating for the electrical outlet
that the charge cord is connected
to. When the vehicle is plugged in using the portable charge cord, on
the Charge Mode tab, toggle the
Charge Limit selection between:
.
12 amps
. 8 amps
Exact current levels may vary from
the values shown in this manual.
Check the vehicle for the current
available levels. When the vehicle is
plugged into a charging station, the
Charge Limit option on the Charge
Mode tab will not be available.
The Charge Limit can be changed
and saved using Location Based
Charging settings. The default value
is the lower current limit. The
Charge Limit will reset to the lower
value when the vehicle is shifted
from P (Park) unless the Location
Based Charging feature is active
and set to retain this preference.
See “Location Based Charging” later
in this section.
{Warning
Using a charge level that exceeds
the electrical circuit or electrical
outlet capacity may start a fire or
damage the electrical circuit. Use
the lowest charge level until a
qualified electrician inspects the
electrical circuit capacity. Use the
lowest charge level if the
electrical circuit or electrical outlet
capacity is not known.
Electric Rate Preference
The vehicle estimates the charging
start time based on the utility rate
schedule, utility rate preference, and
programmed departure time for the
current day of the week. The vehicle
will charge during the least
expensive rate periods to achieve a
full battery charge by the departure
time. Electrical rate information from
the utility company for the charging
location is required for this mode.
If the selected charge mode is
Departure, then electric rate
preference selection will display.
Page 140 of 371
Chevrolet BOLT EV Owner Manual (GMNA-Localizing-U.S./Canada/Mexico-
12163003) - 2019 - crc - 5/18/18
Instruments and Controls 139
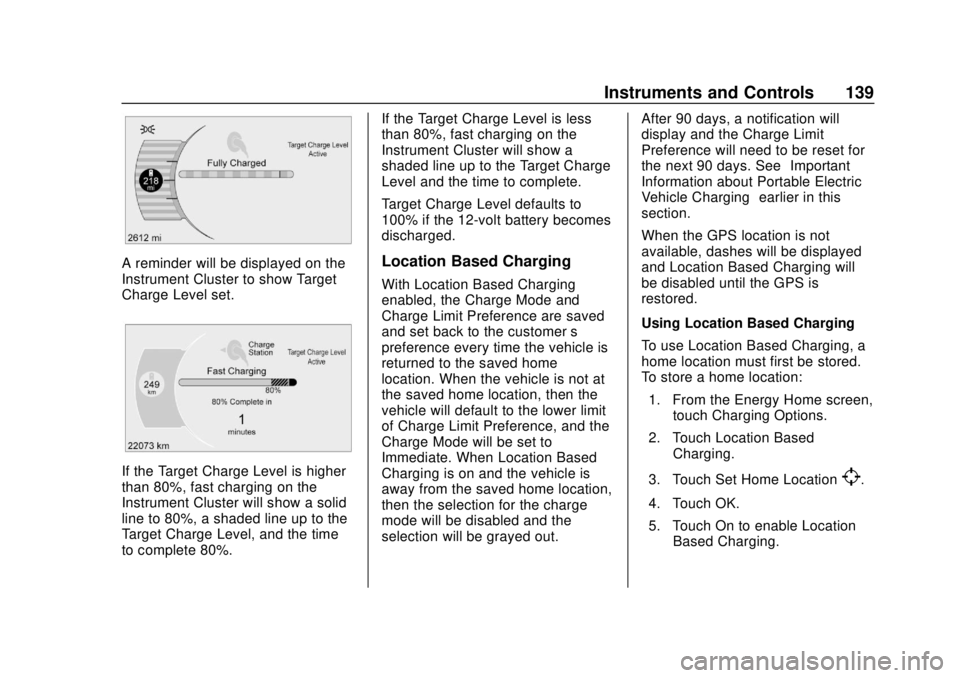
A reminder will be displayed on the
Instrument Cluster to show Target
Charge Level set.
If the Target Charge Level is higher
than 80%, fast charging on the
Instrument Cluster will show a solid
line to 80%, a shaded line up to the
Target Charge Level, and the time
to complete 80%.If the Target Charge Level is less
than 80%, fast charging on the
Instrument Cluster will show a
shaded line up to the Target Charge
Level and the time to complete.
Target Charge Level defaults to
100% if the 12-volt battery becomes
discharged.
Location Based Charging
With Location Based Charging
enabled, the Charge Mode and
Charge Limit Preference are saved
and set back to the customer
’s
preference every time the vehicle is
returned to the saved home
location. When the vehicle is not at
the saved home location, then the
vehicle will default to the lower limit
of Charge Limit Preference, and the
Charge Mode will be set to
Immediate. When Location Based
Charging is on and the vehicle is
away from the saved home location,
then the selection for the charge
mode will be disabled and the
selection will be grayed out. After 90 days, a notification will
display and the Charge Limit
Preference will need to be reset for
the next 90 days. See
“Important
Information about Portable Electric
Vehicle Charging” earlier in this
section.
When the GPS location is not
available, dashes will be displayed
and Location Based Charging will
be disabled until the GPS is
restored.
Using Location Based Charging
To use Location Based Charging, a
home location must first be stored.
To store a home location:
1. From the Energy Home screen, touch Charging Options.
2. Touch Location Based Charging.
3. Touch Set Home Location
[.
4. Touch OK.
5. Touch On to enable Location Based Charging.
Page 141 of 371
Chevrolet BOLT EV Owner Manual (GMNA-Localizing-U.S./Canada/Mexico-
12163003) - 2019 - crc - 5/18/18
140 Instruments and Controls
To change the stored home location:1. Touch Update Home Location
[on the Location Based
Charging screen.
2. Touch Update, then OK to set the new home location.
.Touch Cancel to make no
changes.
. Touch Remove to clear the
location and turn Location
Based Charging off.
Charging Interrupted or
Overridden Pop-Up
The Charging Interrupted or
Overridden pop-up will appear if any
of the following conditions occur:
.
The Charging Options have
been updated via the mobile
app. For example, the Departure
Time Tables, the Rate Tables,
or the Charge Mode were
updated using the customer
website (available in select
regions). See KeyPass.
. There was an unintended loss of
AC power during the plug-in
charge event. For example,
there was a power outage or the
charge cord was unplugged from
the wall.
See Utility Interruption of Charging
0 252.
Programmable Charging
Disabled
When the Programmable Charging
system is disabled, the Unable to
Charge screen will display.
Energy Information
To view Energy Detail, Range
Impacts, and Efficiency History,
touch Energy on the infotainment
display, and then touch Information.
Touch
horkto go to the next
screen.
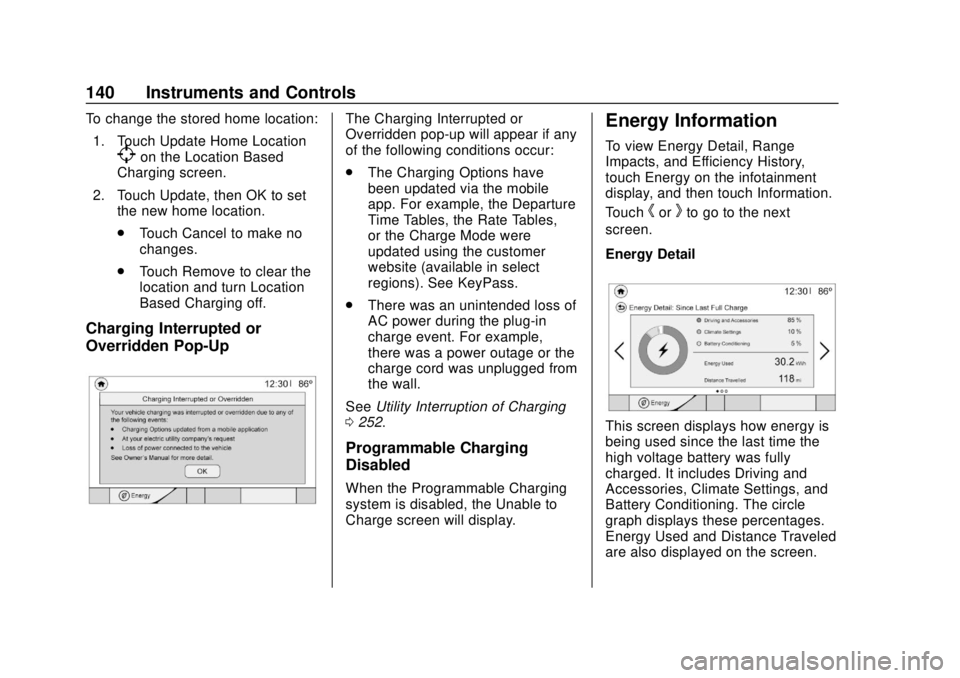
Energy Detail
This screen displays how energy is
being used since the last time the
high voltage battery was fully
charged. It includes Driving and
Accessories, Climate Settings, and
Battery Conditioning. The circle
graph displays these percentages.
Energy Used and Distance Traveled
are also displayed on the screen.
Page 143 of 371
Chevrolet BOLT EV Owner Manual (GMNA-Localizing-U.S./Canada/Mexico-
12163003) - 2019 - crc - 5/18/18
142 Instruments and Controls
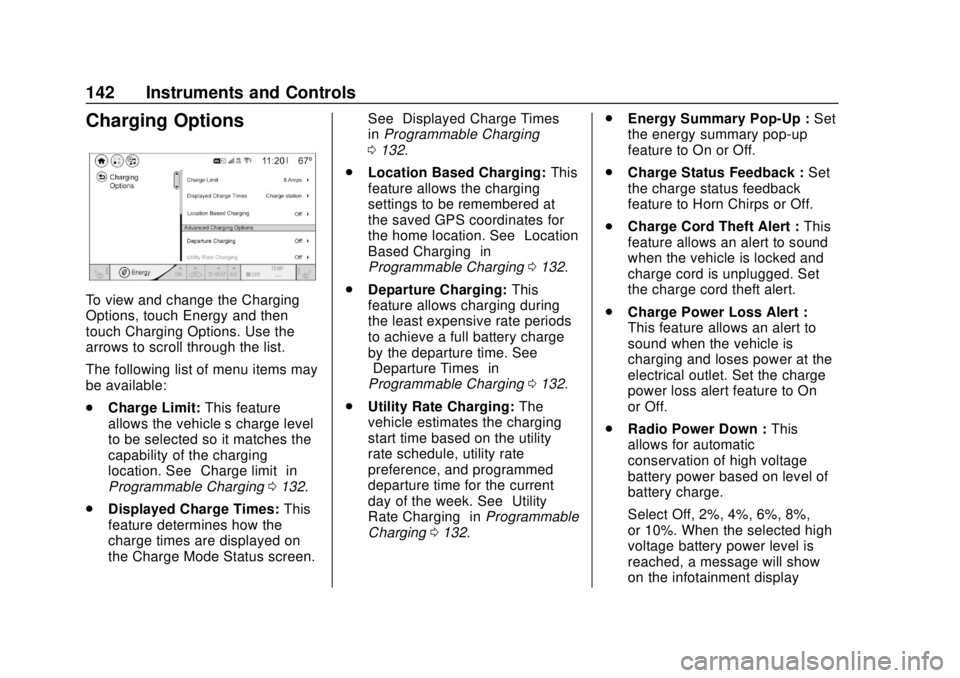
Charging Options
To view and change the Charging
Options, touch Energy and then
touch Charging Options. Use the
arrows to scroll through the list.
The following list of menu items may
be available:
.Charge Limit: This feature
allows the vehicle’s charge level
to be selected so it matches the
capability of the charging
location. See “Charge limit” in
Programmable Charging 0132.
. Displayed Charge Times: This
feature determines how the
charge times are displayed on
the Charge Mode Status screen. See
“Displayed Charge Times”
in Programmable Charging
0 132.
. Location Based Charging: This
feature allows the charging
settings to be remembered at
the saved GPS coordinates for
the home location. See “Location
Based Charging” in
Programmable Charging 0132.
. Departure Charging: This
feature allows charging during
the least expensive rate periods
to achieve a full battery charge
by the departure time. See
“Departure Times” in
Programmable Charging 0132.
. Utility Rate Charging: The
vehicle estimates the charging
start time based on the utility
rate schedule, utility rate
preference, and programmed
departure time for the current
day of the week. See “Utility
Rate Charging” inProgrammable
Charging 0132. .
Energy Summary Pop-Up : Set
the energy summary pop-up
feature to On or Off.
. Charge Status Feedback : Set
the charge status feedback
feature to Horn Chirps or Off.
. Charge Cord Theft Alert : This
feature allows an alert to sound
when the vehicle is locked and
charge cord is unplugged. Set
the charge cord theft alert.
. Charge Power Loss Alert :
This feature allows an alert to
sound when the vehicle is
charging and loses power at the
electrical outlet. Set the charge
power loss alert feature to On
or Off.
. Radio Power Down : This
allows for automatic
conservation of high voltage
battery power based on level of
battery charge.
Select Off, 2%, 4%, 6%, 8%,
or 10%. When the selected high
voltage battery power level is
reached, a message will show
on the infotainment display
Page 207 of 371
Chevrolet BOLT EV Owner Manual (GMNA-Localizing-U.S./Canada/Mexico-
12163003) - 2019 - crc - 5/18/18
206 Driving and Operating
instrument cluster, the vehicle is
ready to be driven. This could take
up to 15 seconds at extremely cold
temperatures.
Service Mode
This power mode is available for
service and diagnostics, and to
verify the proper operation of the
service vehicle soon light as may be
required for emission inspection
purposes. With the vehicle off, and
the brake pedal not applied,
pressing and holding POWER
Ofor
more than five seconds will place
the vehicle in Service Mode. The
instruments and audio systems will
operate as they do in ON/RUN, but
the vehicle will not be able to be
driven. The propulsion system will
not start in Service Mode. Press
POWER
Oagain to turn the
vehicle off.
Caution
Placing the vehicle in Service
Mode will use the 12-volt battery.
Do not use Service Mode for an
extended period, or the vehicle
may not start.
STOPPING THE VEHICLE/OFF :
To turn the vehicle off, apply the
brakes, press the button on top of
the shift lever to shift to P (Park) and
press POWER
O.
Alternatively, apply the brakes and
press POWER
O. The electric drive
unit will shift to P (Park) then shut
off automatically.
Retained Accessory Power (RAP)
will remain active until the driver
door is opened. If the vehicle must be shut off in an
emergency:
1. Brake using a firm and steady pressure. Do not pump the
brakes repeatedly. This may
deplete power assist, requiring
increased brake pedal force.
2. Shift the vehicle to N (Neutral). This can be done while the
vehicle is moving. After shifting
to N (Neutral), firmly apply the
brakes and steer the vehicle to
a safe location.
3. Come to a complete stop, shift to P (Park), and turn the vehicle
off by pressing POWERO.
4. Set the parking brake.
{Warning
Turning off the vehicle while
moving may disable the airbags.
While driving, only shut the
propulsion system off in an
emergency.
Page 238 of 371
Chevrolet BOLT EV Owner Manual (GMNA-Localizing-U.S./Canada/Mexico-
12163003) - 2019 - crc - 5/18/18
Driving and Operating 237
Plug-In Charging
This section explains the process
for charging the high voltage battery.
Do not allow the vehicle to remain in
temperature extremes for long
periods without being driven or
plugged in. It is recommended that
the vehicle be plugged in when
temperatures are below 0 °C (32 °F)
and above 32 °C (90 °F) to
maximize high voltage battery life.
When using a 120-volt AC electrical
outlet, it will take approximately
50 hours to charge the vehicle from
a fully depleted battery with the
12 amp AC current setting, allowing
approximately 6 km (4 mi) for every
hour of charging.
When using a 240-volt charging
station, it will take approximately
9.5 hours to charge the vehicle with
the 32 amp setting, allowing
approximately 40 km (25 mi) for
every hour of charging.Charge times will vary based on
battery condition, charge level, and
outside temperature. See
Programmable Charging
0132 for
charge mode selection.
If equipped, the vehicle can be
charged using DC charging
equipment typically found at service
stations and other public locations.
When using a DC charging station
with at least 80 kW of available
power, it will take approximately
30 minutes to recharge from a
depleted battery to an estimated
145 km (90 mi) of driving range.
This time estimate is applicable to
nominal temperature ranges. In
extreme hot or cold conditions, this
time may be lengthened. A full
charge will take additional time.
The charging system may run fans
and pumps that result in sounds
from the vehicle while it is turned
off. Additionally, clicking sounds
may be caused by the electrical
devices used while charging. The vehicle does not require indoor
charging area ventilation before,
during, or after charging.
The vehicle cannot be driven while
the charge cord is plugged into the
vehicle.
Charging Override
A CHARGING OVERRIDE/
INTERRUPTION OCCURRED
message may display to indicate
that a charging override or
interruption has occurred due to one
or more of the following events:
.
Override of the charge settings
by the owner.
. Unintended interruption of AC
power at the vehicle's
charge port.
. Interruption of charging by the
utility company.
There are several screens that will
display depending on the current
charging status. See Programmable
Charging 0132.