steering CHEVROLET BOLT EV 2020 Get To Know Guide
[x] Cancel search | Manufacturer: CHEVROLET, Model Year: 2020, Model line: BOLT EV, Model: CHEVROLET BOLT EV 2020Pages: 16, PDF Size: 2.51 MB
Page 2 of 16
2
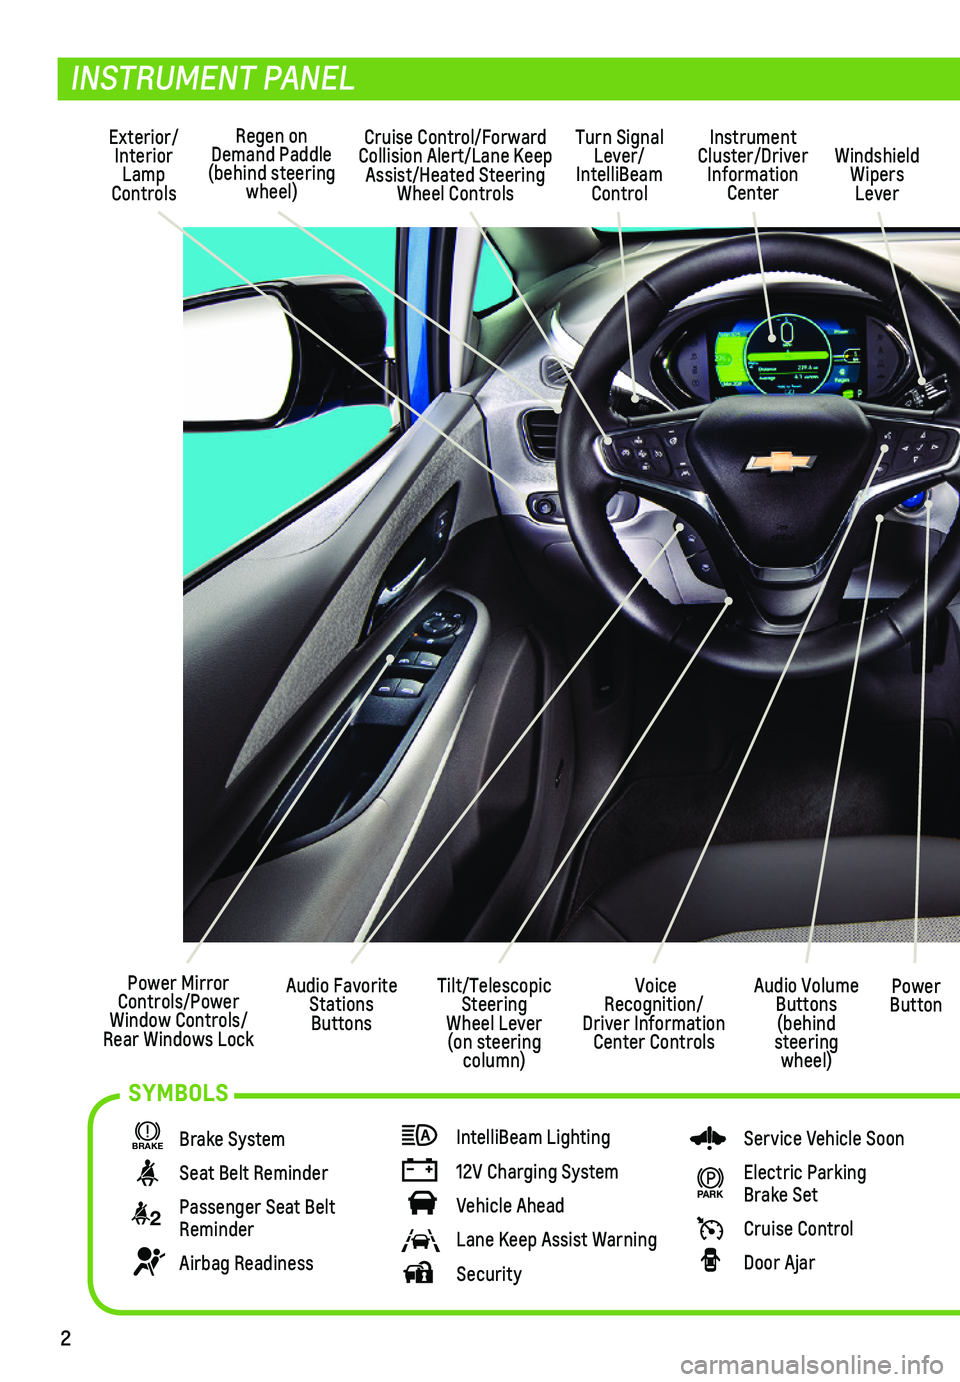
Power Mirror Controls/Power Window Controls/Rear Windows Lock
Exterior/Interior Lamp Controls
Turn Signal Lever/ IntelliBeam Control
Regen on Demand Paddle (behind steering wheel)
Audio Volume Buttons (behind steering wheel)
Voice Recognition/Driver Information Center Controls
Power Button
Cruise Control/Forward Collision Alert/Lane Keep Assist/Heated Steering Wheel Controls
INSTRUMENT PANEL
BRAKE Brake System
Seat Belt Reminder
2 Passenger Seat Belt Reminder
Airbag Readiness
IntelliBeam Lighting
12V Charging System
Vehicle Ahead
Lane Keep Assist Warning
Security
Service Vehicle Soon
PARK Electric Parking Brake Set
Cruise Control
Door Ajar
Instrument Cluster/Driver Information Center
Windshield Wipers Lever
Tilt/Telescopic Steering Wheel Lever (on steering column)
Audio Favorite Stations Buttons
SYMBOLS
Page 5 of 16
5
STARTING THE VEHICLE/ON
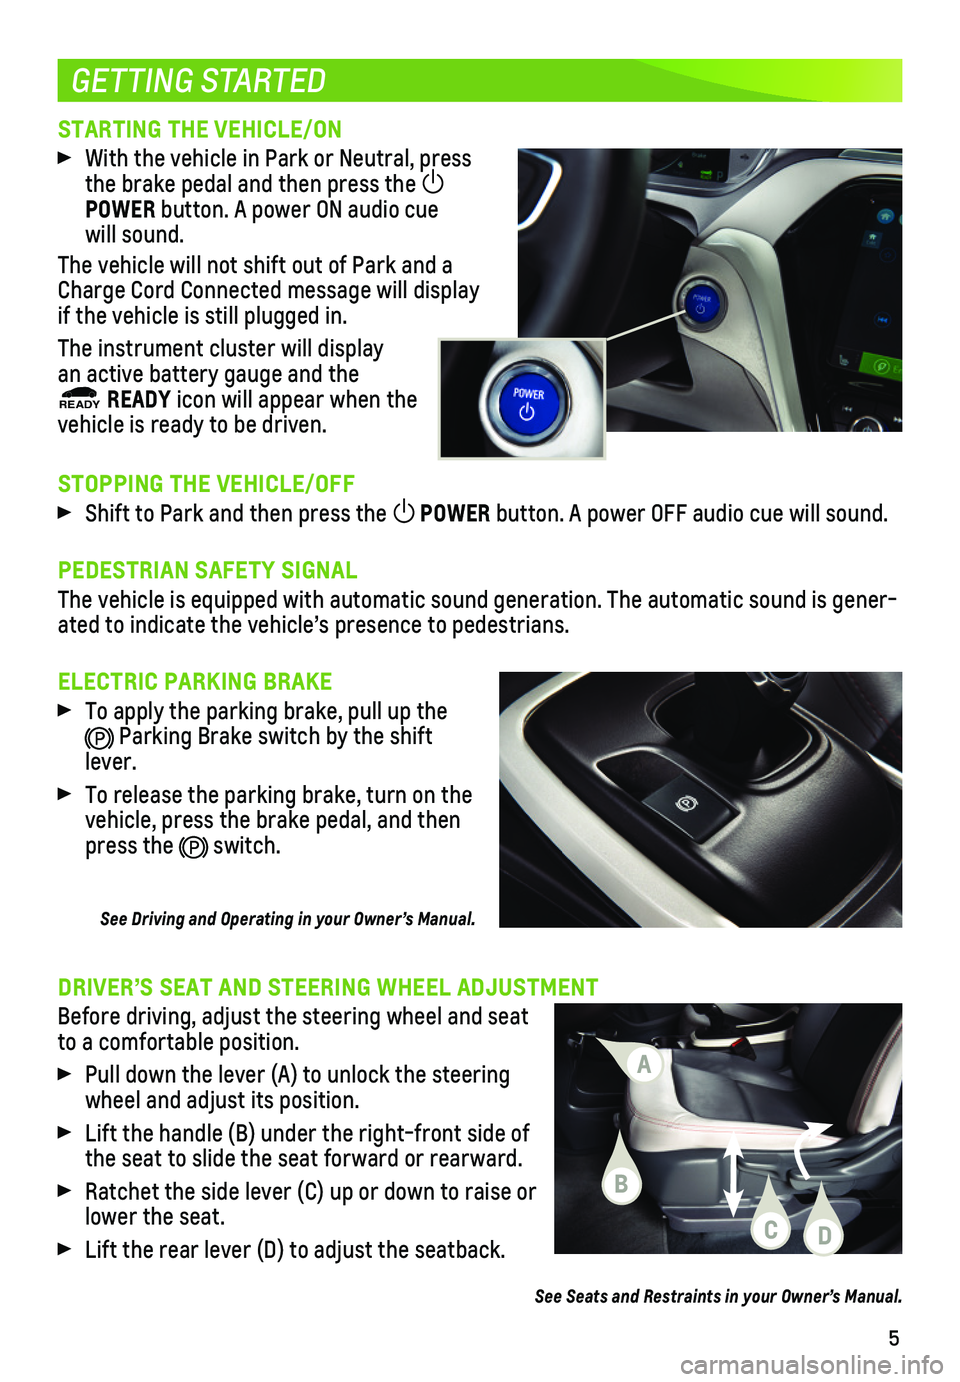
With the vehicle in Park or Neutral, press the brake pedal and then press the POWER button. A power ON audio cue will sound.
The vehicle will not shift out of Park and a Charge Cord Connected message will display if the vehicle is still plugged in.
The instrument cluster will display an active battery gauge and the READY READY icon will appear when the
vehicle is ready to be driven.
STOPPING THE VEHICLE/OFF
Shift to Park and then press the POWER button. A power OFF audio cue will sound.
PEDESTRIAN SAFETY SIGNAL
The vehicle is equipped with automatic sound generation. The automatic s\
ound is gener-ated to indicate the vehicle’s presence to pedestrians.
ELECTRIC PARKING BRAKE
To apply the parking brake, pull up the
Parking Brake switch by the shift lever.
To release the parking brake, turn on the vehicle, press the brake pedal, and then press the switch.
See Driving and Operating in your Owner’s Manual.
GETTING STARTED
DRIVER’S SEAT AND STEERING WHEEL ADJUSTMENT
Before driving, adjust the steering wheel and seat to a comfortable position.
Pull down the lever (A) to unlock the steering wheel and adjust its position.
Lift the handle (B) under the right-front side of the seat to slide the seat forward or rearward.
Ratchet the side lever (C) up or down to raise or lower the seat.
Lift the rear lever (D) to adjust the seatback.
See Seats and Restraints in your Owner’s Manual.
A
C
B
D
Page 7 of 16
7
INSTRUMENT CLUSTER
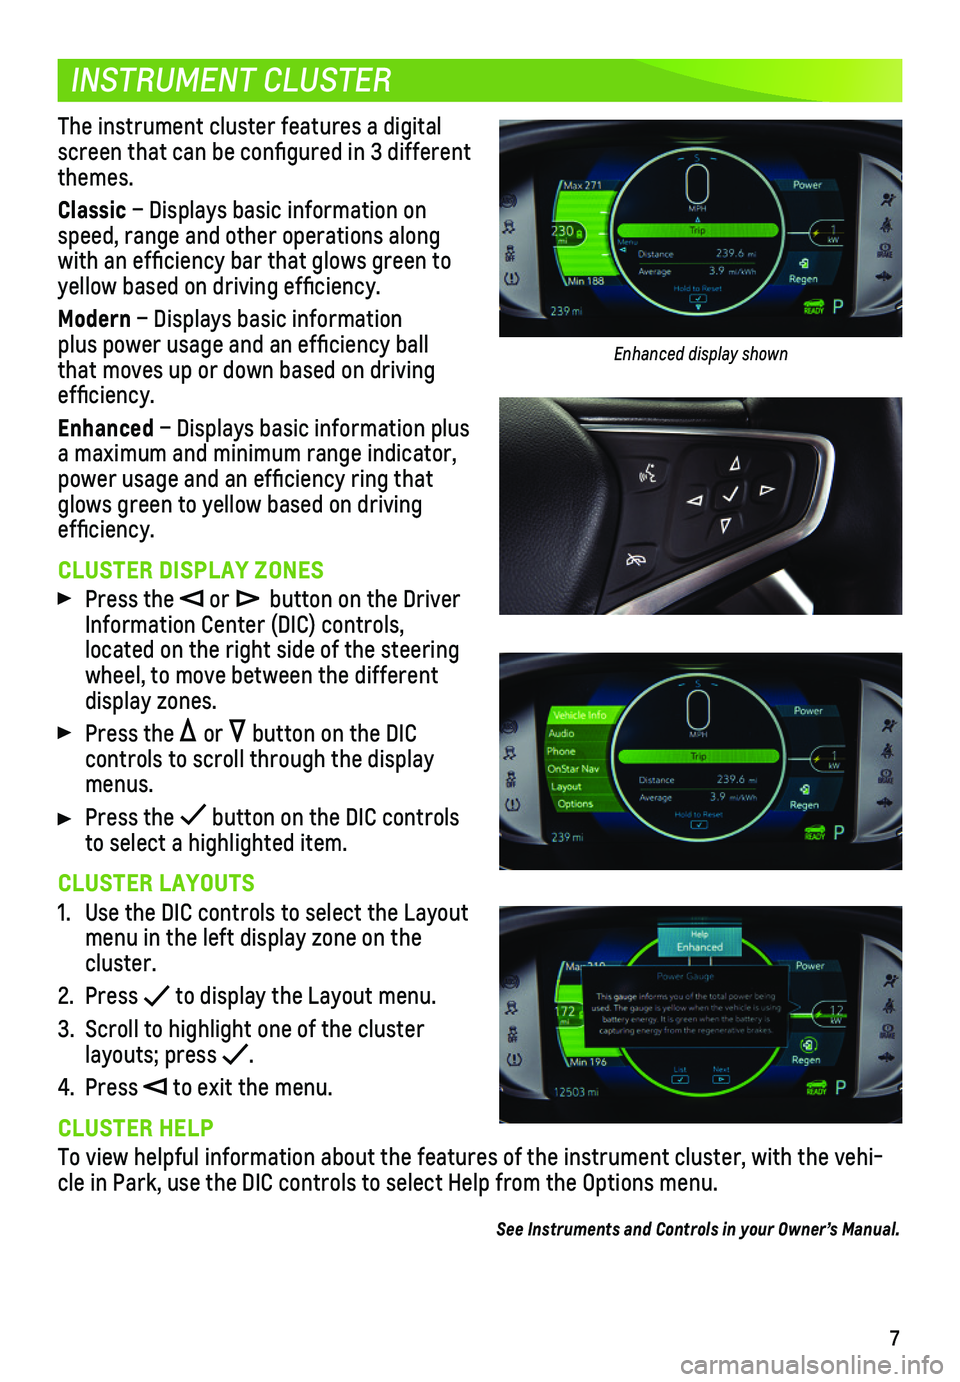
The instrument cluster features a digital screen that can be configured in 3 different themes.
Classic – Displays basic information on speed, range and other operations along with an efficiency bar that glows green to
yellow based on driving efficiency.
Modern – Displays basic information plus power usage and an efficiency ball that moves up or down based on driving efficiency.
Enhanced – Displays basic information plus a maximum and minimum range indicator, power usage and an efficiency ring that glows green to yellow based on driving efficiency.
CLUSTER DISPLAY ZONES
Press the or button on the Driver Information Center (DIC) controls,
located on the right side of the steering wheel, to move between the different display zones.
Press the or button on the DIC
controls to scroll through the display menus.
Press the button on the DIC controls to select a highlighted item.
CLUSTER LAYOUTS
1. Use the DIC controls to select the Layout menu in the left display zone on the cluster.
2. Press to display the Layout menu.
3. Scroll to highlight one of the cluster layouts; press .
4. Press to exit the menu.
CLUSTER HELP
To view helpful information about the features of the instrument cluster, with the vehi-cle in Park, use the DIC controls to select Help from the Options menu.
See Instruments and Controls in your Owner’s Manual.
Enhanced display shown
Page 8 of 16
8
EFFICIENCY
IMPACTS ON RANGE
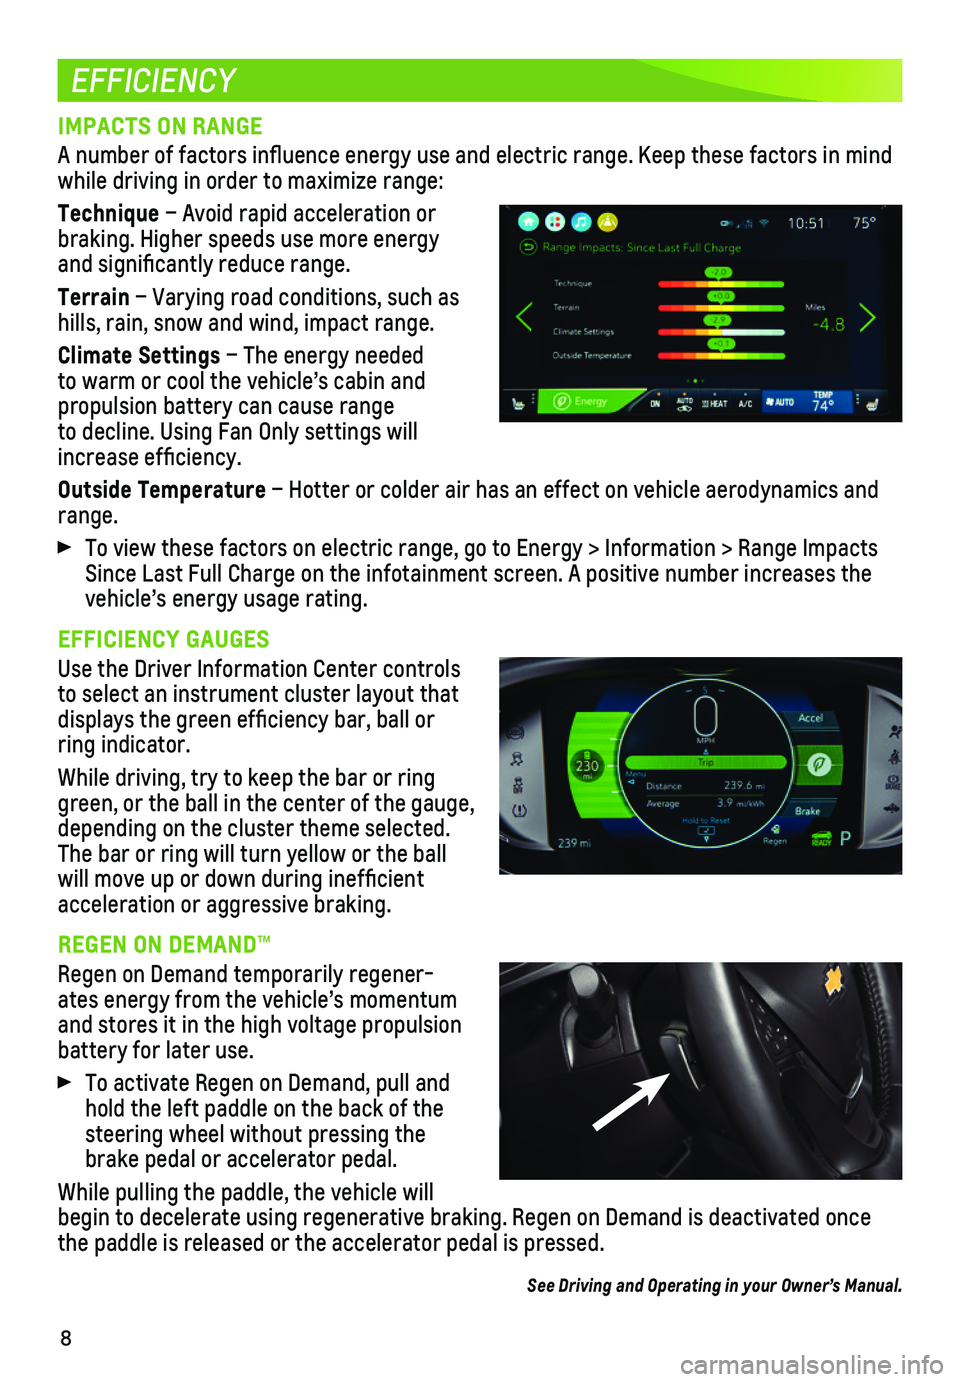
A number of factors influence energy use and electric range. Keep thes\
e factors in mind while driving in order to maximize range:
Technique – Avoid rapid acceleration or braking. Higher speeds use more energy and significantly reduce range.
Terrain – Varying road conditions, such as hills, rain, snow and wind, impact range.
Climate Settings – The energy needed to warm or cool the vehicle’s cabin and
propulsion battery can cause range to decline. Using Fan Only settings will increase efficiency.
Outside Temperature – Hotter or colder air has an effect on vehicle aerodynamics and range.
To view these factors on electric range, go to Energy > Information > Ra\
nge Impacts Since Last Full Charge on the infotainment screen. A positive number inc\
reases the vehicle’s energy usage rating.
EFFICIENCY GAUGES
Use the Driver Information Center controls to select an instrument cluster layout that displays the green efficiency bar, ball or ring indicator.
While driving, try to keep the bar or ring green, or the ball in the center of the gauge, depending on the cluster theme selected. The bar or ring will turn yellow or the ball will move up or down during inefficient acceleration or aggressive braking.
REGEN ON DEMAND™
Regen on Demand temporarily regener-ates energy from the vehicle’s momentum and stores it in the high voltage propulsion
battery for later use.
To activate Regen on Demand, pull and hold the left paddle on the back of the steering wheel without pressing the brake pedal or accelerator pedal.
While pulling the paddle, the vehicle will begin to decelerate using regenerative braking. Regen on Demand is deact\
ivated once the paddle is released or the accelerator pedal is pressed.
See Driving and Operating in your Owner’s Manual.
Page 9 of 16
9
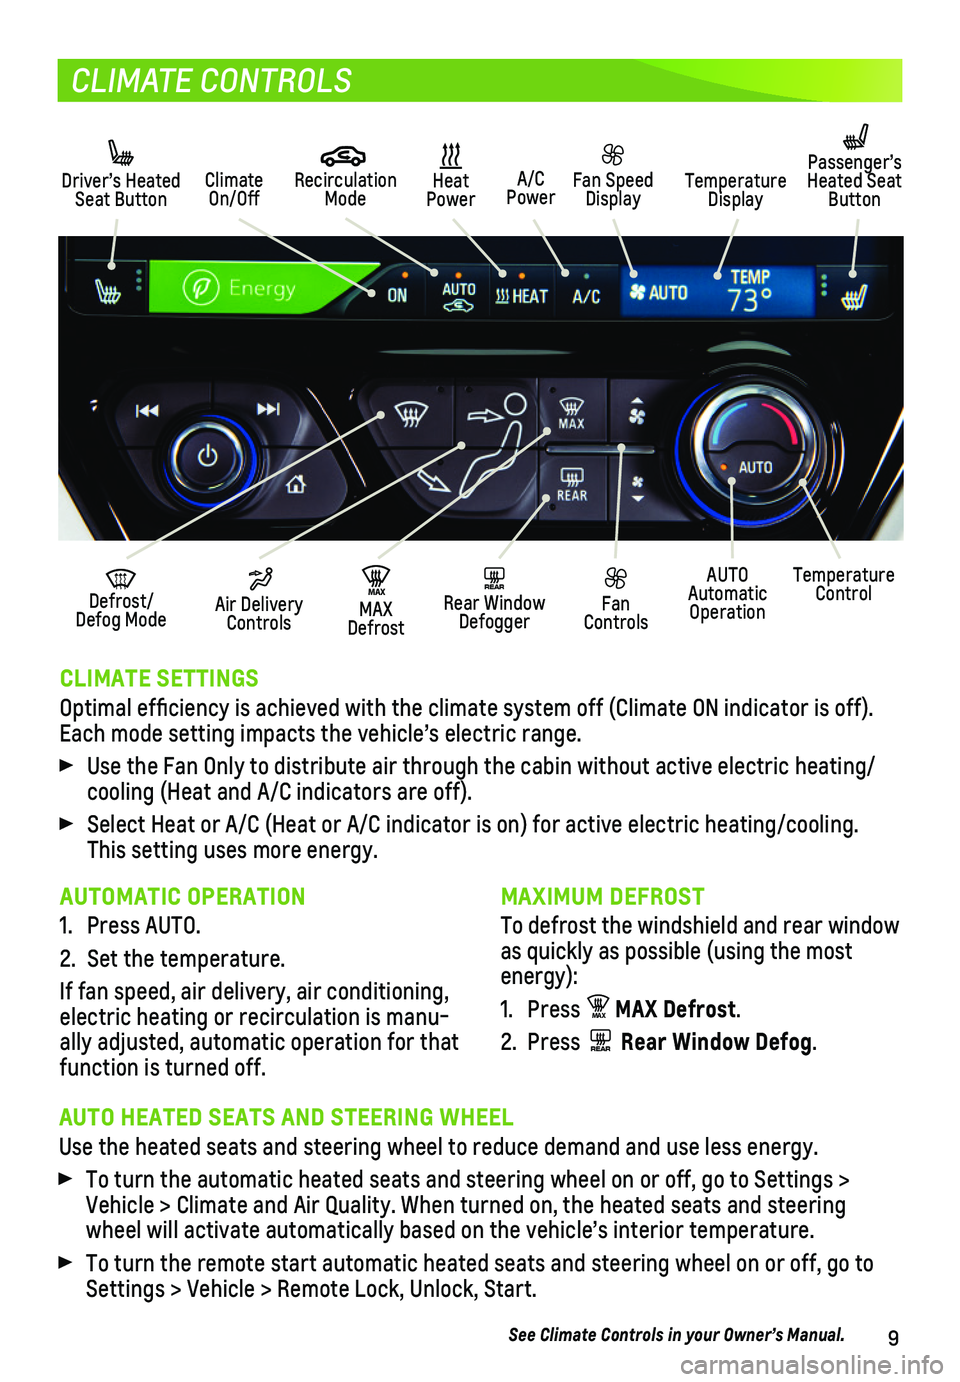
CLIMATE CONTROLS
CLIMATE SETTINGS
Optimal efficiency is achieved with the climate system off (Climate O\
N indicator is off). Each mode setting impacts the vehicle’s electric range.
Use the Fan Only to distribute air through the cabin without active elec\
tric heating/cooling (Heat and A/C indicators are off).
Select Heat or A/C (Heat or A/C indicator is on) for active electric h\
eating/cooling. This setting uses more energy.
Driver’s Heated Seat ButtonClimate On/Off
MAX Defrost
MA X
Heat PowerA/C Power
Defrost/Defog Mode
Fan Speed DisplayTemperature Display
Recirculation Mode
Passenger’s Heated Seat Button
REAR Rear Window Defogger
Air Delivery Controls
Fan Controls
AUTO Automatic Operation
Temperature Control
MAXIMUM DEFROST
To defrost the windshield and rear window as quickly as possible (using the most energy):
1. Press MAX MAX Defrost.
2. Press REAR Rear Window Defog.
AUTOMATIC OPERATION
1. Press AUTO.
2. Set the temperature.
If fan speed, air delivery, air conditioning, electric heating or recirculation is manu-ally adjusted, automatic operation for that function is turned off.
AUTO HEATED SEATS AND STEERING WHEEL
Use the heated seats and steering wheel to reduce demand and use less en\
ergy.
To turn the automatic heated seats and steering wheel on or off, go to S\
ettings > Vehicle > Climate and Air Quality. When turned on, the heated seats and \
steering wheel will activate automatically based on the vehicle’s interior temperature.
To turn the remote start automatic heated seats and steering wheel on or\
off, go to Settings > Vehicle > Remote Lock, Unlock, Start.
See Climate Controls in your Owner’s Manual.
Page 11 of 16
11
INFOTAINMENT SYSTEM
F Optional equipment
BLUETOOTH SYSTEM
Before using a Bluetooth-enabled device in the vehicle, it must be paire\
d with the in-vehicle Bluetooth system. Not all devices will support all functions. Th\
e pairing process is disabled when the vehicle is moving.
To pair a Bluetooth phone using voice recognition, press the Push to Talk button on the steering wheel; after the beep, say “Pair Phone.” To use th\
e touchscreen, select Settings > Devices > Add Device. Follow the pairing instructions.\
To activate Voice Pass-Thru for access to voice recognition commands (i\
.e. Siri® Eyes Free or Voice Command) on a paired, compatible phone, press and hold th\
e Push to Talk button on the steering wheel until a tone sounds.
APPLE CARPLAY
Apple CarPlay capability is available through a compatible smartphone us\
ing the Projection icon on the Home page of the infotainment system. No app is r\
equired.
1. Connect your compatible phone by plugging the Lightning cable into a USB\
data port. Use your device’s factory-provided Lightning cable. Aftermarket cable\
s may not work.
2. The Projection icon will change to Apple CarPlay. Touch the Apple CarPla\
y icon to have your apps displayed.
ANDROID AUTO
Android Auto capability is available through a compatible smartphone usi\
ng the Projection icon on the Home page of the infotainment system.
1. Download the Android Auto app to your phone from the Google Play Store.
2. Connect your compatible phone by plugging the phone USB cable into a USB\
data port. Use your device’s factory-provided USB cable. Aftermarket cables may \
not work.
3. The Projection icon will change to Android Auto. Touch the Android Auto \
icon to have your apps displayed.
4G LTE WI-FI® HOTSPOT
With the vehicle’s available 4G LTE Wi-Fi hotspot, up to 7 devices (\
smartphones, tablets and laptops) can be connected to high-speed internet.
To retrieve the SSID and password for the hotspot, go to Settings > Wi-F\
i > Manage Wi-Fi Networks.
See Infotainment in your Owner’s Manual.
WIRELESS CHARGING FOR MOBILE DEVICESF
The Wireless Charging system is located in the center console. A compati\
ble wireless charging adapter (not supplied) for the device may be needed. To check\
device compat-ibility, visit my.chevrolet.com/learn.
1. The vehicle must be ON.
2. Remove all objects from the charging slot.
3. Place the mobile device upright, facing the driver, in the charging slot\
.
4. The charging symbol displays on the infotainment screen, when it is char\
ging.
See Instruments and Controls in your Owner’s Manual.