air condition CHEVROLET BOLT EV 2023 Owners Manual
[x] Cancel search | Manufacturer: CHEVROLET, Model Year: 2023, Model line: BOLT EV, Model: CHEVROLET BOLT EV 2023Pages: 308, PDF Size: 5.18 MB
Page 4 of 308
Chevrolet BOLT EV Owner Manual (GMNA-Localizing-U.S./Canada-
16404388) - 2023 - CRC - 3/7/22
Introduction 3
A circle with a slash through it is a safety
symbol which means“Do not,” “Do not do
this,” or“Do not let this happen.”
Symbols
The vehicle has components and labels that
use symbols instead of text. Symbols are
shown along with the text describing the
operation or information relating to a
specific component, control, message, gauge,
or indicator.
M:Shown when the owner’s manual has
additional instructions or information.
*: Shown when the service manual has
additional instructions or information.
0: Shown when there is more information
on another page — “see page.”
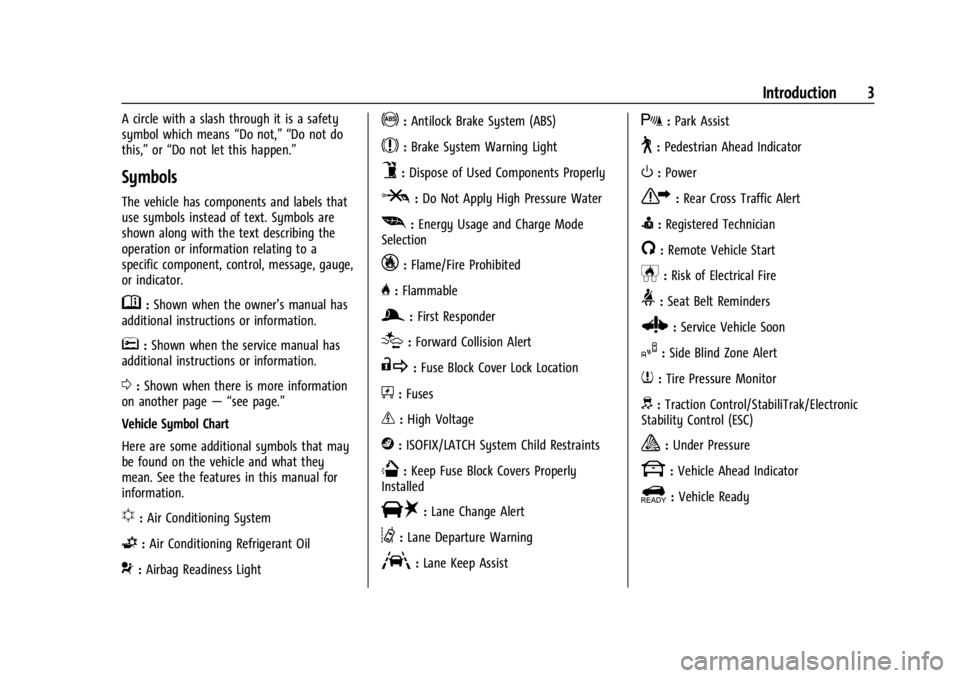
Vehicle Symbol Chart
Here are some additional symbols that may
be found on the vehicle and what they
mean. See the features in this manual for
information.
u: Air Conditioning System
G:Air Conditioning Refrigerant Oil
9:Airbag Readiness Light
!:Antilock Brake System (ABS)
$:Brake System Warning Light
9:Dispose of Used Components Properly
P:Do Not Apply High Pressure Water
[: Energy Usage and Charge Mode
Selection
_: Flame/Fire Prohibited
H: Flammable
g:First Responder
[:Forward Collision Alert
R:Fuse Block Cover Lock Location
+:Fuses
_:High Voltage
j:ISOFIX/LATCH System Child Restraints
Q:Keep Fuse Block Covers Properly
Installed
|: Lane Change Alert
@:Lane Departure Warning
A:Lane Keep Assist
X: Park Assist
~:Pedestrian Ahead Indicator
O:Power
7:Rear Cross Traffic Alert
I:Registered Technician
/:Remote Vehicle Start
h:Risk of Electrical Fire
>:Seat Belt Reminders
Z: Service Vehicle Soon
I:Side Blind Zone Alert
7:Tire Pressure Monitor
d:Traction Control/StabiliTrak/Electronic
Stability Control (ESC)
a: Under Pressure
k: Vehicle Ahead Indicator
]:Vehicle Ready
Page 9 of 308
Chevrolet BOLT EV Owner Manual (GMNA-Localizing-U.S./Canada-
16404388) - 2023 - CRC - 3/7/22
8 Keys, Doors, and Windows
The turn signal indicators may flash and/or
the horn may sound on the second press to
indicate locking. To view available settings
for this feature, touch the Settings icon on
the infotainment home page. Select
“Vehicle”to display the list of available
options and select “Remote Lock, Unlock,
Start”.
If the driver door is open when
Qis
pressed, all doors will lock and the driver
door will immediately unlock, if enabled. To
view available settings for this feature,
touch the Settings icon on the infotainment
home page. Select “Vehicle”to display the
list of available options and select “Power
Door Locks”.
If the passenger door is open when
Qis
pressed, all doors lock.
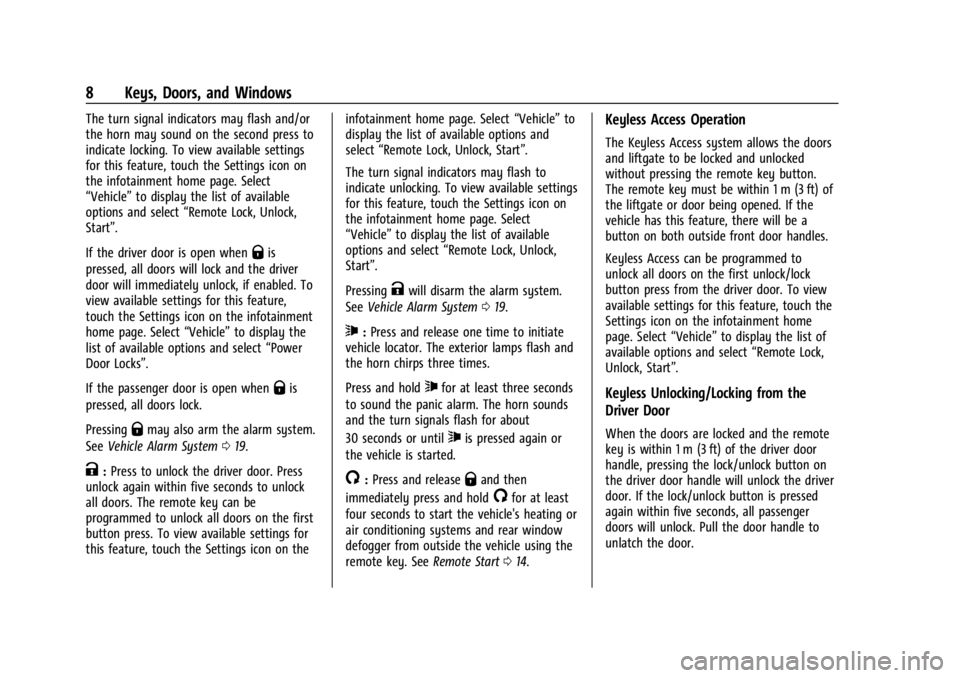
Pressing
Qmay also arm the alarm system.
See Vehicle Alarm System 019.
K:Press to unlock the driver door. Press
unlock again within five seconds to unlock
all doors. The remote key can be
programmed to unlock all doors on the first
button press. To view available settings for
this feature, touch the Settings icon on the infotainment home page. Select
“Vehicle”to
display the list of available options and
select “Remote Lock, Unlock, Start”.
The turn signal indicators may flash to
indicate unlocking. To view available settings
for this feature, touch the Settings icon on
the infotainment home page. Select
“Vehicle” to display the list of available
options and select “Remote Lock, Unlock,
Start”.
Pressing
Kwill disarm the alarm system.
See Vehicle Alarm System 019.
7:Press and release one time to initiate
vehicle locator. The exterior lamps flash and
the horn chirps three times.
Press and hold
7for at least three seconds
to sound the panic alarm. The horn sounds
and the turn signals flash for about
30 seconds or until
7is pressed again or
the vehicle is started.
/: Press and releaseQand then
immediately press and hold
/for at least
four seconds to start the vehicle's heating or
air conditioning systems and rear window
defogger from outside the vehicle using the
remote key. See Remote Start014.
Keyless Access Operation
The Keyless Access system allows the doors
and liftgate to be locked and unlocked
without pressing the remote key button.
The remote key must be within 1 m (3 ft) of
the liftgate or door being opened. If the
vehicle has this feature, there will be a
button on both outside front door handles.
Keyless Access can be programmed to
unlock all doors on the first unlock/lock
button press from the driver door. To view
available settings for this feature, touch the
Settings icon on the infotainment home
page. Select “Vehicle”to display the list of
available options and select “Remote Lock,
Unlock, Start”.
Keyless Unlocking/Locking from the
Driver Door
When the doors are locked and the remote
key is within 1 m (3 ft) of the driver door
handle, pressing the lock/unlock button on
the driver door handle will unlock the driver
door. If the lock/unlock button is pressed
again within five seconds, all passenger
doors will unlock. Pull the door handle to
unlatch the door.
Page 15 of 308
Chevrolet BOLT EV Owner Manual (GMNA-Localizing-U.S./Canada-
16404388) - 2023 - CRC - 3/7/22
14 Keys, Doors, and Windows
7. Reinsert key into the remote key.
Remote Start
This feature starts the heating or air
conditioning systems and the rear window
defogger from outside the vehicle.
Use remote start to heat or cool the interior
when the vehicle is plugged in to maximize
electric range by utilizing electricity from
the electrical outlet. Normal operation of the
system will return after the vehicle has been
turned on.
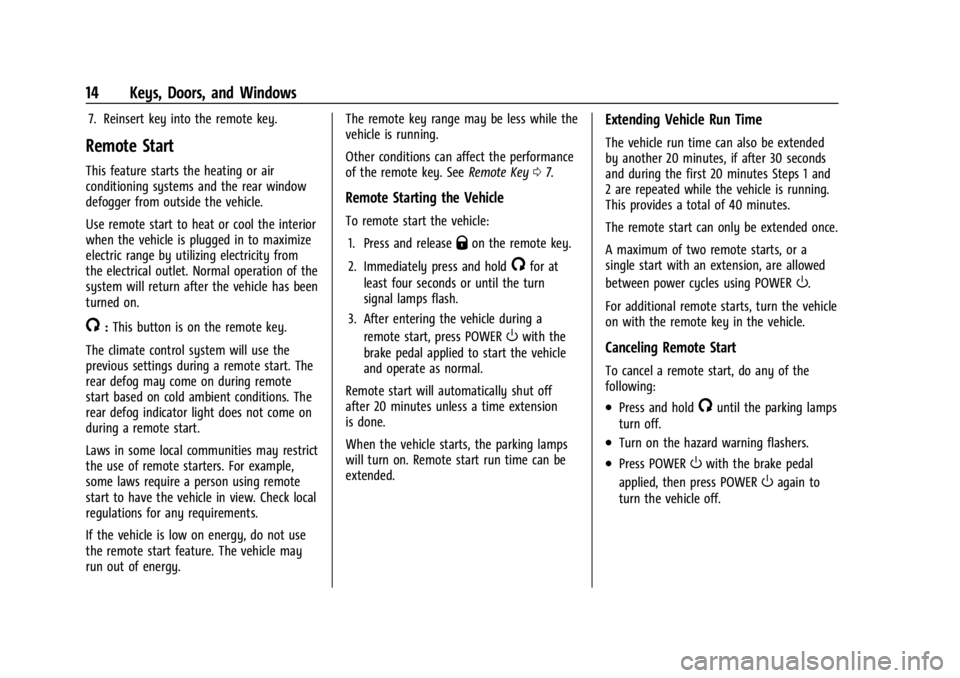
/:This button is on the remote key.
The climate control system will use the
previous settings during a remote start. The
rear defog may come on during remote
start based on cold ambient conditions. The
rear defog indicator light does not come on
during a remote start.
Laws in some local communities may restrict
the use of remote starters. For example,
some laws require a person using remote
start to have the vehicle in view. Check local
regulations for any requirements.
If the vehicle is low on energy, do not use
the remote start feature. The vehicle may
run out of energy. The remote key range may be less while the
vehicle is running.
Other conditions can affect the performance
of the remote key. See
Remote Key07.
Remote Starting the Vehicle
To remote start the vehicle:
1. Press and release
Qon the remote key.
2. Immediately press and hold
/for at
least four seconds or until the turn
signal lamps flash.
3. After entering the vehicle during a remote start, press POWER
Owith the
brake pedal applied to start the vehicle
and operate as normal.
Remote start will automatically shut off
after 20 minutes unless a time extension
is done.
When the vehicle starts, the parking lamps
will turn on. Remote start run time can be
extended.
Extending Vehicle Run Time
The vehicle run time can also be extended
by another 20 minutes, if after 30 seconds
and during the first 20 minutes Steps 1 and
2 are repeated while the vehicle is running.
This provides a total of 40 minutes.
The remote start can only be extended once.
A maximum of two remote starts, or a
single start with an extension, are allowed
between power cycles using POWER
O.
For additional remote starts, turn the vehicle
on with the remote key in the vehicle.
Canceling Remote Start
To cancel a remote start, do any of the
following:
.Press and hold/until the parking lamps
turn off.
.Turn on the hazard warning flashers.
.Press POWEROwith the brake pedal
applied, then press POWER
Oagain to
turn the vehicle off.
Page 45 of 308
Chevrolet BOLT EV Owner Manual (GMNA-Localizing-U.S./Canada-
16404388) - 2023 - CRC - 3/7/22
44 Seats and Restraints
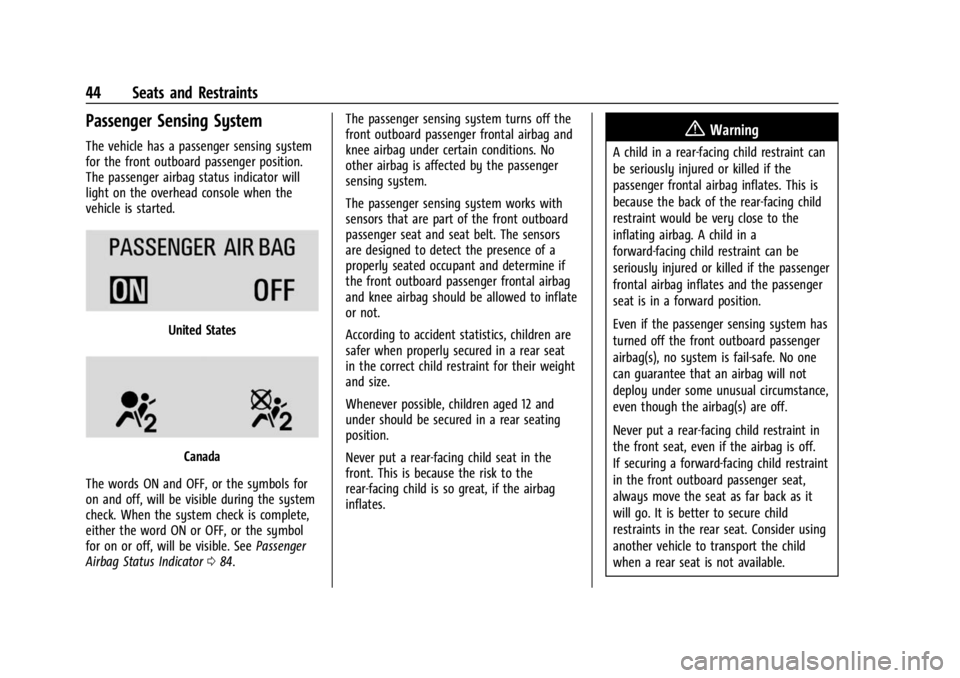
Passenger Sensing System
The vehicle has a passenger sensing system
for the front outboard passenger position.
The passenger airbag status indicator will
light on the overhead console when the
vehicle is started.
United States
Canada
The words ON and OFF, or the symbols for
on and off, will be visible during the system
check. When the system check is complete,
either the word ON or OFF, or the symbol
for on or off, will be visible. See Passenger
Airbag Status Indicator 084. The passenger sensing system turns off the
front outboard passenger frontal airbag and
knee airbag under certain conditions. No
other airbag is affected by the passenger
sensing system.
The passenger sensing system works with
sensors that are part of the front outboard
passenger seat and seat belt. The sensors
are designed to detect the presence of a
properly seated occupant and determine if
the front outboard passenger frontal airbag
and knee airbag should be allowed to inflate
or not.
According to accident statistics, children are
safer when properly secured in a rear seat
in the correct child restraint for their weight
and size.
Whenever possible, children aged 12 and
under should be secured in a rear seating
position.
Never put a rear-facing child seat in the
front. This is because the risk to the
rear-facing child is so great, if the airbag
inflates.
{Warning
A child in a rear-facing child restraint can
be seriously injured or killed if the
passenger frontal airbag inflates. This is
because the back of the rear-facing child
restraint would be very close to the
inflating airbag. A child in a
forward-facing child restraint can be
seriously injured or killed if the passenger
frontal airbag inflates and the passenger
seat is in a forward position.
Even if the passenger sensing system has
turned off the front outboard passenger
airbag(s), no system is fail-safe. No one
can guarantee that an airbag will not
deploy under some unusual circumstance,
even though the airbag(s) are off.
Never put a rear-facing child restraint in
the front seat, even if the airbag is off.
If securing a forward-facing child restraint
in the front outboard passenger seat,
always move the seat as far back as it
will go. It is better to secure child
restraints in the rear seat. Consider using
another vehicle to transport the child
when a rear seat is not available.
Page 67 of 308
Chevrolet BOLT EV Owner Manual (GMNA-Localizing-U.S./Canada-
16404388) - 2023 - CRC - 3/7/22
66 Seats and Restraints
Securing Child Restraints (With
the Seat Belt in the Front Seat)
This vehicle has airbags. A rear seat is a
safer place to secure a forward-facing child
restraint. SeeWhere to Put the Restraint
0 54.
In addition, the vehicle has a passenger
sensing system which is designed to turn off
the front outboard passenger frontal airbag
and knee airbag under certain conditions.
See Passenger Sensing System 044 and
Passenger Airbag Status Indicator 084 for
more information, including important
safety information.
Never put a rear-facing child seat in the
front. This is because the risk to the
rear-facing child is so great if the airbag
deploys.
{Warning
A child in a rear-facing child restraint can
be seriously injured or killed if the front
outboard passenger frontal airbag
inflates. This is because the back of the
rear-facing child restraint would be very
close to the inflating airbag. A child in a
(Continued)
Warning (Continued)
forward-facing child restraint can be
seriously injured or killed if the front
outboard passenger frontal airbag inflates
and the passenger seat is in a forward
position.
Even if the passenger sensing system has
turned off the front outboard passenger
airbag(s), no system is fail-safe. No one
can guarantee that an airbag will not
deploy under some unusual circumstance,
even though the airbag(s) are off.
Secure rear-facing child restraints in a
rear seat, even if the airbag(s) are off.
If you secure a forward-facing child
restraint in the front outboard passenger
seat, always move the seat as far back as
it will go. It is better to secure the child
restraint in a rear seat.
SeePassenger Sensing System 044 for
additional information.
If the vehicle does not have a rear seat that
will accommodate a rear-facing child
restraint, a rear-facing child restraint should
not be installed in the vehicle, even if the
airbag is off. If the child restraint uses a top tether, see
Lower Anchors and Tethers for Children
(LATCH System)
055 for top tether anchor
locations.
Do not secure a child restraint in a position
without a top tether anchor if a national or
local law requires that the top tether be
anchored, or if the instructions that come
with the child restraint say that the top
tether must be anchored.
In Canada, the law requires that
forward-facing child restraints have a top
tether, and that the tether be attached.
When using the lap-shoulder belt to secure
the child restraint in this position, follow the
instructions that came with the child
restraint and the following instructions:
1. Move the seat as far back as it will go before securing the forward-facing child
restraint. Move the seat upward or the
seatback to an upright position,
if needed, to get a tight installation of
the child restraint.
There must be finger clearance between
the push button and the child restraint.
When the passenger sensing system has
turned off the front outboard passenger
frontal airbag and knee airbag, the OFF
Page 99 of 308
Chevrolet BOLT EV Owner Manual (GMNA-Localizing-U.S./Canada-
16404388) - 2023 - CRC - 3/7/22
98 Instruments and Controls
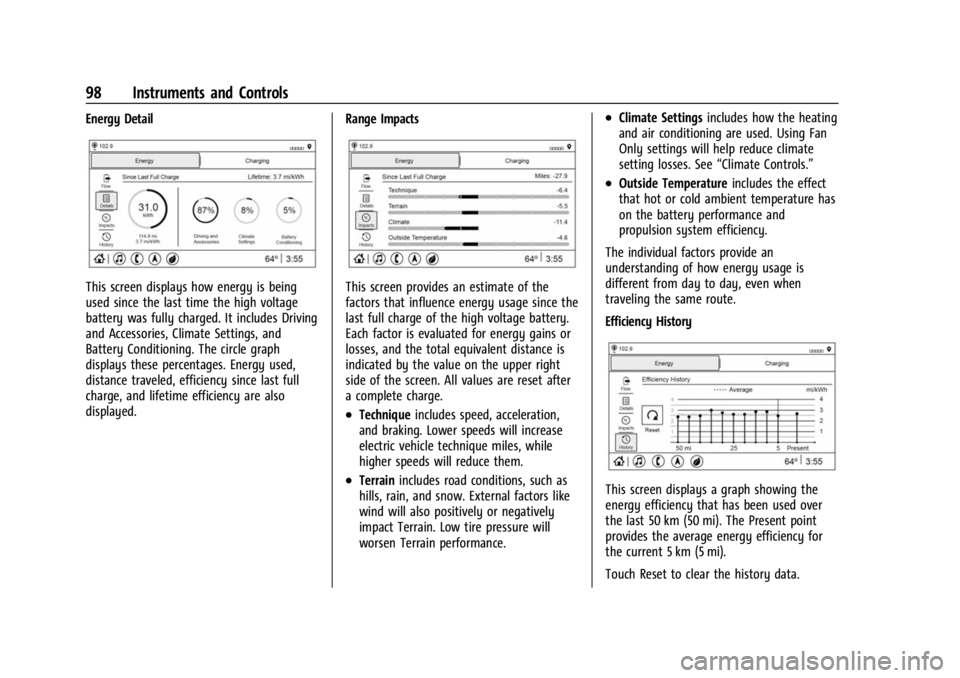
Energy Detail
This screen displays how energy is being
used since the last time the high voltage
battery was fully charged. It includes Driving
and Accessories, Climate Settings, and
Battery Conditioning. The circle graph
displays these percentages. Energy used,
distance traveled, efficiency since last full
charge, and lifetime efficiency are also
displayed.Range ImpactsThis screen provides an estimate of the
factors that influence energy usage since the
last full charge of the high voltage battery.
Each factor is evaluated for energy gains or
losses, and the total equivalent distance is
indicated by the value on the upper right
side of the screen. All values are reset after
a complete charge.
.Technique
includes speed, acceleration,
and braking. Lower speeds will increase
electric vehicle technique miles, while
higher speeds will reduce them.
.Terrain includes road conditions, such as
hills, rain, and snow. External factors like
wind will also positively or negatively
impact Terrain. Low tire pressure will
worsen Terrain performance.
.Climate Settings includes how the heating
and air conditioning are used. Using Fan
Only settings will help reduce climate
setting losses. See “Climate Controls.”
.Outside Temperature includes the effect
that hot or cold ambient temperature has
on the battery performance and
propulsion system efficiency.
The individual factors provide an
understanding of how energy usage is
different from day to day, even when
traveling the same route.
Efficiency History
This screen displays a graph showing the
energy efficiency that has been used over
the last 50 km (50 mi). The Present point
provides the average energy efficiency for
the current 5 km (5 mi).
Touch Reset to clear the history data.
Page 102 of 308
Chevrolet BOLT EV Owner Manual (GMNA-Localizing-U.S./Canada-
16404388) - 2023 - CRC - 3/7/22
Instruments and Controls 101
Timer :This display can be used as a timer.
To start the timer, press the thumbwheel
while this display is active. The display will
show the amount of time that has passed
since the timer was last reset. To stop the
timer, press the thumbwheel briefly while
this display is active and the timer is
running. To reset the timer to zero, press
and hold the thumbwheel while this display
is active.
Driver Assistance : If equipped, shows
information for ACC, Follow Distance, Lane
Keep Assist (LKA) and Forward Collision
Alert (FCA).
Blank Page : The Blank Page display allows
for no information to be displayed in the
cluster info display areas.
Vehicle Messages
Messages displayed on the DIC indicate the
status of the vehicle or some action that
may be needed to correct a condition.
Multiple messages may appear one after
another.
The messages that do not require
immediate action can be acknowledged and
cleared by pressing the thumbwheel. The messages that require immediate action
cannot be cleared until that action is
performed.
All messages should be taken seriously;
clearing the message does not correct the
problem.
If a SERVICE message appears, see your
dealer.
Follow the instructions given in the
messages. The system displays messages
regarding the following topics:
.Service Messages
.Fluid Levels
.Vehicle Security
.Brakes
.Ride Control Systems
.Driver Assistance Systems
.Cruise Control
.Lighting and Bulb Replacement
.Wiper/Washer Systems
.Doors and Windows
.Seat Belts
.Airbag Systems
.Propulsion and Transmission
.Tire Pressure
.Battery
Propulsion Power Messages
PROPULSION POWER IS REDUCED
This message displays when the vehicle's
propulsion power is reduced. A reduction in
propulsion power can affect the vehicle's
ability to accelerate. If this message is on,
but there is no observed reduction in
performance, proceed to your destination.
Under certain conditions the performance
may be reduced the next time the vehicle is
driven. The vehicle may be driven while this
message is on, but maximum acceleration
and speed may be reduced. Anytime this
message stays on, or displays repeatedly,
the vehicle should be taken to your dealer
for service as soon as possible.
Under certain operating conditions
propulsion will be disabled. Try restarting
after the vehicle has been off for
30 seconds.
PROPULSION POWER REDUCED DUE TO
TEMPERATURE
This message displays when the vehicle is
on, the battery temperature is low, and
when the vehicle’s performance is limited.
The duration of the limited vehicle
performance depends, in part, on the high
Page 105 of 308
Chevrolet BOLT EV Owner Manual (GMNA-Localizing-U.S./Canada-
16404388) - 2023 - CRC - 3/7/22
104 Lighting
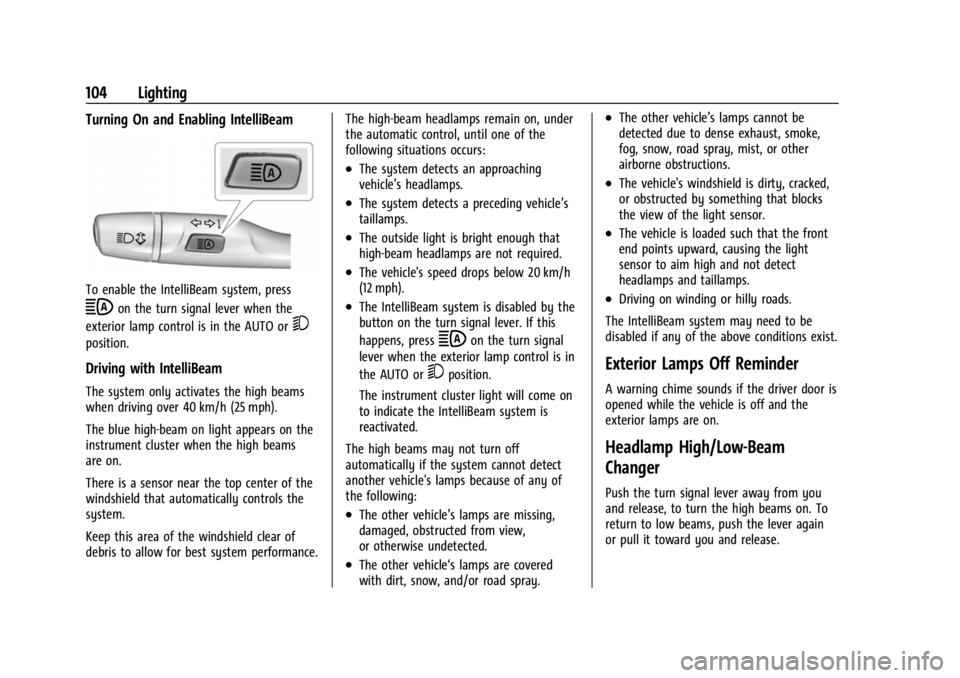
Turning On and Enabling IntelliBeam
To enable the IntelliBeam system, press
bon the turn signal lever when the
exterior lamp control is in the AUTO or
5
position.
Driving with IntelliBeam
The system only activates the high beams
when driving over 40 km/h (25 mph).
The blue high-beam on light appears on the
instrument cluster when the high beams
are on.
There is a sensor near the top center of the
windshield that automatically controls the
system.
Keep this area of the windshield clear of
debris to allow for best system performance. The high-beam headlamps remain on, under
the automatic control, until one of the
following situations occurs:
.The system detects an approaching
vehicle’s headlamps.
.The system detects a preceding vehicle’s
taillamps.
.The outside light is bright enough that
high-beam headlamps are not required.
.The vehicle's speed drops below 20 km/h
(12 mph).
.The IntelliBeam system is disabled by the
button on the turn signal lever. If this
happens, press
bon the turn signal
lever when the exterior lamp control is in
the AUTO or
5position.
The instrument cluster light will come on
to indicate the IntelliBeam system is
reactivated.
The high beams may not turn off
automatically if the system cannot detect
another vehicle's lamps because of any of
the following:
.The other vehicle’s lamps are missing,
damaged, obstructed from view,
or otherwise undetected.
.The other vehicle‘s lamps are covered
with dirt, snow, and/or road spray.
.The other vehicle’s lamps cannot be
detected due to dense exhaust, smoke,
fog, snow, road spray, mist, or other
airborne obstructions.
.The vehicle's windshield is dirty, cracked,
or obstructed by something that blocks
the view of the light sensor.
.The vehicle is loaded such that the front
end points upward, causing the light
sensor to aim high and not detect
headlamps and taillamps.
.Driving on winding or hilly roads.
The IntelliBeam system may need to be
disabled if any of the above conditions exist.
Exterior Lamps Off Reminder
A warning chime sounds if the driver door is
opened while the vehicle is off and the
exterior lamps are on.
Headlamp High/Low-Beam
Changer
Push the turn signal lever away from you
and release, to turn the high beams on. To
return to low beams, push the lever again
or pull it toward you and release.
Page 132 of 308
Chevrolet BOLT EV Owner Manual (GMNA-Localizing-U.S./Canada-
16404388) - 2023 - CRC - 3/7/22
Infotainment System 131
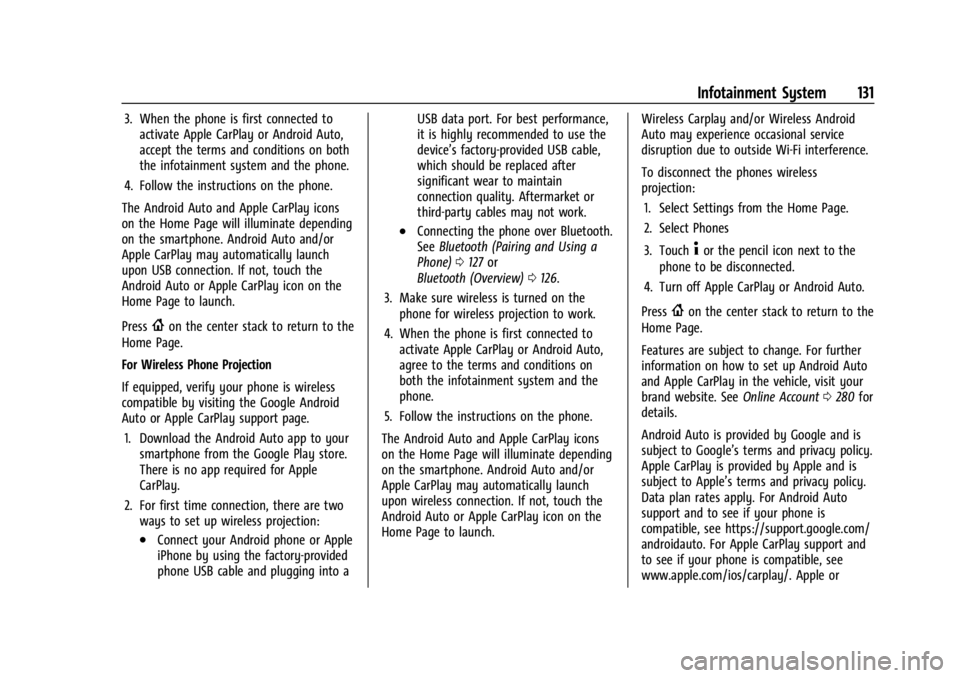
3. When the phone is first connected toactivate Apple CarPlay or Android Auto,
accept the terms and conditions on both
the infotainment system and the phone.
4. Follow the instructions on the phone.
The Android Auto and Apple CarPlay icons
on the Home Page will illuminate depending
on the smartphone. Android Auto and/or
Apple CarPlay may automatically launch
upon USB connection. If not, touch the
Android Auto or Apple CarPlay icon on the
Home Page to launch.
Press
{on the center stack to return to the
Home Page.
For Wireless Phone Projection
If equipped, verify your phone is wireless
compatible by visiting the Google Android
Auto or Apple CarPlay support page.
1. Download the Android Auto app to your smartphone from the Google Play store.
There is no app required for Apple
CarPlay.
2. For first time connection, there are two ways to set up wireless projection:
.Connect your Android phone or Apple
iPhone by using the factory-provided
phone USB cable and plugging into a USB data port. For best performance,
it is highly recommended to use the
device’s factory-provided USB cable,
which should be replaced after
significant wear to maintain
connection quality. Aftermarket or
third-party cables may not work.
.Connecting the phone over Bluetooth.
See
Bluetooth (Pairing and Using a
Phone) 0127 or
Bluetooth (Overview) 0126.
3. Make sure wireless is turned on the phone for wireless projection to work.
4. When the phone is first connected to activate Apple CarPlay or Android Auto,
agree to the terms and conditions on
both the infotainment system and the
phone.
5. Follow the instructions on the phone.
The Android Auto and Apple CarPlay icons
on the Home Page will illuminate depending
on the smartphone. Android Auto and/or
Apple CarPlay may automatically launch
upon wireless connection. If not, touch the
Android Auto or Apple CarPlay icon on the
Home Page to launch. Wireless Carplay and/or Wireless Android
Auto may experience occasional service
disruption due to outside Wi-Fi interference.
To disconnect the phones wireless
projection:
1. Select Settings from the Home Page.
2. Select Phones
3. Touch
4or the pencil icon next to the
phone to be disconnected.
4. Turn off Apple CarPlay or Android Auto.
Press
{on the center stack to return to the
Home Page.
Features are subject to change. For further
information on how to set up Android Auto
and Apple CarPlay in the vehicle, visit your
brand website. See Online Account0280 for
details.
Android Auto is provided by Google and is
subject to Google’s terms and privacy policy.
Apple CarPlay is provided by Apple and is
subject to Apple’s terms and privacy policy.
Data plan rates apply. For Android Auto
support and to see if your phone is
compatible, see https://support.google.com/
androidauto. For Apple CarPlay support and
to see if your phone is compatible, see
www.apple.com/ios/carplay/. Apple or
Page 145 of 308
Chevrolet BOLT EV Owner Manual (GMNA-Localizing-U.S./Canada-
16404388) - 2023 - CRC - 3/7/22
144 Climate Controls
Climate Controls
Climate Control Systems
Automatic Climate Control System . . . . 144
Air Vents
Air Vents . . . . . . . . . . . . . . . . . . . . . . . . . . . . . . 147
Maintenance
Air Intake . . . . . . . . . . . . . . . . . . . . . . . . . . . . . 148
Passenger Compartment Air Filter . . . . . 148
Air Conditioning Regular Operation . . . . 149
Service . . . . . . . . . . . . . . . . . . . . . . . . . . . . . . . . 150
Climate Control Systems
Automatic Climate Control System
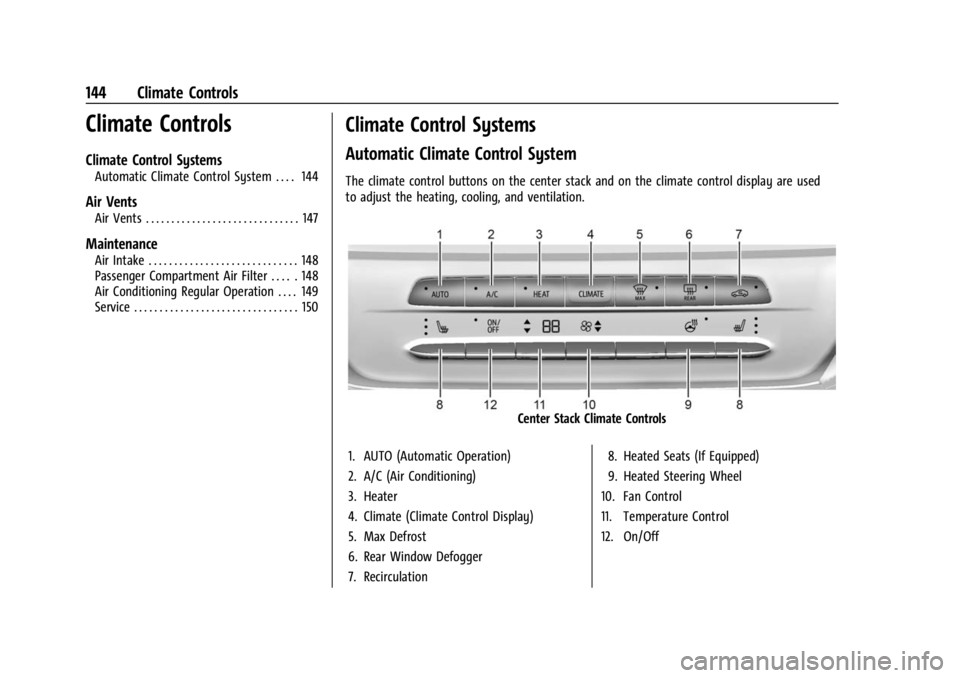
The climate control buttons on the center stack and on the climate control display are used
to adjust the heating, cooling, and ventilation.
Center Stack Climate Controls
1. AUTO (Automatic Operation)
2. A/C (Air Conditioning)
3. Heater
4. Climate (Climate Control Display)
5. Max Defrost
6. Rear Window Defogger
7. Recirculation 8. Heated Seats (If Equipped)
9. Heated Steering Wheel
10. Fan Control
11. Temperature Control
12. On/Off