electrical CHEVROLET CAMARO 1967 1.G Chassis Workshop Manual
[x] Cancel search | Manufacturer: CHEVROLET, Model Year: 1967, Model line: CAMARO, Model: CHEVROLET CAMARO 1967 1.GPages: 659, PDF Size: 114.24 MB
Page 613 of 659
ACCESSORIES 15-4
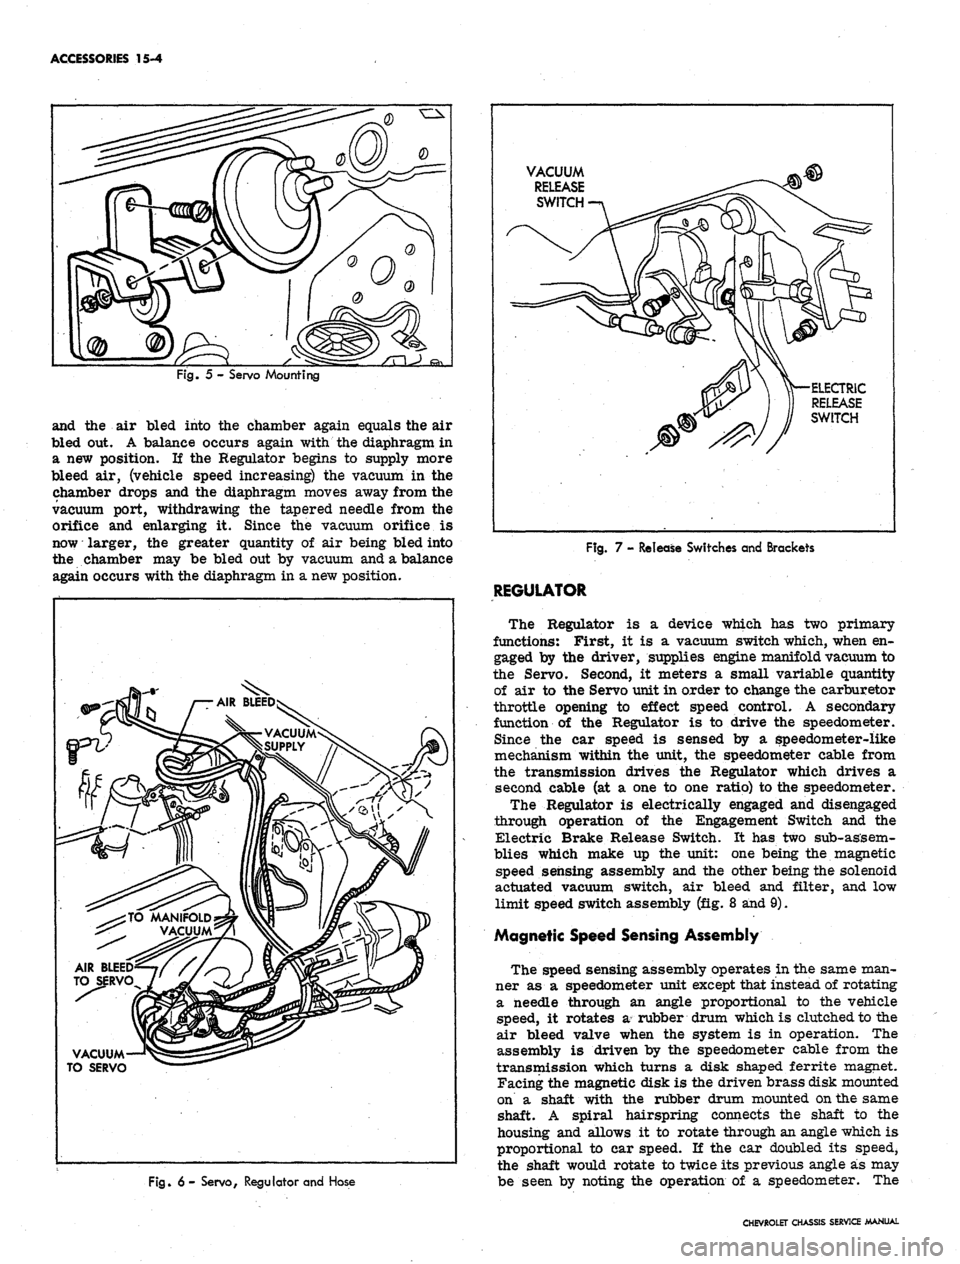
Fig. 5 - Servo Mounting
and the air bled into the chamber again equals the air
bled out. A balance occurs again with the diaphragm in
a new position. If the Regulator begins to supply more
bleed air, (vehicle speed increasing) the vacuum in the
chamber drops and the diaphragm moves away from the
vacuum port, withdrawing the tapered needle from the
orifice and enlarging it. Since the vacuum orifice is
now larger, the greater quantity of air being bled into
the chamber may be bled out by vacuum and a balance
again occurs with the diaphragm in a new position.
AIR
TO SERVO
VACUUM
TO SERVO
VACUUM
RELEASE
SWITCH
ELEaRIC
RELEASE
SWITCH
Fig.
6- Servo, Regulator and Hose
Fig. 7 - Release Switches and Brackets
REGULATOR
The Regulator is a device which has two primary
functions: First, it is a vacuum switch which, when en-
gaged by the driver, supplies engine manifold vacuum to
the Servo. Second, it meters a small variable quantity
of air to the Servo unit in order to change the carburetor
throttle opening to effect speed control. A secondary
function of the Regulator is to drive the speedometer.
Since the car speed is sensed by a speedometer-like
mechanism within the unit, the speedometer cable from
the transmission drives the Regulator which drives a
second cable (at a one to one ratio) to the speedometer.
The Regulator is electrically engaged and disengaged
through operation of the Engagement Switch and the
Electric Brake Release Switch. It has two sub-assem-
blies which make up the unit: one being the magnetic
speed sensing assembly and the other being the solenoid
actuated vacuum switch, air bleed and filter, and low
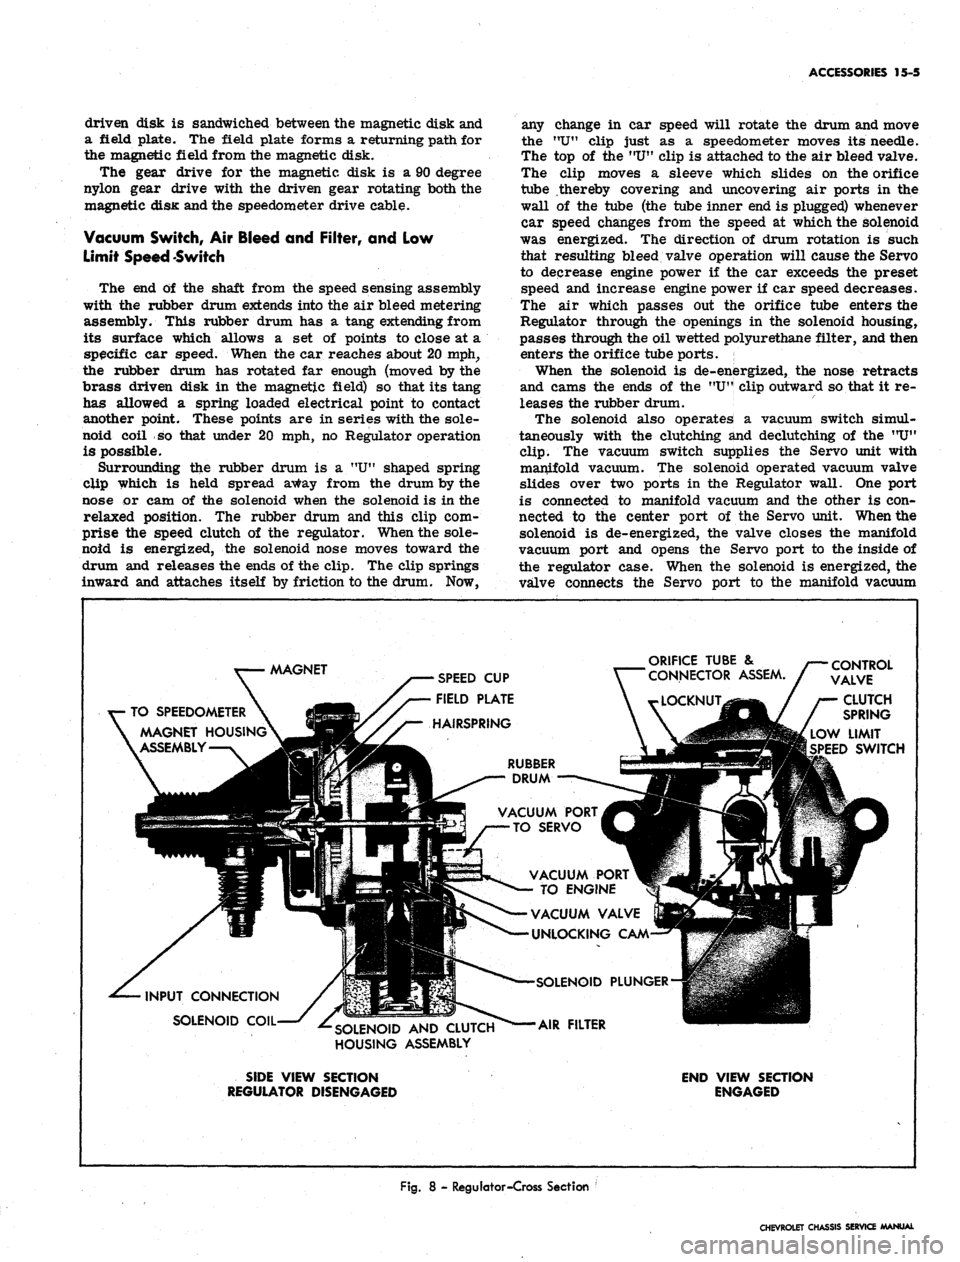
limit speed switch assembly (fig. 8 and 9).
Magnetic Speed Sensing Assembly
The speed sensing assembly operates in the same man-
ner as a speedometer unit except that instead of rotating
a needle through an angle proportional to the vehicle
speed, it rotates a rubber drum which is clutched to the
air bleed valve when the system is in operation. The
assembly is driven by the speedometer cable from the
transmission which turns a disk shaped ferrite magnet.
Facing the magnetic disk is the driven brass disk mounted
on a shaft with the rubber drum mounted on the same
shaft. A spiral hairspring connects the shaft to the
housing and allows it to rotate through an angle which is
proportional to car speed. If the car doubled its speed,
the shaft would rotate to twice its previous angle as may
be seen by noting the operation of a speedometer. The
CHEVROLET CHASSIS SERVICE MANUAL
Page 614 of 659
driven disk is sandwiched between the magnetic disk and
a field plate. The field plate forms a returning path for
the magnetic field from the magnetic disk.
The gear drive for the magnetic disk is a 90 degree
nylon gear drive with the driven gear rotating both the
magnetic disK and the speedometer drive cable.
Vacuum Switch, Air Bleed and Filter, and Low
Limit Speed Switch
The end of the shaft from the speed sensing assembly
with the rubber drum extends into the air bleed metering
assembly. This rubber drum has a tang extending from
its surface which allows a set of points to close at a
specific car speed. When the car reaches about 20 mph,
the rubber drum has rotated far enough (moved by the
brass driven disk in the magnetic field) so that its tang
has allowed a spring loaded electrical point to contact
another point. These points are in series with the sole-
noid coil so that under 20 mph, no Regulator operation
is possible.
Surrounding the rubber drum is a "U" shaped spring
clip which is held spread away from the drum by the
nose or cam of the solenoid when the solenoid is in the
relaxed position. The rubber drum and this clip com-
prise the speed clutch of the regulator. When the sole-
noid is energized, the solenoid nose moves toward the
drum and releases the ends of the clip. The clip springs
inward and attaches itself by friction to the drum. Now,
ACCESSORIES 15-5
any change in car speed will rotate the drum and move
the "U" clip just as a speedometer moves its needle.
The top of the MUtf clip is attached to the air bleed valve.
The clip moves a sleeve which slides on the orifice
tube thereby covering and uncovering air ports in the
wall of the tube (the tube inner end is plugged) whenever
car speed changes from the speed at which the solenoid
was energized. The direction of drum rotation is such
that resulting bleed valve operation will cause the Servo
to decrease engine power if the car exceeds the preset
speed and increase engine power if car speed decreases.
The air which passes out the orifice tube enters the
Regulator through the openings in the solenoid housing,
passes through the oil wetted polyurethane filter, and then
enters the orifice tube ports.
When the solenoid is de-energized, the nose retracts
and cams the ends of the "U" clip outward so that it re-
leases the rubber drum.
The solenoid also operates a vacuum switch simul-
taneously with the clutching and declutching of the "U"
clip.
The vacuum switch supplies the Servo unit with
manifold vacuum. The solenoid operated vacuum valve
slides over two ports in the Regulator wall. One port
is connected to manifold vacuum and the other is con-
nected to the center port of the Servo unit. When the
solenoid is de-energized, the valve closes the manifold
vacuum port and opens the Servo port to the inside of
the regulator case. When the solenoid is energized, the
valve connects the Servo port to the manifold vacuum
AAAGNET
SPEED CUP
FIELD PLATE
HAIRSPRING
TO SPEEDOMETER
MAGNET HOUSING
ASSEMBLY
ORIFICE TUBE &
CONNECTOR ASSEM.
CONTROL
VALVE
CLUTCH
SPRING
LOW LIMIT
SPEED SWITCH
RUBBER
DRUM
VACUUM PORT
TO SERVO
INPUT CONNECTION
SOLENOID COIL
SOLENOID AND CLUTCH
HOUSING ASSEMBLY
VACUUM PORT
TO ENGINE
VACUUM VALVE
UNLOCKING CAM
•SOLENOID PLUNGER
AIR FILTER
SIDE VIEW SECTION
REGULATOR DISENGAGED
END VIEW SECTION
ENGAGED
Fig.
8 - Regulator-Cross Section '
CHEVROLET CHASSIS SERVICE MANUAL
Page 618 of 659
ACCESSORIES 15-9
Adjustment- Adjust the bead chain so that it is as tight
as possible without holding the throttle open when the
carburetor is set at its lowest idle throttle position.
When connecting the bead chain (engine stopped) manually
set the fast idle cam at its lowest step and connect the
chain so that it does not hold the idle screw off the cam.
If the chain needs to be cut, cut it three beads beyond the
bead which pulls the linkage.
REGULATOR
Service - A defective regulator, that is one which is not
simply out of adjustment, must be replaced. During re-
placement, check the hoses which connect to the regulator
and replace any which are cracked or deteriorated.
Air Filter
The air filter located in the solenoid cover should be
cleaned and re-oiled at engine oil change intervals.
1.
Snap the solenoid cover off.
2.
Remove the filter and wash it in kerosene or mineral
spirits. Squeeze it dry and wet with SAE 10 engine
oil.
Squeeze out excess oil and reinstall into the
cover.
3.
Attach the cover with neoprene seal to the solenoid
housing. Be certain that the cover fits tightly to the
housing.
One regulator adjustment is possible: Engagement-
Cruising Speed Zeroing (to remove any difference be-
tween engagement and cruising speed).
NOTE:
No regulator adjustment should be
made, however, until the following items have
been checked or serviced:
1.
Bead chain properly adjusted.
2.
All hoses in good condition, properly attached, not
leaking, not pinched or kinked.
3.
Regulator air filter clean and properly oiled.
4.
Electric and vacuum release switches properly
adjusted.
Engagement—Cruising Speed Zeroing
If the cruising speed is lower than the engagement
speed, loosen the orifice tube locknut and turn the tube
outward; if higher, turn the tube inward. Each 1/8 turn
will alter the engagement-cruising speed difference one
mph. Tighten the locknut after adjustment and check the
system operation at 50 mph.
ELECTRICAL SYSTEM CHECK OUT
1.
Check fuse and connector.
2.
Check electric brake switch as follows: Unplug con-
nector at brake switch. Connect ohmmeter at points
A and B on brake switch. The ohmmeter must indi-
cate infinity when the brake pedal is depressed and
continuity when pedal is released. The cruise re-
lease brake switch (electric) is adjusted as is the
standard stop light brake switch. Replace electric
brake switch if needed.
3.
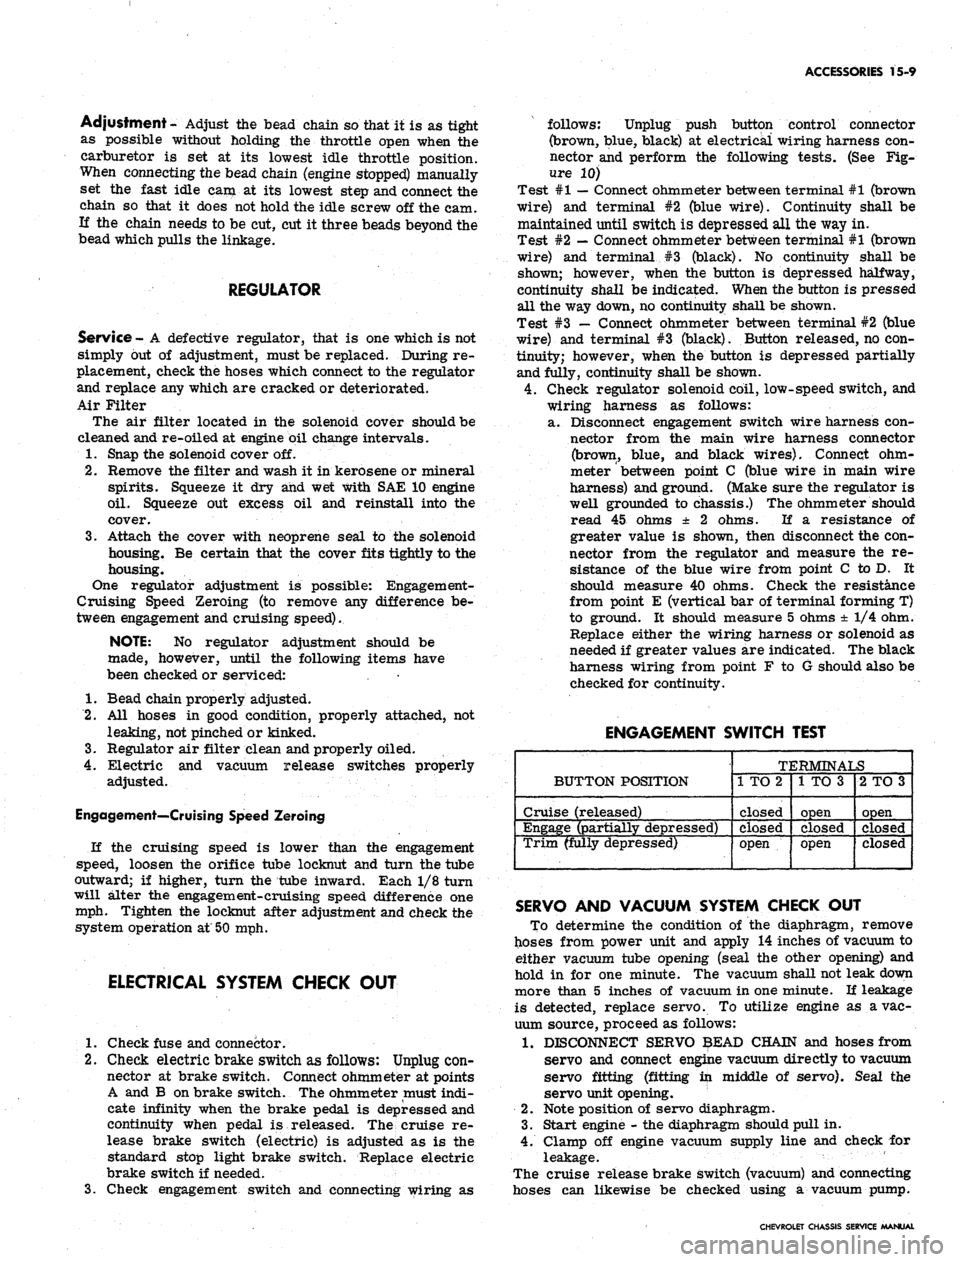
Check engagement switch and connecting wiring as
follows: Unplug push button control connector
(brown, blue, black) at electrical wiring harness con-
nector and perform the following tests. (See Fig-
ure 10)
Test #1
—
Connect ohmmeter between terminal #1 (brown
wire) and terminal #2 (blue wire). Continuity shall be
maintained until switch is depressed all the way in.
Test #2
—
Connect ohmmeter between terminal #1 (brown
wire) and terminal #3 (black). No continuity shall be
shown; however, when the button is depressed halfway,
continuity shall be indicated. When the button is pressed
all the way down, no continuity shall be shown.
Test #3 — Connect ohmmeter between terminal #2 (blue
wire) and terminal #3 (black). Button released, no con-
tinuity; however, when the button is depressed partially
and fully, continuity shall be shown.
4.
Check regulator solenoid coil, low-speed switch, and
wiring harness as follows:
a. Disconnect engagement switch wire harness con-
nector from the main wire harness connector
(brown, blue, and black wires). Connect ohm-
meter
'
between point C (blue wire in main wire
harness) and ground. (Make sure the regulator is
well grounded to chassis.) The ohmmeter should
read 45 ohms ± 2 ohms. If a resistance of
greater value is shown, then disconnect the con-
nector from the regulator and measure the re-
sistance of the blue wire from point C to D. It
should measure 40 ohms. Check the resistance
from point E (vertical bar of terminal forming T)
to ground. It should measure 5 ohms ± 1/4 ohm.
Replace either the wiring harness or solenoid as
needed if greater values are indicated. The black
harness wiring from point F to G should also be
checked for continuity.
ENGAGEMENT SWITCH TEST
BUTTON POSITION
Cruise (released)
Engage (partially depressed)
Trim (fully depressed)
TERMINALS
1 TO 2
closed
Closed
open
1 TO 3
open
closed
open
2 TO 3
open
closed
closed
SERVO AND VACUUM SYSTEM CHECK OUT
To determine the condition of the diaphragm, remove
hoses from power unit and apply 14 inches of vacuum to
either vacuum tube opening (seal the other opening) and
hold in for one minute. The vacuum shall not leak down
more than 5 inches of vacuum in one minute. If leakage
is detected, replace servo. To utilize engine as a vac-
uum source, proceed as follows:
1.
DISCONNECT SERVO $EAD CHAIN and hoses from
servo and connect engine vacuum directly to vacuum
servo fitting (fitting in middle of servo). Seal the
servo unit opening.
2.
Note position of servo diaphragm.
3.
Start engine - the diaphragm should pull in.
4.
Clamp off engine vacuum supply line and check for
leakage. '
The cruise release brake switch (vacuum) and connecting
hoses can likewise be checked using a vacuum pump.
CHEVROLET CHASSIS SERVICE MANUAL
Page 619 of 659
CRUISE MASTER SYSTEM CHECKS
Will not engage
Does not cruise at engage-
ment speed
System hunts or pulses
System does not disengage -
with brake pedal
System applies full throtUe
when engaged
Cannot adjust speed down-
ward with Engage Button
Does not engage or engages
lower than limits referred
to in "Driver Operation"
Cause
Brake Switch Circuit Open
Fuse blown
Defective Engage Switch
Vacuum leak in Servo and/or Brake
Switch and connecting lines.
Open in wiring harness
Defective Regulator
Orifice Tube misadjusted
Bead Chain loose.
Kinked or deteriorated hoses
Dirty Air Filter
Defective and/or improperly posi-
tioned Drive Cables and/or Casing
Assemblies
Defective Regulator
Brake and/or Vacuum Switch mis-
adjusted or defective
Hoses interchanged at Servo
Defective Regulator
Defective Engagement Switch or
Wiring
Internally Misadjusted Regulator
Correction
Check connections - adjust or replace switch. Refer to
Electrical Check Out.
Replace fuse - if it blows again, check for:
1.
Engage Switch stuck in the center of travel - Refer
to Electrical Check Out.
2.
Incorrect wiring - Refer to Electrical Check Out.
3.
Short to ground - Refer to Electrical Check Out.
Make necessary corrections.
Replace as needed - Refer to Electrical Check Out.
Vacuum test and repair or replace as needed. Refer to
Servo and Vacuum System Check Out.
Repair or replace as needed.
Replace Regulator.
Adjust as required.
Tighten Bead Chain.
Repair or replace.
Service as required.
Repair or replace as needed.
Replace Regulator.
Adjust or replace as required. Refer to Servo
and Vacuum System Check Out and Electrical Check
Out.
Correct as needed.
Replace Regulator.
Replace as needed. Refer to Electrical Check Out.
Replace Regulator
Page 620 of 659
ACCESSORIES 15-11
12 VOLTS D.C.
ELECTRIC BRAKE
RELEASE
IGNITION
SWITCH
ENGINE
VACUUM
TRANSDUCER
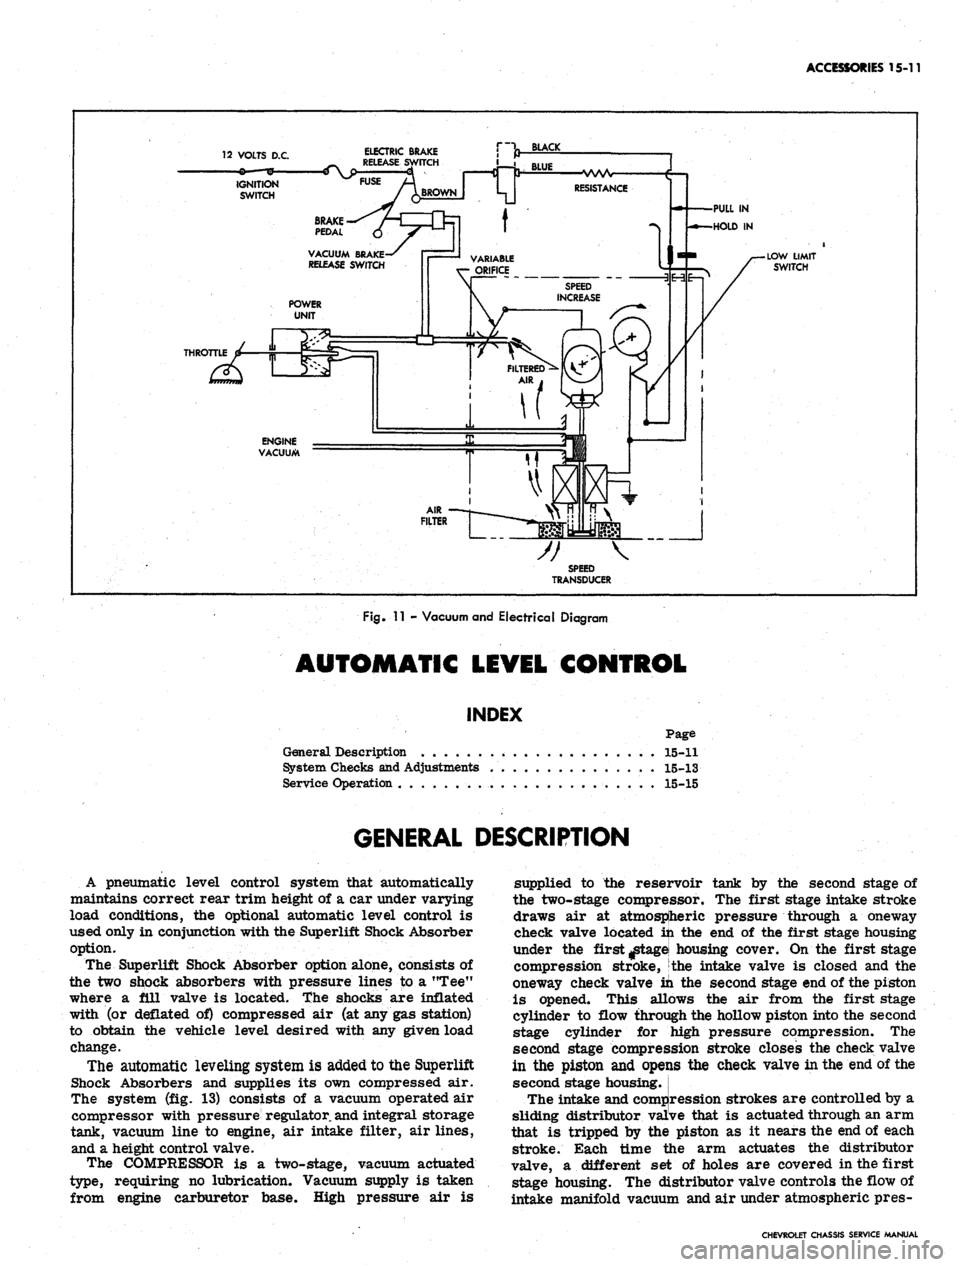
Fig.
11 - Vacuum and Electrical Diagram
AUTOMATIC LEVEL CONTROL
INDEX
Page
General Description . . 15-11
System Checks and Adjustments 15-13
Service Operation . 15-15
GENERAL DESCRIPTION
A pneumatic level control system that automatically
maintains correct rear trim height of a car under varying
load conditions, the optional automatic level control is
used only in conjunction with the Superlift Shock Absorber
option.
The Superlift Shock Absorber option alone, consists of
the two shock absorbers with pressure lines to a "Tee"
where a ill valve is located, the shocks are inflated
with (or deflated of) compressed air (at any gas station)
to obtain the vehicle level desired with any given load
change.
The automatic leveling system is added to the Superlift
Shock Absorbers and supplies its own compressed air.
The system (fig. 13) consists of a vacuum operated air
compressor with pressure regulator,
and
integral storage
tank, vacuum line to engine, air intake filter, air lines,
and a height control valve.
The COMPRESSOR is a two-stage, vacuum actuated
type, requiring no lubrication. Vacuum supply is taken
from engine carburetor base. High pressure air is
supplied to the reservoir tank by the second stage of
the two-stage compressor. The first stage intake stroke
draws air at atmospheric pressure through a oneway
check valve located in the end of the first stage housing
under the first ^tagei housing cover. On the first stage
compression stroke, the intake valve is closed and the
oneway check valve in the second stage end of the piston
is opened. This allows the air from the first stage
cylinder to flow through the hollow piston into the second
stage cylinder for jhigh pressure compression. The
second stage compression stroke closes the check valve
in the piston and opeijis the check valve in the end of the
second stage housing.
The intake and compression strokes are controlled by a
sliding distributor valive that is actuated through an arm
that is tripped by the piston as it nears the end of each
stroke. Each time the arm actuates the distributor
valve, a different set of holes are covered in the first
stage housing. The distributor valve controls the flow of
intake manifold vacuum and air under atmospheric pres-
CHEVROLET CHASSIS SERVICE MANUAL
Page 640 of 659
SPECIFICATIONS
13
ENGINE ELECTRICAL
SECTION
6Y
BATTERY
Battery Model
Application
Ground
Plates
Cranking Power @ 0°F. (Watts)
1980032*
153L-4,
194, 230,
250L-6 & 283
V-8
Neg.
54
2300
1980030*
327,
350, 396
& 427 V-8
Neg.
66
2900
1980036*
396 & 427 V-8
w/AC & M-40
Trans.
Neg.
66
3150
*65° Side Recess and One Piece Cover Construction
GENERATOR
Generator Model
Application
Field Amp.
Draw
Hot
Output
—
Amps.
Cold Output -
Volts
1100695
Chevy n
Exc.
V-8,
Sta. Wgn.
or AC
2.2-2.6
32
14
1100693
Chevy n
w/V-8,
Camaro,
CheveUe,
Chevrolet
* and
Corvette
w/AC
2.2-2.6
37
14
1100696
Chevy II
w/AC &
RPO
K-66
2.2-2.6
42
14
1100742
Chevrolet
w/AC &
Turbo-
Hydramatic
2.8-3.2
63
14
110075Q
AUA/C
except*
w/RPO
M-40
and
Chevy H
2.2-2.6
61
14
1117754
Optional
3.7-4.4
62
14
1117777
Optional
4.14-4.62
62
14
CHEVROLET CHASSIS SERVICE MANUAL
Page 652 of 659
SPECIFICATIONS 25
BODY AND CHASSIS ELECTRICAL
SECTION
12
LAMP USAGE
CANDLE
POWER
BULB
NUMBER
Headlamp Unit
Chevrolet, Chevelle & Corvette
Outer - High Beam
Outer - Low Beam
Inner -• High Beam only
Chevy H
High Beam . .
Low Beam
Parking Lamp and Directional Signal
All Exc. Camaro
Camaro
Tail, Stop and Directional Signal (Exc. Bel Air)
Backing Lamp ••...,
Instrument Illumination Lamps
Chevrolet & Camaro ,
Chevelle and Chevy n
Corvette
Temperature Indicator
Chevrolet & Camaro
Chevelle and Chevy II .............
Oil Pressure Indicator
Chevrolet & Camaro .............
Chevelle and Chevy II
Generator Indicator
Chevrolet & Camaro .
Chevelle and Chevy n ,
Hi-Beam Indicator
Chevrolet & Camaro <
Chevelle and Chevy II
Corvette , . • . ,
Directional Indicator
Chevrolet & Camaro
Chevelle & Chevy II . .
Corvette . .
Cigarette Lighter Lamp
Corvette .
Ignition Lock Lamp
Chevrolet . . .
Corvette . . .
Heater or A/C Control Panel
Chevrolet, Chevelle, Chevy n & Camaro . . .
Corvette . . .
Glove Box Lamps
Chevrolet, Chevelle, Chevy n & Camaro . . .
Corvette . . . . .
Dome and Courtesy Lamps
Cartridge Type (AU)
Bayonet Type (Exc. Corvette) . . .
Corvette ,
Convertible . .
37 1/2 Watts
55 Watts
37 1/2 Watts
55 Watts
45 Watts
4-32
4-32
4-32
Special Fiber
1
2
3
2
3
12
6
6
6
Optic
4002
4002
4001
6012
1157
1034-A
1157
1156
194
1895
.
1816
194
1895
194
1895
194
1895
194
1895
1445
194
1895
1816
1445
Wiring
1445
1895
1893
1895
1893
211
89,
212
90
631
CHEVROLET CHASSIS SERVICE MANUAL