spare tire location CHEVROLET CAMARO 2013 5.G Owners Manual
[x] Cancel search | Manufacturer: CHEVROLET, Model Year: 2013, Model line: CAMARO, Model: CHEVROLET CAMARO 2013 5.GPages: 404, PDF Size: 5.45 MB
Page 306 of 404

Black plate (58,1)Chevrolet Camaro Owner Manual (Include Mex) - 2012
10-58 Vehicle Care
The Tire and Loading Information
label shows the size of the original
equipment tires and the correct
inflation pressure for the tires when
they are cold. SeeVehicle Load
Limits on page 9‑12, for an example
of the Tire and Loading Information
label and its location. Also see Tire
Pressure on page 10‑54.
The TPMS can warn about
a low tire pressure condition but it
does not replace normal tire
maintenance. See Tire Inspection
on page 10‑60, Tire Rotation on
page 10‑60 andTires on
page 10‑47.
Notice: Tire sealant materials are
not all the same. A non-approved
tire sealant could damage the
TPMS sensors. TPMS sensor
damage caused by using an
incorrect tire sealant is not
covered by the vehicle warranty.
Always use only the
GM-approved tire sealant
available through your dealer or
included in the vehicle. Factory-installed Tire Inflator Kits
use a GM-approved liquid tire
sealant. Using non-approved tire
sealants could damage the TPMS
sensors. See
Tire Sealant and
Compressor Kit on page 10‑70 for
information regarding the inflator kit
materials and instructions.
TPMS Malfunction Light and
Message
The TPMS will not function properly
if one or more of the TPMS sensors
are missing or inoperable. When the
system detects a malfunction, the
low tire pressure warning light
flashes for about one minute and
then stays on for the remainder of
the ignition cycle. A DIC warning
message also displays. The
malfunction light and DIC warning
message come on at each ignition
cycle until the problem is corrected.
Some of the conditions that can
cause these to come on are:
.One of the road tires has been
replaced with the spare tire,
if the vehicle has one. The spare tire does not have a TPMS
sensor. The malfunction light
and the DIC message should go
off after the road tire is replaced
and the sensor matching
process is performed
successfully. See "TPMS Sensor
Matching Process" later in this
section.
.The TPMS sensor matching
process was not done or not
completed successfully after
rotating the tires. The
malfunction light and the DIC
message should go off after
successfully completing the
sensor matching process. See
"TPMS Sensor Matching
Process" later in this section.
.One or more TPMS sensors are
missing or damaged. The
malfunction light and the DIC
message should go off when the
TPMS sensors are installed and
the sensor matching process is
performed successfully. See
your dealer for service.
Page 308 of 404

Black plate (60,1)Chevrolet Camaro Owner Manual (Include Mex) - 2012
10-60 Vehicle Care
9. After hearing the confirming hornchirp for the driver side rear tire,
the horn sounds two more times
to signal the tire learning mode
is no longer active. Turn the
ignition to LOCK/OFF.
10. Set all four tires to the recommended air pressure
level as indicated on the Tire
and Loading Information label.
The tires air pressure will not
appear on the screen until driving
begins.
Tire Inspection
We recommend that the tires,
including the spare tire, if the
vehicle has one, be inspected
for signs of wear or damage at
least once a month.
Replace the tire if:
.The indicators at three or
more places around the tire
can be seen.
.There is cord or fabric
showing through the tire's
rubber.
.The tread or sidewall is
cracked, cut, or snagged
deep enough to show cord or
fabric.
.The tire has a bump, bulge,
or split.
.The tire has a puncture, cut,
or other damage that cannot
be repaired well because of
the size or location of the
damage.
Tire Rotation
Tires should be rotated every
12 000 km/7,500 mi. See
Maintenance Schedule on
page 11‑3.
Tires are rotated to achieve
uniform wear for all tires. The
first rotation is the most
important. Any time unusual wear is
noticed, rotate the tires as soon
as possible and check the wheel
alignment. Also check for
damaged tires or wheels. See
When It Is Time for New Tires
on page 10‑62
andWheel
Replacement on page 10‑66.
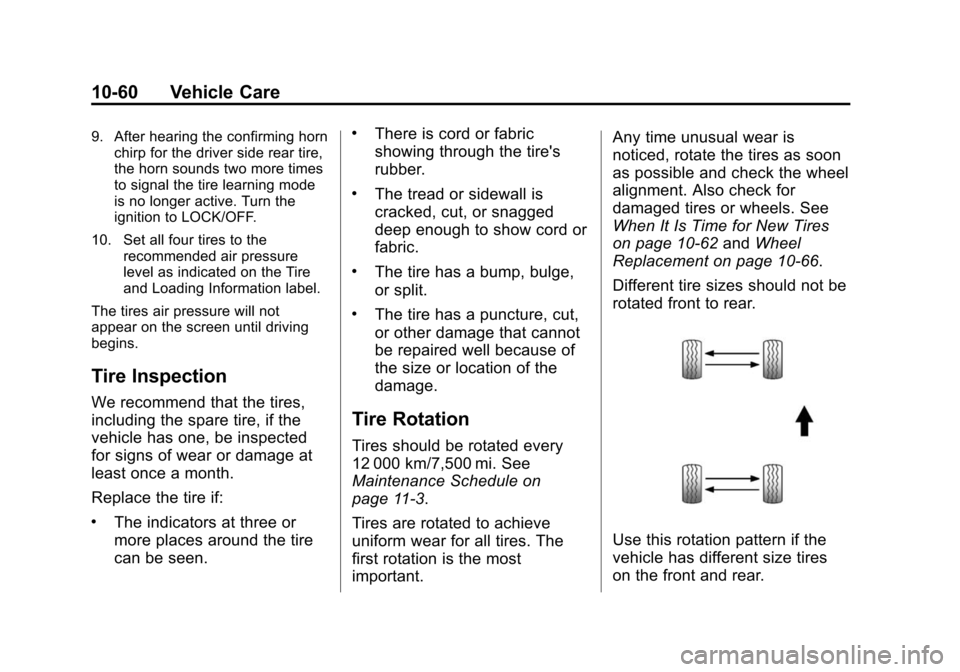
Different tire sizes should not be
rotated front to rear.
Use this rotation pattern if the
vehicle has different size tires
on the front and rear.
Page 318 of 404

Black plate (70,1)Chevrolet Camaro Owner Manual (Include Mex) - 2012
10-70 Vehicle Care
Tire Sealant and
Compressor Kit
{WARNING
Idling a vehicle in an enclosed
area with poor ventilation is
dangerous. Engine exhaust may
enter the vehicle. Engine exhaust
contains carbon monoxide (CO)
which cannot be seen or smelled.
It can cause unconsciousness
and even death. Never run the
engine in an enclosed area that
has no fresh air ventilation. For
more information, seeEngine
Exhaust on page 9‑25.
{WARNING
Overinflating a tire could cause
the tire to rupture and you or
others could be injured. Be sure
to read and follow the tire sealant
and compressor kit instructions
and inflate the tire to its
recommended pressure. Do not
exceed the recommended
pressure.
{WARNING
Storing the tire sealant and
compressor kit or other
equipment in the passenger
compartment of the vehicle could
cause injury. In a sudden stop or
collision, loose equipment could
strike someone. Store the tire
sealant and compressor kit in its
original location. If this vehicle has a tire sealant and
compressor kit, there may not be a
spare tire, tire changing equipment,
and on some vehicles there may not
be a place to store a tire.
The tire sealant and compressor
can be used to temporarily seal
punctures up to 6 mm (¼ in) in the
tread area of the tire. It can also be
used to inflate an under inflated tire.
If the tire has been separated from
the wheel, has damaged sidewalls,
or has a large puncture, the tire is
too severely damaged for the tire
sealant and compressor kit to be
effective. See
Roadside Assistance
Program (U.S. and Canada) on
page 13‑7 orRoadside Assistance
Program (Mexico) on page 13‑9.
Read and follow all of the tire
sealant and compressor kit
instructions.
Page 326 of 404

Black plate (78,1)Chevrolet Camaro Owner Manual (Include Mex) - 2012
10-78 Vehicle Care
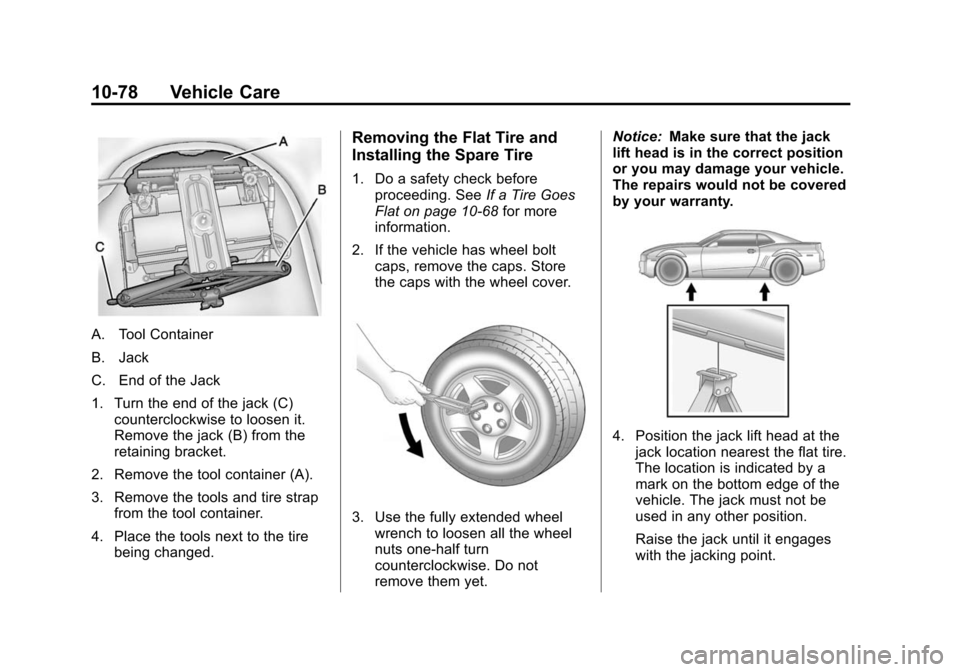
A. Tool Container
B. Jack
C. End of the Jack
1. Turn the end of the jack (C)counterclockwise to loosen it.
Remove the jack (B) from the
retaining bracket.
2. Remove the tool container (A).
3. Remove the tools and tire strap from the tool container.
4. Place the tools next to the tire being changed.
Removing the Flat Tire and
Installing the Spare Tire
1. Do a safety check beforeproceeding. See If a Tire Goes
Flat on page 10‑68 for more
information.
2. If the vehicle has wheel bolt caps, remove the caps. Store
the caps with the wheel cover.
3. Use the fully extended wheelwrench to loosen all the wheel
nuts one-half turn
counterclockwise. Do not
remove them yet. Notice:
Make sure that the jack
lift head is in the correct position
or you may damage your vehicle.
The repairs would not be covered
by your warranty.
4. Position the jack lift head at the
jack location nearest the flat tire.
The location is indicated by a
mark on the bottom edge of the
vehicle. The jack must not be
used in any other position.
Raise the jack until it engages
with the jacking point.