instrument cluster CHEVROLET CAMARO 2015 5.G Owner's Manual
[x] Cancel search | Manufacturer: CHEVROLET, Model Year: 2015, Model line: CAMARO, Model: CHEVROLET CAMARO 2015 5.GPages: 435, PDF Size: 6.28 MB
Page 247 of 435
Black plate (46,1)Chevrolet Camaro Owner Manual (GMNA-Localizing-U.S./Canada/Mexico-
7695163) - 2015 - crc - 9/4/14
9-46 Driving and Operating
If the StabiliTrak®system begins to
limit wheel spin while using cruise
control, the cruise control
automatically disengages. See
Traction Control/Electronic Stability
Control on page 9-38. When road
conditions allow you to safely use it
again, cruise control can be turned
back on.
If the brakes are applied, cruise
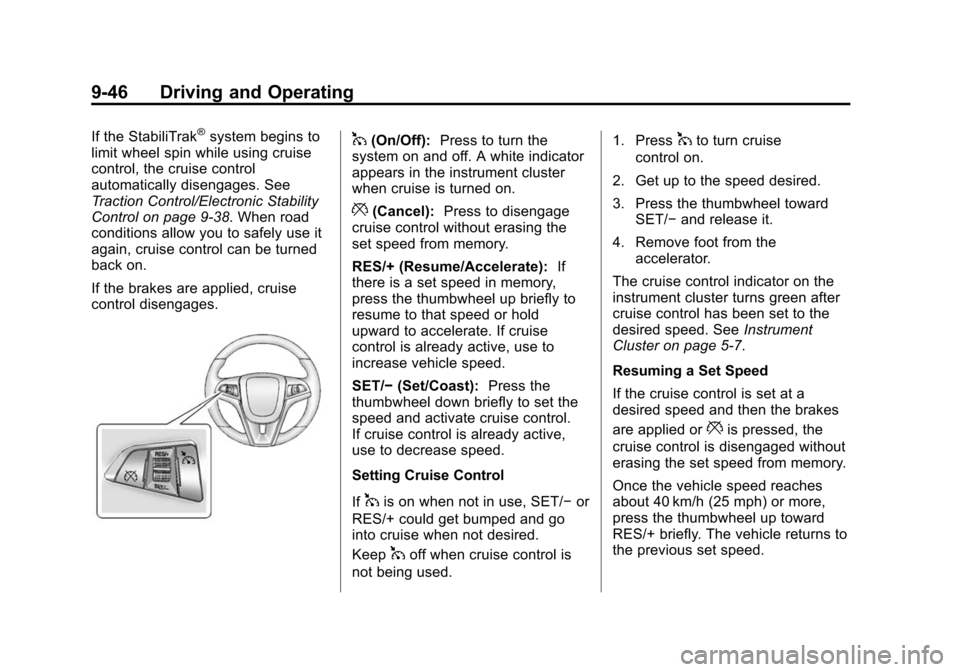
control disengages.1(On/Off): Press to turn the
system on and off. A white indicator
appears in the instrument cluster
when cruise is turned on.
*(Cancel): Press to disengage
cruise control without erasing the
set speed from memory.
RES/+ (Resume/Accelerate): If
there is a set speed in memory,
press the thumbwheel up briefly to
resume to that speed or hold
upward to accelerate. If cruise
control is already active, use to
increase vehicle speed.
SET/− (Set/Coast): Press the
thumbwheel down briefly to set the
speed and activate cruise control.
If cruise control is already active,
use to decrease speed.
Setting Cruise Control
If
1is on when not in use, SET/− or
RES/+ could get bumped and go
into cruise when not desired.
Keep
1off when cruise control is
not being used. 1. Press
1to turn cruise
control on.
2. Get up to the speed desired.
3. Press the thumbwheel toward SET/− and release it.
4. Remove foot from the accelerator.
The cruise control indicator on the
instrument cluster turns green after
cruise control has been set to the
desired speed. See Instrument
Cluster on page 5-7.
Resuming a Set Speed
If the cruise control is set at a
desired speed and then the brakes
are applied or
*is pressed, the
cruise control is disengaged without
erasing the set speed from memory.
Once the vehicle speed reaches
about 40 km/h (25 mph) or more,
press the thumbwheel up toward
RES/+ briefly. The vehicle returns to
the previous set speed.
Page 249 of 435
Black plate (48,1)Chevrolet Camaro Owner Manual (GMNA-Localizing-U.S./Canada/Mexico-
7695163) - 2015 - crc - 9/4/14
9-48 Driving and Operating
Ending Cruise Control
There are four ways to end cruise
control:
.To disengage cruise control,
step lightly on the brake pedal or
clutch. The indicator light on the
instrument cluster goes out.
.Press*.
.Shift the transmission to
N (Neutral).
.To turn off cruise control,
press
1.
Erasing Speed Memory
The cruise control set speed is
erased from memory if
1is pressed
or if the vehicle is turned off.
Driver Assistance
Systems
Parking Assist
If equipped, the Rear Parking Assist
(RPA) system assists the driver with
parking and avoiding objects while
in R (Reverse). RPA operates at
speeds less than 8 km/h (5 mph).
The sensors on the rear bumper
detect objects up to 2.5 m (8 ft)
behind the vehicle, and at least
20 cm (8 in) off the ground. The
distance objects can be detected
may be less during warmer or humid
weather.
{Warning
The parking assist system does
not detect children, pedestrians,
bicyclists, animals, or objects
below the bumper or that are too
close or too far from the vehicle.
It is not available at speeds
(Continued)
Warning (Continued)
greater than 8 km/h (5 mph). To
prevent injury, death, or vehicle
damage, even with parking assist,
always check the area around the
vehicle and check all mirrors
before backing.
How the System Works
RPA comes on automatically when
the shift lever is moved into
R (Reverse). A single beep sounds
to indicate the system is working.
An obstacle detection is indicated
by beeps. The time between the
beeps becomes shorter as the
vehicle gets closer to the obstacle.
When the distance is less than
30 cm (12 in), the beeping is a
continuous beep for five seconds.
Page 258 of 435
Black plate (57,1)Chevrolet Camaro Owner Manual (GMNA-Localizing-U.S./Canada/Mexico-
7695163) - 2015 - crc - 9/4/14
Driving and Operating 9-57
Towing a trailer requires a certain
amount of experience. The
combination you are driving is
longer and not as responsive as the
vehicle itself. Get acquainted with
the handling and braking of the rig
before setting out for the open road.
Before starting, check all trailer hitch
parts and attachments, safety
chains, electrical connectors, lamps,
tires and mirrors. If the trailer has
electric brakes, start the
combination moving and then apply
the trailer brake controller by hand
to be sure the brakes work.
During the trip, check occasionally
to be sure that the load is secure
and the lamps and any trailer
brakes still work.
Towing with a Stability Control
System
When towing, the sound of the
stability control system might be
heard. The system is reacting to the
vehicle movement caused by thetrailer, which mainly occurs during
cornering. This is normal when
towing heavier trailers.
Following Distance
Stay at least twice as far behind the
vehicle ahead as you would when
driving the vehicle without a trailer.
This can help to avoid situations
that require heavy braking and
sudden turns.
Passing
More passing distance is needed
when towing a trailer. Because the
rig is longer, it is necessary to go
farther beyond the passed vehicle
before returning to the lane.
Backing Up
Hold the bottom of the steering
wheel with one hand. To move the
trailer to the left, move your hand to
the left. To move the trailer to the
right, move your hand to the right.
Always back up slowly and,
if possible, have someone
guide you.
Making Turns
{Caution
Making very sharp turns while
trailering could cause the trailer to
come in contact with the vehicle.
The vehicle could be damaged.
Avoid making very sharp turns
while trailering.
When turning with a trailer, make
wider turns than normal so the
trailer will not strike soft shoulders,
curbs, road signs, trees or other
objects. Use the turn signal well in
advance and avoid jerky or sudden
maneuvers.
Turn Signals When Towing a
Trailer
The turn signal indicators on the
instrument cluster flash whenever
signaling a turn or lane change.
Properly hooked up, the trailer
Page 259 of 435
Black plate (58,1)Chevrolet Camaro Owner Manual (GMNA-Localizing-U.S./Canada/Mexico-
7695163) - 2015 - crc - 9/4/14
9-58 Driving and Operating
lamps also flash, telling other
drivers the vehicle is turning,
changing lanes or stopping.
When towing a trailer, the arrows on
the instrument cluster flash for turns
even if the bulbs on the trailer are
burned out. Check occasionally to
be sure the trailer bulbs are still
working.
Driving on Grades
Reduce speed and shift to a lower
gear before starting down a long or
steep downgrade. If the
transmission is not shifted down, the
brakes might have to be used so
much that they would get hot and no
longer work well.
The vehicle can tow in D (Drive).
Use a lower gear if the transmission
shifts too often.
When towing at high altitude on
steep uphill grades, engine coolant
boils at a lower temperature than at
normal altitudes. If the engine is
turned off immediately after towing
at high altitude on steep uphillgrades, the vehicle could show
signs similar to engine overheating.
To avoid this, let the engine run
while parked, preferably on level
ground, with the transmission in
P (Park) for a few minutes before
turning the engine off. If the
overheat warning comes on, see
Engine Overheating on page 10-35.
Parking on Hills
{Warning
Parking the vehicle on a hill with
the trailer attached can be
dangerous. If something goes
wrong, the rig could start to move.
People can be injured, and both
the vehicle and the trailer can be
damaged. When possible, always
park the rig on a flat surface.
If parking the rig on a hill:
1. Press the brake pedal, but do
not shift into P (Park) yet. Turn
the wheels into the curb if facing
downhill or into traffic if facing
uphill.
2. Have someone place chocks under the trailer wheels.
3. When the wheel chocks are in place, release the brake pedal
until the chocks absorb the load.
4. Reapply the brake pedal. Then apply the parking brake and shift
into P (Park) for vehicles with an
automatic transmission or into
gear for vehicles with a manual
transmission.
5. Release the brake pedal.
Leaving After Parking on a Hill
1. Apply and hold the brake pedal while you:
.Start the engine.
.Shift into a gear.
.Release the parking brake.
Page 330 of 435
Black plate (67,1)Chevrolet Camaro Owner Manual (GMNA-Localizing-U.S./Canada/Mexico-
7695163) - 2015 - crc - 9/4/14
Vehicle Care 10-67
pressure as intended. TPMS
malfunctions may occur for a variety
of reasons, including the installation
of replacement or alternate tires or
wheels on the vehicle that prevent
the TPMS from functioning properly.
Always check the TPMS malfunction
telltale after replacing one or more
tires or wheels on your vehicle to
ensure that the replacement or
alternate tires and wheels allow the
TPMS to continue to function
properly.
SeeTire Pressure Monitor
Operation on page 10-67.
See Radio Frequency Statement on
page 13-12.
Tire Pressure Monitor
Operation
This vehicle may have a Tire
Pressure Monitor System (TPMS).
The TPMS is designed to warn the
driver when a low tire pressure
condition exists. TPMS sensors are
mounted onto each tire and wheel
assembly, excluding the spare tire and wheel assembly. The TPMS
sensors monitor the air pressure in
the tires and transmit the tire
pressure readings to a receiver
located in the vehicle.
When a low tire pressure condition
is detected, the TPMS illuminates
the low tire pressure warning light
located on the instrument cluster.
If the warning light comes on, stop
as soon as possible and inflate the
tires to the recommended pressure
shown on the Tire and Loading
Information label. See
Vehicle Load
Limits on page 9-14.
A message to check the pressure in
a specific tire displays in the Driver
Information Center (DIC) display.
The low tire pressure warning light
and the DIC warning message come
on at each ignition cycle until the tires are inflated to the correct
inflation pressure. Using the DIC,
tire pressure levels can be viewed.
For additional information and
details about the DIC operation and
displays see
Driver Information
Center (DIC) on page 5-24.
The low tire pressure warning light
may come on in cool weather when
the vehicle is first started, and then
turn off as the vehicle is driven. This
could be an early indicator that the
air pressure is getting low and must
be inflated to the proper pressure.
A Tire and Loading Information label
shows the size of the original
equipment tires and the correct
inflation pressure for the tires when
they are cold. See Vehicle Load
Limits on page 9-14, for an example
of the Tire and Loading Information
label and its location. Also see Tire
Pressure on page 10-64.
Page 367 of 435
Black plate (104,1)Chevrolet Camaro Owner Manual (GMNA-Localizing-U.S./Canada/Mexico-
7695163) - 2015 - crc - 9/4/14
10-104 Vehicle Care
Chemical Paint Spotting
Airborne pollutants can fall upon
and attack painted vehicle surfaces
causing blotchy, ring-shaped
discolorations, and small, irregular
dark spots etched into the paint
surface. See“Finish Care”
previously in this section.
Interior Care
To prevent dirt particle abrasions,
regularly clean the vehicle's interior.
Immediately remove any soils. Note
that newspapers or dark garments
that can transfer color to home
furnishings can also permanently
transfer color to the vehicle's
interior.
Use a soft bristle brush to remove
dust from knobs and crevices on the
instrument cluster. Using a mild
soap solution, immediately remove
hand lotions, sunscreen, and insect
repellent from all interior surfaces or
permanent damage may result. Your dealer may have products for
cleaning the interior. Use cleaners
specifically designed for the
surfaces being cleaned to prevent
permanent damage. Apply all
cleaners directly to the cleaning
cloth. Do not spray cleaners directly
on any switches or controls.
Cleaners should be removed
quickly. Never allow cleaners to
remain on the surface being
cleaned for extended periods
of time.
Cleaners may contain solvents that
can become concentrated in the
interior. Before using cleaners, read
and adhere to all safety instructions
on the label. While cleaning the
interior, maintain adequate
ventilation by opening the doors and
windows.
To prevent damage, do not clean
the interior using the following
cleaners or techniques:
.Never use a razor or any other
sharp object to remove a soil
from any interior surface.
.Never use a brush with stiff
bristles.
.Never rub any surface
aggressively or with excessive
pressure.
.Do not use laundry detergents or
dishwashing soaps with
degreasers. For liquid cleaners,
use approximately 20 drops per
3.8 L (1 gal) of water.
A concentrated soap solution will
leave a residue that creates
streaks and attracts dirt. Do not
use solutions that contain strong
or caustic soap.
.Do not heavily saturate the
upholstery when cleaning.
.Do not use solvents or cleaners
containing solvents.
Interior Glass
To clean, use a terry cloth fabric
dampened with water. Wipe droplets
left behind with a clean dry cloth.
Commercial glass cleaners may be
used, if necessary, after cleaning
the interior glass with plain water.
Page 380 of 435
Black plate (9,1)Chevrolet Camaro Owner Manual (GMNA-Localizing-U.S./Canada/Mexico-
7695163) - 2015 - crc - 9/4/14
Service and Maintenance 11-9
Additional
Maintenance and Care
Your vehicle is an important
investment and caring for it properly
may help to avoid future costly
repairs. To maintain vehicle
performance, additional
maintenance services may be
required.
It is recommended that your dealer
perform these services—their
trained dealer technicians know
your vehicle best. Your dealer can
also perform a thorough
assessment with a multi-point
inspection to recommend when your
vehicle may need attention.
The following list is intended to
explain the services and conditions
to look for that may indicate
services are required. Battery
The battery supplies power to start
the engine and operate any
additional electrical accessories.
.To avoid break-down or failure to
start the vehicle, maintain a
battery with full cranking power.
.Trained dealer technicians have
the diagnostic equipment to test
the battery and ensure that the
connections and cables are
corrosion-free.
Belts
.Belts may need replacing if they
squeak or show signs of
cracking or splitting.
.Trained dealer technicians have
access to tools and equipment
to inspect the belts and
recommend adjustment or
replacement when necessary. Brakes
Brakes stop the vehicle and are
crucial to safe driving.
.Signs of brake wear may include
chirping, grinding, or squealing
noises, or difficulty stopping.
.Trained dealer technicians have
access to tools and equipment
to inspect the brakes and
recommend quality parts
engineered for the vehicle.
Fluids
Proper fluid levels and approved
fluids protect the vehicle’s systems
and components. See
Recommended Fluids and
Lubricants on page 11-12 for GM
approved fluids.
.Engine oil and windshield
washer fluid levels should be
checked at every fuel fill.
.Instrument cluster lights may
come on to indicate that fluids
may be low and need to be
filled.
Page 424 of 435

Black plate (3,1)Chevrolet Camaro Owner Manual (GMNA-Localizing-U.S./Canada/Mexico-
7695163) - 2015 - crc - 9/4/14
INDEX i-3
Climate Control Systems . . . . . . . 8-1Air Conditioning . . . . . . . . . . . . . . . 8-1
Heating . . . . . . . . . . . . . . . . . . . . . . . . 8-1
Clock . . . . . . . . . . . . . . . . . . . . . . . . . . . 5-4
Cluster, Instrument . . . . . . . . . . . . . 5-7
Clutch, Hydraulic . . . . . . . . . . . . . 10-21
Collision Damage Repair . . . . . . 13-8
Compact Spare Tire . . . . . . . . . . 10-94
Compartments Storage . . . . . . . . . . . . . . . . . . . . . . . . 4-1
Compass . . . . . . . . . . . . . . . . . . . . . . . 5-4
Messages . . . . . . . . . . . . . . . . . . . . 5-33
Competition Oriented Tires . . . 10-57
Competitive Driving Mode . . . . . 9-40
Compressor Kit, Tire Sealant . . . . . . . . . . . . . . . . . . . . . . 10-80
Connections OnStar
®. . . . . . . . . . . . . . . . . . . . . . 14-4
Control Traction and ElectronicStability . . . . . . . . . . . . . . . . . . . . . 9-38
Control of a Vehicle . . . . . . . . . . . . . 9-3
Convenience Net . . . . . . . . . . . . . . . 4-5
Convertible Top . . . . . . . . . . . . . . . . 2-19 Messages . . . . . . . . . . . . . . . . . . . . 5-33
Convex Mirrors . . . . . . . . . . . . . . . . 2-14 Coolant
Engine . . . . . . . . . . . . . . . . . . . . . . 10-30
Engine Temperature
Gauge . . . . . . . . . . . . . . . . . . . . . . 5-12
Cooling System . . . . 10-25, 10-27–10-29
Engine Messages . . . . . . . . . . . . 5-35
Courtesy Transportation Program . . . . . . . . . . . . . . . . . . . . . . 13-7
Cover Engine . . . . . . . . . . . . . . . . . . . . . . 10-13
Tonneau . . . . . . . . . . . . . . . . . . . . . . . 4-3
Cruise Control . . . . . . . . . . . . . . . . . 9-45
Light . . . . . . . . . . . . . . . . . . . . . . . . . . 5-23
Messages . . . . . . . . . . . . . . . . . . . . 5-34
Customer Assistance . . . . . . . . . . 13-4 Offices . . . . . . . . . . . . . . . . . . . . . . . . 13-3
Text Telephone (TTY)Users . . . . . . . . . . . . . . . . . . . . . . . 13-4
Customer Information Service PublicationsOrdering Information . . . . . . .13-11
Customer Satisfaction
Procedure . . . . . . . . . . . . . . . . . . . . 13-1
D
Damage Repair, Collision . . . . . . 13-8
Danger, Warnings, andCautions . . . . . . . . . . . . . . . . . . . . . . . . iv
Data Recorders, Event . . . . . . . 13-14
Daytime Running Lamps (DRL) . . . . . . . . . . . . . . . . . . 6-2
Defensive Driving . . . . . . . . . . . . . . . 9-3
Delayed Locking . . . . . . . . . . . . . . . . 2-9
Devices Auxiliary . . . . . . . . . . . . . . . . . . . . . . 7-14
Distracted Driving . . . . . . . . . . . . . . . 9-2
Dome Lamps . . . . . . . . . . . . . . . . . . . 6-6
Door Ajar Messages . . . . . . . . . . . . . . . 5-34
Delayed Locking . . . . . . . . . . . . . . . 2-9
Locks . . . . . . . . . . . . . . . . . . . . . . . . . . 2-7
Power Locks . . . . . . . . . . . . . . . . . . . 2-8
Drive Belt Routing, Engine . . . . . 12-5
Driver Information Center (DIC) . . . . . . . . . . . . . . . . . 5-24
Driving Characteristics andTowing Tips . . . . . . . . . . . . . . . . . 9-56
Defensive . . . . . . . . . . . . . . . . . . . . . . 9-3
Drunk . . . . . . . . . . . . . . . . . . . . . . . . . . 9-3
Page 427 of 435

Black plate (6,1)Chevrolet Camaro Owner Manual (GMNA-Localizing-U.S./Canada/Mexico-
7695163) - 2015 - crc - 9/4/14
i-6 INDEX
H
Halogen Bulbs . . . . . . . . . . . . . . . . 10-44
Hazard Warning Flashers . . . . . . . 6-4
Head Restraints . . . . . . . . . . . . . . . . 3-2
Head-up Display . . . . . . . . . . . . . . . 5-28
HeadlampsAiming . . . . . . . . . . . . . . . . . . . . . . 10-44
Automatic . . . . . . . . . . . . . . . . . . . . . . 6-3
Bulb Replacement . . . . . . . . . . 10-44
Daytime RunningLamps (DRL) . . . . . . . . . . . . . . . . . 6-2
Flash-to-Pass . . . . . . . . . . . . . . . . . . 6-2
High Intensity Discharge (HID) Lighting . . . . . . . . . . . . . 10-44
High-Beam On Light . . . . . . . . . . 5-23
High/Low Beam Changer . . . . . . 6-2
Heated Front Seats . . . . . . . . . . . . . 3-6
Heated Mirrors . . . . . . . . . . . . . . . . . 2-15
Heater Engine . . . . . . . . . . . . . . . . . . . . . . . . 9-22
Heating and Air Conditioning . . . 8-1
High-Beam On Light . . . . . . . . . . . 5-23
High-Speed Operation . . . . . . . . 10-65
Hill and Mountain Roads . . . . . . . 9-11
Hill Start Assist (HSA) . . . . . . . . . 9-38 Hood . . . . . . . . . . . . . . . . . . . . . . . . . . 10-5
Horn . . . . . . . . . . . . . . . . . . . . . . . . . . . . 5-3
How to Wear Safety Belts
Properly . . . . . . . . . . . . . . . . . . . . . . . 3-9
Hydraulic Clutch . . . . . . . . . . . . . . 10-21
I
Ignition Positions . . . . . . . . . . . . . . 9-19
Ignition Transmission Lock Check . . . . . . . . . . . . . . . . . . . . . . . 10-42
Immobilizer . . . . . . . . . . . . . . . . . . . . 2-13 Light . . . . . . . . . . . . . . . . . . . . . . . . . . 5-22
Infants and Young Children,
Restraints . . . . . . . . . . . . . . . . . . . . 3-31
Infotainment . . . . . . . . . . . . . . . . . . . . 7-1
Infotainment System . . . . . . . . . . 13-15
Instrument Cluster . . . . . . . . . . . . . . 5-7
Interior Rearview Mirrors . . . . . . . 2-15
Introduction . . . . . . . . . . . . . . . . . . . . . . . iii
J
Jump Starting . . . . . . . . . . . . . . . . . 10-95
K
Key and Lock Messages . . . . . . . 5-36
Keyless Entry Remote (RKE) System . . . . . . . . 2-3
Keys . . . . . . . . . . . . . . . . . . . . . . . . . . . . 2-1
L
Labeling, Tire Sidewall . . . . . . . . 10-58
Lamps Daytime Running (DRL) . . . . . . . 6-2
Dome . . . . . . . . . . . . . . . . . . . . . . . . . . 6-6
Exterior Controls . . . . . . . . . . . . . . . 6-1
Exterior Lighting BatterySaver . . . . . . . . . . . . . . . . . . . . . . . . 6-7
Front Fog . . . . . . . . . . . . . . . . . . . . . . 6-5
Headlamps, Front Turn Signal, and
Parking Lamps . . . . . 10-44, 10-45
License Plate . . . . . . . . . . . . . . . 10-47
Malfunction Indicator . . . . . . . . . 5-16
Messages . . . . . . . . . . . . . . . . . . . . 5-36
Lap-Shoulder Belt . . . . . . . . . . . . . 3-10
LATCH System Replacing Parts after aCrash . . . . . . . . . . . . . . . . . . . . . . . 3-42