engine CHEVROLET CAMARO 2018 Workshop Manual
[x] Cancel search | Manufacturer: CHEVROLET, Model Year: 2018, Model line: CAMARO, Model: CHEVROLET CAMARO 2018Pages: 393, PDF Size: 5.77 MB
Page 201 of 393
Chevrolet Camaro Owner Manual (GMNA-Localizing-U.S./Canada/Mexico-
11348325) - 2018 - CRC - 10/23/17
200 Driving and Operating
.Ease your foot off the
accelerator pedal and steer the
way you want the vehicle to go.
The vehicle may straighten out.
Be ready for a second skid if it
occurs.
. Slow down and adjust your
driving according to weather
conditions. Stopping distance
can be longer and vehicle
control can be affected when
traction is reduced by water,
snow, ice, gravel, or other
material on the road. Learn to
recognize warning clues —such
as enough water, ice, or packed
snow on the road to make a
mirrored surface —and slow
down when you have any doubt.
. Try to avoid sudden steering,
acceleration, or braking,
including reducing vehicle speed
by shifting to a lower gear. Any
sudden changes could cause
the tires to slide.
Remember: Antilock brakes help
avoid only the braking skid.Track Events and
Competitive Driving
{Danger
High-performance features are
intended for use only on closed
tracks by experienced and
qualified drivers and should not
be used on public roads.
High-speed driving, aggressive
cornering, hard braking, and other
high-performance driving can be
dangerous. Improper driver inputs
for the conditions may result in
loss of control of the vehicle,
which could injure or kill you or
others. Always drive safely.
If the vehicle is a Camaro High
Performance model, see the
additional items in the Camaro High
Performance supplement.
Track events or competitive driving
may affect the vehicle warranty. See
the warranty manual before using
the vehicle for racing or other
competitive driving. The Engine Sound Management
setting (if equipped) should not be
set to Stealth Mode during track
events and competitive driving. See
Driver Mode Control
0234.Engine Oil
Caution
If you use the vehicle for racing or
other competitive driving, the
engine may use more oil than it
would with normal use. Low oil
levels can damage the engine.
For information on how to add oil,
seeEngine Oil 0261.
Be sure to check the oil level
often during racing or other
competitive driving and keep the
level at or near the upper mark
that shows the proper operating
range on the engine oil dipstick.
Page 202 of 393
Chevrolet Camaro Owner Manual (GMNA-Localizing-U.S./Canada/Mexico-
11348325) - 2018 - CRC - 10/23/17
Driving and Operating 201
2.0L (LTG) Turbo Engine
Keep the oil level at or near 1 L
(1 qt) above the upper mark on the
engine oil dipstick which shows the
proper operating range.
6.2L (LT1) Engine
Keep the oil level at or near the
upper mark on the engine oil
dipstick which shows the proper
operating range.
Change the engine oil to 0W-40 or
5W-40 that meets the dexos2
specification. If this oil is not
available, the following oils can be
used as an alternative: Valvoline
SYNPOWER MST 5W-40, Mobil 1
ESP Formula M 5W-40. See
Capacities and Specifications0351.
Automatic Transmission Fluid
Have the transmission fluid set to
the track specific oil level prior to
track usage. Transmission fluid
should be changed after every
15 hours of track usage. Any
transmission level set or change
should be performed at your dealer.
Manual Transmission Fluid
Manual transmission fluid should be
changed after every 15 hours of
track usage.
Rear Axle Fluid
Axles must have 2 400 km
(1,500 mi) before being used in
track driving.
The rear axle fluid temperatures
may be higher than when driving in
severe conditions. Drain and refill
with new fluid after the first racing or
competitive driving event, and then
after every 24 hours of racing or
competitive driving. See
Recommended Fluids and
Lubricants 0346.
Caution
During a first time track or racing
event, high rear axle
temperatures can occur. Damage
could be caused to the rear axle
and would not be covered by the
vehicle warranty. Do not drive as
(Continued)
Caution (Continued)
long or as fast the first time the
vehicle is driven on the track or
raced.
Brake Fluid
For track events or competitive
driving, it is recommended that the
brake fluid be replaced with a high
performance brake fluid that has a
dry boiling point greater than 279 °C
(534 °F). After conversion to the
high performance brake fluid, follow
the brake fluid service
recommendations outlined by the
fluid manufacturer. Do not use
silicone or DOT-5 brake fluids.
Brake Burnishing
To prepare the Camaro brake
systems for track events and racing,
complete the appropriate high
performance brake burnishing
procedure described below.
New brake pads must be burnished
before racing or competitive driving.
Page 203 of 393
Chevrolet Camaro Owner Manual (GMNA-Localizing-U.S./Canada/Mexico-
11348325) - 2018 - CRC - 10/23/17
202 Driving and Operating
Caution
These procedures are specific to
the Camaro SS, or LT with Y4Q
Heavy Duty Cooling System that
is equipped with J55 brakes. This
procedure should not be run on
other Camaro models as damage
may result.
Caution
The new vehicle break-in period
should be completed before
performing the brake burnishing
procedure or damage may occur
to the powertrain/engine. See
New Vehicle Break-In0212.
When performed as instructed, this
procedure will not damage the
brakes. During the burnishing
procedure, the brake pads will
smoke and produce an odor. The
braking force and pedal travel may increase. After the procedure is
complete, the brake pads may
appear white at the rotor contact.
Run this procedure in a safe
manner and in compliance with all
local and state ordinances/laws
regarding motor vehicle operation.
Run this procedure only on dry
pavement.
Racing/Track Brake Burnishing
Procedure
Caution
Brake pedal fade will occur during
this track burnish procedure and
can cause brake pedal travel and
force to increase. This could
extend stopping distance until the
brakes are fully burnished.
1. Apply the brakes 25 times starting at 100 km/h (60 mph) to
50 km/h (30 mph) while
decelerating at 0.4 g. This is a
medium brake application.
Drive for at least 1 km (0.6 mi)
between applying the brakes. This first step may be skipped
if there are more than 320 km
(200 mi) on the brake pads.
2. Repeatedly apply the brakes from 100 km/h (60 mph) to
25 km/h (15 mph) while
decelerating at 0.8 g. This is a
hard brake application, without
activating the Antilock Brake
System (ABS). Drive for at
least 1 km (0.6 mi) between
stops. Repeat until the brake
pedal travel starts to increase.
Depending on conditions, this
should take no longer than 25
brake applications.
3. Cool down: Drive at 100 km/h (60 mph) for approximately
15 km (10 mi) without using the
brakes.
4. Apply the brakes 25 times from 100 km/h (60 mph) to 50 km/h
(30 mph) while decelerating at
0.4 g. This is a medium brake
application. Drive for at least
1 km (0.6 mi) between
applications.
Page 204 of 393
Chevrolet Camaro Owner Manual (GMNA-Localizing-U.S./Canada/Mexico-
11348325) - 2018 - CRC - 10/23/17
Driving and Operating 203
Front Tire Deflectors, Lower
Control Arm Deflectors, and
Disc Splash Shields (SS Only)
Before any racing event, remove the
tire deflectors in the front of the
vehicle, and replace the original
deflector and splash shield with the
tall deflector and small splash
shield.
Caution
Race track driving with the
original front disc brake splash
shield and front tire deflector may
result in brake pedal fade due to
high rotor temperatures.
To install the tall deflector and small
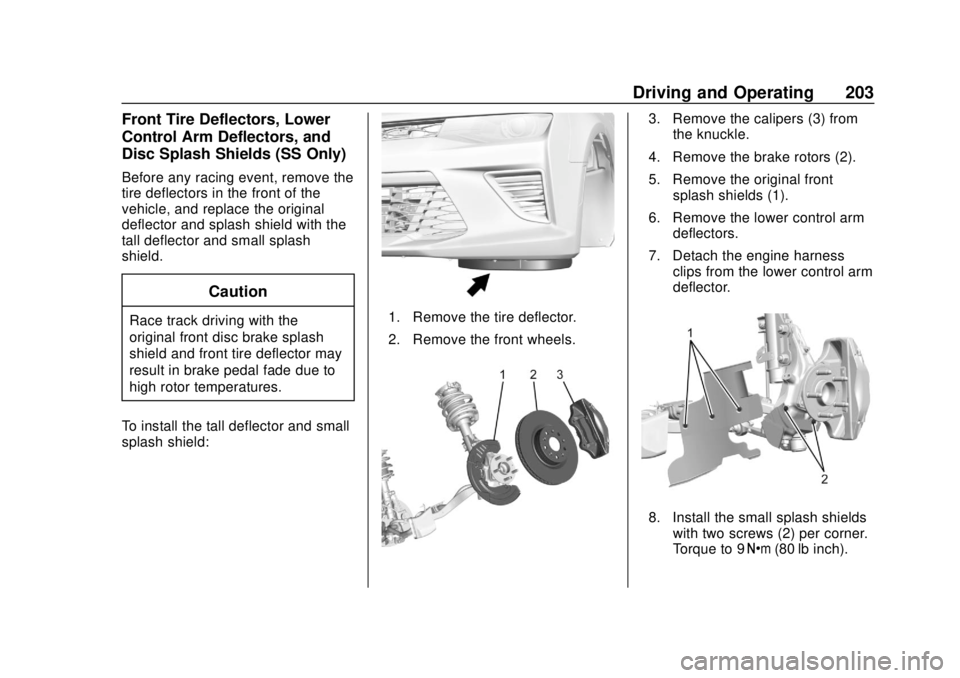
splash shield:1. Remove the tire deflector.
2. Remove the front wheels.
3. Remove the calipers (3) from the knuckle.
4. Remove the brake rotors (2).
5. Remove the original front splash shields (1).
6. Remove the lower control arm deflectors.
7. Detach the engine harness clips from the lower control arm
deflector.
8. Install the small splash shieldswith two screws (2) per corner.
Torque to 9 Y(80 lb inch).
Page 205 of 393
Chevrolet Camaro Owner Manual (GMNA-Localizing-U.S./Canada/Mexico-
11348325) - 2018 - CRC - 10/23/17
204 Driving and Operating
Caution
Failure to reattach the engine
harness clips correctly could
cause possible interference with
the wheel speed sensor and
vehicle damage.
9. Re-attach the engine harness clips by pushing them from the
bottom up, on the back tab. On
the original deflector, the push
pins are pushed from the
top down.
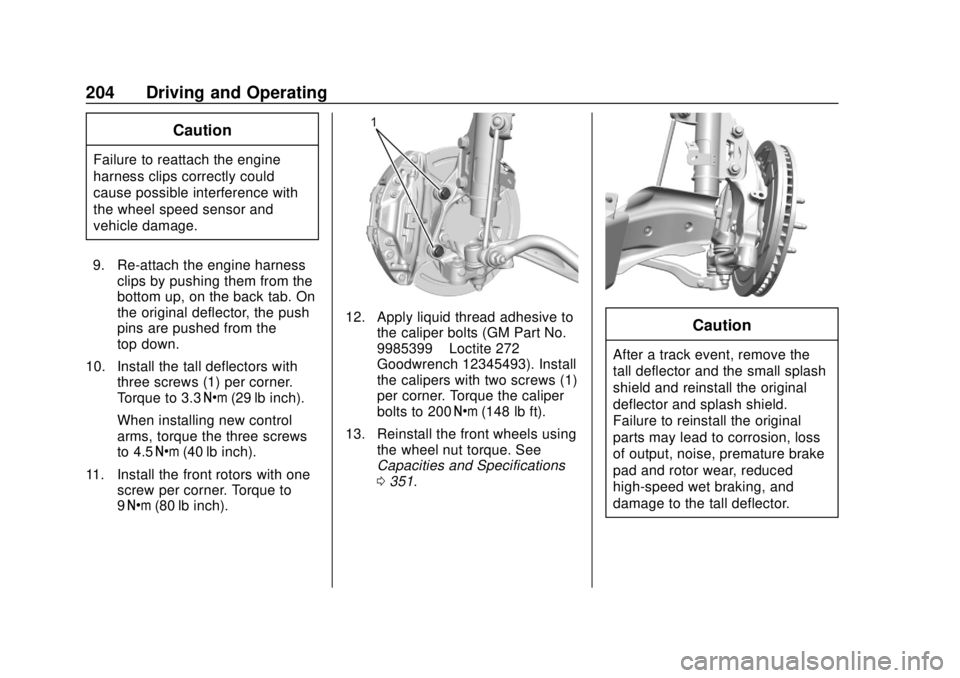
10. Install the tall deflectors with three screws (1) per corner.
Torque to 3.3 Y(29 lb inch).
When installing new control
arms, torque the three screws
to 4.5 Y(40 lb inch).
11. Install the front rotors with one screw per corner. Torque to
9Y (80 lb inch).
12. Apply liquid thread adhesive to
the caliper bolts (GM Part No.
9985399 –Loctite 272 –
Goodwrench 12345493). Install
the calipers with two screws (1)
per corner. Torque the caliper
bolts to 200 Y(148 lb ft).
13. Reinstall the front wheels using the wheel nut torque. See
Capacities and Specifications
0351.Caution
After a track event, remove the
tall deflector and the small splash
shield and reinstall the original
deflector and splash shield.
Failure to reinstall the original
parts may lead to corrosion, loss
of output, noise, premature brake
pad and rotor wear, reduced
high-speed wet braking, and
damage to the tall deflector.
Page 207 of 393
Chevrolet Camaro Owner Manual (GMNA-Localizing-U.S./Canada/Mexico-
11348325) - 2018 - CRC - 10/23/17
206 Driving and Operating
.Shift to a lower gear when going
down steep or long hills.
{Warning
Using the brakes to slow the
vehicle on a long downhill slope
can cause brake overheating, can
reduce brake performance, and
could result in a loss of braking.
Shift the transmission to a lower
gear to let the engine assist the
brakes on a steep downhill slope.
{Warning
Coasting downhill in N (Neutral)
or with the ignition off is
dangerous. This can cause
overheating of the brakes and
loss of steering assist. Always
have the engine running and the
vehicle in gear. .
Drive at speeds that keep the
vehicle in its own lane. Do not
swing wide or cross the
center line.
. Be alert on top of hills;
something could be in your lane
(e.g., stalled car, accident).
. Pay attention to special road
signs (e.g., falling rocks area,
winding roads, long grades,
passing or no-passing zones)
and take appropriate action.
Winter Driving
Driving on Snow or Ice
Snow or ice between the tires and
the road creates less traction or
grip, so drive carefully. Wet ice can
occur at about 0 °C (32 °F) when
freezing rain begins to fall. Avoid
driving on wet ice or in freezing rain
until roads can be treated.
For Slippery Road Driving:
.Accelerate gently. Accelerating
too quickly causes the wheels to
spin and makes the surface
under the tires slick. .
Turn on Traction Control. See
Traction Control/Electronic
Stability Control 0232.
. The Antilock Brake System
(ABS) improves vehicle stability
during hard stops, but the
brakes should be applied sooner
than when on dry pavement.
See Antilock Brake System
(ABS) 0229.
. Allow greater following distance
and watch for slippery spots. Icy
patches can occur on otherwise
clear roads in shaded areas.
The surface of a curve or an
overpass can remain icy when
the surrounding roads are clear.
Avoid sudden steering
maneuvers and braking while
on ice.
. Turn off cruise control.
Blizzard Conditions
Stop the vehicle in a safe place and
signal for help. Stay with the vehicle
unless there is help nearby.
If possible, use Roadside
Assistance. See Roadside
Page 208 of 393
Chevrolet Camaro Owner Manual (GMNA-Localizing-U.S./Canada/Mexico-
11348325) - 2018 - CRC - 10/23/17
Driving and Operating 207
Assistance Program0359. To get
help and keep everyone in the
vehicle safe:
. Turn on the hazard warning
flashers.
. Tie a red cloth to an outside
mirror.
{Warning
Snow can trap engine exhaust
under the vehicle. This may
cause exhaust gases to get
inside. Engine exhaust contains
carbon monoxide (CO), which
cannot be seen or smelled. It can
cause unconsciousness and even
death.
If the vehicle is stuck in snow:
. Clear snow from the base of
the vehicle, especially any
blocking the exhaust pipe.
. Open a window about 5 cm
(2 in) on the vehicle side
that is away from the wind,
to bring in fresh air.
(Continued)
Warning (Continued)
.Fully open the air outlets on
or under the instrument
panel.
. Adjust the climate control
system to circulate the air
inside the vehicle and set
the fan speed to the highest
setting. See “Climate
Control Systems.”
For more information about CO,
see Engine Exhaust 0220.
To save fuel, run the engine for
short periods to warm the vehicle
and then shut the engine off and
partially close the window. Moving
about to keep warm also helps.
If it takes time for help to arrive,
when running the engine, push the
accelerator pedal slightly so the
engine runs faster than the idle
speed. This keeps the battery
charged to restart the vehicle and to
signal for help with the headlamps.
Do this as little as possible, to
save fuel.
If the Vehicle Is Stuck
Slowly and cautiously spin the
wheels to free the vehicle when
stuck in sand, mud, ice, or snow.
If stuck too severely for the traction
system to free the vehicle, turn the
traction system off and use the
rocking method. See Traction
Control/Electronic Stability Control
0 232.
{Warning
If the vehicle's tires spin at high
speed, they can explode, and you
or others could be injured. The
vehicle can overheat, causing an
engine compartment fire or other
damage. Spin the wheels as little
as possible and avoid going
above 56 km/h (35 mph).
Rocking the Vehicle to Get
it Out
Turn the steering wheel left and
right to clear the area around the
front wheels. Turn off any traction
Page 213 of 393
Chevrolet Camaro Owner Manual (GMNA-Localizing-U.S./Canada/Mexico-
11348325) - 2018 - CRC - 10/23/17
212 Driving and Operating
Starting and
Operating
New Vehicle Break-In
Caution
Follow these recommended
guidelines during the first
2 414 km (1,500 mi) of driving this
vehicle. Parts have a break-in
period and performance will be
better in the long run.. Avoid full throttle starts and
abrupt stops.
. Do not exceed 4000
engine rpm.
. Avoid driving at any one
constant speed, fast or slow.
. Do not drive above
129 km/h (80 mph).
. Avoid downshifting to brake
or slow the vehicle when the
engine speed will exceed
4000 rpm.
(Continued)
Caution (Continued)
.Do not let the engine labor.
Never lug the engine in high
gear at low speeds. With a
manual transmission, shift
to the next lower gear. This
rule applies at all times, not
just during the break-in
period.
. Do not participate in racing
events, sport driving
schools, or similar activities
during this break-in period.
. Check engine oil with every
refueling and add if
necessary. Oil and fuel
consumption may be higher
than normal during the first
2 414 km (1,500 mi).
. To break in new tires, drive
at moderate speeds and
avoid hard cornering for the
first 322 km (200 mi). New
(Continued)
Caution (Continued)
tires do not have maximum
traction and may tend
to slip.
. New brake linings also need
a break-in period. Avoid
making hard stops during
the first 322 km (200 mi).
This is recommended every
time brake linings are
replaced.
. Should the vehicle be used
for racing or competitive
driving (after break-in), the
rear axle lubricant must be
replaced beforehand.
See Track Events and Competitive
Driving 0200.
Page 214 of 393
Chevrolet Camaro Owner Manual (GMNA-Localizing-U.S./Canada/Mexico-
11348325) - 2018 - CRC - 10/23/17
Driving and Operating 213
Ignition Positions
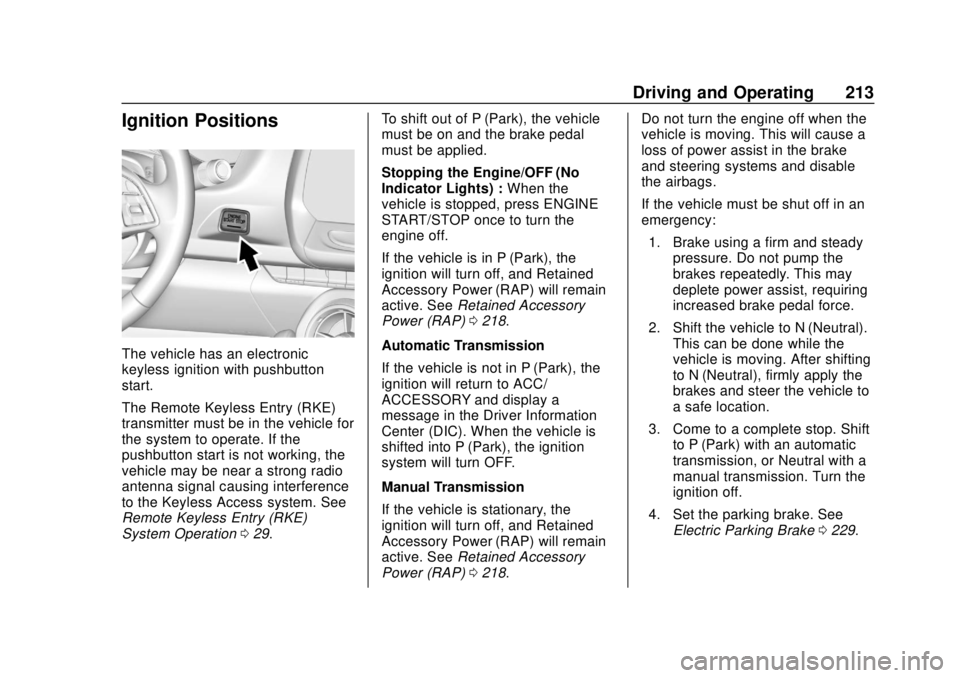
The vehicle has an electronic
keyless ignition with pushbutton
start.
The Remote Keyless Entry (RKE)
transmitter must be in the vehicle for
the system to operate. If the
pushbutton start is not working, the
vehicle may be near a strong radio
antenna signal causing interference
to the Keyless Access system. See
Remote Keyless Entry (RKE)
System Operation029. To shift out of P (Park), the vehicle
must be on and the brake pedal
must be applied.
Stopping the Engine/OFF (No
Indicator Lights) :
When the
vehicle is stopped, press ENGINE
START/STOP once to turn the
engine off.
If the vehicle is in P (Park), the
ignition will turn off, and Retained
Accessory Power (RAP) will remain
active. See Retained Accessory
Power (RAP) 0218.
Automatic Transmission
If the vehicle is not in P (Park), the
ignition will return to ACC/
ACCESSORY and display a
message in the Driver Information
Center (DIC). When the vehicle is
shifted into P (Park), the ignition
system will turn OFF.
Manual Transmission
If the vehicle is stationary, the
ignition will turn off, and Retained
Accessory Power (RAP) will remain
active. See Retained Accessory
Power (RAP) 0218. Do not turn the engine off when the
vehicle is moving. This will cause a
loss of power assist in the brake
and steering systems and disable
the airbags.
If the vehicle must be shut off in an
emergency:
1. Brake using a firm and steady pressure. Do not pump the
brakes repeatedly. This may
deplete power assist, requiring
increased brake pedal force.
2. Shift the vehicle to N (Neutral). This can be done while the
vehicle is moving. After shifting
to N (Neutral), firmly apply the
brakes and steer the vehicle to
a safe location.
3. Come to a complete stop. Shift to P (Park) with an automatic
transmission, or Neutral with a
manual transmission. Turn the
ignition off.
4. Set the parking brake. See Electric Parking Brake 0229.
Page 215 of 393
Chevrolet Camaro Owner Manual (GMNA-Localizing-U.S./Canada/Mexico-
11348325) - 2018 - CRC - 10/23/17
214 Driving and Operating
{Warning
Turning off the vehicle while
moving may cause loss of power
assist in the brake and steering
systems and disable the airbags.
While driving, only shut the
vehicle off in an emergency.
If the vehicle cannot be pulled over,
and must be shut off while driving,
press and hold ENGINE START/
STOP for longer than two seconds,
or press twice within five seconds.
ACC/ACCESSORY (Amber
Indicator Light) : This mode allows
the use of some electrical
accessories when the engine is off.
With the ignition off, pressing the
button one time without the brake
pedal applied will place the ignition
system in ACC/ACCESSORY.
The ignition will switch from ACC/
ACCESSORY to OFF after
five minutes to prevent battery
rundown. ON/RUN/START (Green Indicator
Light) :
This mode is for driving and
starting. With the ignition off, and
the brake pedal applied, pressing
the button once will place the
ignition system in ON/RUN/START.
Once engine cranking begins,
release the button. Engine cranking
will continue until the engine starts.
See Starting the Engine 0214. The
ignition will then remain on.
Service Mode
This power mode is available for
service and diagnostics, and to
verify the proper operation of the
malfunction indicator lamp as may
be required for emission inspection
purposes. With the vehicle off, and
the brake pedal not applied,
pressing and holding ENGINE
START/STOP for more than
five seconds will place the vehicle in
Service Mode. The instruments and
audio systems will operate as they
do in ON/RUN, but the vehicle will
not be able to be driven. The engine
will not start in Service Mode. Press
the button again to turn the
vehicle off.
Starting the Engine
Place the transmission in the
proper gear.
Caution
If you add electrical parts or
accessories, you could change
the way the engine operates. Any
resulting damage would not be
covered by the vehicle warranty.
See Add-On Electrical Equipment
0 251.
For an automatic transmission,
move the shift lever to P (Park) or
N (Neutral). To restart the vehicle
when it is already moving, use
N (Neutral) only.
Caution
Do not try to shift to P (Park) if the
vehicle is moving. If you do, you
could damage the transmission.
Shift to P (Park) only when the
vehicle is stopped.