parking brake CHEVROLET CAMARO 2019 Owner's Guide
[x] Cancel search | Manufacturer: CHEVROLET, Model Year: 2019, Model line: CAMARO, Model: CHEVROLET CAMARO 2019Pages: 375, PDF Size: 6.16 MB
Page 260 of 375
Chevrolet Camaro Owner Manual (GMNA-Localizing-U.S./Canada/Mexico-
12461811) - 2019 - crc - 11/5/18
Vehicle Care 259
the reservoir cap. SeeEngine
Compartment Overview 0238 for
the location of the reservoir.
Checking Brake Fluid
Place the vehicle in P (Park) or
Neutral with the parking brake
applied if equipped with a manual
transmission. On a level surface,
the brake fluid level should be
between the minimum and
maximum marks on the brake fluid
reservoir.
There are only two reasons why the
brake fluid level in the reservoir may
go down:
. Normal brake lining wear. When
new linings are installed, the
fluid level goes back up.
. A fluid leak in the brake/clutch
hydraulic system. Have the
brake/clutch hydraulic system
fixed. With a leak, the brakes will
not work well.
Always clean the brake fluid
reservoir cap and the area around
the cap before removing it. Do not top off the brake/clutch fluid.
Adding fluid does not correct a leak.
If fluid is added when the linings are
worn, there will be too much fluid
when new brake linings are
installed. Add or remove fluid, as
necessary, only when work is done
on the brake/clutch hydraulic
system.
{Warning
If too much brake fluid is added, it
can spill on the engine and burn,
if the engine is hot enough. You
or others could be burned, and
the vehicle could be damaged.
Add brake fluid only when work is
done on the brake/clutch
hydraulic system.
When the brake/clutch fluid falls to a
low level, the brake warning light
comes on. See Brake System
Warning Light 0128.
Brake fluid absorbs water over time
which degrades the effectiveness of
the brake fluid. Replace brake fluid at the specified intervals to prevent
increased stopping distance. See
Maintenance Schedule
0320.
What to Add
Use only GM approved DOT 3
brake fluid from a clean, sealed
container. See Recommended
Fluids and Lubricants 0329.
{Warning
The wrong or contaminated brake
fluid could result in damage to the
brake system. This could result in
the loss of braking leading to a
possible injury. Always use the
proper GM approved brake fluid.
Caution
If brake fluid is spilled on the
vehicle's painted surfaces, the
paint finish can be damaged.
Immediately wash off any painted
surface.
Page 262 of 375
Chevrolet Camaro Owner Manual (GMNA-Localizing-U.S./Canada/Mexico-
12461811) - 2019 - crc - 11/5/18
Vehicle Care 261
Starter Switch Check
{Warning
When you are doing this
inspection, the vehicle could
move suddenly. If the vehicle
moves, you or others could be
injured.
1. Before starting this check, be sure there is enough room
around the vehicle.
2. Apply both the parking brake and the regular brake.
Do not use the accelerator
pedal, and be ready to turn off
the engine immediately if it
starts.
3. For automatic transmission vehicles, try to start the engine
in each gear. The vehicle
should start only in P (Park) or
N (Neutral). If the vehicle starts
in any other position, contact
your dealer for service. For manual transmission
vehicles, put the shift lever in
Neutral, push the clutch pedal
down halfway, and try to start
the engine. The vehicle should
start only when the clutch
pedal is pushed down all the
way to the floor. If the vehicle
starts when the clutch pedal is
not pushed all the way down,
contact your dealer for service.
Automatic Transmission
Shift Lock Control
Function Check
{Warning
When you are doing this
inspection, the vehicle could
move suddenly. If the vehicle
moves, you or others could be
injured.
1. Before starting this check, be sure there is enough room
around the vehicle. It should be
parked on a level surface. 2. Apply the parking brake. Be
ready to apply the regular
brake immediately if the vehicle
begins to move.
3. With the engine off, turn the ignition on, but do not start the
engine. Without applying the
regular brake, try to move the
shift lever out of P (Park) with
normal effort. If the shift lever
moves out of P (Park), contact
your dealer for service.
Park Brake and P (Park)
Mechanism Check
{Warning
When you are doing this check,
the vehicle could begin to move.
You or others could be injured
and property could be damaged.
Make sure there is room in front
of the vehicle in case it begins to
roll. Be ready to apply the regular
brake at once should the vehicle
begin to move.
Page 263 of 375
Chevrolet Camaro Owner Manual (GMNA-Localizing-U.S./Canada/Mexico-
12461811) - 2019 - crc - 11/5/18
262 Vehicle Care
Park on a fairly steep hill, with the
vehicle facing downhill. Keeping
your foot on the regular brake, set
the parking brake.
.To check the parking brake's
holding ability: With the engine
running and the transmission in
N (Neutral), slowly remove foot
pressure from the regular brake
pedal. Do this until the vehicle is
held by the parking brake only.
. To check the P (Park)
mechanism's holding ability:
With the engine running, shift to
P (Park). Then release the
parking brake followed by the
regular brake.
Contact your dealer if service is
required.
Wiper Blade Replacement
Windshield wiper blades should be
inspected for wear and cracking.
See Maintenance Schedule 0320. Replacement blades come in
different types and are removed in
different ways. For proper type and
length, see
Maintenance
Replacement Parts 0331.
To replace the windshield wiper
blade:
Caution
Keep the hood closed to avoid
damaging the paint.
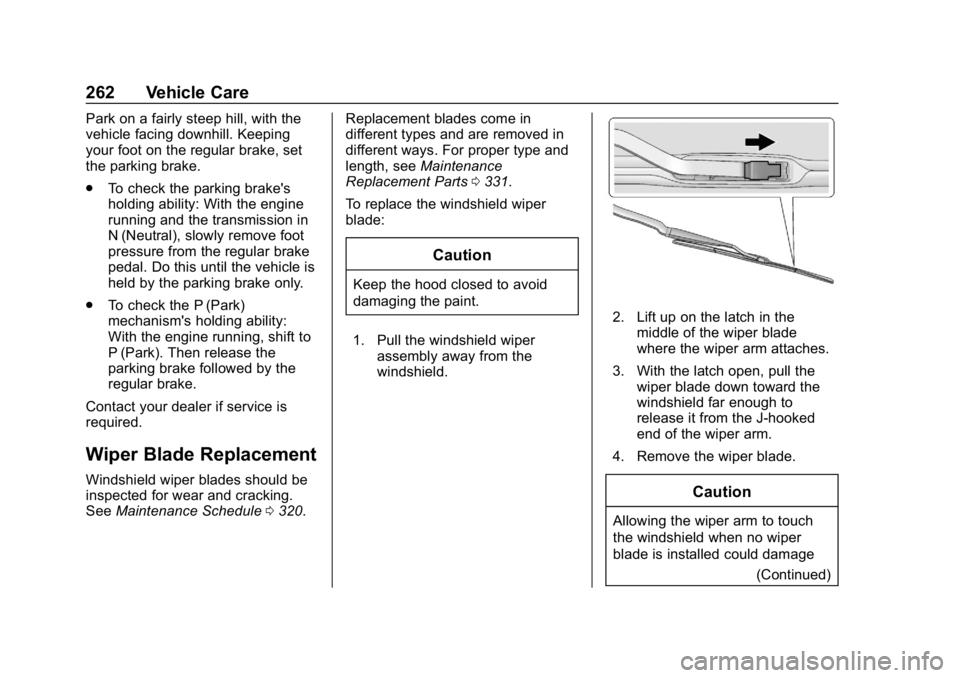
1. Pull the windshield wiper assembly away from the
windshield.
2. Lift up on the latch in themiddle of the wiper blade
where the wiper arm attaches.
3. With the latch open, pull the wiper blade down toward the
windshield far enough to
release it from the J-hooked
end of the wiper arm.
4. Remove the wiper blade.
Caution
Allowing the wiper arm to touch
the windshield when no wiper
blade is installed could damage (Continued)
Page 273 of 375
Chevrolet Camaro Owner Manual (GMNA-Localizing-U.S./Canada/Mexico-
12461811) - 2019 - crc - 11/5/18
272 Vehicle Care
Fuses UsageF2 Front blower
F3 Electric parking brake
F4 –
F5 –
F6 Rear drive control module
F7 Right window
F8 –
F9 Left window
F10 Heated mirror F11 –
F12 Heated steering wheel
F13 –
F14 HVAC control
F15 Spare
F16 Display
F17 Spare
F18 – Fuses Usage
F19 Front ventilated seat
F20 Spare
F21 –
F22 –
F23 Body control module
F24 –
F25 –
F26 –
F27 RGB lights
F28 Passive entry/ Passive start
battery
F29 Data link connector
F30 Canister vent
F31 Power fold top
F32 Memory seat module
F33 Wireless charger Fuses Usage
F34 Engine control module battery
F35 Fuel system control
module V6
F36 –
F37 Electric steering
column lock
F38 Outside rear view mirror/
Power window
F39 Rear closure
F40 –
F41 Battery regulated
voltage control
F42 SADS
F43 –
F44 Folding top solenoid
F45 Amplifier
Page 288 of 375
Chevrolet Camaro Owner Manual (GMNA-Localizing-U.S./Canada/Mexico-
12461811) - 2019 - crc - 11/5/18
Vehicle Care 287
www.gmtoolsandequipment.com or
call 1-800-GM TOOLS
(1-800-468-6657).
There are two minutes to match the
first tire/wheel position, and
five minutes overall to match all four
tire/wheel positions. If it takes
longer, the matching process stops
and must be restarted.
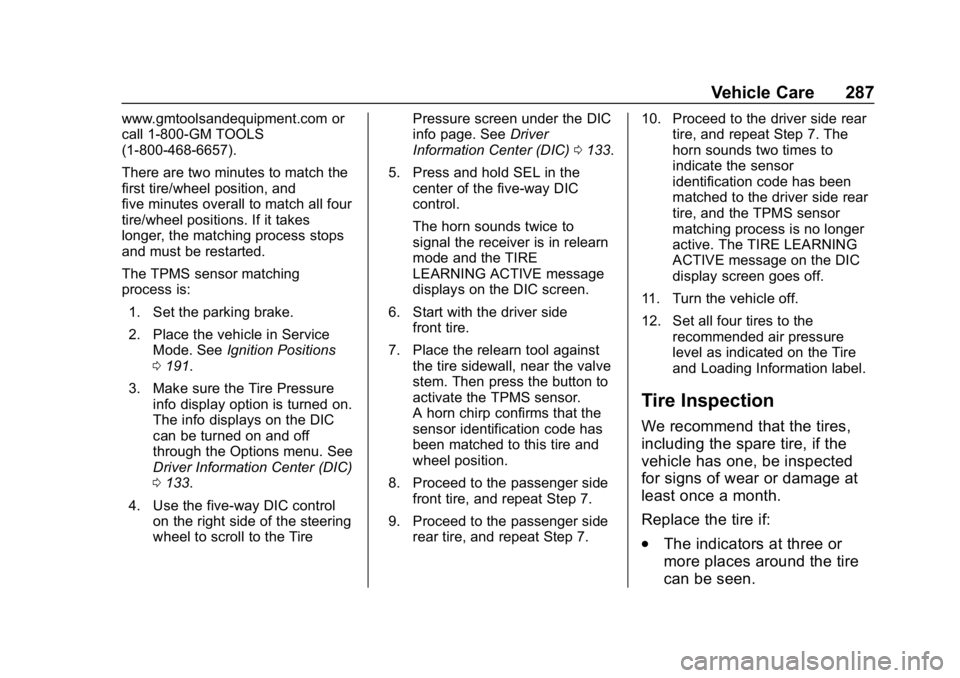
The TPMS sensor matching
process is:1. Set the parking brake.
2. Place the vehicle in Service Mode. See Ignition Positions
0 191.
3. Make sure the Tire Pressure info display option is turned on.
The info displays on the DIC
can be turned on and off
through the Options menu. See
Driver Information Center (DIC)
0133.
4. Use the five-way DIC control on the right side of the steering
wheel to scroll to the Tire Pressure screen under the DIC
info page. See
Driver
Information Center (DIC) 0133.
5. Press and hold SEL in the center of the five-way DIC
control.
The horn sounds twice to
signal the receiver is in relearn
mode and the TIRE
LEARNING ACTIVE message
displays on the DIC screen.
6. Start with the driver side front tire.
7. Place the relearn tool against the tire sidewall, near the valve
stem. Then press the button to
activate the TPMS sensor.
A horn chirp confirms that the
sensor identification code has
been matched to this tire and
wheel position.
8. Proceed to the passenger side front tire, and repeat Step 7.
9. Proceed to the passenger side rear tire, and repeat Step 7. 10. Proceed to the driver side rear
tire, and repeat Step 7. The
horn sounds two times to
indicate the sensor
identification code has been
matched to the driver side rear
tire, and the TPMS sensor
matching process is no longer
active. The TIRE LEARNING
ACTIVE message on the DIC
display screen goes off.
11. Turn the vehicle off.
12. Set all four tires to the recommended air pressure
level as indicated on the Tire
and Loading Information label.
Tire Inspection
We recommend that the tires,
including the spare tire, if the
vehicle has one, be inspected
for signs of wear or damage at
least once a month.
Replace the tire if:
.The indicators at three or
more places around the tire
can be seen.
Page 291 of 375
Chevrolet Camaro Owner Manual (GMNA-Localizing-U.S./Canada/Mexico-
12461811) - 2019 - crc - 11/5/18
290 Vehicle Care
Vehicle Storage
Tires age when stored normally
mounted on a parked vehicle. Park
a vehicle that will be stored for at
least a month in a cool, dry, clean
area away from direct sunlight to
slow aging. This area should be free
of grease, gasoline, or other
substances that can deteriorate
rubber.
Parking for an extended period can
cause flat spots on the tires that
may result in vibrations while
driving. When storing a vehicle for
at least a month, remove the tires or
raise the vehicle to reduce the
weight from the tires.
Buying New Tires
GM has developed and matched
specific tires for the vehicle. The
original equipment tires installed
were designed to meet General
Motors Tire Performance Criteria
Specification (TPC Spec)
system rating. When
replacement tires are needed,GM strongly recommends
buying tires with the same TPC
Spec rating.
GM's exclusive TPC Spec
system considers over a dozen
critical specifications that impact
the overall performance of the
vehicle, including brake system
performance, ride and handling,
traction control, and tire
pressure monitoring
performance. GM's TPC Spec
number is molded onto the tire's
sidewall near the tire size. If the
tires have an all-season tread
design, the TPC Spec number
will be followed by MS for mud
and snow. See
Tire Sidewall
Labeling 0277.
GM recommends replacing worn
tires in complete sets of four.
Uniform tread depth on all tires
will help to maintain the
performance of the vehicle.
Braking and handling
performance may be adversely affected if all the tires are not
replaced at the same time.
If proper rotation and
maintenance have been done,
all four tires should wear out at
about the same time. See
Tire
Rotation 0288. However, if it is
necessary to replace only one
axle set of worn tires, place the
new tires on the rear axle.
Winter tires with the same speed
rating as the original equipment
tires may not be available for H,
V, W, Y and ZR speed rated
tires. Never exceed the winter
tires’ maximum speed capability
when using winter tires with a
lower speed rating.{Warning
Tires could explode during
improper service. Attempting
to mount or dismount a tire
could cause injury or death.
(Continued)
Page 296 of 375
Chevrolet Camaro Owner Manual (GMNA-Localizing-U.S./Canada/Mexico-
12461811) - 2019 - crc - 11/5/18
Vehicle Care 295
{Warning
Special tools and procedures are
required to service a run-flat tire.
If these special tools and
procedures are not used, injury or
vehicle damage may occur.
Always be sure the proper tools
and procedures, as described in
the service manual, are used.
It is unusual for a tire to blow out
while driving, especially if the tires
are maintained properly. See Tires
0 273. If air goes out of a tire, it is
much more likely to leak out slowly.
But if there is ever a blowout, here
are a few tips about what to expect
and what to do:
If a front tire fails, the flat tire
creates a drag that pulls the vehicle
toward that side. Take your foot off
the accelerator pedal and grip the
steering wheel firmly. Steer to
maintain lane position, and then
gently brake to a stop, well off the
road, if possible. A rear blowout, particularly on a
curve, acts much like a skid and
may require the same correction as
used in a skid. Stop pressing the
accelerator pedal and steer to
straighten the vehicle. It may be
very bumpy and noisy. Gently brake
to a stop, well off the road,
if possible.
{Warning
Lifting a vehicle and getting under
it to do maintenance or repairs is
dangerous without the
appropriate safety equipment and
training. If a jack is provided with
the vehicle, it is designed only for
changing a flat tire. If it is used for
anything else, you or others could
be badly injured or killed if the
vehicle slips off the jack. If a jack
is provided with the vehicle, only
use it for changing a flat tire.
If this vehicle does not have run-flat
tires and a tire goes flat, avoid
further tire and wheel damage by
driving slowly to a level place, well
off the road, if possible.
1. Turn on the hazard warning flashers. See Hazard Warning
Flashers 0149.
2. Set the parking brake firmly.
3. Put an automatic transmission in P (Park) or a manual
transmission in 1 (First) or
R (Reverse).
4. Turn off the ignition.
5. Inspect the flat tire.
{Warning
Driving on a flat tire will cause
permanent damage to the tire.
Re-inflating a tire after it has been
driven on while severely
underinflated or flat may cause a
blowout and a serious crash.
Never attempt to re-inflate a tire
that has been driven on while (Continued)
Page 305 of 375
Chevrolet Camaro Owner Manual (GMNA-Localizing-U.S./Canada/Mexico-
12461811) - 2019 - crc - 11/5/18
304 Vehicle Care
Caution
Ignoring these steps could result
in costly damage to the vehicle
that would not be covered by the
vehicle warranty. Trying to start
the vehicle by pushing or pulling it
will not work, and it could damage
the vehicle.
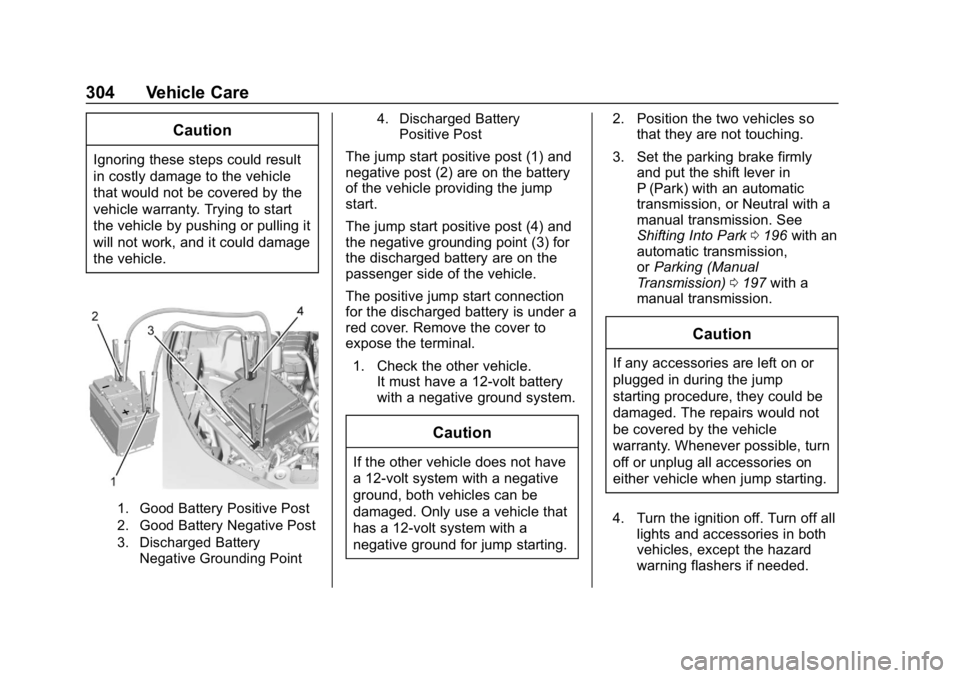
1. Good Battery Positive Post
2. Good Battery Negative Post
3. Discharged BatteryNegative Grounding Point 4. Discharged Battery
Positive Post
The jump start positive post (1) and
negative post (2) are on the battery
of the vehicle providing the jump
start.
The jump start positive post (4) and
the negative grounding point (3) for
the discharged battery are on the
passenger side of the vehicle.
The positive jump start connection
for the discharged battery is under a
red cover. Remove the cover to
expose the terminal.
1. Check the other vehicle. It must have a 12-volt battery
with a negative ground system.
Caution
If the other vehicle does not have
a 12-volt system with a negative
ground, both vehicles can be
damaged. Only use a vehicle that
has a 12-volt system with a
negative ground for jump starting. 2. Position the two vehicles so
that they are not touching.
3. Set the parking brake firmly and put the shift lever in
P (Park) with an automatic
transmission, or Neutral with a
manual transmission. See
Shifting Into Park 0196 with an
automatic transmission,
or Parking (Manual
Transmission) 0197 with a
manual transmission.
Caution
If any accessories are left on or
plugged in during the jump
starting procedure, they could be
damaged. The repairs would not
be covered by the vehicle
warranty. Whenever possible, turn
off or unplug all accessories on
either vehicle when jump starting.
4. Turn the ignition off. Turn off all lights and accessories in both
vehicles, except the hazard
warning flashers if needed.
Page 322 of 375

Chevrolet Camaro Owner Manual (GMNA-Localizing-U.S./Canada/Mexico-
12461811) - 2019 - crc - 11/5/18
Service and Maintenance 321
parts, or signs of wear at least
once a year. SeeExterior Care
0 308.
. Inspect power steering for
proper attachment, connections,
binding, leaks, cracks,
chafing, etc.
. Visually inspect halfshafts and
drive shafts for excessive wear,
lubricant leaks, and/or damage
including: tube dents or cracks,
constant velocity joint or
universal joint looseness,
cracked or missing boots, loose
or missing boot clamps, center
bearing excessive looseness,
loose or missing fasteners, and
axle seal leaks.
. Check restraint system
components. See Safety System
Check 073. .
Visually inspect fuel system for
damage or leaks.
. Visually inspect exhaust system
and nearby heat shields for
loose or damaged parts.
. Lubricate body components. See
Exterior Care 0308.
. Check starter switch. See Starter
Switch Check 0261.
. Check automatic transmission
shift lock control function. See
Automatic Transmission Shift
Lock Control Function Check
0261.
. Check parking brake and
automatic transmission park
mechanism. See Park Brake and
P (Park) Mechanism Check
0 261. .
Check accelerator pedal for
damage, high effort, or binding.
Replace if needed.
. Visually inspect gas strut for
signs of wear, cracks, or other
damage. Check the hold open
ability of the strut. If the hold
open is low, service the gas
strut. See Gas Strut(s) 0263.
. Check tire sealant expiration
date, if equipped. See Tire
Sealant and Compressor Kit
0 296.
. Inspect sunroof track and seal,
if equipped. See Sunroof052.
Page 331 of 375

Chevrolet Camaro Owner Manual (GMNA-Localizing-U.S./Canada/Mexico-
12461811) - 2019 - crc - 11/5/18
330 Service and Maintenance
UsageFluid/Lubricant
Key Lock Cylinders, Hood and Door Hinges Multi-Purpose Lubricant, Superlube (GM Part No. 12346241, in
Canada 10953474).
Manual Transmission (L4 and V6 Engines) DEXRON-VI Automatic Transmission Fluid.
Manual Transmission (V8 Engine) Manual Transmission Fluid (GM Part No. 88861800, in Canada 88861801).
Parking Brake Cable Guides Chassis Lubricant (GM Part No. 12377985, in Canada 88901242) or lubricant meeting requirements of NLGI #2, Category LB or GC-LB.
Rear Axle (L4 and V6 Engines with Automatic Transmission) Dexron non-LSD Gear Oil (GM Part No. 88863089, in Canada 88863090).
Rear Axle (L4 and V6 Engines with Manual Transmission) Dexron LS Gear Oil (GM Part No. 88862624, in Canada 88862625).
Rear Axle (V8 Engine) Dexron LS Gear Oil (GM Part No. 88862624, in Canada 88862625).
Weatherstrip Conditioning Weatherstrip Lubricant (GM Part No. 3634770, in Canada 10953518) or equivalent.
Windshield Washer Automotive windshield washer fluid that meets regional freeze protection requirements.