clock CHEVROLET CAMARO 2020 Get To Know Guide
[x] Cancel search | Manufacturer: CHEVROLET, Model Year: 2020, Model line: CAMARO, Model: CHEVROLET CAMARO 2020Pages: 361, PDF Size: 3.27 MB
Page 25 of 361
Chevrolet Camaro Owner Manual (GMNA-Localizing-U.S./Canada/Mexico-
13556304) - 2020 - CRC - 9/3/19
24 Keys, Doors, and Windows
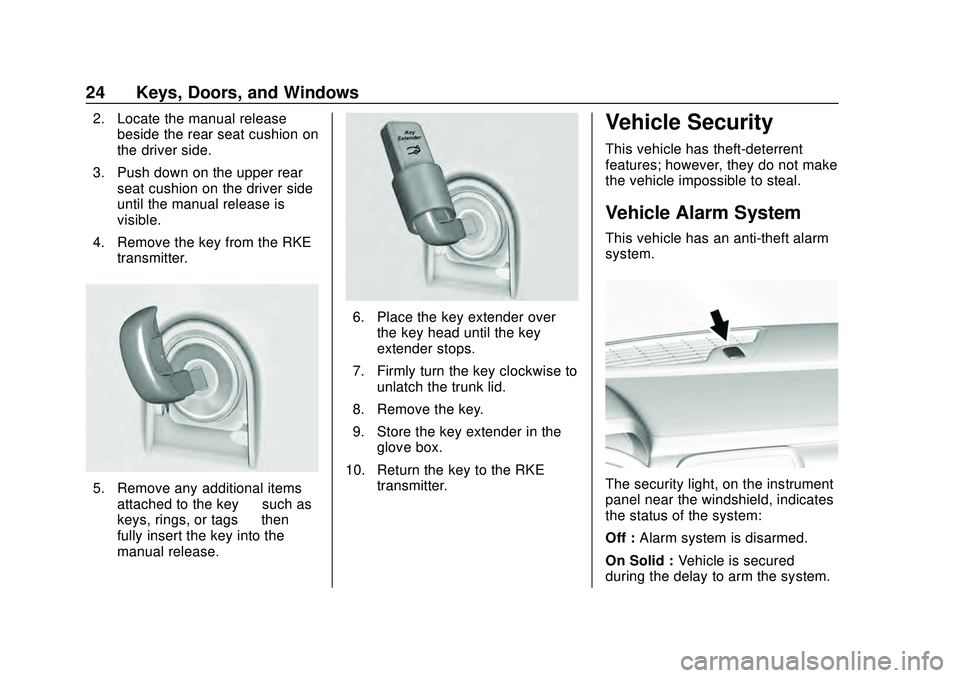
2. Locate the manual releasebeside the rear seat cushion on
the driver side.
3. Push down on the upper rear seat cushion on the driver side
until the manual release is
visible.
4. Remove the key from the RKE transmitter.
5. Remove any additional items
attached to the key —such as
keys, rings, or tags —then
fully insert the key into the
manual release.
6. Place the key extender over the key head until the key
extender stops.
7. Firmly turn the key clockwise to unlatch the trunk lid.
8. Remove the key.
9. Store the key extender in the glove box.
10. Return the key to the RKE transmitter.
Vehicle Security
This vehicle has theft-deterrent
features; however, they do not make
the vehicle impossible to steal.
Vehicle Alarm System
This vehicle has an anti-theft alarm
system.
The security light, on the instrument
panel near the windshield, indicates
the status of the system:
Off : Alarm system is disarmed.
On Solid : Vehicle is secured
during the delay to arm the system.
Page 41 of 361
Chevrolet Camaro Owner Manual (GMNA-Localizing-U.S./Canada/Mexico-
13556304) - 2020 - CRC - 9/3/19
40 Keys, Doors, and Windows
3. Lock the front of the convertibletop to the frame by popping out
the small cover, inserting a hex
wrench, and turning clockwise
until it stops.
4. Lift up the tension bow on both sides and raise the tonneau
cover to approximately the half
raised position, and then allow
it to slide into the closed
position.
5. Lower the tension bow.
The vehicle can now be driven to
your dealer for service. The
convertible top will not be
completely waterproof and should
not be driven over 80 km/h (50 mph)
in this position.
Cleaning the Convertible Top
The convertible top should be
cleaned often. Do not use
high-pressure car washes as these
may cause water to enter the
vehicle.
Hand wash the convertible top in
partial shade. Use mild soap,
lukewarm water, and a soft sponge. A chamois or cloth may leave lint on
the top, and a brush can chafe the
threads in the top fabric. Do not use
detergents, harsh cleaners,
solvents, or bleaching agents.
Wet the entire top and let the soap
remain on the fabric for a few
minutes. Wash evenly to avoid
spots or rings. When the top is very
dirty, use a mild foam-type cleaner.
Thoroughly rinse the entire vehicle,
then let the top dry in direct sunlight.
To protect the convertible top:
.
Make sure the convertible top is
completely dry before lowering it.
. Do not get any cleaner on the
vehicle's painted finish; it could
leave streaks.
Page 92 of 361
Chevrolet Camaro Owner Manual (GMNA-Localizing-U.S./Canada/Mexico-
13556304) - 2020 - CRC - 9/3/19
Instruments and Controls 91
Instruments and
Controls
Controls
Steering Wheel Adjustment . . . . 92
Steering Wheel Controls . . . . . . . 92
Heated Steering Wheel . . . . . . . . 92
Horn . . . . . . . . . . . . . . . . . . . . . . . . . . . 92
Windshield Wiper/Washer . . . . . . 92
Compass . . . . . . . . . . . . . . . . . . . . . . 94
Clock . . . . . . . . . . . . . . . . . . . . . . . . . . 94
Power Outlets . . . . . . . . . . . . . . . . . 94
Wireless Charging . . . . . . . . . . . . . 95
Warning Lights, Gauges, and
Indicators
Warning Lights, Gauges, andIndicators . . . . . . . . . . . . . . . . . . . . 97
Instrument Cluster . . . . . . . . . . . . . 98
Speedometer . . . . . . . . . . . . . . . . . 102
Odometer . . . . . . . . . . . . . . . . . . . . . 102
Trip Odometer . . . . . . . . . . . . . . . . 102
Tachometer . . . . . . . . . . . . . . . . . . . 102
Fuel Gauge . . . . . . . . . . . . . . . . . . . 103
Boost Gauge (Uplevel Cluster Only) . . . . . . . . . . . . . . . . 104
Engine Oil Pressure Gauge (Uplevel Cluster Only) . . . . . . . 105 Engine Coolant Temperature
Gauge . . . . . . . . . . . . . . . . . . . . . . 106
Voltmeter Gauge (Uplevel Cluster Only) . . . . . . . . . . . . . . . . 107
Seat Belt Reminders . . . . . . . . . 107
Airbag Readiness Light . . . . . . . 108
Passenger Airbag Status
Indicator . . . . . . . . . . . . . . . . . . . . 108
Charging System Light . . . . . . . 109
Malfunction Indicator Lamp . . . 110
Brake System Warning Light . . . . . . . . . . . . . . . . . . . . . . . . 112
Electric Parking Brake Light . . . . . . . . . . . . . . . . . . . . . . . . 112
Service Electric Parking Brake Light . . . . . . . . . . . . . . . . . . . . . . . . 113
Antilock Brake System (ABS) Warning Light . . . . . . . . . . . . . . . 113
Vehicle Ahead Indicator . . . . . . . 113
Traction Off Light . . . . . . . . . . . . . 114
StabiliTrak OFF Light . . . . . . . . . 114
Traction Control System (TCS)/ StabiliTrak Light . . . . . . . . . . . . . 114
Tire Pressure Light . . . . . . . . . . . 115
Engine Oil Pressure Light . . . . . 115
Low Fuel Warning Light . . . . . . . 115
Security Light . . . . . . . . . . . . . . . . . 116
High-Beam On Light . . . . . . . . . . 116
Lamps On Reminder . . . . . . . . . . 116
Cruise Control Light . . . . . . . . . . 116 Door Ajar Light . . . . . . . . . . . . . . . 116
Information Displays
Driver Information
Center (DIC) . . . . . . . . . . . . . . . . 117
Head-Up Display (HUD) . . . . . . 120
Vehicle Messages
Vehicle Messages . . . . . . . . . . . . 124
Engine Power Messages . . . . . 124
Vehicle Speed Messages . . . . . 124
Vehicle Personalization
Vehicle Personalization . . . . . . . 125
Page 95 of 361
Chevrolet Camaro Owner Manual (GMNA-Localizing-U.S./Canada/Mexico-
13556304) - 2020 - CRC - 9/3/19
94 Instruments and Controls
Compass
The vehicle has a compass display
in the Driver Information
Center (DIC). The compass receives
its heading and other information
from the Global Positioning
System (GPS) antenna, StabiliTrak/
Electronic Stability Control (ESC),
and vehicle speed information.
Avoid covering the GPS antenna,
located on the roof, for long periods
of time with objects that may
interfere with the antenna's ability to
receive a satellite signal. The
compass system is designed to
operate for a certain number of
miles or degrees of turn before
needing a signal from the GPS
satellites. When the compass
display shows CAL, drive the
vehicle for a short distance in an
open area where it can receive a
GPS signal. The compass system
will automatically determine when
the GPS signal is restored and
provide a heading again.
Clock
The time and date for the clock can
be set using the infotainment
system. See“Time/Date”in
“System” under“Settings” in the
infotainment manual.
Power Outlets
The vehicle has an accessory
power outlet on the center floor
console in front of the cupholders.
It can be used to plug in electrical
equipment, such as a cell phone or
an MP3 player.
The accessory power outlet does
not work when the ignition is turned
off and the driver door is opened.
This helps to preserve the battery
life of the vehicle.
Certain power accessory plugs may
not be compatible with the
accessory power outlet and could
overload vehicle and adapter fuses.
If a problem is experienced, see
your dealer.
Caution
Adding any electrical equipment
to the vehicle may damage it or
keep other components from
working as they should. The
repairs would not be covered by
the vehicle warranty. Do not use
equipment exceeding
maximum amperage rating of
15 amperes. Check with your
dealer before adding electrical
equipment.
When adding electrical equipment,
be sure to follow the proper
installation instructions included with
the equipment. See Add-On
Electrical Equipment 0218.
Caution
Hanging heavy equipment from
the power outlet can cause
damage not covered by the
vehicle warranty. The power
(Continued)
Page 122 of 361
Chevrolet Camaro Owner Manual (GMNA-Localizing-U.S./Canada/Mexico-
13556304) - 2020 - CRC - 9/3/19
Instruments and Controls 121
“Settings”in the Infotainment
Manual and “Options”under
Instrument Cluster 098.
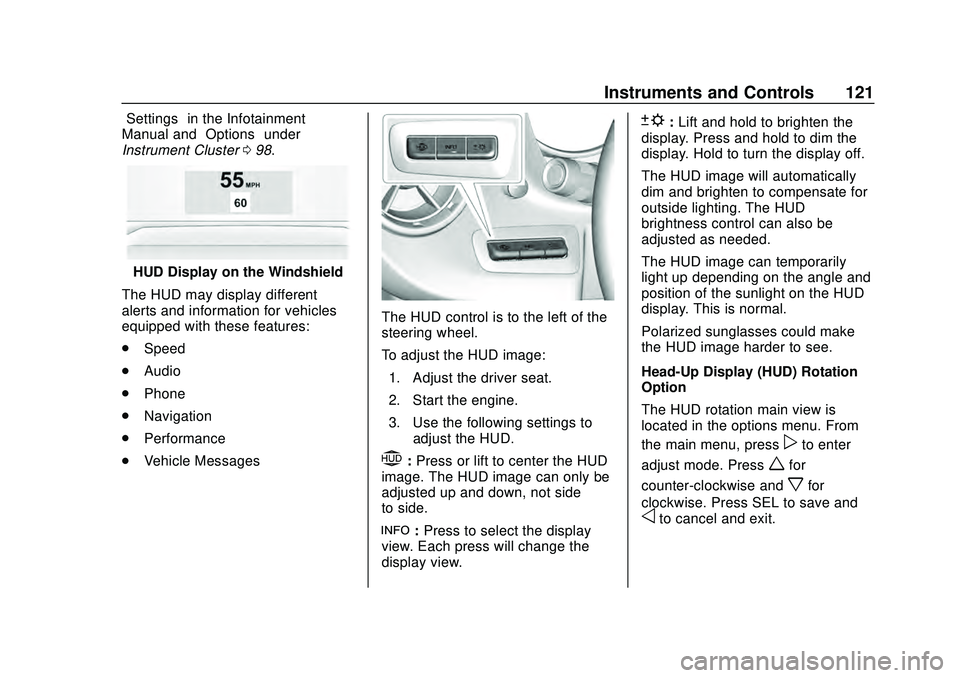
HUD Display on the Windshield
The HUD may display different
alerts and information for vehicles
equipped with these features:
. Speed
. Audio
. Phone
. Navigation
. Performance
. Vehicle Messages
The HUD control is to the left of the
steering wheel.
To adjust the HUD image:
1. Adjust the driver seat.
2. Start the engine.
3. Use the following settings to adjust the HUD.
$:Press or lift to center the HUD
image. The HUD image can only be
adjusted up and down, not side
to side.
!: Press to select the display
view. Each press will change the
display view.
D: Lift and hold to brighten the
display. Press and hold to dim the
display. Hold to turn the display off.
The HUD image will automatically
dim and brighten to compensate for
outside lighting. The HUD
brightness control can also be
adjusted as needed.
The HUD image can temporarily
light up depending on the angle and
position of the sunlight on the HUD
display. This is normal.
Polarized sunglasses could make
the HUD image harder to see.
Head-Up Display (HUD) Rotation
Option
The HUD rotation main view is
located in the options menu. From
the main menu, press
pto enter
adjust mode. Press
wfor
counter-clockwise and
xfor
clockwise. Press SEL to save and
oto cancel and exit.
Page 134 of 361
Chevrolet Camaro Owner Manual (GMNA-Localizing-U.S./Canada/Mexico-
13556304) - 2020 - CRC - 9/3/19
Lighting 133
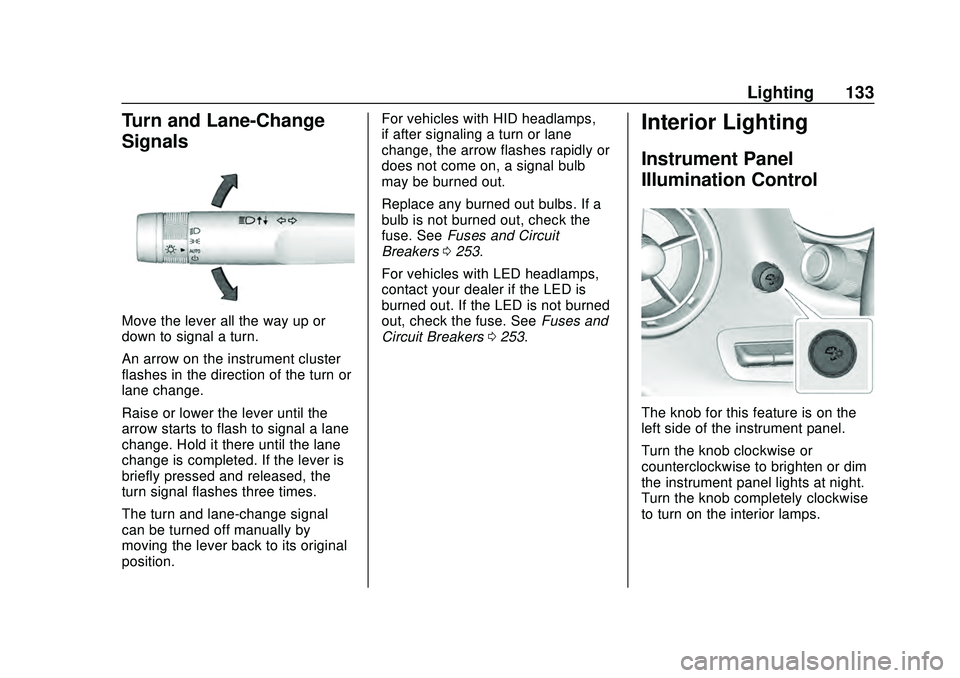
Turn and Lane-Change
Signals
Move the lever all the way up or
down to signal a turn.
An arrow on the instrument cluster
flashes in the direction of the turn or
lane change.
Raise or lower the lever until the
arrow starts to flash to signal a lane
change. Hold it there until the lane
change is completed. If the lever is
briefly pressed and released, the
turn signal flashes three times.
The turn and lane-change signal
can be turned off manually by
moving the lever back to its original
position.For vehicles with HID headlamps,
if after signaling a turn or lane
change, the arrow flashes rapidly or
does not come on, a signal bulb
may be burned out.
Replace any burned out bulbs. If a
bulb is not burned out, check the
fuse. See
Fuses and Circuit
Breakers 0253.
For vehicles with LED headlamps,
contact your dealer if the LED is
burned out. If the LED is not burned
out, check the fuse. See Fuses and
Circuit Breakers 0253.
Interior Lighting
Instrument Panel
Illumination Control
The knob for this feature is on the
left side of the instrument panel.
Turn the knob clockwise or
counterclockwise to brighten or dim
the instrument panel lights at night.
Turn the knob completely clockwise
to turn on the interior lamps.
Page 145 of 361
Chevrolet Camaro Owner Manual (GMNA-Localizing-U.S./Canada/Mexico-
13556304) - 2020 - CRC - 9/3/19
144 Climate Controls
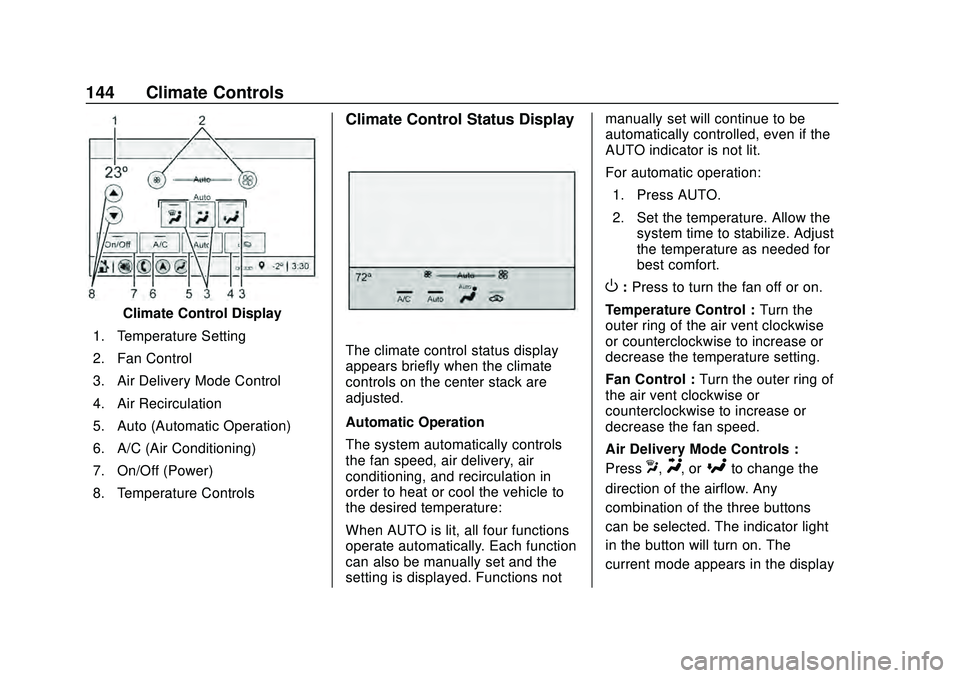
Climate Control Display
1. Temperature Setting
2. Fan Control
3. Air Delivery Mode Control
4. Air Recirculation
5. Auto (Automatic Operation)
6. A/C (Air Conditioning)
7. On/Off (Power)
8. Temperature Controls
Climate Control Status Display
The climate control status display
appears briefly when the climate
controls on the center stack are
adjusted.
Automatic Operation
The system automatically controls
the fan speed, air delivery, air
conditioning, and recirculation in
order to heat or cool the vehicle to
the desired temperature:
When AUTO is lit, all four functions
operate automatically. Each function
can also be manually set and the
setting is displayed. Functions not manually set will continue to be
automatically controlled, even if the
AUTO indicator is not lit.
For automatic operation:
1. Press AUTO.
2. Set the temperature. Allow the system time to stabilize. Adjust
the temperature as needed for
best comfort.
O:Press to turn the fan off or on.
Temperature Control : Turn the
outer ring of the air vent clockwise
or counterclockwise to increase or
decrease the temperature setting.
Fan Control : Turn the outer ring of
the air vent clockwise or
counterclockwise to increase or
decrease the fan speed.
Air Delivery Mode Controls :
Press
X,Y, or[to change the
direction of the airflow. Any
combination of the three buttons
can be selected. The indicator light
in the button will turn on. The
current mode appears in the display
Page 148 of 361
Chevrolet Camaro Owner Manual (GMNA-Localizing-U.S./Canada/Mexico-
13556304) - 2020 - CRC - 9/3/19
Climate Controls 147
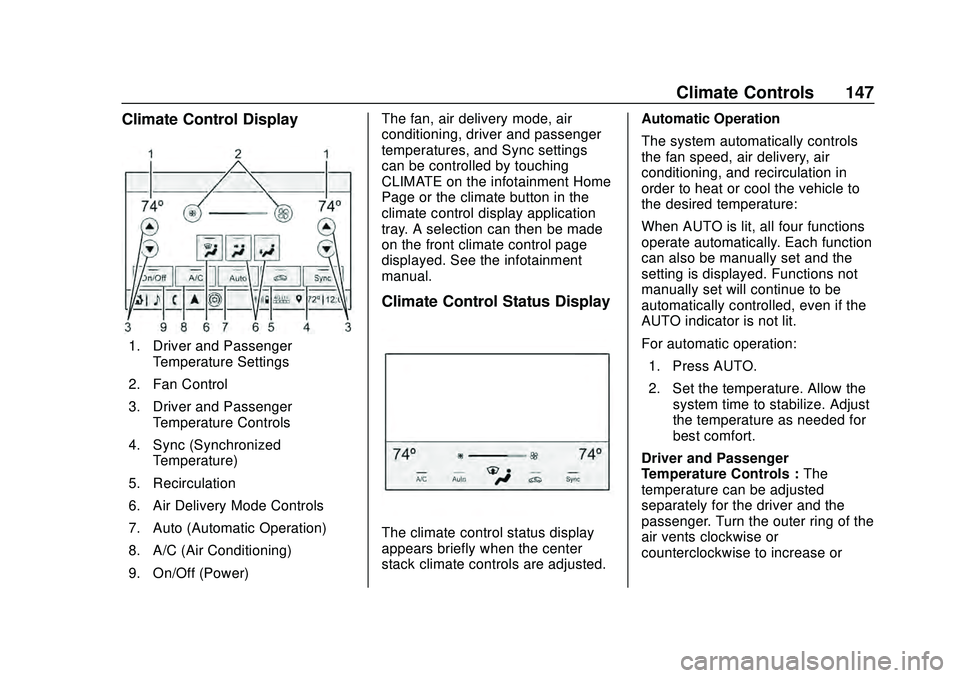
Climate Control Display
1. Driver and PassengerTemperature Settings
2. Fan Control
3. Driver and Passenger Temperature Controls
4. Sync (Synchronized Temperature)
5. Recirculation
6. Air Delivery Mode Controls
7. Auto (Automatic Operation)
8. A/C (Air Conditioning)
9. On/Off (Power) The fan, air delivery mode, air
conditioning, driver and passenger
temperatures, and Sync settings
can be controlled by touching
CLIMATE on the infotainment Home
Page or the climate button in the
climate control display application
tray. A selection can then be made
on the front climate control page
displayed. See the infotainment
manual.
Climate Control Status Display
The climate control status display
appears briefly when the center
stack climate controls are adjusted.
Automatic Operation
The system automatically controls
the fan speed, air delivery, air
conditioning, and recirculation in
order to heat or cool the vehicle to
the desired temperature:
When AUTO is lit, all four functions
operate automatically. Each function
can also be manually set and the
setting is displayed. Functions not
manually set will continue to be
automatically controlled, even if the
AUTO indicator is not lit.
For automatic operation:
1. Press AUTO.
2. Set the temperature. Allow the system time to stabilize. Adjust
the temperature as needed for
best comfort.
Driver and Passenger
Temperature Controls : The
temperature can be adjusted
separately for the driver and the
passenger. Turn the outer ring of the
air vents clockwise or
counterclockwise to increase or
Page 151 of 361
Chevrolet Camaro Owner Manual (GMNA-Localizing-U.S./Canada/Mexico-
13556304) - 2020 - CRC - 9/3/19
150 Climate Controls
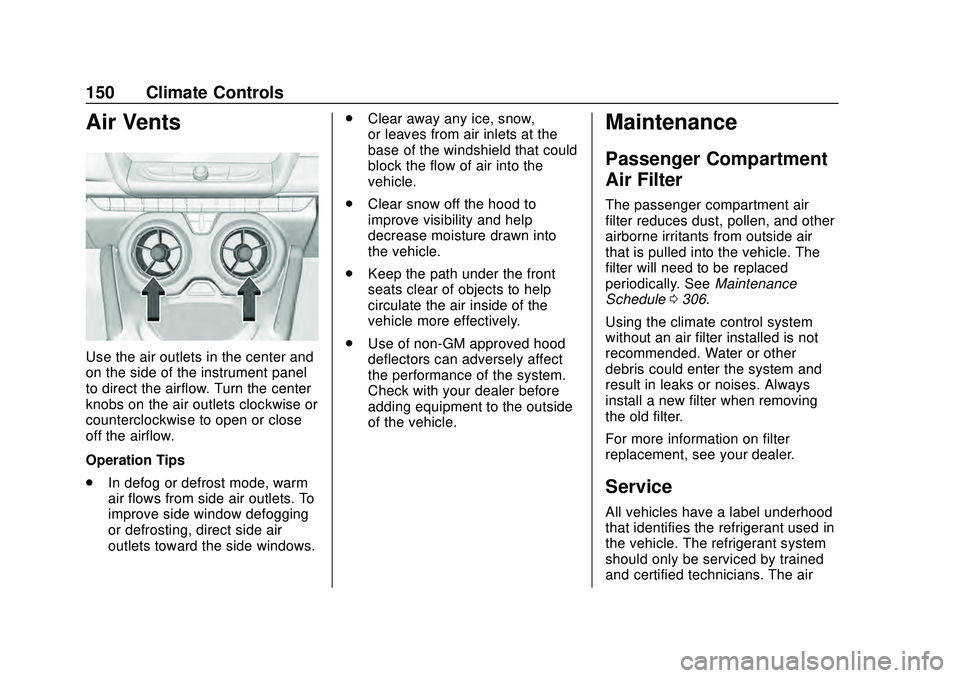
Air Vents
Use the air outlets in the center and
on the side of the instrument panel
to direct the airflow. Turn the center
knobs on the air outlets clockwise or
counterclockwise to open or close
off the airflow.
Operation Tips
.In defog or defrost mode, warm
air flows from side air outlets. To
improve side window defogging
or defrosting, direct side air
outlets toward the side windows. .
Clear away any ice, snow,
or leaves from air inlets at the
base of the windshield that could
block the flow of air into the
vehicle.
. Clear snow off the hood to
improve visibility and help
decrease moisture drawn into
the vehicle.
. Keep the path under the front
seats clear of objects to help
circulate the air inside of the
vehicle more effectively.
. Use of non-GM approved hood
deflectors can adversely affect
the performance of the system.
Check with your dealer before
adding equipment to the outside
of the vehicle.
Maintenance
Passenger Compartment
Air Filter
The passenger compartment air
filter reduces dust, pollen, and other
airborne irritants from outside air
that is pulled into the vehicle. The
filter will need to be replaced
periodically. See Maintenance
Schedule 0306.
Using the climate control system
without an air filter installed is not
recommended. Water or other
debris could enter the system and
result in leaks or noises. Always
install a new filter when removing
the old filter.
For more information on filter
replacement, see your dealer.
Service
All vehicles have a label underhood
that identifies the refrigerant used in
the vehicle. The refrigerant system
should only be serviced by trained
and certified technicians. The air
Page 241 of 361
Chevrolet Camaro Owner Manual (GMNA-Localizing-U.S./Canada/Mexico-
13556304) - 2020 - CRC - 9/3/19
240 Vehicle Care
system, including the coolant surge
tank pressure cap, is cool before
you do it.
{Warning
Steam and scalding liquids from a
hot cooling system are under
pressure. Turning the pressure
cap, even a little, can cause them
to come out at high speed and
you could be burned. Never turn
the cap when the cooling system,
including the pressure cap, is hot.
Wait for the cooling system and
pressure cap to cool.
{Warning
Plain water, or other liquids such
as alcohol, can boil before the
proper coolant mixture will. With
plain water or the wrong mixture,
the engine could get too hot but
there would not be an overheat(Continued)
Warning (Continued)
warning. The engine could catch
fire and you or others could be
burned.
{Warning
Spilling coolant on hot engine
parts can burn you. Coolant
contains ethylene glycol and it will
burn if the engine parts are hot
enough.
Caution
Failure to follow the specific
coolant fill procedure could cause
the engine to overheat and could
cause system damage. If coolant
is not visible in the surge tank,
contact your dealer.
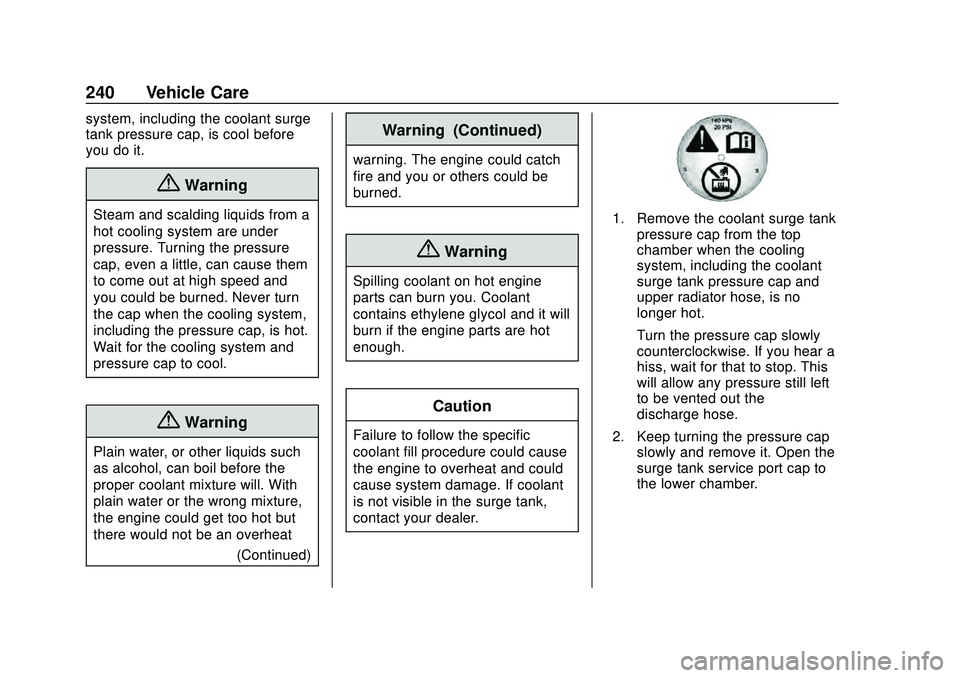
1. Remove the coolant surge tankpressure cap from the top
chamber when the cooling
system, including the coolant
surge tank pressure cap and
upper radiator hose, is no
longer hot.
Turn the pressure cap slowly
counterclockwise. If you hear a
hiss, wait for that to stop. This
will allow any pressure still left
to be vented out the
discharge hose.
2. Keep turning the pressure cap slowly and remove it. Open the
surge tank service port cap to
the lower chamber.