clock setting CHEVROLET CAMARO 2020 Get To Know Guide
[x] Cancel search | Manufacturer: CHEVROLET, Model Year: 2020, Model line: CAMARO, Model: CHEVROLET CAMARO 2020Pages: 361, PDF Size: 3.27 MB
Page 95 of 361

Chevrolet Camaro Owner Manual (GMNA-Localizing-U.S./Canada/Mexico-
13556304) - 2020 - CRC - 9/3/19
94 Instruments and Controls
Compass
The vehicle has a compass display
in the Driver Information
Center (DIC). The compass receives
its heading and other information
from the Global Positioning
System (GPS) antenna, StabiliTrak/
Electronic Stability Control (ESC),
and vehicle speed information.
Avoid covering the GPS antenna,
located on the roof, for long periods
of time with objects that may
interfere with the antenna's ability to
receive a satellite signal. The
compass system is designed to
operate for a certain number of
miles or degrees of turn before
needing a signal from the GPS
satellites. When the compass
display shows CAL, drive the
vehicle for a short distance in an
open area where it can receive a
GPS signal. The compass system
will automatically determine when
the GPS signal is restored and
provide a heading again.
Clock
The time and date for the clock can
be set using the infotainment
system. See“Time/Date”in
“System” under“Settings” in the
infotainment manual.
Power Outlets
The vehicle has an accessory
power outlet on the center floor
console in front of the cupholders.
It can be used to plug in electrical
equipment, such as a cell phone or
an MP3 player.
The accessory power outlet does
not work when the ignition is turned
off and the driver door is opened.
This helps to preserve the battery
life of the vehicle.
Certain power accessory plugs may
not be compatible with the
accessory power outlet and could
overload vehicle and adapter fuses.
If a problem is experienced, see
your dealer.
Caution
Adding any electrical equipment
to the vehicle may damage it or
keep other components from
working as they should. The
repairs would not be covered by
the vehicle warranty. Do not use
equipment exceeding
maximum amperage rating of
15 amperes. Check with your
dealer before adding electrical
equipment.
When adding electrical equipment,
be sure to follow the proper
installation instructions included with
the equipment. See Add-On
Electrical Equipment 0218.
Caution
Hanging heavy equipment from
the power outlet can cause
damage not covered by the
vehicle warranty. The power
(Continued)
Page 122 of 361

Chevrolet Camaro Owner Manual (GMNA-Localizing-U.S./Canada/Mexico-
13556304) - 2020 - CRC - 9/3/19
Instruments and Controls 121
“Settings”in the Infotainment
Manual and “Options”under
Instrument Cluster 098.
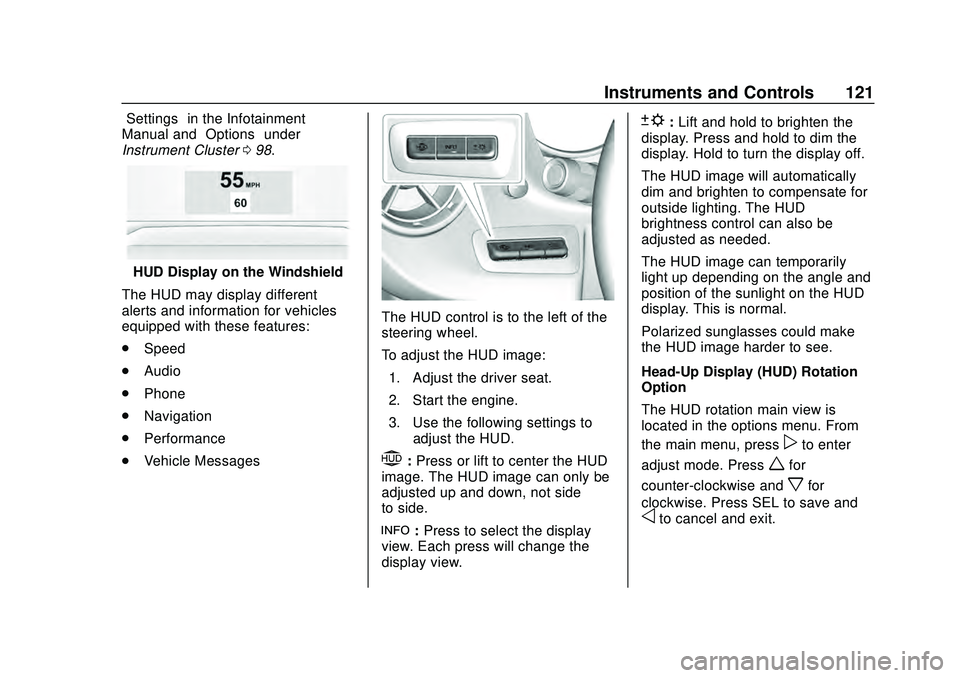
HUD Display on the Windshield
The HUD may display different
alerts and information for vehicles
equipped with these features:
. Speed
. Audio
. Phone
. Navigation
. Performance
. Vehicle Messages
The HUD control is to the left of the
steering wheel.
To adjust the HUD image:
1. Adjust the driver seat.
2. Start the engine.
3. Use the following settings to adjust the HUD.
$:Press or lift to center the HUD
image. The HUD image can only be
adjusted up and down, not side
to side.
!: Press to select the display
view. Each press will change the
display view.
D: Lift and hold to brighten the
display. Press and hold to dim the
display. Hold to turn the display off.
The HUD image will automatically
dim and brighten to compensate for
outside lighting. The HUD
brightness control can also be
adjusted as needed.
The HUD image can temporarily
light up depending on the angle and
position of the sunlight on the HUD
display. This is normal.
Polarized sunglasses could make
the HUD image harder to see.
Head-Up Display (HUD) Rotation
Option
The HUD rotation main view is
located in the options menu. From
the main menu, press
pto enter
adjust mode. Press
wfor
counter-clockwise and
xfor
clockwise. Press SEL to save and
oto cancel and exit.
Page 145 of 361

Chevrolet Camaro Owner Manual (GMNA-Localizing-U.S./Canada/Mexico-
13556304) - 2020 - CRC - 9/3/19
144 Climate Controls
Climate Control Display
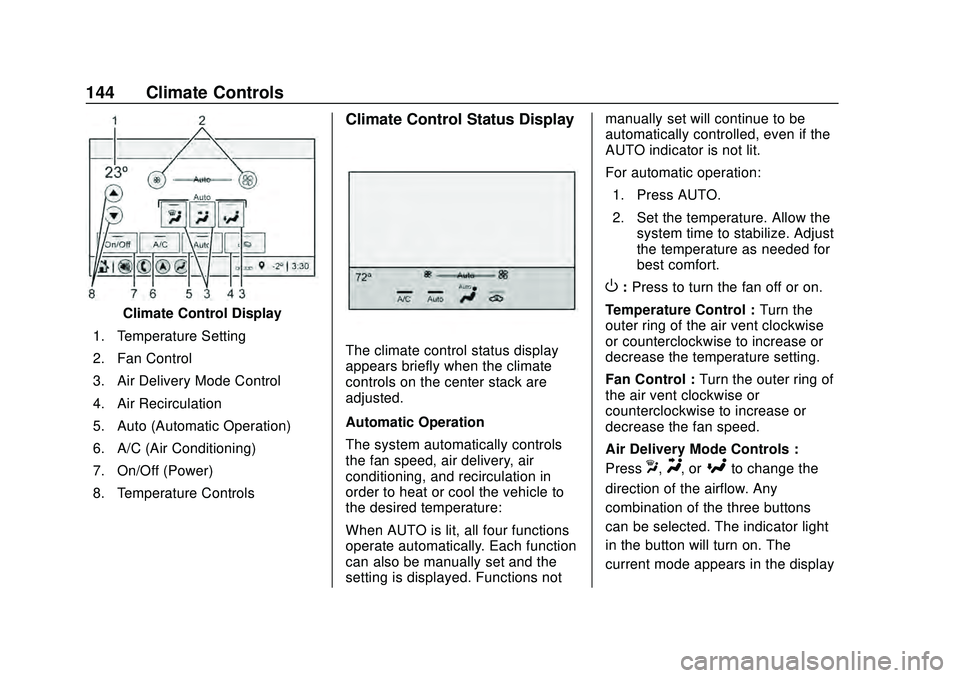
1. Temperature Setting
2. Fan Control
3. Air Delivery Mode Control
4. Air Recirculation
5. Auto (Automatic Operation)
6. A/C (Air Conditioning)
7. On/Off (Power)
8. Temperature Controls
Climate Control Status Display
The climate control status display
appears briefly when the climate
controls on the center stack are
adjusted.
Automatic Operation
The system automatically controls
the fan speed, air delivery, air
conditioning, and recirculation in
order to heat or cool the vehicle to
the desired temperature:
When AUTO is lit, all four functions
operate automatically. Each function
can also be manually set and the
setting is displayed. Functions not manually set will continue to be
automatically controlled, even if the
AUTO indicator is not lit.
For automatic operation:
1. Press AUTO.
2. Set the temperature. Allow the system time to stabilize. Adjust
the temperature as needed for
best comfort.
O:Press to turn the fan off or on.
Temperature Control : Turn the
outer ring of the air vent clockwise
or counterclockwise to increase or
decrease the temperature setting.
Fan Control : Turn the outer ring of
the air vent clockwise or
counterclockwise to increase or
decrease the fan speed.
Air Delivery Mode Controls :
Press
X,Y, or[to change the
direction of the airflow. Any
combination of the three buttons
can be selected. The indicator light
in the button will turn on. The
current mode appears in the display
Page 148 of 361

Chevrolet Camaro Owner Manual (GMNA-Localizing-U.S./Canada/Mexico-
13556304) - 2020 - CRC - 9/3/19
Climate Controls 147
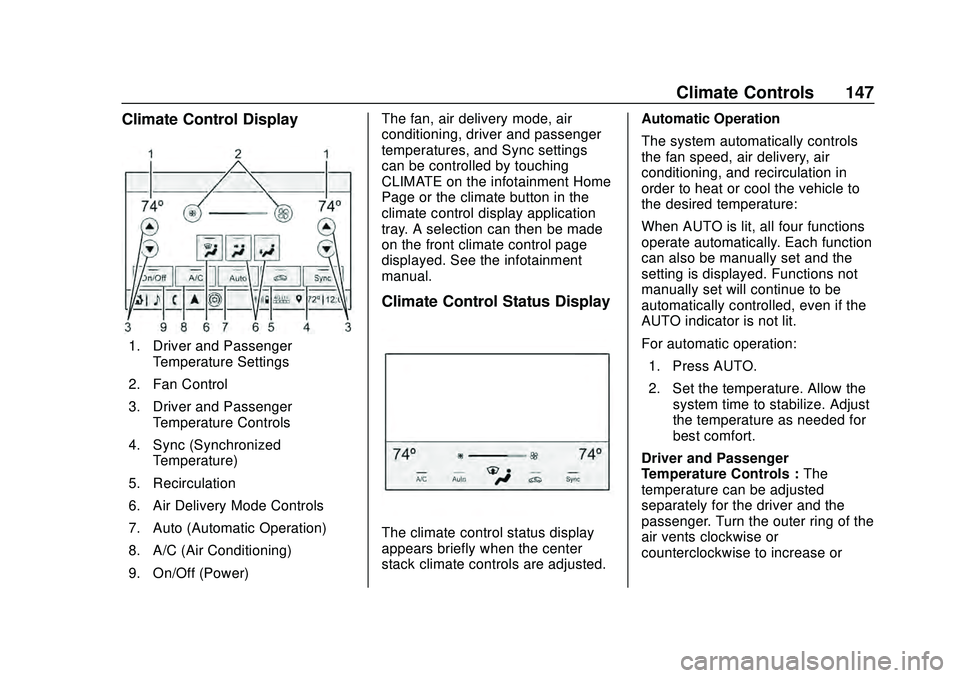
Climate Control Display
1. Driver and PassengerTemperature Settings
2. Fan Control
3. Driver and Passenger Temperature Controls
4. Sync (Synchronized Temperature)
5. Recirculation
6. Air Delivery Mode Controls
7. Auto (Automatic Operation)
8. A/C (Air Conditioning)
9. On/Off (Power) The fan, air delivery mode, air
conditioning, driver and passenger
temperatures, and Sync settings
can be controlled by touching
CLIMATE on the infotainment Home
Page or the climate button in the
climate control display application
tray. A selection can then be made
on the front climate control page
displayed. See the infotainment
manual.
Climate Control Status Display
The climate control status display
appears briefly when the center
stack climate controls are adjusted.
Automatic Operation
The system automatically controls
the fan speed, air delivery, air
conditioning, and recirculation in
order to heat or cool the vehicle to
the desired temperature:
When AUTO is lit, all four functions
operate automatically. Each function
can also be manually set and the
setting is displayed. Functions not
manually set will continue to be
automatically controlled, even if the
AUTO indicator is not lit.
For automatic operation:
1. Press AUTO.
2. Set the temperature. Allow the system time to stabilize. Adjust
the temperature as needed for
best comfort.
Driver and Passenger
Temperature Controls : The
temperature can be adjusted
separately for the driver and the
passenger. Turn the outer ring of the
air vents clockwise or
counterclockwise to increase or