display CHEVROLET CAMARO 2021 User Guide
[x] Cancel search | Manufacturer: CHEVROLET, Model Year: 2021, Model line: CAMARO, Model: CHEVROLET CAMARO 2021Pages: 354, PDF Size: 8.86 MB
Page 38 of 354

Chevrolet Camaro Owner Manual (GMNA-Localizing-U.S./Canada/Mexico-
14583589) - 2021 - CRC - 10/1/20
Seats and Restraints 37
Before saving, adjust all available memory
feature positions. Turn the vehicle on and
then press and release SET; a beep will
sound. Then immediately press and hold 1,
2, or
B(Exit) until two beeps sound. To
manually recall these positions, press and
hold 1, 2, or
Buntil the saved position is
reached. Follow the instructions under
“Saving Memory Positions.”
The vehicle identifies the current driver’s RKE
transmitter number (1–8). See Remote
Keyless Entry (RKE) System Operation 07.
Only RKE transmitters 1 and 2 can be used
for automatic memory recalls. A Driver
Information Center (DIC) welcome message
indicating the transmitter number may
display for the first few ignition cycles
following a transmitter change. For Seat
Entry Memory to work properly, save the
positions to the memory button (1 or 2)
matching the RKE transmitter number
displayed in the DIC welcome message.
Carry the linked RKE transmitter when
entering the vehicle.
Vehicle Personalization Settings
.To have the Seat Entry Memory
movement begin when the vehicle is
started, select the Settings menu, then Vehicle, then Seating Position, and then
Seat Entry Memory. Select On or Off. See
“Seat Entry Memory”
later in this section.
.To begin Seat Exit Memory movement
when the vehicle is turned off and the
driver door is opened, or when the vehicle
is turned off with the driver door already
opened, select the Settings menu, then
Vehicle, then Seating Position, and then
Seat Exit Memory. Select On or Off. See
“Seat Exit Memory”later in this section.
.SeeVehicle Personalization 0104 for
additional setting information.
Identifying Driver Number
To identify the driver number: 1. Move your RKE transmitter away from the vehicle.
2. Start the vehicle with another key or RKE transmitter. The DIC should display the
driver number for the other RKE
transmitter. Turn the vehicle off and
remove the key or RKE transmitter from
the vehicle.
3. Start the vehicle with the initial key or RKE transmitter. The DIC should display
the driver number of your RKE
transmitter. Saving Memory Positions
Read these instructions completely before
saving memory positions.
To save preferred driving positions 1 and 2:
1. Turn the vehicle on or to ACC/ ACCESSORY.
A DIC welcome message may indicate
driver number 1 or 2.
2. Adjust all available memory features to the desired driving position.
3. Press and release SET; a beep will sound.
4. Immediately press and hold the 1 or 2 memory button matching the above
DIC welcome message until two beeps
sound.
If too much time passes between
releasing SET and pressing 1, the
memory position will not be saved and
two beeps will not sound. Repeat
Steps 3 and 4.
1 or 2 corresponds to the driver number.
See “Identifying Driver Number”
previously in this section.
5. Repeat Steps 1–4 for a second driver using 1 or 2.
Page 75 of 354
Chevrolet Camaro Owner Manual (GMNA-Localizing-U.S./Canada/Mexico-
14583589) - 2021 - CRC - 10/1/20
74 Storage
Storage
Storage Compartments
Storage Compartments . . . . . . . . . . . . . . . . . 74
Glove Box . . . . . . . . . . . . . . . . . . . . . . . . . . . . . . 74
Rear Storage . . . . . . . . . . . . . . . . . . . . . . . . . . . 74
Center Console Storage . . . . . . . . . . . . . . . . . 75
Additional Storage Features
Convenience Net . . . . . . . . . . . . . . . . . . . . . . . . 75
Storage Compartments{
Warning
Do not store heavy or sharp objects in
storage compartments. In a crash, these
objects may cause the cover to open and
could result in injury.
Glove Box
Open the glove box by lifting up on the
lever. Use the key to lock and unlock the
glove box.
Rear Storage
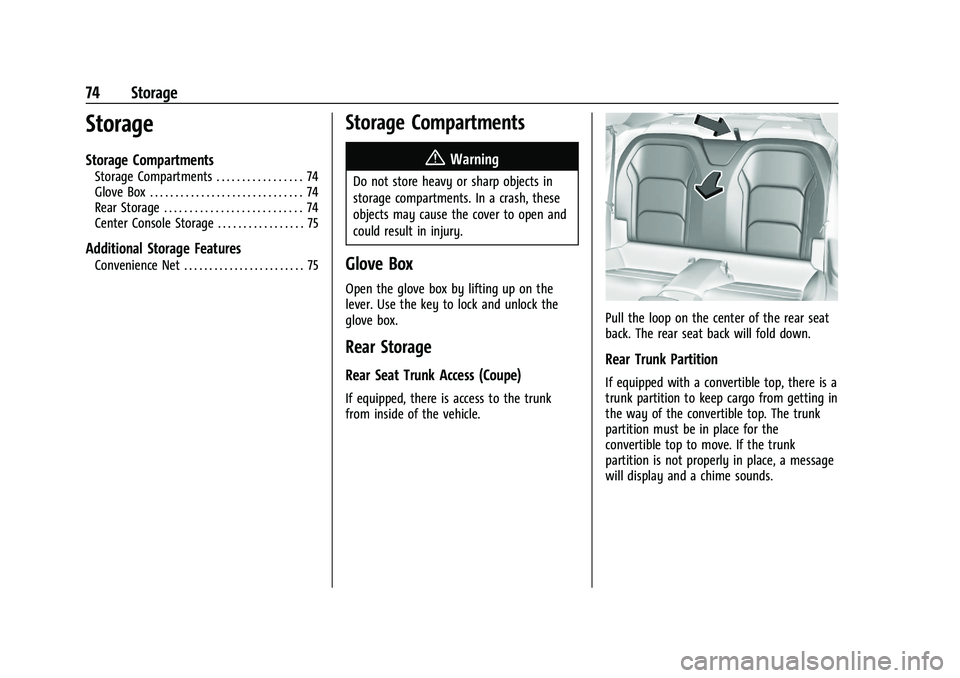
Rear Seat Trunk Access (Coupe)
If equipped, there is access to the trunk
from inside of the vehicle.
Pull the loop on the center of the rear seat
back. The rear seat back will fold down.
Rear Trunk Partition
If equipped with a convertible top, there is a
trunk partition to keep cargo from getting in
the way of the convertible top. The trunk
partition must be in place for the
convertible top to move. If the trunk
partition is not properly in place, a message
will display and a chime sounds.
Page 77 of 354
Chevrolet Camaro Owner Manual (GMNA-Localizing-U.S./Canada/Mexico-
14583589) - 2021 - CRC - 10/1/20
76 Instruments and Controls
Instruments and Controls
Controls
Steering Wheel Adjustment . . . . . . . . . . . . . 77
Steering Wheel Controls . . . . . . . . . . . . . . . . 77
Heated Steering Wheel . . . . . . . . . . . . . . . . . 77
Horn . . . . . . . . . . . . . . . . . . . . . . . . . . . . . . . . . . . . 77
Windshield Wiper/Washer . . . . . . . . . . . . . . 77
Compass . . . . . . . . . . . . . . . . . . . . . . . . . . . . . . . . 78
Clock . . . . . . . . . . . . . . . . . . . . . . . . . . . . . . . . . . . 78
Power Outlets . . . . . . . . . . . . . . . . . . . . . . . . . . 79
Wireless Charging . . . . . . . . . . . . . . . . . . . . . . 79
Warning Lights, Gauges, and Indicators
Warning Lights, Gauges, andIndicators . . . . . . . . . . . . . . . . . . . . . . . . . . . . . 81
Instrument Cluster . . . . . . . . . . . . . . . . . . . . . 82
Speedometer . . . . . . . . . . . . . . . . . . . . . . . . . . . 85
Odometer . . . . . . . . . . . . . . . . . . . . . . . . . . . . . . 85
Trip Odometer . . . . . . . . . . . . . . . . . . . . . . . . . . 85
Tachometer . . . . . . . . . . . . . . . . . . . . . . . . . . . . 85
Fuel Gauge . . . . . . . . . . . . . . . . . . . . . . . . . . . . . 86
Boost Gauge (Uplevel Cluster Only) . . . . 87
Engine Oil Pressure Gauge (Uplevel Cluster Only) . . . . . . . . . . . . . . . . . . . . . . . . . 87
Engine Coolant Temperature Gauge . . . . 88
Voltmeter Gauge (Uplevel Cluster Only) . . . . . . . . . . . . . . . . . . . . . . . . . 89 Seat Belt Reminders . . . . . . . . . . . . . . . . . . . . 89
Airbag Readiness Light . . . . . . . . . . . . . . . . . 90
Passenger Airbag Status Indicator . . . . . . 90
Charging System Light . . . . . . . . . . . . . . . . . . 91
Malfunction Indicator Lamp . . . . . . . . . . . . . 91
Brake System Warning Light . . . . . . . . . . . 93
Electric Parking Brake Light . . . . . . . . . . . . . 93
Service Electric Parking Brake Light . . . . . 93
Antilock Brake System (ABS) Warning
Light . . . . . . . . . . . . . . . . . . . . . . . . . . . . . . . . . 94
Performance Shifting Light . . . . . . . . . . . . . 94
Vehicle Ahead Indicator . . . . . . . . . . . . . . . . 94
Traction Off Light . . . . . . . . . . . . . . . . . . . . . . 94
StabiliTrak OFF Light . . . . . . . . . . . . . . . . . . . 95
Traction Control System (TCS)/StabiliTrak Light . . . . . . . . . . . . . . . . . . . . . . . . . . . . . . . . . . 95
Tire Pressure Light . . . . . . . . . . . . . . . . . . . . . . 95
Engine Oil Pressure Light . . . . . . . . . . . . . . . 96
Low Fuel Warning Light . . . . . . . . . . . . . . . . 96
Security Light . . . . . . . . . . . . . . . . . . . . . . . . . . 96
High-Beam On Light . . . . . . . . . . . . . . . . . . . . 97
Lamps On Reminder . . . . . . . . . . . . . . . . . . . . 97
Cruise Control Light . . . . . . . . . . . . . . . . . . . . 97
Door Ajar Light . . . . . . . . . . . . . . . . . . . . . . . . . 97
Information Displays
Driver Information Center (DIC) . . . . . . . . . 97
Head-Up Display (HUD) . . . . . . . . . . . . . . . 100
Vehicle Messages
Vehicle Messages . . . . . . . . . . . . . . . . . . . . . . 103
Engine Power Messages . . . . . . . . . . . . . . . 103
Vehicle Speed Messages . . . . . . . . . . . . . . . 103
Vehicle Personalization
Vehicle Personalization . . . . . . . . . . . . . . . . 104
Page 78 of 354

Chevrolet Camaro Owner Manual (GMNA-Localizing-U.S./Canada/Mexico-
14583589) - 2021 - CRC - 10/1/20
Instruments and Controls 77
Controls
Steering Wheel Adjustment
To adjust the tilt and telescoping steering
wheel:1. Pull the lever down.
2. Move the steering wheel up or down.
3. Pull or push the steering wheel closer or away from you.
4. Pull the lever up to lock the steering wheel in place.
Do not adjust the steering wheel while
driving.
Steering Wheel Controls
The infotainment system can be operated
by using the steering wheel controls. See
Steering Wheel Controls 0117.
Heated Steering Wheel
(:If equipped, press to turn the heated
steering wheel on or off. A light next to the
button displays when the feature is
turned on.
The steering wheel takes about
three minutes to be fully heated.
Horn
Pressaon the steering wheel pad to
sound the horn.
Windshield Wiper/Washer
The windshield wiper/washer lever is on the
right side of the steering column. With the
ignition on or in ACC/ACCESSORY, move the
windshield wiper lever to select the wiper
speed.
HI : Use for fast wipes.
LO : Use for slow wipes.
Page 79 of 354
Chevrolet Camaro Owner Manual (GMNA-Localizing-U.S./Canada/Mexico-
14583589) - 2021 - CRC - 10/1/20
78 Instruments and Controls
INT :Move the lever up to INT for
intermittent wipes, then turn the
xINT
band up for more frequent wipes or down
for less frequent wipes.
OFF : Use to turn the wipers off.
1X : For a single wipe, briefly move the
wiper lever down. For several wipes, hold
the wiper lever down.
n L: Pull the windshield wiper lever
toward you to spray windshield washer fluid
and activate the wipers. The wipers will
continue until the lever is released or the
maximum wash time is reached. When the
windshield wiper lever is released, additional
wipes may occur depending on how long
the windshield washer had been activated.
See Washer Fluid 0253 for information on
filling the windshield washer fluid reservoir.
Clear snow and ice from the wiper blades
and windshield before using them. If frozen
to the windshield, carefully loosen or thaw
them. Damaged blades should be replaced.
See Wiper Blade Replacement 0257.
Heavy snow or ice can overload the wiper
motor.
{Warning
In freezing weather, do not use the
washer until the windshield is warmed.
Otherwise the washer fluid can form ice
on the windshield, blocking your vision.
{Warning
Before driving the vehicle, always clear
snow and ice from the hood, windshield,
roof, and rear of the vehicle, including all
lamps and windows. Reduced visibility
from snow and ice buildup could lead to
a crash.
Wiper Parking
If the ignition is turned off while the wipers
are on LO, HI, or INT, they will
immediately stop.
If the windshield wiper lever is then moved
to OFF before the driver door is opened or
within 10 minutes, the wipers will restart
and move to the base of the windshield.
If the ignition is turned off while the wipers
are performing wipes due to windshield
washing, the wipers continue to run until
they reach the base of the windshield.
Compass
The vehicle has a compass display in the
Driver Information Center (DIC). The compass
receives its heading and other information
from the Global Positioning System (GPS)
antenna, StabiliTrak/Electronic Stability
Control (ESC), and vehicle speed information.
Avoid covering the GPS antenna, located on
the roof, for long periods of time with
objects that may interfere with the
antenna's ability to receive a satellite signal.
The compass system is designed to operate
for a certain number of miles or degrees of
turn before needing a signal from the GPS
satellites. When the compass display shows
CAL, drive the vehicle for a short distance in
an open area where it can receive a GPS
signal. The compass system will
automatically determine when the GPS
signal is restored and provide a heading
again.
Clock
Set the time and date using the
infotainment system. See "Time / Date"
under Settings 0156.
Page 81 of 354

Chevrolet Camaro Owner Manual (GMNA-Localizing-U.S./Canada/Mexico-
14583589) - 2021 - CRC - 10/1/20
80 Instruments and Controls
Warning (Continued)
that the charging system does not detect
an object, and the object gets wedged
between the smartphone and charger,
remove the smartphone and allow the
object to cool before removing it from
the charging pad, to prevent burns.
To charge a compatible smartphone:1. Remove all objects from the charging pad. The system may not charge if there
are any objects between the smartphone
and charging pad. 2. Place the smartphone face up on the
charging pad.
To maximize the charge rate, ensure the
smartphone is fully seated and centered
in the holder with nothing under it.
A thick smartphone case may prevent
the wireless charger from working,
or may reduce the charging performance.
See your dealer for additional
information.
3. The
$will appear on theVon the
infotainment display. This indicates that
the smartphone is properly positioned
and charging. If a smartphone is placed
on the charging pad and
$does not
appear, remove the smartphone from the
pad, turn it 180 degrees, and wait
three seconds before placing/aligning the
smartphone on the pad again.
The smartphone may become warm
during charging. This is normal. In
warmer temperatures, the speed of
charging may be reduced. Software Acknowledgements
Certain Wireless Charging Module product
from LG Electronics, Inc. ("LGE") contains the
open source software detailed below. Refer
to the indicated open source licenses (as are
included following this notice) for the terms
and conditions of their use.
OSS Notice Information
To obtain the source code that is
contained in this product, please visit
http://opensource.lge.com. In addition to
the source code, all referred license terms,
warranty disclaimers and copyright notices
are available for download. LG Electronics
will also provide open source code to you
on CD-ROM for a charge covering the cost of
performing such distribution (such as the
cost of media, shipping, and handling) upon
email request to [email protected]. This
offer is valid for three (3) years from the
date on which you purchased the product.
Page 84 of 354

Chevrolet Camaro Owner Manual (GMNA-Localizing-U.S./Canada/Mexico-
14583589) - 2021 - CRC - 10/1/20
Instruments and Controls 83
Uplevel English Standard Theme Shown, Metric Similar
1.Tachometer 085
2. Engine Oil Pressure Gauge (Uplevel
Cluster Only) 087
3. Engine Coolant Temperature Gauge
088
4. Fuel Gauge 086
5. Voltmeter Gauge (Uplevel Cluster Only)
089
6. Speedometer 085
7. Driver Information Center (DIC) 097See the Camaro High Performance
supplement for more information.
Reconfigurable Instrument Cluster
To change the theme for the uplevel cluster:
1. Find the Options page in one of the interactive display zones on the cluster.
2. Press SEL to enter the Options menu. 3. Scroll down to highlight Display Theme,
then press
pto enter the Display
Theme menu.
4. Press SEL to select the desired cluster configuration.
5. Exit the Display Theme menu by pressing
o.
Cluster Menu
There is an interactive display area in the
center of the instrument cluster.
Use the right steering wheel control to open
and scroll through the different items and
displays.
Page 85 of 354
Chevrolet Camaro Owner Manual (GMNA-Localizing-U.S./Canada/Mexico-
14583589) - 2021 - CRC - 10/1/20
84 Instruments and Controls
Pressoto access the cluster applications.
Use
worxto scroll through the list of
applications. Press SEL to select the
application from the list.
.Info. This is where you can view the
Driver Information Center (DIC) displays.
See Driver Information Center (DIC) 097.
.Performance (Uplevel Cluster)
.Audio (If Equipped)
.Phone (If Equipped)
.Navigation (If Equipped)
.Options
Performance (Uplevel Cluster)
Press SEL to enter the Performance menu.
Use
worxto scroll through the available
items.
Friction Bubble : A four quadrant visual
display, indicative of the four corners of the
car, with a “bubble”showing where the
most inertia is being exerted on the vehicle.
Performance Timer : Press
pwhen
Performance Timer is displayed to enter the
menu. Use
worxto select an interval.
Press SEL to save it. On the next acceleration, the performance time will
record the time. To reset the timer,
highlight Reset and press SEL.
G-Force :
Gives the driver an indication of
the vehicle performance in cornering. The
G-force is displayed in the center of the DIC
as a numerical value.
Lap Timer : Use to start, stop, or reset the
lap timer. A stopwatch icon will be
displayed when the lap timer is active. Press
SEL while the Lap Timer page is active to
start the timer. If the lap timer is active,
pressing SEL on any page will stop the
current lap timer and start a new lap. Also,
pressing and holding SEL on any page will
stop the lap timer.
Oil Temperature : Shows the current oil
temperature in either degrees Celsius (°C) or
degrees Fahrenheit (°F).
Oil Pressure : Shows the current oil pressure
in either kilopascal (kPa) or in pounds per
square inch (psi).
Battery Voltage : Displays the current
battery voltage, if equipped. Battery voltage
changes are normal while driving. Transmission Fluid Temperature :
Shows the
temperature of the transmission fluid in
either degrees Celsius (°C) or degrees
Fahrenheit (°F).
Tire Temperature : If equipped, displays tire
temperature status. Unknown may display if
information is unavailable.
Tire temperature states:
.Cold —Drive with caution as tire
performance may be degraded.
.Cool —Drive with caution as tire
performance may be degraded.
.Normal —Tires are at normal driving
temperature.
.Warm —Tires are ready for aggressive
driving.
.Overheated —Tire temperature may be
higher than optimal.
Audio
If equipped, while the audio app is open,
use
worxto change the radio station or
seek to the next or previous track,
depending on the current audio source.
Press
pto enter the Audio menu. In the
Audio menu browse for music, select from
the favorites, or change the audio source.
Page 86 of 354
Chevrolet Camaro Owner Manual (GMNA-Localizing-U.S./Canada/Mexico-
14583589) - 2021 - CRC - 10/1/20
Instruments and Controls 85
Phone
If equipped, press
pto enter the Phone
menu. In the Phone menu, if there is no
active phone call, view recent calls, or scroll
through contacts. If there is an active call,
mute or unmute the phone or switch to
handset or hands-free operation.
Navigation
If equipped, press
pto enter the
Navigation menu. If there is no active route,
a compass will be displayed. If there is an
active route, press SEL to cancel route
guidance or turn the voice prompts on/off.
Options
Press SEL to enter the Options menu. Use
worxto scroll through items in
the menu.
Units : Press
pwhile Units is displayed to
enter the Units menu. Choose US or Metric
units by pressing SEL while the desired item
is highlighted.
Speed Warning : The Speed Warning display
allows the driver to set a speed that they
do not want to exceed. To set the Speed
Warning, press
pwhen Speed Warning is
displayed. Enable the speed warning and then use
worxto adjust the value. Press
SEL to set the speed. Once the speed is set,
this feature can be turned off by pressing
SEL while viewing this page. If the selected
speed limit is exceeded, a pop-up warning is
displayed with a chime.
Display Theme (Uplevel) : Press SEL while
Display Theme is highlighted to change the
configuration of the uplevel cluster. See
“Reconfigurable Instrument Cluster” earlier
in this section.
Launch Control : If equipped, the Launch
Control display allows the driver to adjust
the parameters of the Launch Control
System. See Track Events and Competitive
Driving 0185.
Head-Up Display (HUD) Rotation :
If equipped, this feature allows for adjusting
the angle of the HUD image. Press SEL on
the steering wheel controls while Head-Up
Display Rotation is highlighted to enter
Adjust Mode. Press
worxto highlight
OK, then press SEL to save the setting.
Cancel can also be selected to cancel the
setting. The vehicle must be on P (Park). Info Pages :
Press
pwhile Info Pages is
highlighted to select the items to be
displayed in the DIC info displays. See Driver
Information Center (DIC) 097.
Software Info : Displays open source
software information.
Speedometer
The speedometer shows the vehicle's speed
in either kilometers per hour (km/h) or
miles per hour (mph).
Odometer
The odometer shows how far the vehicle has
been driven, in either kilometers or miles.
Trip Odometer
The trip odometer shows how far the
vehicle has been driven since the trip
odometer was last reset.
The trip odometer is accessed and reset
through the Driver Information Center (DIC).
See Driver Information Center (DIC) 097.
Tachometer
The tachometer displays the engine speed in
revolutions per minute (rpm).
Page 88 of 354

Chevrolet Camaro Owner Manual (GMNA-Localizing-U.S./Canada/Mexico-
14583589) - 2021 - CRC - 10/1/20
Instruments and Controls 87
Boost Gauge (Uplevel
Cluster Only)
See the Camaro High Performance
supplement for more information.
Metric
English
If equipped, this gauge indicates vacuum
during light to moderate throttle and boost
under heavier throttle.
It displays the air pressure level in the
intake manifold before it enters the engine's
combustion chamber.
The gauge is automatically centered at zero
every time the engine is started. Actual
vacuum or boost is displayed from this zero
point. Changes in ambient pressure, such as
driving in mountains and changing weather,
will slightly change the zero reading.
Engine Oil Pressure Gauge
(Uplevel Cluster Only)
Metric, Standard Theme Shown
English, Standard Theme Shown