tow CHEVROLET CAMARO 2021 Owner's Guide
[x] Cancel search | Manufacturer: CHEVROLET, Model Year: 2021, Model line: CAMARO, Model: CHEVROLET CAMARO 2021Pages: 354, PDF Size: 8.86 MB
Page 198 of 354
Chevrolet Camaro Owner Manual (GMNA-Localizing-U.S./Canada/Mexico-
14583589) - 2021 - CRC - 10/1/20
Driving and Operating 197
if the "XXX" amount equals 1400 lbs.
and there will be five 150 lb
passengers in your vehicle, the
amount of available cargo and
luggage load capacity is 650 lbs.
(1400-750 (5 x 150) = 650 lbs.)
5.Determine the combined weight of
luggage and cargo being loaded on
the vehicle. That weight may not
safely exceed the available cargo and
luggage load capacity calculated in
Step 4.
6.If your vehicle will be towing a
trailer, load from your trailer will be
transferred to your vehicle. Consult
this manual to determine how this
reduces the available cargo and
luggage load capacity of your
vehicle.”
This vehicle is neither designed nor
intended to tow a trailer.
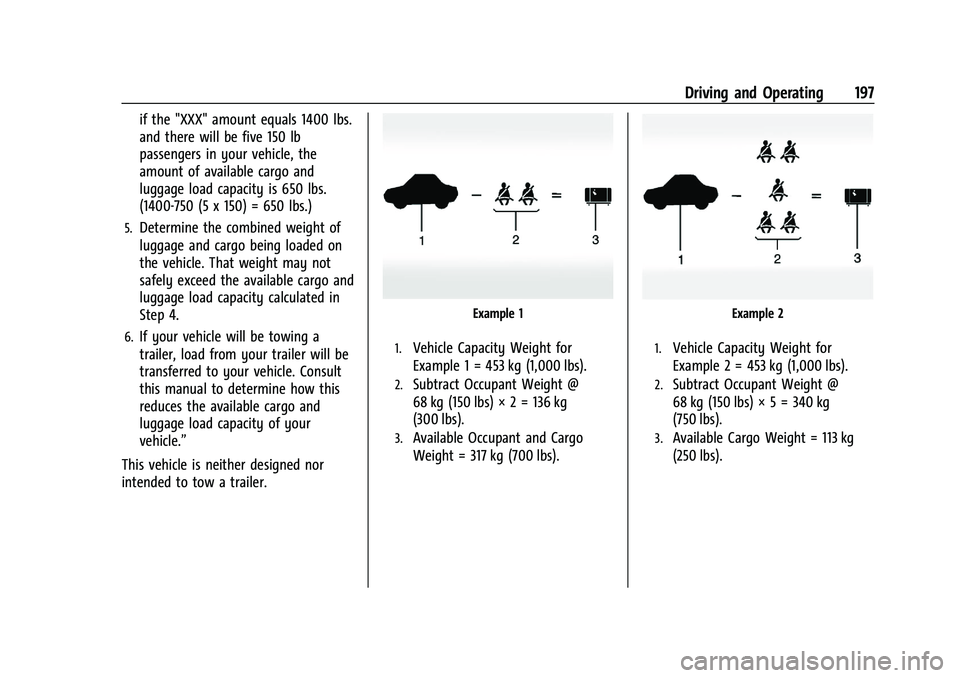
Example 1
1.Vehicle Capacity Weight for
Example 1 = 453 kg (1,000 lbs).
2.Subtract Occupant Weight @
68 kg (150 lbs) × 2 = 136 kg
(300 lbs).
3.Available Occupant and Cargo
Weight = 317 kg (700 lbs).
Example 2
1.Vehicle Capacity Weight for
Example 2 = 453 kg (1,000 lbs).
2.Subtract Occupant Weight @
68 kg (150 lbs) × 5 = 340 kg
(750 lbs).
3.Available Cargo Weight = 113 kg
(250 lbs).
Page 204 of 354
Chevrolet Camaro Owner Manual (GMNA-Localizing-U.S./Canada/Mexico-
14583589) - 2021 - CRC - 10/1/20
Driving and Operating 203
{Warning
Improper use of the heater cord or an
extension cord can damage the cord and
may result in overheating and fire.
.Plug the cord into a three-prong
electrical utility receptacle that is
protected by a ground fault detection
function. An ungrounded outlet could
cause an electric shock.
.Use a weatherproof, heavy-duty,
15 amp-rated extension cord if needed.
Failure to use the recommended
extension cord in good operating
condition, or using a damaged heater
or extension cord, could make it
overheat and cause a fire, property
damage, electric shock, and injury.
.Do not operate the vehicle with the
heater cord permanently attached to
the vehicle. Possible heater cord and
thermostat damage could occur.(Continued)
Warning (Continued)
.While in use, do not let the heater
cord touch vehicle parts or sharp
edges. Never close the hood on the
heater cord.
.Before starting the vehicle, unplug the
cord, reattach the cover to the plug,
and securely fasten the cord. Keep the
cord away from any moving parts.
4. Before starting the engine, be sure to unplug and store the cord as it was
before to keep it away from moving
engine parts. If you do not it could be
damaged.
The length of time the heater should remain
plugged in depends on several factors. Ask a
dealer in the area where you will be parking
the vehicle for the best advice on this.
Retained Accessory Power (RAP)
When the ignition is turned from on to off,
the following features (if equipped) will
continue to function for up to 10 minutes,
or until the driver door is opened. These
features will also work when the ignition is
in RUN or ACC/ACCESSORY:
.Infotainment System
.Power Windows (during RAP this
functionality will be lost when any door
is opened)
.Sunroof (during RAP this functionality will
be lost when any door is opened)
.Auxiliary Power Outlet
.Audio System
.OnStar System
Shifting Into Park
To shift into P (Park): 1. Hold the brake pedal down and set the parking brake.
See Electric Parking Brake 0213.
2. Move the shift lever into P (Park) by holding in the button on the shift lever
and pushing the shift lever all the way
toward the front of the vehicle.
3. Turn the ignition off.
Page 205 of 354

Chevrolet Camaro Owner Manual (GMNA-Localizing-U.S./Canada/Mexico-
14583589) - 2021 - CRC - 10/1/20
204 Driving and Operating
Leaving the Vehicle with the Engine
Running
{Warning
It can be dangerous to leave the vehicle
with the engine running. It could
overheat and catch fire.
It is dangerous to get out of the vehicle
if the shift lever is not fully in P (Park)
with the parking brake firmly set. The
vehicle can roll.
Do not leave the vehicle when the engine
is running. If you have left the engine
running, the vehicle can move suddenly.
You or others could be injured. To be
sure the vehicle will not move, even
when you are on fairly level ground,
always set the parking brake and move
the shift lever to P (Park). SeeShifting
Into Park 0203.
If you have to leave the vehicle with the
engine running, be sure the vehicle is in
P (Park) and the parking brake is set before
you leave it. After you have moved the shift
lever into P (Park), hold the brake pedal down. Then, see if you can move the shift
lever away from P (Park) without first
pressing the button on the shift lever.
Release the button and check that the shift
lever cannot be moved out of P (Park).
Torque Lock
Torque lock is when the weight of the
vehicle puts too much force on the parking
pawl in the transmission. This happens when
parking on a hill and shifting the
transmission into P (Park) is not done
properly and then it is difficult to shift out
of P (Park). To prevent torque lock, set the
parking brake and then shift into P (Park). To
find out how, see
“Shifting Into Park”
previously in this section.
If torque lock does occur, the vehicle may
need to be pushed uphill by another vehicle
to relieve the parking pawl pressure, so you
can shift out of P (Park).
Shifting out of Park
This vehicle is equipped with an electronic
shift lock release system. The shift lock
release is designed to prevent movement of
the shift lever out of P (Park), unless the
ignition is on and the brake pedal is applied. The shift lock release is always functional
except in the case of an uncharged or low
voltage (less than 9 volt) battery.
If the vehicle has an uncharged battery or a
battery with low voltage, try charging or
jump starting the battery. See
Jump Starting
- North America 0291 for more information.
To shift out of P (Park): 1. Apply the brake pedal.
2. Release the parking brake. See Electric
Parking Brake 0213.
3. Press the shift lever button.
4. Move the shift lever.
If unable to shift out of P (Park): 1. Fully release the shift lever button.
2. While holding down the brake pedal, press the shift lever button again.
3. Move the shift lever.
If the shift lever will not move from P (Park),
consult your dealer or a professional towing
service.
Page 230 of 354

Chevrolet Camaro Owner Manual (GMNA-Localizing-U.S./Canada/Mexico-
14583589) - 2021 - CRC - 10/1/20
Driving and Operating 229
LCA can be disabled through vehicle
personalization. See“Collision/Detection
Systems” underVehicle Personalization
0 104. If LCA is disabled by the driver, the
LCA mirror displays will not light up.
When the System Does Not Seem to
Work Properly
The LCA system requires some driving for
the system to calibrate to maximum
performance. This calibration may occur
more quickly if the vehicle is driving on a
straight highway road with traffic and
roadside objects (e.g., guardrails, barriers).
LCA displays may not come on when
passing a vehicle quickly or for a stopped
vehicle. LCA may alert to objects attached to
the vehicle, such as a bicycle or object
extending out to either side of the vehicle.
Attached objects may also interfere with the
detection of vehicles. This is normal system
operation; the vehicle does not need service.
LCA may not always alert the driver to
vehicles in the next lane over, especially in
wet conditions or when driving on sharp
curves. The system does not need to be
serviced. The system may light up due to guardrails, signs, trees, shrubs, and other
non-moving objects. This is normal system
operation; the vehicle does not need service.
LCA may not operate when the LCA sensors
in the left or right corners of the rear
bumper are covered with mud, dirt, snow,
ice, or slush, or in heavy rainstorms. For
cleaning instructions, see "Washing the
Vehicle" under
Exterior Care0294. If the
DIC still displays the system unavailable
message after cleaning both sides of the
vehicle toward the rear corners of the
vehicle, see your dealer.
If the LCA displays do not light up when
moving vehicles are in the side blind zone or
rapidly approaching this zone and the
system is clean, the system may need
service. Take the vehicle to your dealer.
Radio Frequency Information
See Radio Frequency Statement 0331.
Fuel
Top Tier Fuel
GM recommends the use of TOP TIER
Detergent Gasoline to keep the engine clean,
reduce engine deposits, and maintain
optimal vehicle performance. Look for the TOP TIER Logo or see www.toptiergas.com
for a list of TOP TIER Detergent Gasoline
marketers and applicable countries.
Recommended Fuel (3.6L
V6 Engine)
Use regular unleaded gasoline meeting
ASTM specification D4814 with a posted
octane rating of 87
—(R+M)/2 —or higher.
Page 234 of 354

Chevrolet Camaro Owner Manual (GMNA-Localizing-U.S./Canada/Mexico-
14583589) - 2021 - CRC - 10/1/20
Driving and Operating 233
Trailer Towing
General Towing Information
{Warning
Never tow a trailer with your vehicle.
It was not designed or intended to tow a
trailer.
Conversions and Add-Ons
Add-On Electrical Equipment
{Warning
The Data Link Connector (DLC) is used for
vehicle service and Emission Inspection/
Maintenance testing. SeeMalfunction
Indicator Lamp 091. A device connected
to the DLC —such as an aftermarket
fleet or driver-behavior tracking device —
may interfere with vehicle systems. This
could affect vehicle operation and cause a
crash. Such devices may also access
information stored in the vehicle’s
systems.
Caution
Some electrical equipment can damage
the vehicle or cause components to not
work and would not be covered by the
vehicle warranty. Always check with your
dealer before adding electrical equipment.
Add-on equipment can drain the vehicle's
12-volt battery, even if the vehicle is not
operating.
The vehicle has an airbag system. Before
attempting to add anything electrical to the
vehicle, see Servicing the Airbag-Equipped
Vehicle 056 and
Adding Equipment to the Airbag-Equipped
Vehicle 056.
Page 236 of 354

Chevrolet Camaro Owner Manual (GMNA-Localizing-U.S./Canada/Mexico-
14583589) - 2021 - CRC - 10/1/20
Vehicle Care 235
Towing the Vehicle
Towing the Vehicle . . . . . . . . . . . . . . . . . . . . 293
Recreational Vehicle Towing . . . . . . . . . . . 294
Appearance Care
Exterior Care . . . . . . . . . . . . . . . . . . . . . . . . . . 294
Interior Care . . . . . . . . . . . . . . . . . . . . . . . . . . 299
Floor Mats . . . . . . . . . . . . . . . . . . . . . . . . . . . . . 301
General Information
For service and parts needs, visit your
dealer. You will receive genuine GM parts
and GM-trained and supported service
people.
Genuine GM parts have one of these marks:
California Proposition 65 Warning
{Warning
Most motor vehicles, including this one,
as well as many of its service parts and
fluids, contain and/or emit chemicals
known to the State of California to cause(Continued)
Warning (Continued)
cancer and birth defects or other
reproductive harm. Engine exhaust, many
parts and systems, many fluids, and
some component wear by-products
contain and/or emit these chemicals. For
more information go to
www.P65Warnings.ca.gov/
passenger-vehicle.
See Battery - North America 0255 and
Jump Starting - North America 0291 and the
back cover.
California Perchlorate Materials
Requirements
Certain types of automotive applications,
such as airbag initiators, seat belt
pretensioners, and lithium batteries
contained in electronic keys, may contain
perchlorate materials. Perchlorate Material –
special handling may apply. See
www.dtsc.ca.gov/hazardouswaste/
perchlorate.
Page 238 of 354
Chevrolet Camaro Owner Manual (GMNA-Localizing-U.S./Canada/Mexico-
14583589) - 2021 - CRC - 10/1/20
Vehicle Care 237
Hood
{Warning
Turn the vehicle off before opening the
hood. If the engine is running with the
hood open, you or others could be
injured.
{Warning
Components under the hood can get hot
from running the engine. To help avoid
the risk of burning unprotected skin,
never touch these components until they
have cooled, and always use a glove or
towel to avoid direct skin contact.
Clear any snow from the hood before
opening.
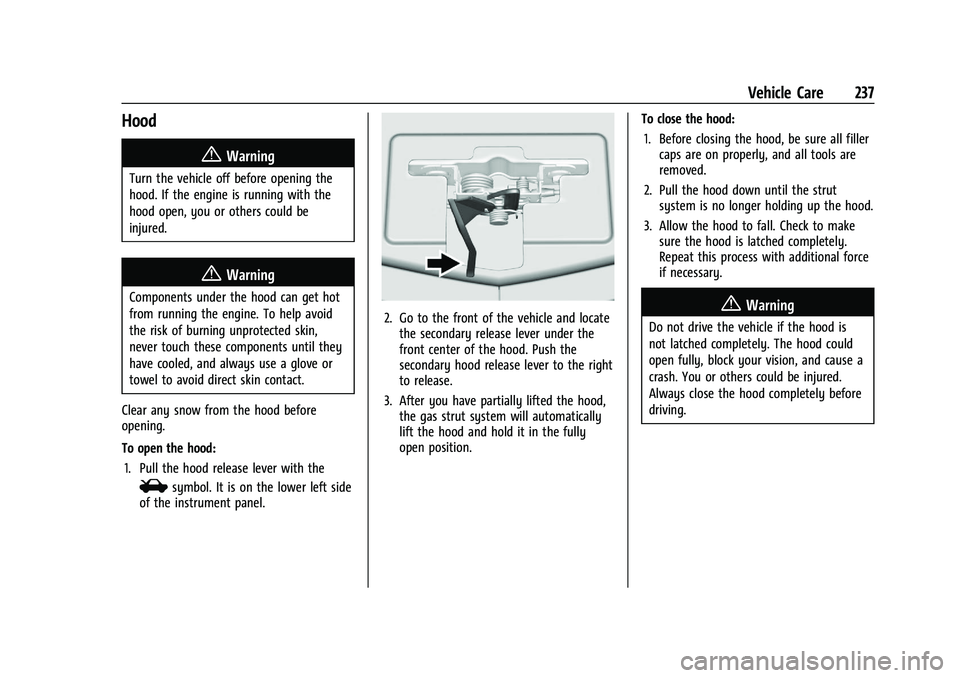
To open the hood: 1. Pull the hood release lever with the
isymbol. It is on the lower left side
of the instrument panel.
2. Go to the front of the vehicle and locate the secondary release lever under the
front center of the hood. Push the
secondary hood release lever to the right
to release.
3. After you have partially lifted the hood, the gas strut system will automatically
lift the hood and hold it in the fully
open position. To close the hood:
1. Before closing the hood, be sure all filler caps are on properly, and all tools are
removed.
2. Pull the hood down until the strut system is no longer holding up the hood.
3. Allow the hood to fall. Check to make sure the hood is latched completely.
Repeat this process with additional force
if necessary.{Warning
Do not drive the vehicle if the hood is
not latched completely. The hood could
open fully, block your vision, and cause a
crash. You or others could be injured.
Always close the hood completely before
driving.
Page 243 of 354

Chevrolet Camaro Owner Manual (GMNA-Localizing-U.S./Canada/Mexico-
14583589) - 2021 - CRC - 10/1/20
242 Vehicle Care
If the vehicle has a 6.2L V8 LT4 engine, see
the Camaro High Performance supplement.
Engine Oil
To ensure proper engine performance and
long life, careful attention must be paid to
engine oil. Following these simple, but
important steps will help protect your
investment:
.Use engine oil approved to the proper
specification and of the proper viscosity
grade. See“Selecting the Right Engine
Oil” in this section.
.Check the engine oil level regularly and
maintain the proper oil level. See
“Checking Engine Oil” and“When to Add
Engine Oil” in this section.
.Change the engine oil at the appropriate
time. SeeEngine Oil Life System 0244.
.Always dispose of engine oil properly. See
“What to Do with Used Oil” in this
section.
Checking Engine Oil
Check the engine oil level regularly, every
650 km (400 mi), especially prior to a long
trip. The engine oil dipstick handle is a loop.
See Engine Compartment Overview 0238 for
the location.
{Warning
The engine oil dipstick handle may be
hot; it could burn you. Use a towel or
glove to touch the dipstick handle.
If a low oil Driver Information Center (DIC)
message displays, check the oil level.
Follow these guidelines:
.To get an accurate reading, park the
vehicle on level ground. Check the engine
oil level after the engine has been off for
at least two hours. Checking the engine
oil level on steep grades or too soon after
engine shutoff can result in incorrect
readings. Accuracy improves when
checking a cold engine prior to starting.
Remove the dipstick and check the level.
.If unable to wait two hours, the engine
must be off for at least 15 minutes if the
engine is warm, or at least 30 minutes if
the engine is not warm. Pull out the
dipstick, wipe it with a clean paper towel
or cloth, then push it back in all the way.
Remove it again, keeping the tip down,
and check the level.
When to Add Engine Oil
LTG 2.0L L4 Engine
LGX 3.6L V6 Engine Shown, 6.2L V8 Engine Similar
If the oil is below the cross-hatched area at
the tip of the dipstick and the engine has
been off for at least 15 minutes, add 1 L (1
qt) of the recommended oil and then
recheck the level. See “Selecting the Right
Engine Oil” later in this section for an
explanation of what kind of oil to use. For
engine oil crankcase capacity, see Capacities
and Specifications 0318.
Page 258 of 354

Chevrolet Camaro Owner Manual (GMNA-Localizing-U.S./Canada/Mexico-
14583589) - 2021 - CRC - 10/1/20
Vehicle Care 257
.To check the P (Park) mechanism's holding
ability: With the engine running, shift to
P (Park). Then release the parking brake
followed by the regular brake.
Contact your dealer if service is required.
Wiper Blade Replacement
Windshield wiper blades should be inspected
for wear and cracking. See Maintenance
Schedule 0304.
Replacement blades come in different types
and are removed in different ways. For
proper type and length, see Maintenance
Replacement Parts 0314.
To replace the windshield wiper blade:
Caution
Keep the hood closed to avoid damaging
the paint.
1. Pull the windshield wiper assembly away from the windshield.
2. Lift up on the latch in the middle of thewiper blade where the wiper arm
attaches.
3. With the latch open, pull the wiper blade down toward the windshield far enough
to release it from the J-hooked end of
the wiper arm.
4. Remove the wiper blade.
Caution
Allowing the wiper arm to touch the
windshield when no wiper blade is
installed could damage the windshield.
Any damage that occurs would not be
(Continued)
Caution (Continued)
covered by the vehicle warranty. Do not
allow the wiper arm to touch the
windshield.
5. Reverse Steps 1–3 for wiper blade replacement.
Windshield Replacement
HUD System
The windshield is part of the HUD system.
If the windshield must be replaced, a GM
replacement windshield is recommended.
The replacement windshield must be
installed according to GM specifications for
proper alignment. If it is not, the HUD
image may look out of focus.
Driver Assistance Systems
If the windshield needs to be replaced and
the vehicle is equipped with a front camera
sensor for the Driver Assistance Systems, a
GM replacement windshield is
recommended. The replacement windshield
must be installed according to GM
specifications for proper alignment. If it is
not, these systems may not work properly,
Page 281 of 354
Chevrolet Camaro Owner Manual (GMNA-Localizing-U.S./Canada/Mexico-
14583589) - 2021 - CRC - 10/1/20
280 Vehicle Care
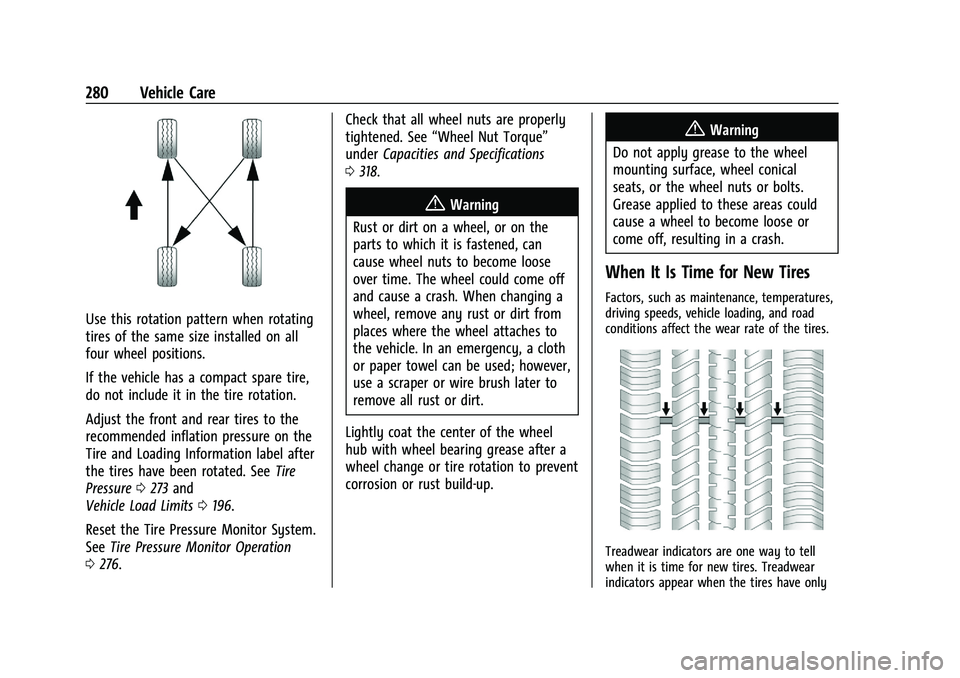
Use this rotation pattern when rotating
tires of the same size installed on all
four wheel positions.
If the vehicle has a compact spare tire,
do not include it in the tire rotation.
Adjust the front and rear tires to the
recommended inflation pressure on the
Tire and Loading Information label after
the tires have been rotated. SeeTire
Pressure 0273 and
Vehicle Load Limits 0196.
Reset the Tire Pressure Monitor System.
See Tire Pressure Monitor Operation
0 276. Check that all wheel nuts are properly
tightened. See
“Wheel Nut Torque”
under Capacities and Specifications
0 318.
{Warning
Rust or dirt on a wheel, or on the
parts to which it is fastened, can
cause wheel nuts to become loose
over time. The wheel could come off
and cause a crash. When changing a
wheel, remove any rust or dirt from
places where the wheel attaches to
the vehicle. In an emergency, a cloth
or paper towel can be used; however,
use a scraper or wire brush later to
remove all rust or dirt.
Lightly coat the center of the wheel
hub with wheel bearing grease after a
wheel change or tire rotation to prevent
corrosion or rust build-up.
{Warning
Do not apply grease to the wheel
mounting surface, wheel conical
seats, or the wheel nuts or bolts.
Grease applied to these areas could
cause a wheel to become loose or
come off, resulting in a crash.
When It Is Time for New Tires
Factors, such as maintenance, temperatures,
driving speeds, vehicle loading, and road
conditions affect the wear rate of the tires.
Treadwear indicators are one way to tell
when it is time for new tires. Treadwear
indicators appear when the tires have only