start stop button CHEVROLET CAMARO 2021 Owner's Manual
[x] Cancel search | Manufacturer: CHEVROLET, Model Year: 2021, Model line: CAMARO, Model: CHEVROLET CAMARO 2021Pages: 354, PDF Size: 8.86 MB
Page 6 of 354
Chevrolet Camaro Owner Manual (GMNA-Localizing-U.S./Canada/Mexico-
14583589) - 2021 - CRC - 10/1/20
Introduction 5
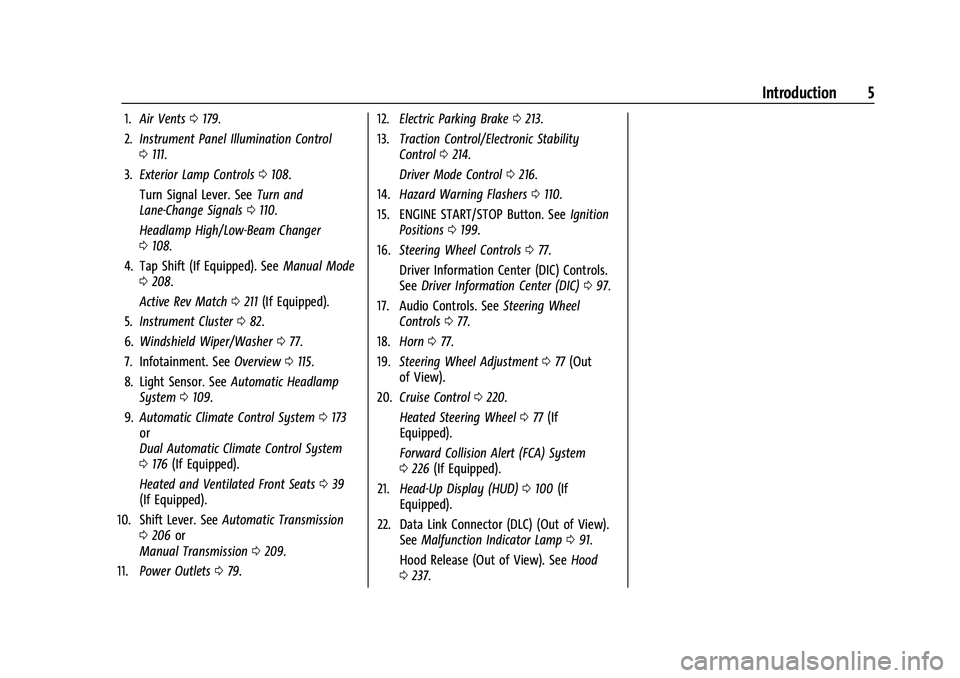
1.Air Vents 0179.
2. Instrument Panel Illumination Control
0111.
3. Exterior Lamp Controls 0108.
Turn Signal Lever. See Turn and
Lane-Change Signals 0110.
Headlamp High/Low-Beam Changer
0 108.
4. Tap Shift (If Equipped). See Manual Mode
0 208.
Active Rev Match 0211 (If Equipped).
5. Instrument Cluster 082.
6. Windshield Wiper/Washer 077.
7. Infotainment. See Overview0115.
8. Light Sensor. See Automatic Headlamp
System 0109.
9. Automatic Climate Control System 0173
or
Dual Automatic Climate Control System
0 176 (If Equipped).
Heated and Ventilated Front Seats 039
(If Equipped).
10. Shift Lever. See Automatic Transmission
0 206 or
Manual Transmission 0209.
11. Power Outlets 079. 12.
Electric Parking Brake 0213.
13. Traction Control/Electronic Stability
Control 0214.
Driver Mode Control 0216.
14. Hazard Warning Flashers 0110.
15. ENGINE START/STOP Button. See Ignition
Positions 0199.
16. Steering Wheel Controls 077.
Driver Information Center (DIC) Controls.
See Driver Information Center (DIC) 097.
17. Audio Controls. See Steering Wheel
Controls 077.
18. Horn 077.
19. Steering Wheel Adjustment 077 (Out
of View).
20. Cruise Control 0220.
Heated Steering Wheel 077 (If
Equipped).
Forward Collision Alert (FCA) System
0 226 (If Equipped).
21. Head-Up Display (HUD) 0100 (If
Equipped).
22. Data Link Connector (DLC) (Out of View). SeeMalfunction Indicator Lamp 091.
Hood Release (Out of View). See Hood
0 237.
Page 9 of 354
Chevrolet Camaro Owner Manual (GMNA-Localizing-U.S./Canada/Mexico-
14583589) - 2021 - CRC - 10/1/20
8 Keys, Doors, and Windows
The turn signal indicators may flash and/or
the horn may sound on the second press to
indicate locking. SeeVehicle Personalization
0 104.
If the driver door is open when
Qis pressed
and Open Door Anti-Lockout is enabled, all
doors will lock and then the driver door will
immediately unlock. See Vehicle
Personalization 0104. If the passenger door
is open when
Qis pressed, all doors lock.
Pressing
Qmay also arm the alarm system.
See Vehicle Alarm System 020.
K:Press to unlock the driver door. Press
unlock again within five seconds to unlock
all doors. The RKE transmitter can be
programmed to unlock all doors on the first
button press. See Vehicle Personalization
0 104.
The turn signal indicators may flash and/or
the horn may sound to indicate unlocking.
See Vehicle Personalization 0104.
Pressing
Kwill disarm the alarm system.
See Vehicle Alarm System 020.
If equipped, press and hold
Kon the RKE
transmitter to open the windows remotely,
if enabled. See Vehicle Personalization 0104.
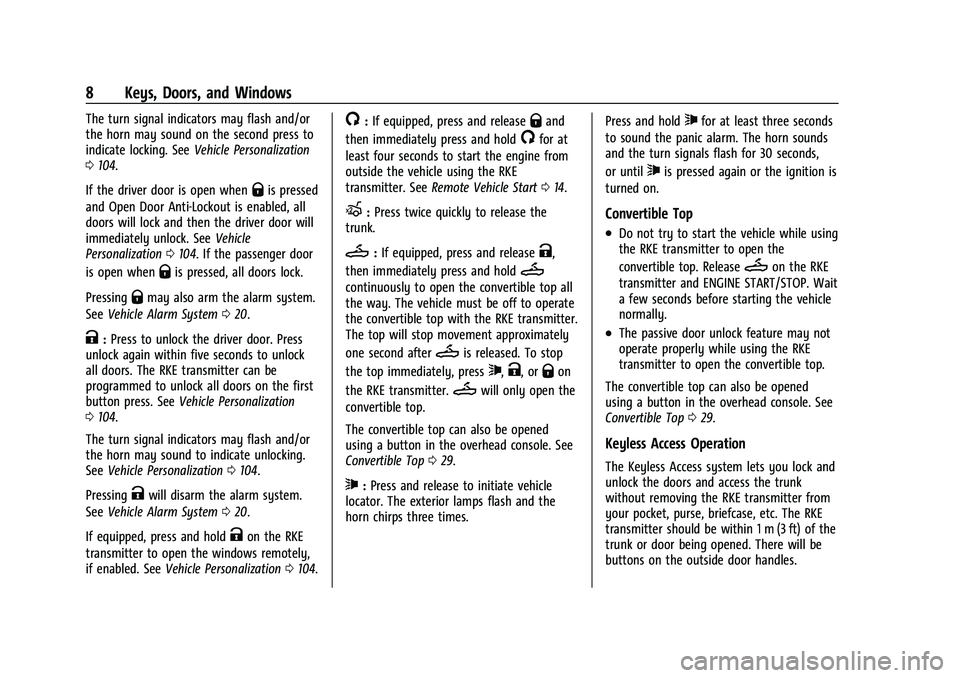
/:If equipped, press and releaseQand
then immediately press and hold
/for at
least four seconds to start the engine from
outside the vehicle using the RKE
transmitter. See Remote Vehicle Start 014.
X:Press twice quickly to release the
trunk.
M: If equipped, press and releaseK,
then immediately press and hold
M
continuously to open the convertible top all
the way. The vehicle must be off to operate
the convertible top with the RKE transmitter.
The top will stop movement approximately
one second after
Mis released. To stop
the top immediately, press
7,K, orQon
the RKE transmitter.
Mwill only open the
convertible top.
The convertible top can also be opened
using a button in the overhead console. See
Convertible Top 029.
7:Press and release to initiate vehicle
locator. The exterior lamps flash and the
horn chirps three times. Press and hold
7for at least three seconds
to sound the panic alarm. The horn sounds
and the turn signals flash for 30 seconds,
or until
7is pressed again or the ignition is
turned on.
Convertible Top
.Do not try to start the vehicle while using
the RKE transmitter to open the
convertible top. Release
Mon the RKE
transmitter and ENGINE START/STOP. Wait
a few seconds before starting the vehicle
normally.
.The passive door unlock feature may not
operate properly while using the RKE
transmitter to open the convertible top.
The convertible top can also be opened
using a button in the overhead console. See
Convertible Top 029.
Keyless Access Operation
The Keyless Access system lets you lock and
unlock the doors and access the trunk
without removing the RKE transmitter from
your pocket, purse, briefcase, etc. The RKE
transmitter should be within 1 m (3 ft) of the
trunk or door being opened. There will be
buttons on the outside door handles.
Page 12 of 354
Chevrolet Camaro Owner Manual (GMNA-Localizing-U.S./Canada/Mexico-
14583589) - 2021 - CRC - 10/1/20
Keys, Doors, and Windows 11
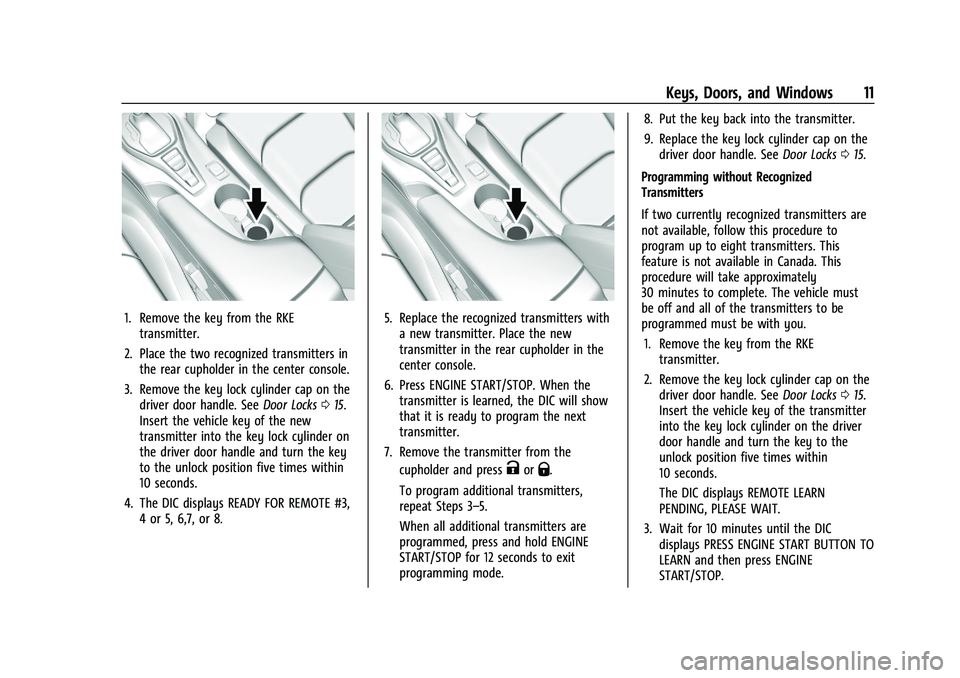
1. Remove the key from the RKEtransmitter.
2. Place the two recognized transmitters in the rear cupholder in the center console.
3. Remove the key lock cylinder cap on the driver door handle. See Door Locks015.
Insert the vehicle key of the new
transmitter into the key lock cylinder on
the driver door handle and turn the key
to the unlock position five times within
10 seconds.
4. The DIC displays READY FOR REMOTE #3, 4 or 5, 6,7, or 8.5. Replace the recognized transmitters witha new transmitter. Place the new
transmitter in the rear cupholder in the
center console.
6. Press ENGINE START/STOP. When the transmitter is learned, the DIC will show
that it is ready to program the next
transmitter.
7. Remove the transmitter from the cupholder and press
KorQ.
To program additional transmitters,
repeat Steps 3–5.
When all additional transmitters are
programmed, press and hold ENGINE
START/STOP for 12 seconds to exit
programming mode. 8. Put the key back into the transmitter.
9. Replace the key lock cylinder cap on the
driver door handle. See Door Locks015.
Programming without Recognized
Transmitters
If two currently recognized transmitters are
not available, follow this procedure to
program up to eight transmitters. This
feature is not available in Canada. This
procedure will take approximately
30 minutes to complete. The vehicle must
be off and all of the transmitters to be
programmed must be with you. 1. Remove the key from the RKE transmitter.
2. Remove the key lock cylinder cap on the driver door handle. See Door Locks015.
Insert the vehicle key of the transmitter
into the key lock cylinder on the driver
door handle and turn the key to the
unlock position five times within
10 seconds.
The DIC displays REMOTE LEARN
PENDING, PLEASE WAIT.
3. Wait for 10 minutes until the DIC displays PRESS ENGINE START BUTTON TO
LEARN and then press ENGINE
START/STOP.
Page 39 of 354
Chevrolet Camaro Owner Manual (GMNA-Localizing-U.S./Canada/Mexico-
14583589) - 2021 - CRC - 10/1/20
38 Seats and Restraints
To save the position forBand Seat Exit
Memory features, repeat Steps 1–4 using
B. This saves the position for getting out
of the vehicle.
Save preferred memory feature positions to
both 1 and 2 if you are the only driver.
Manually Recalling Memory Positions
Press and hold 1, 2, or
Bto recall the
previously saved memory positions if you
are driver 1 or 2 identified in the DIC
welcome message.
To stop Manual Memory recall movement,
release 1, 2, or
Bor press any of the
following controls:
.Power seat
.Memory SET
.Power mirror, with the driver or
passenger side mirror selected
.Power steering wheel, if equipped
If equipped with an automatic transmission,
Manual Memory recall movement for 1, 2,
or
Bbuttons may be initiated and will
complete to the saved memory position if
the vehicle is in or out of P (Park). Seat Entry Memory
The vehicle identifies the number of the
current driver’s RKE transmitter (1–8). See
Remote Keyless Entry (RKE) System
Operation
07. If the RKE transmitter is 1 or
2, and Seat Entry Memory is enabled in
vehicle personalization, the positions saved
to the same memory button number 1 or 2
are automatically recalled when the vehicle
is turned on, or turned from off to ACC/
ACCESSORY. RKE transmitters 3–8 will not
provide automatic memory recalls.
To turn Seat Entry Memory on or off, see
“Vehicle Personalization Settings” previously
in this section and Vehicle Personalization
0 104.
If equipped with an automatic transmission,
the shift lever must be in P (Park) to start
Seat Entry Memory recall. Seat Entry
Memory recall will complete if the vehicle is
shifted out of P (Park) prior to reaching the
saved memory position.
If equipped with a manual transmission, the
parking brake must be set to start Seat
Entry Memory recall. Seat Entry Memory
recall will complete if the parking brake is
released prior to reaching the saved memory
position. To stop Seat Entry Memory recall
movement, turn the vehicle off or press any
of the following controls:
.Power seat
.Memory SET, 1, 2, orB
.Power mirror, with the driver or
passenger side mirror selected
.Power steering wheel, if equipped
If the saved memory seat position does not
automatically recall or recalls to the wrong
positions, the driver’s RKE transmitter
number (1 or 2) may not match the memory
button number that positions were saved to.
Try storing the position to the other
memory button or try the other RKE
transmitter.
Seat Exit Memory
Seat Exit Memory is not linked to an RKE
transmitter. The position saved to
Bis
used for all drivers. To turn Seat Exit
Memory on or off, see "Vehicle
Personalization Settings" previously in this
section and Vehicle Personalization 0104.
If turned on, the position saved to
Bis
automatically recalled when one of the
following occurs:
Page 147 of 354

Chevrolet Camaro Owner Manual (GMNA-Localizing-U.S./Canada/Mexico-
14583589) - 2021 - CRC - 10/1/20
146 Infotainment System
Performance Data
Recorder (PDR)
If equipped, the PDR icon displays on the
Home Page.
Important Information
Use of the PDR may be prohibited or legally
restricted in certain countries and situations.
Ensure compliance with applicable laws and
regulations, including, but not limited to:
privacy laws, laws related to camera
surveillance and recordings, road traffic and
security laws, and laws on the protection of
publicity and personality rights.
.Do not use the PDR if it causes
distraction.
.Do not rely on camera footage to steer
the vehicle.
.Comply with any notice and consent
requirements before capturing and/or
recording the voices or images of other
persons or before collecting other
personal data.
.Notify other drivers of your vehicle of the
above rules and require them to comply.
.General Motors does not accept any
responsibility or liability in connection
with use that is not permitted.
.Law enforcement authorities may have
the right to seize video recordings and
use them as evidence of criminal/driving
offenses against you or third parties.
The PDR records video, audio, and vehicle
data. This data is stored on a removable SD
card. The SD card reader is below the
instrument panel to the left of the steering
wheel and just above the hood release.
The recorded data is not stored anywhere
else and is only accessible from the SD card.
To begin, insert a FAT32 formatted SD card,
Class 10 required, 8, 16, or 32 GB
recommended, into the SD card reader.
Touch the PDR icon to access the PDR menu.
The options displayed are:
Start RecordingIf the system is unable to begin recording,
the Start Recording button is grayed out.
Touch Start Recording to begin recording.
After recording begins, this button changes
to Stop Recording. Touch to stop the
recording session.
The recording must be stopped and the file
closed before removing the SD card, or the
recording cannot be reviewed.
The elapsed time will show when recording.
To define a finish line, see “Define Finish
Line” later in this section.
Page 163 of 354
Chevrolet Camaro Owner Manual (GMNA-Localizing-U.S./Canada/Mexico-
14583589) - 2021 - CRC - 10/1/20
162 Infotainment System
Name
Touch to edit your user name that will be
displayed in the vehicle.
Vehicle Account Information
Touch to view the vehicle account
information and to change the account
password.
An“unverified user account” pop-up will
display until the account information
verification process has been completed on
the Internet. Check your registered e-mail
account for an activation e-mail to complete
the verification process.
Profile Picture
Touch to choose or change your profile
picture.
Profile Identifiers
Touch to have the vehicle recognize the
identifier you choose.
Touch Vehicle Key 1 and/or Vehicle Key 2.
If the Remote Keyless Entry (RKE)
transmitter is lost or stolen, see your dealer.
Security
Touch to have your profile secured with
a PIN. Touch No or Yes.
Vehicle Name
Touch to edit your vehicle name.
Vehicle Account
Touch to view the vehicle account
information and to change the account
password.
Delete Profile
Touch to remove the profile from the
vehicle.
Touch Remove or Cancel.
Teen Driver
If equipped, this allows multiple keys to be
registered for beginner drivers to encourage
safe driving habits. When the vehicle is
started with a Teen Driver key, it will
automatically activate certain safety
systems, allow setting of some features, and
limit the use of others. The Report Card will
record vehicle data about driving behavior
that can be viewed later. When the vehicle
is started with a registered key, the Driver
Information Center (DIC) displays a message
that Teen Driver is active.
To access:
1. Touch Settings on the Home Page, then touch Vehicle, and then Teen Driver.
2. Create a Personal Identification Number (PIN) by choosing a four-digit PIN.
Re-enter the PIN to confirm. To change
the PIN, touch Change PIN.
The PIN is required to:
.Register or unregister keys.
.Change Teen Driver settings.
.Change or clear the Teen Driver PIN.
.Access or delete Report Card data.
Register keys to activate Teen Driver and
assign restrictions to the key:
Any vehicle key can be registered, up to a
maximum of eight keys. Label the key to
tell it apart from the other keys.
For a pushbutton start system: 1. Start the engine.
2. For automatic transmissions, the vehicle must be in P (Park). For manual
transmissions, the vehicle must be
stopped with the parking brake set.
3. From the Settings menu, touch Vehicle and then Teen Driver.
4. Enter the PIN.
Page 164 of 354
Chevrolet Camaro Owner Manual (GMNA-Localizing-U.S./Canada/Mexico-
14583589) - 2021 - CRC - 10/1/20
Infotainment System 163
5. Place the Remote Keyless Entry (RKE)transmitter key you wish to register in
the transmitter pocket. The key does not
need to be the one that started the
vehicle. See Remote Keyless Entry (RKE)
System Operation 07for transmitter
pocket location.
6. From the Teen Driver menu, touch Setup Keys.
.If the transmitter key has not
previously been registered, the option
to add the key displays. Touch Setup
and a confirmation message displays.
Teen Driver restrictions will be
applied whenever this key is used to
operate the vehicle.
.If the transmitter key has already
been registered, the option to
remove the key displays. If Remove is
touched, the transmitter key is no
longer registered. A confirmation
message displays, and Teen Driver
restrictions will not be applied if this
transmitter key is used to operate
the vehicle.
In vehicles with a pushbutton start system,
if a Teen Driver and a non-Teen Driver key
are both present at start up, the vehicle will recognize the non-Teen Driver key to start
the vehicle. The Teen Driver settings will not
be active.
For a keyed ignition system:
1. Start the engine.
2. For automatic transmissions, the vehicle must be in P (Park). For manual
transmissions, the vehicle must be
stopped with the parking brake set.
3. From the Settings menu, touch Vehicle and then Teen Driver.
4. Enter the PIN.
5. Touch Setup Keys. The system displays instructions for registering or
unregistering a key. A confirmation
message displays.
Manage Settings
Audio Volume Limit : Allows the audio
volume limit to be turned on or off. Touch
Set Audio Volume Limit to choose the
maximum allowable audio volume level.
Set Audio Volume Limit : Allows a
maximum radio volume to be set. Use the
arrows to choose the maximum allowable
level for the audio volume. Teen Driver Speed Limiter :
Limits the
maximum speed of the vehicle. When the
speed limiter is turned on and the vehicle is
started with a Teen Driver key, the DIC
displays a message that the top speed is
limited.
On certain vehicles, when the Speed Limiter
is turned ON, the vehicle’s maximum
acceleration will be limited. The DIC will
display a message that the acceleration is
limited.
Teen Driver Speed Warning : Allows the
speed warning to be turned on or off. Touch
Set Teen Driver Speed Warning to set the
warning speed.
Set Teen Driver Speed Warning : Displays a
warning in the DIC when exceeding a
selectable speed. Choose the desired speed
warning level. The speed warning does not
limit the speed of the vehicle.
SiriusXM Explicit Content Filter (if
equipped) : Allows the SiriusXM Explicit
Content Filter to be turned ON or OFF.
When ON, the teen driver will not be able
to listen to SiriusXM stations that contain
explicit content, and the Explicit Content
Filter selection in the Audio Settings will be
unavailable for change.
Page 200 of 354
Chevrolet Camaro Owner Manual (GMNA-Localizing-U.S./Canada/Mexico-
14583589) - 2021 - CRC - 10/1/20
Driving and Operating 199
Starting and Operating
New Vehicle Break-In
Caution
Follow these recommended guidelines
during the first 2 414 km (1,500 mi) of
driving this vehicle. Parts have a break-in
period and performance will be better in
the long run.
.Avoid full throttle starts and abrupt
stops.
.Do not exceed 4000 engine rpm.
.Avoid driving at any one constant
speed, fast or slow.
.Do not drive above
129 km/h (80 mph).
.Avoid downshifting to brake or slow
the vehicle when the engine speed
will exceed 4000 rpm.
.Do not let the engine labor. Never lug
the engine in high gear at low speeds.
With a manual transmission, shift to
the next lower gear. This rule applies
at all times, not just during the
break-in period.
(Continued)
Caution (Continued)
.Do not participate in racing events,
sport driving schools, or similar
activities during this break-in period.
.Check engine oil with every refueling
and add if necessary. Oil and fuel
consumption may be higher than
normal during the first
2 414 km (1,500 mi).
.To break in new tires, drive at
moderate speeds and avoid hard
cornering for the first 322 km (200 mi).
New tires do not have maximum
traction and may tend to slip.
.New brake linings also need a break-in
period. Avoid making hard stops
during the first 322 km (200 mi). This
is recommended every time brake
linings are replaced.
.Should the vehicle be used for racing
or competitive driving (after break-in),
the rear axle lubricant must be
replaced beforehand.
See Track Events and Competitive Driving
0 185.
Ignition Positions
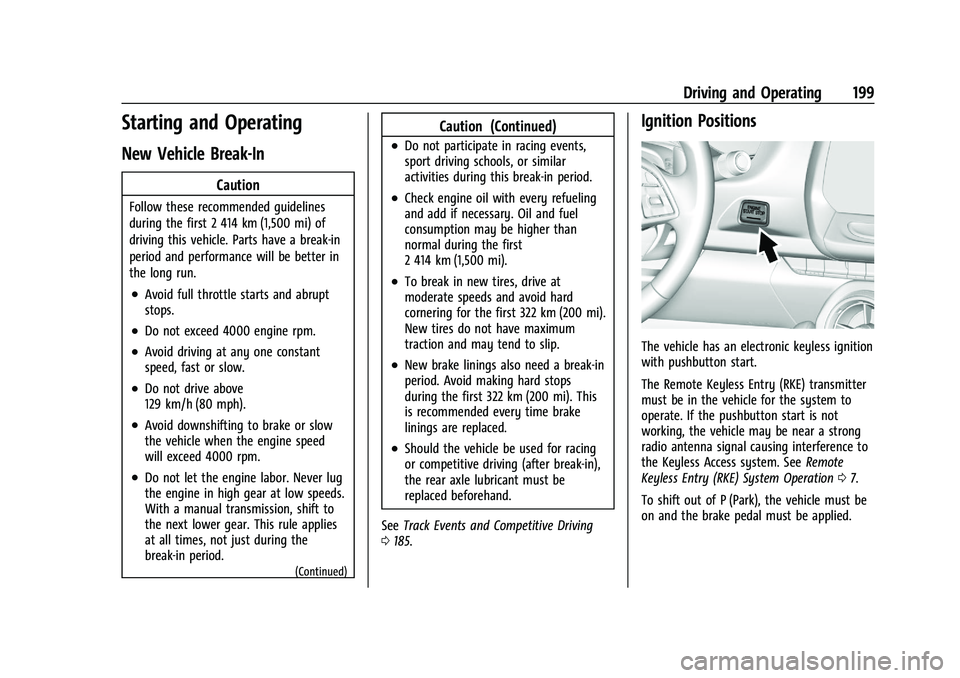
The vehicle has an electronic keyless ignition
with pushbutton start.
The Remote Keyless Entry (RKE) transmitter
must be in the vehicle for the system to
operate. If the pushbutton start is not
working, the vehicle may be near a strong
radio antenna signal causing interference to
the Keyless Access system. See Remote
Keyless Entry (RKE) System Operation 07.
To shift out of P (Park), the vehicle must be
on and the brake pedal must be applied.
Page 201 of 354

Chevrolet Camaro Owner Manual (GMNA-Localizing-U.S./Canada/Mexico-
14583589) - 2021 - CRC - 10/1/20
200 Driving and Operating
Stopping the Engine/OFF (No Indicator
Lights) :When the vehicle is stopped, press
ENGINE START/STOP once to turn the
engine off.
If the vehicle is in P (Park), the ignition will
turn off, and Retained Accessory Power (RAP)
will remain active. See Retained Accessory
Power (RAP) 0203.
Automatic Transmission
If the vehicle is not in P (Park), the ignition
will return to ACC/ACCESSORY and display a
message in the Driver Information Center
(DIC). When the vehicle is shifted into
P (Park), the ignition system will turn OFF.
Manual Transmission
If the vehicle is stationary, the ignition will
turn off, and Retained Accessory Power (RAP)
will remain active. See Retained Accessory
Power (RAP) 0203.
Do not turn the engine off when the vehicle
is moving. This will cause a loss of power
assist in the brake and steering systems and
disable the airbags.
If the vehicle must be shut off in an
emergency: 1. Brake using a firm and steady pressure.
Do not pump the brakes repeatedly. This
may deplete power assist, requiring
increased brake pedal force.
2. Shift the vehicle to N (Neutral). This can be done while the vehicle is moving.
After shifting to N (Neutral), firmly apply
the brakes and steer the vehicle to a
safe location.
3. Come to a complete stop. Shift to P (Park) with an automatic transmission,
or Neutral with a manual transmission.
Turn the ignition off.
4. Set the parking brake. See Electric
Parking Brake 0213.
{Warning
Turning off the vehicle while moving may
cause loss of power assist in the brake
and steering systems and disable the
airbags. While driving, only shut the
vehicle off in an emergency.
If the vehicle cannot be pulled over, and
must be shut off while driving, press and
hold ENGINE START/STOP for longer than
two seconds, or press twice within
five seconds. ACC/ACCESSORY (Amber Indicator Light) :
This mode allows the use of some electrical
accessories when the engine is off.
With the ignition off, pressing the button
one time without the brake pedal applied
will place the ignition system in ACC/
ACCESSORY.
The ignition will switch from ACC/
ACCESSORY to OFF after five minutes to
prevent battery rundown.
ON/RUN/START (Green Indicator Light) :
This
mode is for driving and starting. With the
ignition off, and the brake pedal applied,
pressing the button once will place the
ignition system in ON/RUN/START. Once
engine cranking begins, release the button.
Engine cranking will continue until the
engine starts. See Starting the Engine 0201.
The ignition will then remain on.
Service Mode
This power mode is available for service and
diagnostics, and to verify the proper
operation of the malfunction indicator lamp
as may be required for emission inspection
purposes. With the vehicle off, and the
brake pedal not applied, pressing and
holding ENGINE START/STOP for more than
five seconds will place the vehicle in Service
Page 202 of 354
Chevrolet Camaro Owner Manual (GMNA-Localizing-U.S./Canada/Mexico-
14583589) - 2021 - CRC - 10/1/20
Driving and Operating 201
Mode. The instruments and audio systems
will operate as they do in ON/RUN, but the
vehicle will not be able to be driven. The
engine will not start in Service Mode. Press
the button again to turn the vehicle off.
Starting the Engine
Place the transmission in the proper gear.
Caution
If you add electrical parts or accessories,
you could change the way the engine
operates. Any resulting damage would
not be covered by the vehicle warranty.
SeeAdd-On Electrical Equipment 0233.
Automatic Transmission
Move the shift lever to P (Park) or
N (Neutral). To restart the vehicle when it is
already moving, use N (Neutral) only.
Caution
Do not try to shift to P (Park) if the
vehicle is moving. If you do, you could
damage the transmission. Shift to P (Park)
only when the vehicle is stopped. Manual Transmission
The shift lever should be in Neutral and the
parking brake engaged. Hold the clutch
pedal down to the floor, press the brake
pedal, and start the engine.
Starting the Vehicle
The RKE transmitter must be inside the
vehicle for the ignition to work.
Cell phone chargers can interfere with the
operation of the Keyless Access system.
Battery chargers should not be plugged in
when starting or turning off the engine.
To start the vehicle:
1. For vehicles with an automatic transmission, press the brake pedal, then
press ENGINE START/STOP on the
instrument panel. For a manual
transmission, place the shift lever in
Neutral with the parking brake engaged.
Hold the clutch pedal down to the floor,
press the brake pedal, then press ENGINE
START/STOP.
If there is no RKE transmitter in the
vehicle or if there is something causing
interference with it, the Driver
Information Center (DIC) will display a
message. 2. When the engine begins cranking, let go
of the button and the engine cranks
automatically until it starts. If the
battery in the RKE transmitter is weak,
the DIC will display a message. The
vehicle can still be driven.
See “Starting the Vehicle with a Low
Transmitter Battery” underRemote
Keyless Entry (RKE) System Operation 07
. If the RKE transmitter battery is dead,
insert it into the rear cupholder to
enable engine starting.
3. Do not race the engine immediately after starting it. Operate the engine and
transmission gently until the oil warms
up and lubricates all moving parts.
4. If the engine does not start and no DIC message is displayed, wait 15 seconds
before trying again to let the cranking
motor cool down.
If the engine does not start after five to
10 seconds, especially in very cold
weather (below −18 °C or 0 °F), it could
be flooded with too much gasoline. Try
pushing the accelerator pedal all the way
to the floor while cranking for up to
15 seconds maximum. Wait at least
15 seconds between each try, to allow
the cranking motor to cool down. When