manual transmission CHEVROLET CAMARO 2022 Owners Manual
[x] Cancel search | Manufacturer: CHEVROLET, Model Year: 2022, Model line: CAMARO, Model: CHEVROLET CAMARO 2022Pages: 357, PDF Size: 7.99 MB
Page 6 of 357
Chevrolet Camaro Owner Manual (GMNA-Localizing-U.S./Canada/Mexico-
14583589) - 2021 - CRC - 3/24/20
Introduction 5
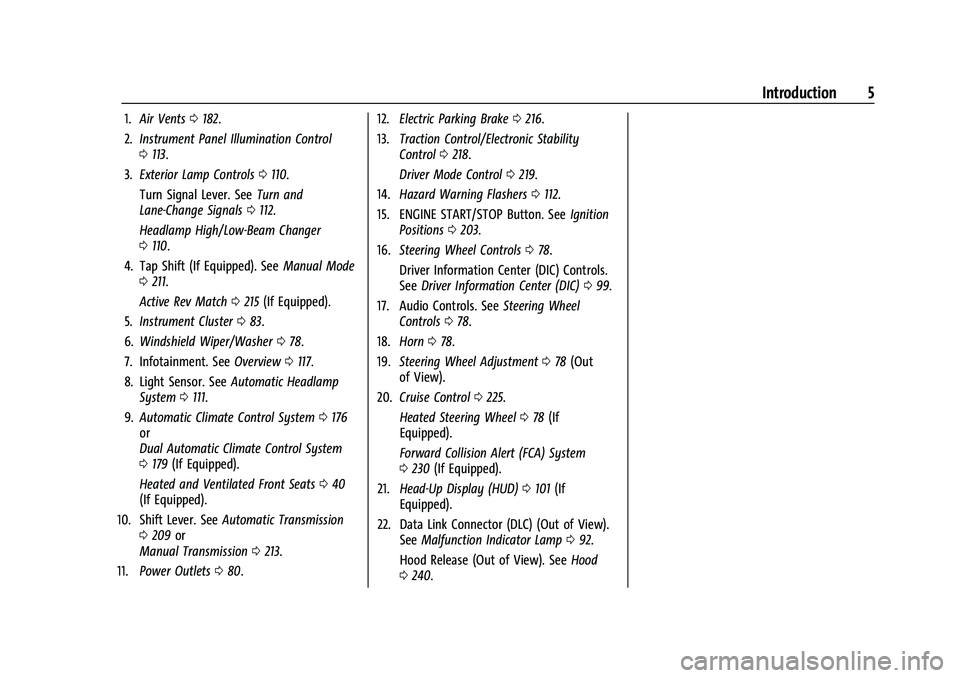
1.Air Vents 0182.
2. Instrument Panel Illumination Control
0113.
3. Exterior Lamp Controls 0110.
Turn Signal Lever. See Turn and
Lane-Change Signals 0112.
Headlamp High/Low-Beam Changer
0 110.
4. Tap Shift (If Equipped). See Manual Mode
0 211.
Active Rev Match 0215 (If Equipped).
5. Instrument Cluster 083.
6. Windshield Wiper/Washer 078.
7. Infotainment. See Overview0117.
8. Light Sensor. See Automatic Headlamp
System 0111.
9. Automatic Climate Control System 0176
or
Dual Automatic Climate Control System
0 179 (If Equipped).
Heated and Ventilated Front Seats 040
(If Equipped).
10. Shift Lever. See Automatic Transmission
0 209 or
Manual Transmission 0213.
11. Power Outlets 080. 12.
Electric Parking Brake 0216.
13. Traction Control/Electronic Stability
Control 0218.
Driver Mode Control 0219.
14. Hazard Warning Flashers 0112.
15. ENGINE START/STOP Button. See Ignition
Positions 0203.
16. Steering Wheel Controls 078.
Driver Information Center (DIC) Controls.
See Driver Information Center (DIC) 099.
17. Audio Controls. See Steering Wheel
Controls 078.
18. Horn 078.
19. Steering Wheel Adjustment 078 (Out
of View).
20. Cruise Control 0225.
Heated Steering Wheel 078 (If
Equipped).
Forward Collision Alert (FCA) System
0 230 (If Equipped).
21. Head-Up Display (HUD) 0101 (If
Equipped).
22. Data Link Connector (DLC) (Out of View). SeeMalfunction Indicator Lamp 092.
Hood Release (Out of View). See Hood
0 240.
Page 18 of 357
Chevrolet Camaro Owner Manual (GMNA-Localizing-U.S./Canada/Mexico-
14583589) - 2021 - CRC - 3/24/20
Keys, Doors, and Windows 17
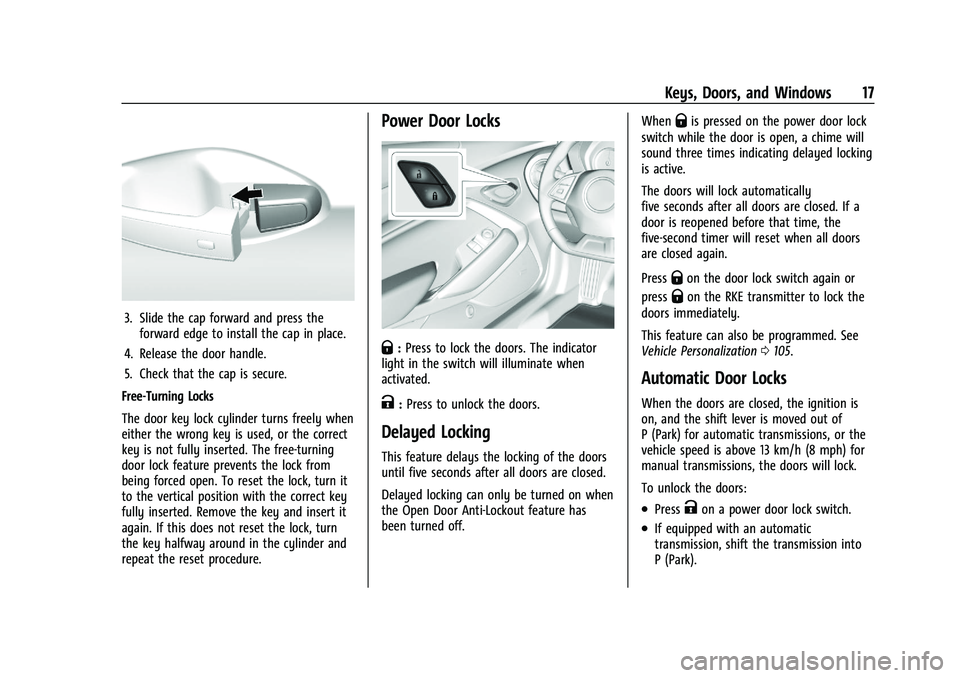
3. Slide the cap forward and press theforward edge to install the cap in place.
4. Release the door handle.
5. Check that the cap is secure.
Free-Turning Locks
The door key lock cylinder turns freely when
either the wrong key is used, or the correct
key is not fully inserted. The free-turning
door lock feature prevents the lock from
being forced open. To reset the lock, turn it
to the vertical position with the correct key
fully inserted. Remove the key and insert it
again. If this does not reset the lock, turn
the key halfway around in the cylinder and
repeat the reset procedure.
Power Door Locks
Q: Press to lock the doors. The indicator
light in the switch will illuminate when
activated.
K: Press to unlock the doors.
Delayed Locking
This feature delays the locking of the doors
until five seconds after all doors are closed.
Delayed locking can only be turned on when
the Open Door Anti-Lockout feature has
been turned off. When
Qis pressed on the power door lock
switch while the door is open, a chime will
sound three times indicating delayed locking
is active.
The doors will lock automatically
five seconds after all doors are closed. If a
door is reopened before that time, the
five-second timer will reset when all doors
are closed again.
Press
Qon the door lock switch again or
press
Qon the RKE transmitter to lock the
doors immediately.
This feature can also be programmed. See
Vehicle Personalization 0105.
Automatic Door Locks
When the doors are closed, the ignition is
on, and the shift lever is moved out of
P (Park) for automatic transmissions, or the
vehicle speed is above 13 km/h (8 mph) for
manual transmissions, the doors will lock.
To unlock the doors:
.PressKon a power door lock switch.
.If equipped with an automatic
transmission, shift the transmission into
P (Park).
Page 19 of 357
Chevrolet Camaro Owner Manual (GMNA-Localizing-U.S./Canada/Mexico-
14583589) - 2021 - CRC - 3/24/20
18 Keys, Doors, and Windows
.If equipped with a manual transmission,
turn the vehicle off when parked.
Automatic door locking cannot be disabled.
Automatic door unlocking can be enabled
through vehicle personalization. See Vehicle
Personalization 0105.
Lockout Protection
If the vehicle is on or in ACC/ACCESSORY
and the power door lock switch is pressed
with the driver door open, all the doors will
lock and only the driver door will unlock.
If the vehicle is off and locking is requested
while a door is open, when all doors are
closed the vehicle will check for RKE
transmitters inside. If an RKE transmitter is
detected and the number of RKE
transmitters inside has not reduced, the
driver door will unlock and the horn will
chirp three times.
Lockout Protection can be manually
overridden with the driver door open by
pressing and holding
Qon the power door
lock switch. Open Door Anti-Lockout
If Open Door Anti-Lockout has been turned
on and the vehicle is off, the driver door is
open, and locking is requested, all the doors
will lock and the driver door will remain
unlocked. The Open Door Anti-Lockout
feature can be turned on or off. See
Vehicle
Personalization 0105.
Doors
Trunk
{Warning
Exhaust gases can enter the vehicle if it
is driven with the liftgate, trunk/hatch
open, or with any objects that pass
through the seal between the body and
the trunk/hatch or liftgate. Engine
exhaust contains carbon monoxide (CO)
which cannot be seen or smelled. It can
cause unconsciousness and even death.
If the vehicle must be driven with the
liftgate, or trunk/hatch open:
.Close all of the windows.
(Continued)
Warning (Continued)
.Fully open the air outlets on or under
the instrument panel.
.Adjust the climate control system to a
setting that brings in only outside air
and set the fan speed to the highest
setting. See“Climate Control Systems”
in the Index.
.If the vehicle has a power liftgate,
disable the power liftgate function.
For more information about carbon
monoxide, see Engine Exhaust 0209.
Trunk Release
To open the trunk from outside of the
vehicle:
.PressXtwice quickly on the Remote
Keyless Entry (RKE) transmitter.
.Press the touch pad in the area above the
license plate after unlocking all doors.
.For Keyless Access, press the touch pad in
the area above the license plate when the
transmitter is within 1 m (3 ft) of the rear
of the vehicle.
Page 20 of 357
Chevrolet Camaro Owner Manual (GMNA-Localizing-U.S./Canada/Mexico-
14583589) - 2021 - CRC - 3/24/20
Keys, Doors, and Windows 19
For automatic transmissions, the vehicle
must be in P (Park). For manual
transmissions, the vehicle must be off,
or stationary with the parking brake set.
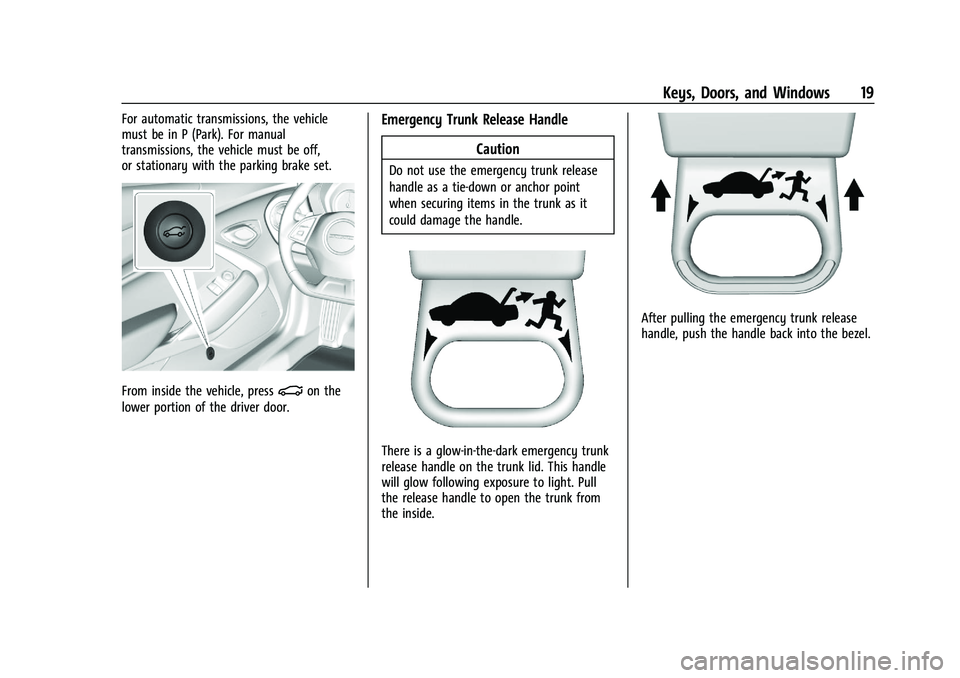
From inside the vehicle, press|on the
lower portion of the driver door.
Emergency Trunk Release Handle
Caution
Do not use the emergency trunk release
handle as a tie-down or anchor point
when securing items in the trunk as it
could damage the handle.
There is a glow-in-the-dark emergency trunk
release handle on the trunk lid. This handle
will glow following exposure to light. Pull
the release handle to open the trunk from
the inside.
After pulling the emergency trunk release
handle, push the handle back into the bezel.
Page 40 of 357
Chevrolet Camaro Owner Manual (GMNA-Localizing-U.S./Canada/Mexico-
14583589) - 2021 - CRC - 3/24/20
Seats and Restraints 39
To save the position forBand Seat Exit
Memory features, repeat Steps 1–4 using
B. This saves the position for getting out
of the vehicle.
Save preferred memory feature positions to
both 1 and 2 if you are the only driver.
Manually Recalling Memory Positions
Press and hold 1, 2, or
Bto recall the
previously saved memory positions if you
are driver 1 or 2 identified in the DIC
welcome message.
To stop Manual Memory recall movement,
release 1, 2, or
Bor press any of the
following controls:
.Power seat
.Memory SET
.Power mirror, with the driver or
passenger side mirror selected
.Power steering wheel, if equipped
If equipped with an automatic transmission,
Manual Memory recall movement for 1, 2,
or
Bbuttons may be initiated and will
complete to the saved memory position if
the vehicle is in or out of P (Park). Seat Entry Memory
The vehicle identifies the number of the
current driver’s RKE transmitter (1–8). See
Remote Keyless Entry (RKE) System
Operation
07. If the RKE transmitter is 1 or
2, and Seat Entry Memory is enabled in
vehicle personalization, the positions saved
to the same memory button number 1 or 2
are automatically recalled when the vehicle
is turned on, or turned from off to ACC/
ACCESSORY. RKE transmitters 3–8 will not
provide automatic memory recalls.
To turn Seat Entry Memory on or off, see
“Vehicle Personalization Settings” previously
in this section and Vehicle Personalization
0 105.
If equipped with an automatic transmission,
the shift lever must be in P (Park) to start
Seat Entry Memory recall. Seat Entry
Memory recall will complete if the vehicle is
shifted out of P (Park) prior to reaching the
saved memory position.
If equipped with a manual transmission, the
parking brake must be set to start Seat
Entry Memory recall. Seat Entry Memory
recall will complete if the parking brake is
released prior to reaching the saved memory
position. To stop Seat Entry Memory recall
movement, turn the vehicle off or press any
of the following controls:
.Power seat
.Memory SET, 1, 2, orB
.Power mirror, with the driver or
passenger side mirror selected
.Power steering wheel, if equipped
If the saved memory seat position does not
automatically recall or recalls to the wrong
positions, the driver’s RKE transmitter
number (1 or 2) may not match the memory
button number that positions were saved to.
Try storing the position to the other
memory button or try the other RKE
transmitter.
Seat Exit Memory
Seat Exit Memory is not linked to an RKE
transmitter. The position saved to
Bis
used for all drivers. To turn Seat Exit
Memory on or off, see "Vehicle
Personalization Settings" previously in this
section and Vehicle Personalization 0105.
Page 41 of 357
Chevrolet Camaro Owner Manual (GMNA-Localizing-U.S./Canada/Mexico-
14583589) - 2021 - CRC - 3/24/20
40 Seats and Restraints
If turned on, the position saved toBis
automatically recalled when one of the
following occurs:
.The vehicle is turned off and the driver
door is opened within a short time.
.The vehicle is turned off with the driver
door open.
If equipped with a manual transmission, the
parking brake must be set to start Seat Exit
Memory recall. Seat Exit Memory recall will
complete if the parking brake is released
prior to reaching the saved memory
position.
To stop Seat Exit Memory movement, press
any of the following memory controls:
.Power seat
.Memory SET, 1, 2, orB
.Power mirror, with the driver or
passenger side mirror selected
.Power steering wheel, if equipped
Obstructions
If something has blocked the driver seat
while recalling a memory position, the recall
may stop. Remove the obstruction and try
the recall again. If the memory position still
does not recall, see your dealer.
Seatback Latches
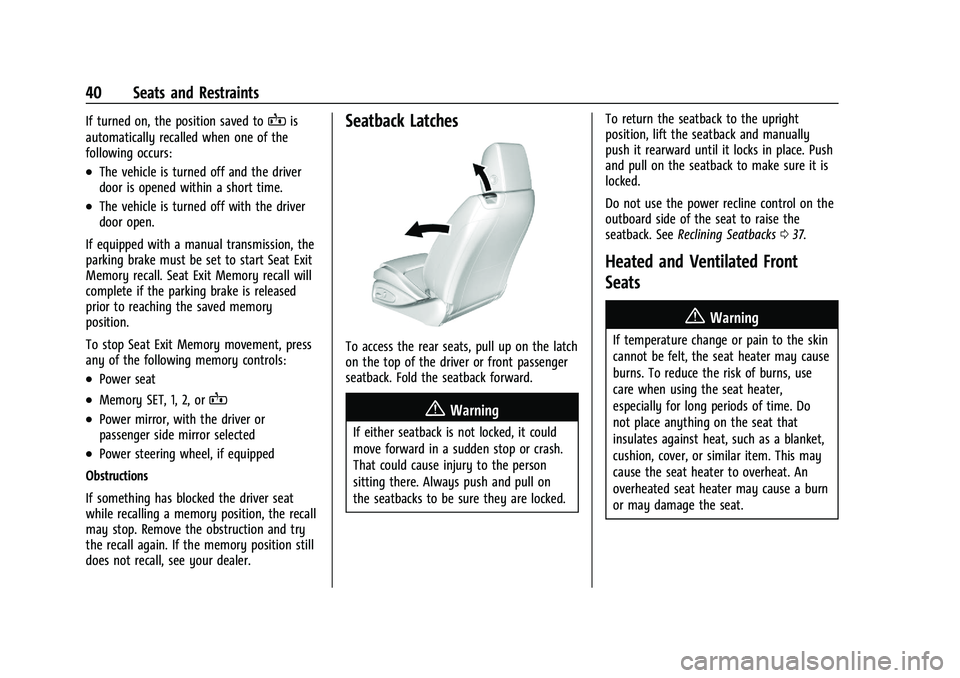
To access the rear seats, pull up on the latch
on the top of the driver or front passenger
seatback. Fold the seatback forward.
{Warning
If either seatback is not locked, it could
move forward in a sudden stop or crash.
That could cause injury to the person
sitting there. Always push and pull on
the seatbacks to be sure they are locked. To return the seatback to the upright
position, lift the seatback and manually
push it rearward until it locks in place. Push
and pull on the seatback to make sure it is
locked.
Do not use the power recline control on the
outboard side of the seat to raise the
seatback. See
Reclining Seatbacks 037.
Heated and Ventilated Front
Seats
{Warning
If temperature change or pain to the skin
cannot be felt, the seat heater may cause
burns. To reduce the risk of burns, use
care when using the seat heater,
especially for long periods of time. Do
not place anything on the seat that
insulates against heat, such as a blanket,
cushion, cover, or similar item. This may
cause the seat heater to overheat. An
overheated seat heater may cause a burn
or may damage the seat.
Page 86 of 357
Chevrolet Camaro Owner Manual (GMNA-Localizing-U.S./Canada/Mexico-
14583589) - 2021 - CRC - 3/26/20
Instruments and Controls 85
Pressoto access the cluster applications.
Use
worxto scroll through the list of
applications. Press SEL to select the
application from the list.
.Info. This is where you can view the
Driver Information Center (DIC) displays.
See Driver Information Center (DIC) 099.
.Performance (Uplevel Cluster)
.Audio (If Equipped)
.Phone (If Equipped)
.Navigation (If Equipped)
.Options
Performance (Uplevel Cluster)
Press SEL to enter the Performance menu.
Use
worxto scroll through the available
items.
Friction Bubble : A four quadrant visual
display, indicative of the four corners of the
car, with a “bubble”showing where the
most inertia is being exerted on the vehicle.
Performance Timer : Press
pwhen
Performance Timer is displayed to enter the
menu. Use
worxto select an interval.
Press SEL to save it. On the next acceleration, the performance time will
record the time. To reset the timer,
highlight Reset and press SEL.
G-Force :
Gives the driver an indication of
the vehicle performance in cornering. The
G-force is displayed in the center of the DIC
as a numerical value.
Lap Timer : Use to start, stop, or reset the
lap timer. A stopwatch icon will be
displayed when the lap timer is active. Press
SEL while the Lap Timer page is active to
start the timer. If the lap timer is active,
pressing SEL on any page will stop the
current lap timer and start a new lap. Also,
pressing and holding SEL on any page will
stop the lap timer.
Oil Temperature : Shows the current oil
temperature in either degrees Celsius (°C) or
degrees Fahrenheit (°F).
Oil Pressure : Shows the current oil pressure
in either kilopascal (kPa) or in pounds per
square inch (psi).
Battery Voltage : Displays the current
battery voltage, if equipped. Battery voltage
changes are normal while driving. Transmission Fluid Temperature :
Shows the
temperature of the transmission fluid in
either degrees Celsius (°C) or degrees
Fahrenheit (°F).
Tire Temperature : If equipped, displays tire
temperature status. Unknown may display if
information is unavailable.
Tire temperature states:
.Cold —Drive with caution as tire
performance may be degraded.
.Cool —Drive with caution as tire
performance may be degraded.
.Normal —Tires are at normal driving
temperature.
.Warm —Tires are ready for aggressive
driving.
.Overheated —Tire temperature may be
higher than optimal.
Audio
If equipped, while the audio app is open,
use
worxto change the radio station or
seek to the next or previous track,
depending on the current audio source.
Press
pto enter the Audio menu. In the
Audio menu browse for music, select from
the favorites, or change the audio source.
Page 94 of 357
Chevrolet Camaro Owner Manual (GMNA-Localizing-U.S./Canada/Mexico-
14583589) - 2021 - CRC - 3/26/20
Instruments and Controls 93
Caution
If the vehicle is driven continually with
this light on, the emission control system
may not work as well, the fuel economy
may be lower, and the vehicle may not
run smoothly. This could lead to costly
repairs that might not be covered by the
vehicle warranty.
Caution
Modifications to the engine, transmission,
exhaust, intake, or fuel system, or the
use of replacement tires that do not
meet the original tire specifications, can
cause this light to come on. This could
lead to costly repairs not covered by the
vehicle warranty. This could also affect
the vehicle’s ability to pass an Emissions
Inspection/Maintenance test. See
Accessories and Modifications0240.
If the light is flashing : A malfunction has
been detected that could damage the
emission control system and increase vehicle
emissions. Diagnosis and service may be
required. To help prevent damage, reduce vehicle
speed and avoid hard accelerations and
uphill grades.
If the light continues to flash, find a safe
place to park. Turn the vehicle off and wait
at least 10 seconds before restarting the
engine. If the light is still flashing, follow
the previous guidelines and see your dealer
for service as soon as possible.
If the light is on steady :
A malfunction has
been detected. Diagnosis and service may be
required.
Check the following:
.If fuel has been added to the vehicle
using the capless funnel adapter, make
sure that it has been removed. See
“Filling the Tank with a Portable Gas Can”
under Filling the Tank 0235. The
diagnostic system can detect if the
adapter has been left installed in the
vehicle, allowing fuel to evaporate into
the atmosphere. A few driving trips with
the adapter removed may turn off the
light.
.Poor fuel quality can cause inefficient
engine operation and poor driveability,
which may go away once the engine is
warmed up. If this occurs, change the fuel
brand. It may require at least one full
tank of the proper fuel to turn the light
off. See Recommended Fuel (3.6L
V6 Engine) 0234 or
Recommended Fuel (2.0L L4 Turbo Engine
and 6.2L V8 Engine) 0234 or
Recommended Fuel (6.2L V8 Supercharged
Engine) 0234.
If the light remains on, see your dealer.
Emissions Inspection and Maintenance
Programs
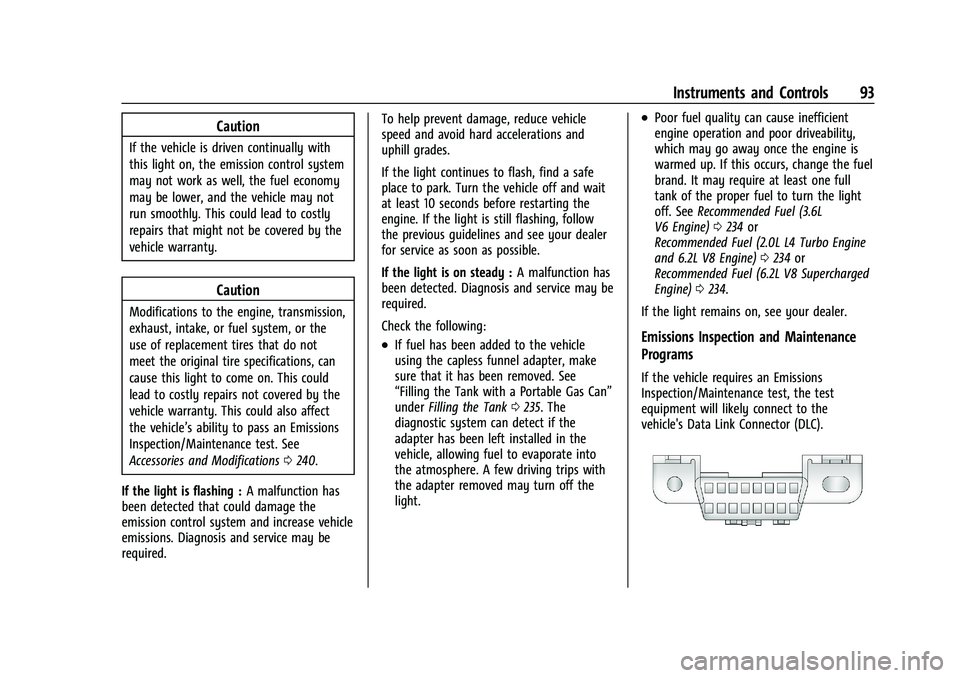
If the vehicle requires an Emissions
Inspection/Maintenance test, the test
equipment will likely connect to the
vehicle's Data Link Connector (DLC).
Page 102 of 357
Chevrolet Camaro Owner Manual (GMNA-Localizing-U.S./Canada/Mexico-
14583589) - 2021 - CRC - 3/26/20
Instruments and Controls 101
Battery Voltage :Displays the current
battery voltage. The battery voltage can
fluctuate while viewing this information on
the DIC. This is normal.
Speed Limit (Uplevel Cluster) : Displays sign
information, which comes from a roadway
database in the onboard navigation.
Oil Temperature (Base Cluster) : Shows the
current oil temperature in either degrees
Celsius (°C) or degrees Fahrenheit (°F). This
display is available in the Performance app
on the uplevel cluster.
Oil Pressure (Base Cluster) : Shows the
current oil pressure in either kilopascal (kPa)
or in pounds per square inch (psi). This
display is available in the Performance app
on the uplevel cluster.
Performance Timer (Base Cluster) : Press
p
when Performance Timer is displayed to
enter the menu. Press
pwhile Set Start
Speed is highlighted then use
worxto
enter the start speed. Press SEL to save it.
Press
pwhile Set End Speed is highlighted
then use
worxto enter the end speed. Press SEL to save it. After the start and end
speeds have been entered, press
oto set
the Sport display to the set speeds and the
performance timer is ready to use. On the
next acceleration, the performance time will
record the time. To reset the timer,
highlight Reset on the performance timer
menu and press SEL. This display is available
in the Performance app on the uplevel
cluster.
Lap Timer (Base Cluster) : Use to start, stop,
or reset the lap timer. A stopwatch icon will
be displayed when the lap timer is active.
Press SEL while the Lap Timer page is active
to start the timer. If the lamp timer is
active, pressing SEL on any page will stop
the current lap timer and start a new lap.
Also, pressing and holding SEL on any page
will stop the lap timer. This display is
available in the Performance app on the
uplevel cluster.
G-Force (Base Cluster) : Gives the driver an
indication of the vehicle performance in
cornering. The G-force is displayed in the
center of the DIC as a numerical value. This
display is available in the Performance app
on the uplevel cluster. Transmission Fluid Temperature (Base
Cluster) :
Shows the temperature of the
transmission fluid in either degrees Celsius (°
C) or degrees Fahrenheit (°F). This display is
available in the Performance app on the
uplevel cluster.
Blank : Shows no information.
Head-Up Display (HUD)
{Warning
If the HUD image is too bright or too
high in your field of view, it may take
you more time to see things you need to
see when it is dark outside. Be sure to
keep the HUD image dim and placed low
in your field of view.
If equipped with HUD, some information
concerning the operation of the vehicle is
projected onto the windshield.
The HUD information appears as an image
focused out toward the front of the vehicle.
Page 105 of 357
Chevrolet Camaro Owner Manual (GMNA-Localizing-U.S./Canada/Mexico-
14583589) - 2021 - CRC - 3/26/20
104 Instruments and Controls
English
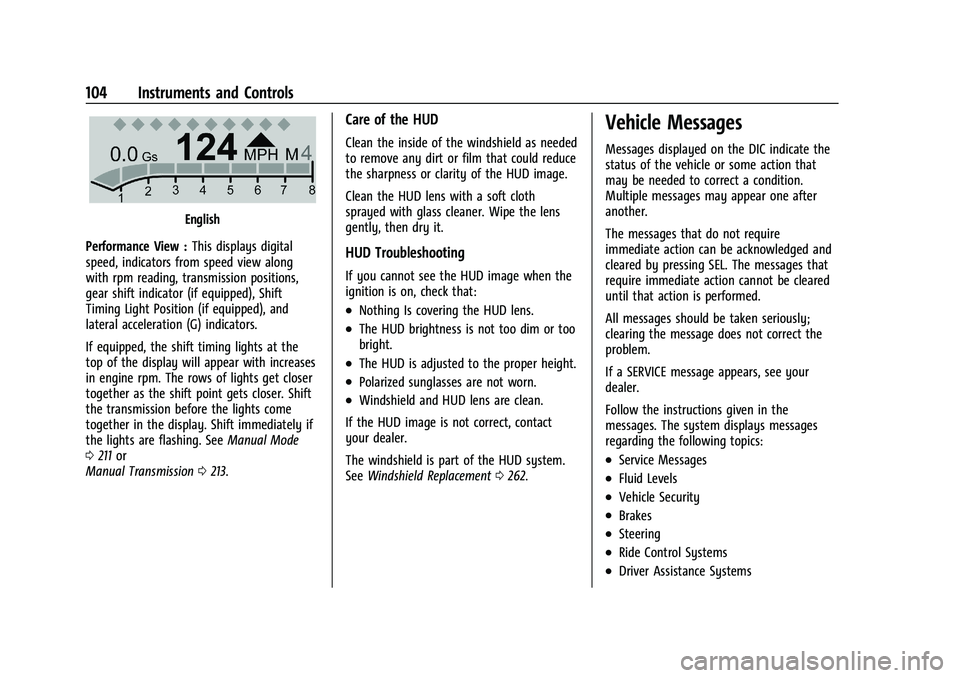
Performance View : This displays digital
speed, indicators from speed view along
with rpm reading, transmission positions,
gear shift indicator (if equipped), Shift
Timing Light Position (if equipped), and
lateral acceleration (G) indicators.
If equipped, the shift timing lights at the
top of the display will appear with increases
in engine rpm. The rows of lights get closer
together as the shift point gets closer. Shift
the transmission before the lights come
together in the display. Shift immediately if
the lights are flashing. See Manual Mode
0 211 or
Manual Transmission 0213.
Care of the HUD
Clean the inside of the windshield as needed
to remove any dirt or film that could reduce
the sharpness or clarity of the HUD image.
Clean the HUD lens with a soft cloth
sprayed with glass cleaner. Wipe the lens
gently, then dry it.
HUD Troubleshooting
If you cannot see the HUD image when the
ignition is on, check that:
.Nothing Is covering the HUD lens.
.The HUD brightness is not too dim or too
bright.
.The HUD is adjusted to the proper height.
.Polarized sunglasses are not worn.
.Windshield and HUD lens are clean.
If the HUD image is not correct, contact
your dealer.
The windshield is part of the HUD system.
See Windshield Replacement 0262.
Vehicle Messages
Messages displayed on the DIC indicate the
status of the vehicle or some action that
may be needed to correct a condition.
Multiple messages may appear one after
another.
The messages that do not require
immediate action can be acknowledged and
cleared by pressing SEL. The messages that
require immediate action cannot be cleared
until that action is performed.
All messages should be taken seriously;
clearing the message does not correct the
problem.
If a SERVICE message appears, see your
dealer.
Follow the instructions given in the
messages. The system displays messages
regarding the following topics:
.Service Messages
.Fluid Levels
.Vehicle Security
.Brakes
.Steering
.Ride Control Systems
.Driver Assistance Systems