remote start CHEVROLET CAMARO 2022 User Guide
[x] Cancel search | Manufacturer: CHEVROLET, Model Year: 2022, Model line: CAMARO, Model: CHEVROLET CAMARO 2022Pages: 357, PDF Size: 7.99 MB
Page 33 of 357
Chevrolet Camaro Owner Manual (GMNA-Localizing-U.S./Canada/Mexico-
14583589) - 2021 - CRC - 3/24/20
32 Keys, Doors, and Windows
2. The top will stop movementapproximately one second after
Kis
released. To stop the top immediately,
press
7,K, orQon the RKE
transmitter.
Mwill only open the
convertible top.
See Remote Keyless Entry (RKE) System
0 7and
Remote Keyless Entry (RKE) System
Operation 07.
Closing the Convertible Top
The RKE transmitter cannot be used to close
the convertible top. 1. Make sure the sun visors are stored in the center mount position.
2. Remove all objects from the top of the tonneau cover and forward of the
partition. Place the partition in the rear
storage area in the upright position.
Fasten both sides of the partition to the
posts just below the tonneau cover. See
Rear Storage 075.
3. Close the trunk.
4. Start the vehicle or place it in ACC/ ACCESSORY. 5. When possible, operate the convertible
top when the vehicle is stopped. The top
can be operated while driving below
50 km/h (31 mph) and will stop if that
speed is exceeded. The top operation will
take approximately 25 seconds. Make
sure the top operation can be completed
before that speed is reached.
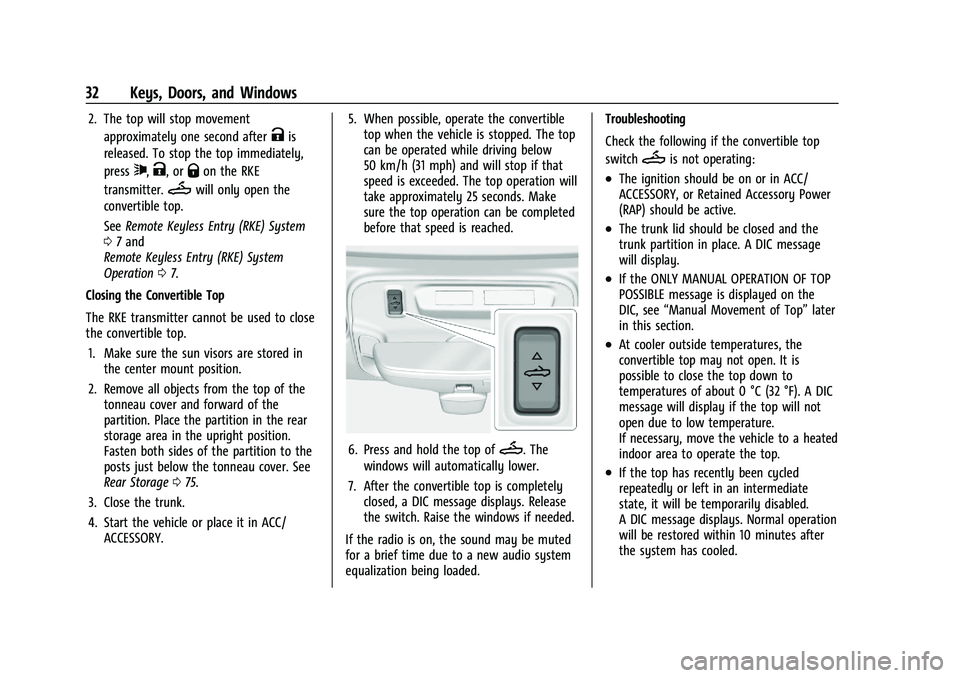
6. Press and hold the top ofM. The
windows will automatically lower.
7. After the convertible top is completely closed, a DIC message displays. Release
the switch. Raise the windows if needed.
If the radio is on, the sound may be muted
for a brief time due to a new audio system
equalization being loaded. Troubleshooting
Check the following if the convertible top
switch
Mis not operating:
.The ignition should be on or in ACC/
ACCESSORY, or Retained Accessory Power
(RAP) should be active.
.The trunk lid should be closed and the
trunk partition in place. A DIC message
will display.
.If the ONLY MANUAL OPERATION OF TOP
POSSIBLE message is displayed on the
DIC, see
“Manual Movement of Top” later
in this section.
.At cooler outside temperatures, the
convertible top may not open. It is
possible to close the top down to
temperatures of about 0 °C (32 °F). A DIC
message will display if the top will not
open due to low temperature.
If necessary, move the vehicle to a heated
indoor area to operate the top.
.If the top has recently been cycled
repeatedly or left in an intermediate
state, it will be temporarily disabled.
A DIC message displays. Normal operation
will be restored within 10 minutes after
the system has cooled.
Page 39 of 357
Chevrolet Camaro Owner Manual (GMNA-Localizing-U.S./Canada/Mexico-
14583589) - 2021 - CRC - 3/24/20
38 Seats and Restraints
Before saving, adjust all available memory
feature positions. Turn the vehicle on and
then press and release SET; a beep will
sound. Then immediately press and hold 1,
2, or
B(Exit) until two beeps sound. To
manually recall these positions, press and
hold 1, 2, or
Buntil the saved position is
reached. Follow the instructions under
“Saving Memory Positions.”
The vehicle identifies the current driver’s RKE
transmitter number (1–8). See Remote
Keyless Entry (RKE) System Operation 07.
Only RKE transmitters 1 and 2 can be used
for automatic memory recalls. A Driver
Information Center (DIC) welcome message
indicating the transmitter number may
display for the first few ignition cycles
following a transmitter change. For Seat
Entry Memory to work properly, save the
positions to the memory button (1 or 2)
matching the RKE transmitter number
displayed in the DIC welcome message.
Carry the linked RKE transmitter when
entering the vehicle.
Vehicle Personalization Settings
.To have the Seat Entry Memory
movement begin when the vehicle is
started, select the Settings menu, then Vehicle, then Seating Position, and then
Seat Entry Memory. Select On or Off. See
“Seat Entry Memory”
later in this section.
.To begin Seat Exit Memory movement
when the vehicle is turned off and the
driver door is opened, or when the vehicle
is turned off with the driver door already
opened, select the Settings menu, then
Vehicle, then Seating Position, and then
Seat Exit Memory. Select On or Off. See
“Seat Exit Memory”later in this section.
.SeeVehicle Personalization 0105 for
additional setting information.
Identifying Driver Number
To identify the driver number: 1. Move your RKE transmitter away from the vehicle.
2. Start the vehicle with another key or RKE transmitter. The DIC should display the
driver number for the other RKE
transmitter. Turn the vehicle off and
remove the key or RKE transmitter from
the vehicle.
3. Start the vehicle with the initial key or RKE transmitter. The DIC should display
the driver number of your RKE
transmitter. Saving Memory Positions
Read these instructions completely before
saving memory positions.
To save preferred driving positions 1 and 2:
1. Turn the vehicle on or to ACC/ ACCESSORY.
A DIC welcome message may indicate
driver number 1 or 2.
2. Adjust all available memory features to the desired driving position.
3. Press and release SET; a beep will sound.
4. Immediately press and hold the 1 or 2 memory button matching the above
DIC welcome message until two beeps
sound.
If too much time passes between
releasing SET and pressing 1, the
memory position will not be saved and
two beeps will not sound. Repeat
Steps 3 and 4.
1 or 2 corresponds to the driver number.
See “Identifying Driver Number”
previously in this section.
5. Repeat Steps 1–4 for a second driver using 1 or 2.
Page 40 of 357
Chevrolet Camaro Owner Manual (GMNA-Localizing-U.S./Canada/Mexico-
14583589) - 2021 - CRC - 3/24/20
Seats and Restraints 39
To save the position forBand Seat Exit
Memory features, repeat Steps 1–4 using
B. This saves the position for getting out
of the vehicle.
Save preferred memory feature positions to
both 1 and 2 if you are the only driver.
Manually Recalling Memory Positions
Press and hold 1, 2, or
Bto recall the
previously saved memory positions if you
are driver 1 or 2 identified in the DIC
welcome message.
To stop Manual Memory recall movement,
release 1, 2, or
Bor press any of the
following controls:
.Power seat
.Memory SET
.Power mirror, with the driver or
passenger side mirror selected
.Power steering wheel, if equipped
If equipped with an automatic transmission,
Manual Memory recall movement for 1, 2,
or
Bbuttons may be initiated and will
complete to the saved memory position if
the vehicle is in or out of P (Park). Seat Entry Memory
The vehicle identifies the number of the
current driver’s RKE transmitter (1–8). See
Remote Keyless Entry (RKE) System
Operation
07. If the RKE transmitter is 1 or
2, and Seat Entry Memory is enabled in
vehicle personalization, the positions saved
to the same memory button number 1 or 2
are automatically recalled when the vehicle
is turned on, or turned from off to ACC/
ACCESSORY. RKE transmitters 3–8 will not
provide automatic memory recalls.
To turn Seat Entry Memory on or off, see
“Vehicle Personalization Settings” previously
in this section and Vehicle Personalization
0 105.
If equipped with an automatic transmission,
the shift lever must be in P (Park) to start
Seat Entry Memory recall. Seat Entry
Memory recall will complete if the vehicle is
shifted out of P (Park) prior to reaching the
saved memory position.
If equipped with a manual transmission, the
parking brake must be set to start Seat
Entry Memory recall. Seat Entry Memory
recall will complete if the parking brake is
released prior to reaching the saved memory
position. To stop Seat Entry Memory recall
movement, turn the vehicle off or press any
of the following controls:
.Power seat
.Memory SET, 1, 2, orB
.Power mirror, with the driver or
passenger side mirror selected
.Power steering wheel, if equipped
If the saved memory seat position does not
automatically recall or recalls to the wrong
positions, the driver’s RKE transmitter
number (1 or 2) may not match the memory
button number that positions were saved to.
Try storing the position to the other
memory button or try the other RKE
transmitter.
Seat Exit Memory
Seat Exit Memory is not linked to an RKE
transmitter. The position saved to
Bis
used for all drivers. To turn Seat Exit
Memory on or off, see "Vehicle
Personalization Settings" previously in this
section and Vehicle Personalization 0105.
Page 42 of 357
Chevrolet Camaro Owner Manual (GMNA-Localizing-U.S./Canada/Mexico-
14583589) - 2021 - CRC - 3/24/20
Seats and Restraints 41
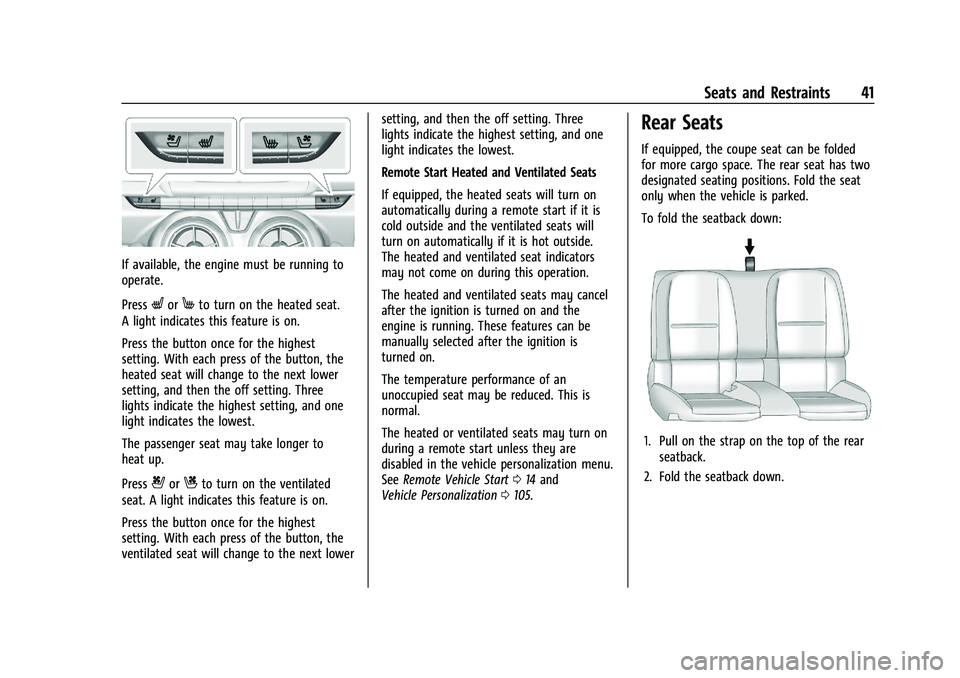
If available, the engine must be running to
operate.
Press
LorMto turn on the heated seat.
A light indicates this feature is on.
Press the button once for the highest
setting. With each press of the button, the
heated seat will change to the next lower
setting, and then the off setting. Three
lights indicate the highest setting, and one
light indicates the lowest.
The passenger seat may take longer to
heat up.
Press
{orCto turn on the ventilated
seat. A light indicates this feature is on.
Press the button once for the highest
setting. With each press of the button, the
ventilated seat will change to the next lower setting, and then the off setting. Three
lights indicate the highest setting, and one
light indicates the lowest.
Remote Start Heated and Ventilated Seats
If equipped, the heated seats will turn on
automatically during a remote start if it is
cold outside and the ventilated seats will
turn on automatically if it is hot outside.
The heated and ventilated seat indicators
may not come on during this operation.
The heated and ventilated seats may cancel
after the ignition is turned on and the
engine is running. These features can be
manually selected after the ignition is
turned on.
The temperature performance of an
unoccupied seat may be reduced. This is
normal.
The heated or ventilated seats may turn on
during a remote start unless they are
disabled in the vehicle personalization menu.
See
Remote Vehicle Start 014 and
Vehicle Personalization 0105.
Rear Seats
If equipped, the coupe seat can be folded
for more cargo space. The rear seat has two
designated seating positions. Fold the seat
only when the vehicle is parked.
To fold the seatback down:
1. Pull on the strap on the top of the rear
seatback.
2. Fold the seatback down.
Page 108 of 357

Chevrolet Camaro Owner Manual (GMNA-Localizing-U.S./Canada/Mexico-
14583589) - 2021 - CRC - 3/26/20
Instruments and Controls 107
Comfort and Convenience
Touch and the following may display:
.Chime Volume
.Reverse Tilt Mirror
Chime Volume
This setting determines the chime volume
level.
Touch the controls on the infotainment
display to adjust the volume.
Reverse Tilt Mirror
When on, the driver, passenger, or both
driver and passenger outside mirrors will tilt
downward when the vehicle is shifted into
R (Reverse) to improve visibility of the
ground near the rear wheels. They may
move from their tilted position when the
vehicle is shifted out of R (Reverse) or
turned off. See Reverse Tilt Mirrors 024.
Touch Off, On - Driver and Passenger, On -
Driver, or On - Passenger.
Lighting
Touch and the following may display:
.Ambient Lighting
.Vehicle Locator Lights
.Exit Lighting Ambient Lighting
This setting allows the selection of available
colors for the ambient lighting in the
vehicle.
The Link to Drive Mode option will change
the ambient lighting to match the color
being used in the instrument cluster based
on the setting of the drive mode button.
This feature can be turned off or on.
Vehicle Locator Lights
This setting flashes the vehicle’s headlamps
when
Kis pressed on the Remote Keyless
Entry (RKE) transmitter.
Touch Off or On.
Exit Lighting
This setting specifies how long the
headlamps stay on after the vehicle is
turned off and exited.
Touch Off, 30 Seconds, 60 Seconds,
or 120 Seconds.
Power Door Locks
Touch and the following may display:
.Open Door Anti Lock Out
.Auto Door Unlock
.Delayed Door Lock
Open Door Anti Lock Out
This setting prevents the driver door from
locking when the door is open. If this
setting is on, the Delayed Door Lock menu
will not be available.
Touch Off or On.
Auto Door Unlock
This allows selection of which of the doors
will automatically unlock when the vehicle is
shifted into P (Park) with an automatic
transmission or when the vehicle is turned
off with a manual transmission.
Select Off, All Doors, or Driver Door.
Delayed Door Lock
When on, this feature will delay the locking
of the doors. To override the delay, press
the power door lock switch on the door.
Touch Off or On.
Remote Lock, Unlock, and Start
Touch and the following may display:
.Remote Unlock Light Feedback
.Remote Lock Feedback
.Remote Door Unlock
.Remote Start Auto Cool Seats
Page 109 of 357
Chevrolet Camaro Owner Manual (GMNA-Localizing-U.S./Canada/Mexico-
14583589) - 2021 - CRC - 3/26/20
108 Instruments and Controls
.Remote Start Auto Heat Seats
.Remote Window Operation
.Passive Door Unlock
.Passive Door Lock
.Remote Left in Vehicle Alert
Remote Unlock Light Feedback
This setting flashes the exterior lamps when
the vehicle is unlocked with the RKE
transmitter.
Touch Off or Flash Lights.
Remote Lock Feedback
This setting specifies how the vehicle
responds when the vehicle is locked with
the RKE transmitter.
Touch Off, Lights and Horn, Lights Only,
or Horn Only.
Remote Door Unlock
This setting specifies whether all doors,
or just the driver door, unlock when pressing
Kon the RKE transmitter.
Touch All Doors or Driver Door. Remote Start Auto Cool Seats
If equipped and turned on, this feature will
turn the ventilated seats on when using
remote start on warm days.
Touch Off, On-Driver and Passenger,
or On-Driver.
Remote Start Auto Heat Seats
This setting automatically turns on the
heated seats when using the remote start
function on cold days. See
Heated and
Ventilated Front Seats 040 and
Remote Vehicle Start 014.
Touch Off, On-Driver and Passenger,
or On-Driver.
Remote Window Operation
If equipped, this feature enables remote
operation of the windows with the RKE
transmitter. See Remote Keyless Entry (RKE)
System Operation 07.
Touch Off or On.
Passive Door Unlock
This setting specifies which doors unlock
when using the button on the driver door
handle to unlock the vehicle.
Touch Off, All Doors, or Driver Door Only. Passive Door Lock
This setting specifies if the vehicle will
automatically lock, or lock and provide an
alert after all the doors are closed, and you
walk away from the vehicle with the RKE
transmitter. See
Remote Keyless Entry (RKE)
System Operation 07.
Touch Off, On with Horn Chirp, or On.
Remote Left in Vehicle Alert
This feature sounds an alert when the RKE
transmitter is left in the vehicle. This menu
also enables Remote No Longer in Vehicle
Alert.
Touch Off or On.
Seating Position
Touch and the following may display:
.Seat Entry Memory
.Seat Exit Memory
Seat Entry Memory
This feature automatically recalls the
previously stored 1 or 2 button positions
when the ignition is changed from off to on
or ACC/ACCESSORY. See Memory Seats037.
Touch Off or On.
Page 165 of 357
Chevrolet Camaro Owner Manual (GMNA-Localizing-U.S./Canada/Mexico-
14583589) - 2021 - CRC - 3/24/20
164 Infotainment System
.Sort Contacts: Touch to sort by first or
last name.
.Re-sync Device Contacts:
This allows the device contacts to re-sync
if you are having difficulty accessing all of
the contacts on your cell phone.
.Delete All Vehicle Contacts: Touch to
delete all vehicle stored contacts.
.OnStar Phone TTY Mode: This enables
OnStar cell phone TTY mode.
Touch Disable or Enable.
Vehicle
This menu allows adjustment of different
vehicle features. SeeVehicle Personalization
0 105.
Personal
If equipped, this menu allows adjustment of
different user profile settings. See “Users”in
Using the System 0119 for information on
setting up user profiles.
The menu may contain the following:
Name
Touch to edit your user name that will be
displayed in the vehicle. Vehicle Account Information
Touch to view the vehicle account
information and to change the account
password.
An
“unverified user account” pop-up will
display until the account information
verification process has been completed on
the Internet. Check your registered e-mail
account for an activation e-mail to complete
the verification process.
Profile Picture
Touch to choose or change your profile
picture.
Profile Identifiers
Touch to have the vehicle recognize the
identifier you choose.
Touch Vehicle Key 1 and/or Vehicle Key 2.
If the Remote Keyless Entry (RKE)
transmitter is lost or stolen, see your dealer.
Security
Touch to have your profile secured with
a PIN.
Touch No or Yes.
Vehicle Name
Touch to edit your vehicle name. Vehicle Account
Touch to view the vehicle account
information and to change the account
password.
Delete Profile
Touch to remove the profile from the
vehicle.
Touch Remove or Cancel.
Teen Driver
If equipped, this allows multiple keys to be
registered for beginner drivers to encourage
safe driving habits. When the vehicle is
started with a Teen Driver key, it will
automatically activate certain safety
systems, allow setting of some features, and
limit the use of others. The Report Card will
record vehicle data about driving behavior
that can be viewed later. When the vehicle
is started with a registered key, the Driver
Information Center (DIC) displays a message
that Teen Driver is active.
To access:
1. Touch Settings on the Home Page, then touch Vehicle, and then Teen Driver.
Page 166 of 357
Chevrolet Camaro Owner Manual (GMNA-Localizing-U.S./Canada/Mexico-
14583589) - 2021 - CRC - 3/24/20
Infotainment System 165
2. Create a Personal Identification Number(PIN) by choosing a four-digit PIN.
Re-enter the PIN to confirm. To change
the PIN, touch Change PIN.
The PIN is required to:
.Register or unregister keys.
.Change Teen Driver settings.
.Change or clear the Teen Driver PIN.
.Access or delete Report Card data.
Register keys to activate Teen Driver and
assign restrictions to the key:
Any vehicle key can be registered, up to a
maximum of eight keys. Label the key to
tell it apart from the other keys.
For a pushbutton start system: 1. Start the engine.
2. For automatic transmissions, the vehicle must be in P (Park). For manual
transmissions, the vehicle must be
stopped with the parking brake set.
3. From the Settings menu, touch Vehicle and then Teen Driver.
4. Enter the PIN.
5. Place the Remote Keyless Entry (RKE) transmitter key you wish to register in
the transmitter pocket. The key does not need to be the one that started the
vehicle. See
Remote Keyless Entry (RKE)
System Operation 07for transmitter
pocket location.
6. From the Teen Driver menu, touch Setup Keys.
.If the transmitter key has not
previously been registered, the option
to add the key displays. Touch Setup
and a confirmation message displays.
Teen Driver restrictions will be
applied whenever this key is used to
operate the vehicle.
.If the transmitter key has already
been registered, the option to
remove the key displays. If Remove is
touched, the transmitter key is no
longer registered. A confirmation
message displays, and Teen Driver
restrictions will not be applied if this
transmitter key is used to operate
the vehicle.
In vehicles with a pushbutton start system,
if a Teen Driver and a non-Teen Driver key
are both present at start up, the vehicle will
recognize the non-Teen Driver key to start
the vehicle. The Teen Driver settings will not
be active. For a keyed ignition system:
1. Start the engine.
2. For automatic transmissions, the vehicle must be in P (Park). For manual
transmissions, the vehicle must be
stopped with the parking brake set.
3. From the Settings menu, touch Vehicle and then Teen Driver.
4. Enter the PIN.
5. Touch Setup Keys. The system displays instructions for registering or
unregistering a key. A confirmation
message displays.
Manage Settings
Audio Volume Limit : Allows the audio
volume limit to be turned on or off. Touch
Set Audio Volume Limit to choose the
maximum allowable audio volume level.
Set Audio Volume Limit : Allows a
maximum radio volume to be set. Use the
arrows to choose the maximum allowable
level for the audio volume.
Teen Driver Speed Limiter : Limits the
maximum speed of the vehicle. When the
speed limiter is turned on and the vehicle is
Page 180 of 357
Chevrolet Camaro Owner Manual (GMNA-Localizing-U.S./Canada/Mexico-
14583589) - 2021 - CRC - 3/24/20
Climate Controls 179
Caution
Do not use a razor blade or sharp object
to clear the inside rear window. Do not
adhere anything to the defogger grid
lines in the rear glass. These actions may
damage the rear defogger. Repairs would
not be covered by the vehicle warranty.
Remote Start Climate Control Operation, If
Equipped : The climate control system may
run when the vehicle is started remotely,
depending on the outside temperature. See
Remote Vehicle Start 014. The rear defog
may come on during remote start based on
cold ambient conditions. The rear defog
indicator light does not come on during a
remote start. When enabled, the front
heated seats, if equipped, will turn on
automatically if it is cold outside. See
Vehicle Personalization 0105. The heated
seat indicator lights do not come on during
a remote start.
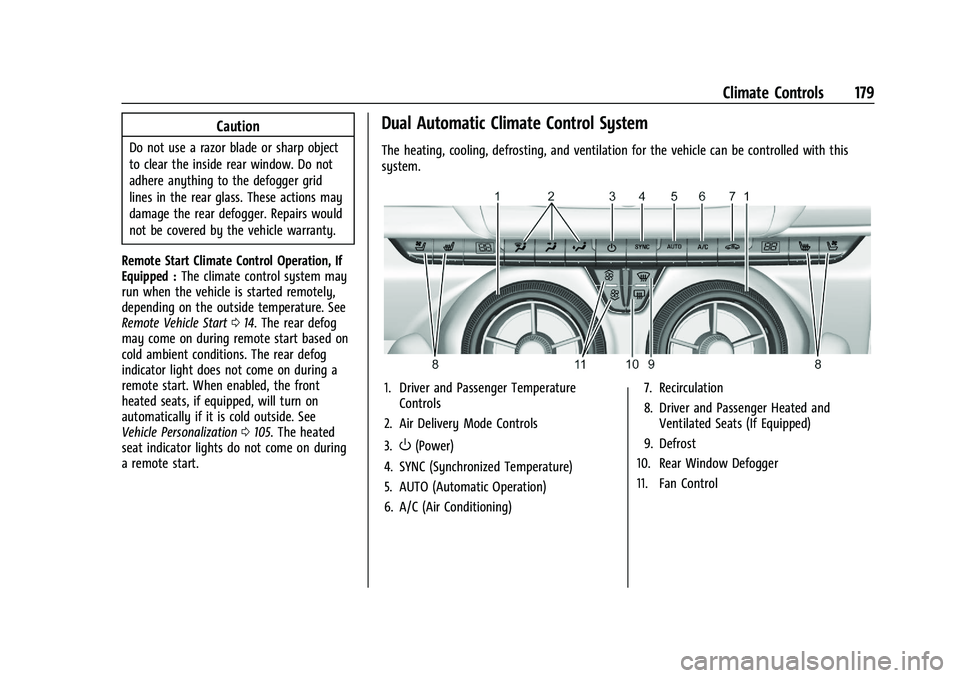
Dual Automatic Climate Control System
The heating, cooling, defrosting, and ventilation for the vehicle can be controlled with this
system.
1. Driver and Passenger Temperature Controls
2. Air Delivery Mode Controls
3.
O(Power)
4. SYNC (Synchronized Temperature)
5. AUTO (Automatic Operation)
6. A/C (Air Conditioning) 7. Recirculation
8. Driver and Passenger Heated and
Ventilated Seats (If Equipped)
9. Defrost
10. Rear Window Defogger
11. Fan Control
Page 183 of 357
Chevrolet Camaro Owner Manual (GMNA-Localizing-U.S./Canada/Mexico-
14583589) - 2021 - CRC - 3/24/20
182 Climate Controls
Do not drive the vehicle until all windows
are clear.
Caution
Do not use a razor blade or sharp object
to clear the inside rear window. Do not
adhere anything to the defogger grid
lines in the rear glass. These actions may
damage the rear defogger. Repairs would
not be covered by the vehicle warranty.
LorM(If Equipped) :PressLorMto
heat the driver or passenger seat.
Press
{orC, if equipped, to ventilate the
driver or passenger seat. See Heated and
Ventilated Front Seats 040.
Remote Start Climate Control Operation, If
Equipped : The climate control system may
run when the vehicle is started remotely,
depending on the outside temperature. See
Remote Vehicle Start 014. The rear defog
may come on during remote start based on
cold ambient conditions. The rear defog
indicator light does not come on during a
remote start. When enabled, the front
heated seats, if equipped, will turn on automatically if it is cold outside. See
Vehicle Personalization
0105. The heated
seat indicator lights do not come on during
a remote start.
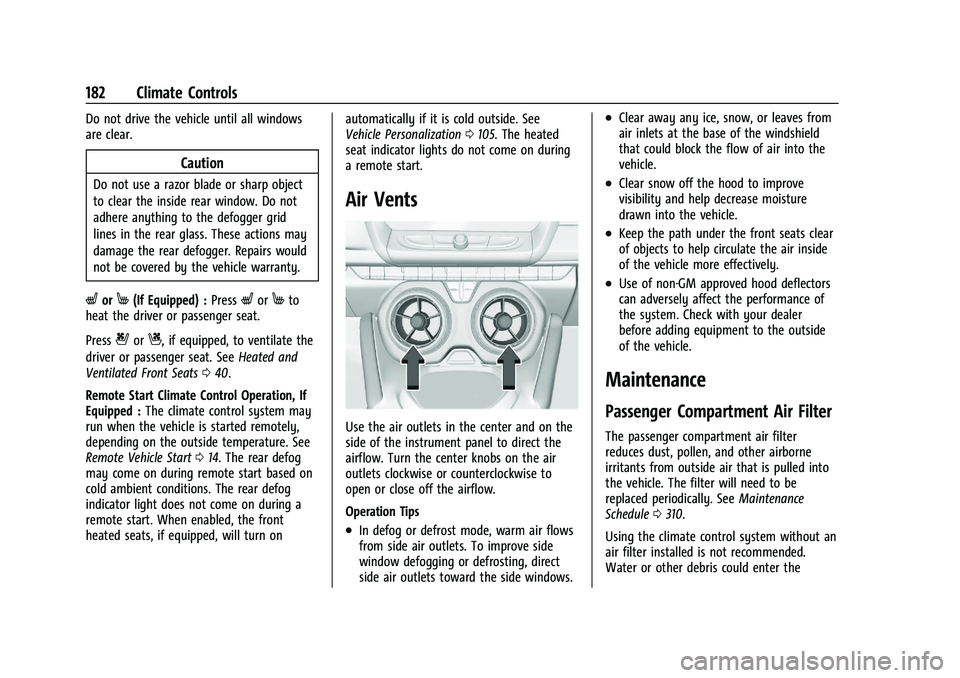
Air Vents
Use the air outlets in the center and on the
side of the instrument panel to direct the
airflow. Turn the center knobs on the air
outlets clockwise or counterclockwise to
open or close off the airflow.
Operation Tips
.In defog or defrost mode, warm air flows
from side air outlets. To improve side
window defogging or defrosting, direct
side air outlets toward the side windows.
.Clear away any ice, snow, or leaves from
air inlets at the base of the windshield
that could block the flow of air into the
vehicle.
.Clear snow off the hood to improve
visibility and help decrease moisture
drawn into the vehicle.
.Keep the path under the front seats clear
of objects to help circulate the air inside
of the vehicle more effectively.
.Use of non-GM approved hood deflectors
can adversely affect the performance of
the system. Check with your dealer
before adding equipment to the outside
of the vehicle.
Maintenance
Passenger Compartment Air Filter
The passenger compartment air filter
reduces dust, pollen, and other airborne
irritants from outside air that is pulled into
the vehicle. The filter will need to be
replaced periodically. See Maintenance
Schedule 0310.
Using the climate control system without an
air filter installed is not recommended.
Water or other debris could enter the