remote start CHEVROLET CAMARO SS 2020 User Guide
[x] Cancel search | Manufacturer: CHEVROLET, Model Year: 2020, Model line: CAMARO SS, Model: CHEVROLET CAMARO SS 2020Pages: 362, PDF Size: 6.08 MB
Page 27 of 362

Chevrolet Camaro Owner Manual (GMNA-Localizing-U.S./Canada/Mexico-
13556304) - 2020 - CRC - 5/10/19
26 Keys, Doors, and Windows
When trying to start the vehicle, the
security light comes on briefly when
the ignition is turned on.
If the engine does not start and the
security light stays on, there is a
problem with the system. Turn the
vehicle off and try again.
If the RKE transmitter appears to be
undamaged, try another transmitter.
Or, you may try placing the
transmitter in the rear cupholder in
the center console. See“Starting
the Vehicle with a Low Transmitter
Battery” underRemote Keyless
Entry (RKE) System Operation 08.
If the engine does not start with the
other transmitter or when the
transmitter is in the rear cupholder
in the center console, your vehicle
needs service. See your dealer who
can service the theft-deterrent
system and have a new transmitter
programmed to the vehicle.
Do not leave the transmitter or
device that disarms or deactivates
the theft-deterrent system in the
vehicle.Exterior Mirrors
Convex Mirrors
{Warning
A convex mirror can make things,
like other vehicles, look farther
away than they really are. If you
cut too sharply into the right lane,
you could hit a vehicle on the
right. Check the inside mirror or
glance over your shoulder before
changing lanes.
The passenger side mirror is convex
shaped.
A convex mirror's surface is curved
so more can be seen from the
driver seat.
Power Mirrors
To adjust each mirror: 1. Press
}or|to select the
driver or passenger side mirror.
The indicator light will
illuminate.
2. Press the arrows on the control pad to move the mirror in the
desired position.
3. Adjust each outside mirror so that a little of the vehicle and
the area behind it can be seen.
4. Press
}or|again to
deselect the mirror.
Page 37 of 362

Chevrolet Camaro Owner Manual (GMNA-Localizing-U.S./Canada/Mexico-
13556304) - 2020 - CRC - 5/10/19
36 Keys, Doors, and Windows
4. When possible, operate theconvertible top when the
vehicle is stopped. The top can
be operated while driving
below 50 km/h (31 mph) and
will stop if that speed is
exceeded. The top operation
will take approximately
25 seconds. Make sure the top
operation can be completed
before that speed is reached.
5. Press and hold the bottom ofM. The windows will
automatically lower. 6. After the convertible top is
completely open, a Driver
Information Center (DIC)
message displays. Release the
switch.
If the radio is on, the sound may be
muted for a brief time due to a new
audio system equalization being
loaded.
Using the RKE Transmitter 1. If equipped, press and release
K, and then
immediately press and hold
Mcontinuously to open the
convertible top all the way. The
vehicle must be off to operate
the convertible top with the
RKE transmitter.
2. The top will stop movement approximately one second
after
Kis released. To stop the
top immediately, press
7,K,
or
Qon the RKE transmitter.
Mwill only open the
convertible top. See
Remote Keyless Entry
(RKE) System 08and
Remote Keyless Entry (RKE)
System Operation 08.
Closing the Convertible Top
The RKE transmitter cannot be used
to close the convertible top. 1. Make sure the sun visors are stored in the center mount
position.
2. Remove all objects from the top of the tonneau cover and
forward of the partition. Place
the partition in the rear storage
area in the upright position.
Fasten both sides of the
partition to the posts just below
the tonneau cover. See Rear
Storage 089.
3. Close the trunk.
4. Start the vehicle or place it in ACC/ACCESSORY.
5. When possible, operate the convertible top when the
vehicle is stopped. The top can
be operated while driving
below 50 km/h (31 mph) and
Page 46 of 362
Chevrolet Camaro Owner Manual (GMNA-Localizing-U.S./Canada/Mexico-
13556304) - 2020 - CRC - 5/10/19
Seats and Restraints 45
Memory positions are linked to RKE
transmitter 1 or 2 for automatic
memory recalls.
Before saving, adjust all available
memory feature positions. Turn the
vehicle on and then press and
release SET; a beep will sound.
Then immediately press and hold 1,
2, or
B(Exit) until two beeps
sound. To manually recall these
positions, press and hold 1, 2, or
B
until the saved position is reached.
Follow the instructions under
“Saving Memory Positions.”
The vehicle identifies the current
driver ’s RKE transmitter number
(1–8). See Remote Keyless Entry
(RKE) System Operation 08. Only
RKE transmitters 1 and 2 can be
used for automatic memory recalls.
A Driver Information Center (DIC)
welcome message indicating the
transmitter number may display for
the first few ignition cycles following
a transmitter change. For Seat Entry
Memory to work properly, save the
positions to the memory button (1 or
2) matching the RKE transmitter
number displayed in the DIC welcome message. Carry the linked
RKE transmitter when entering the
vehicle.
Vehicle Personalization Settings
.
To have the Seat Entry Memory
movement begin when the
vehicle is started, select the
Settings menu, then Vehicle,
then Seating Position, and then
Seat Entry Memory. Select On or
Off. See “Seat Entry Memory”
later in this section.
. To begin Seat Exit Memory
movement when the vehicle is
turned off and the driver door is
opened, or when the vehicle is
turned off with the driver door
already opened, select the
Settings menu, then Vehicle,
then Seating Position, and then
Seat Exit Memory. Select On or
Off. See “Seat Exit Memory”
later in this section.
. See Vehicle Personalization
0 124 for additional setting
information. Identifying Driver Number
To identify the driver number:
1. Move your RKE transmitter away from the vehicle.
2. Start the vehicle with another key or RKE transmitter. The
DIC should display the driver
number for the other RKE
transmitter. Turn the vehicle off
and remove the key or RKE
transmitter from the vehicle.
3. Start the vehicle with the initial key or RKE transmitter. The
DIC should display the driver
number of your RKE
transmitter.
Saving Memory Positions
Read these instructions completely
before saving memory positions.
To save preferred driving positions
1 and 2: 1. Turn the vehicle on or to ACC/ ACCESSORY.
A DIC welcome message may
indicate driver number 1 or 2.
Page 47 of 362
Chevrolet Camaro Owner Manual (GMNA-Localizing-U.S./Canada/Mexico-
13556304) - 2020 - CRC - 5/10/19
46 Seats and Restraints
2. Adjust all available memoryfeatures to the desired driving
position.
3. Press and release SET; a beep will sound.
4. Immediately press and hold the 1 or 2 memory button matching
the above DIC welcome
message until two beeps
sound.
If too much time passes
between releasing SET and
pressing 1, the memory
position will not be saved and
two beeps will not sound.
Repeat Steps 3 and 4.
1 or 2 corresponds to the driver
number. See “Identifying Driver
Number” previously in this
section.
5. Repeat Steps 1–4 for a second driver using 1 or 2.
To save the position for
Band
Seat Exit Memory features, repeat
Steps 1–4 using
B. This saves the
position for getting out of the
vehicle. Save preferred memory feature
positions to both 1 and 2 if you are
the only driver.
Manually Recalling Memory
Positions
Press and hold 1, 2, or
Bto recall
the previously saved memory
positions if you are driver 1 or 2
identified in the DIC welcome
message.
To stop Manual Memory recall
movement, release 1, 2, or
Bor
press any of the following controls:
. Power seat
. Memory SET
. Power mirror, with the driver or
passenger side mirror selected
. Power steering wheel,
if equipped
Seat Entry Memory
The vehicle identifies the number of
the current driver ’s RKE transmitter
(1–8). See Remote Keyless Entry
(RKE) System Operation 08. If the
RKE transmitter is 1 or 2, and Seat Entry Memory is enabled in vehicle
personalization, the positions saved
to the same memory button number
1 or 2 are automatically recalled
when the vehicle is turned on,
or turned from off to ACC/
ACCESSORY. RKE transmitters 3–8
will not provide automatic memory
recalls.
To turn Seat Entry Memory on or off,
see
“Vehicle Personalization
Settings” previously in this section
and Vehicle Personalization 0124.
If equipped with an automatic
transmission, the shift lever must be
in P (Park) to start Seat Entry
Memory recall. Seat Entry Memory
recall will complete if the vehicle is
shifted out of P (Park) prior to
reaching the saved memory
position.
If equipped with a manual
transmission, the parking brake
must be set to start Seat Entry
Memory recall. Seat Entry Memory
recall will complete if the parking
brake is released prior to reaching
the saved memory position.
Page 49 of 362
Chevrolet Camaro Owner Manual (GMNA-Localizing-U.S./Canada/Mexico-
13556304) - 2020 - CRC - 5/10/19
48 Seats and Restraints
To return the seatback to the upright
position, lift the seatback and
manually push it rearward until it
locks in place. Push and pull on the
seatback to make sure it is locked.
Do not use the power recline control
on the outboard side of the seat to
raise the seatback. SeeReclining
Seatbacks 044.
Heated and Ventilated
Front Seats
{Warning
If temperature change or pain to
the skin cannot be felt, the seat
heater may cause burns. To
reduce the risk of burns, use care
when using the seat heater,
especially for long periods of
time. Do not place anything on
the seat that insulates against
heat, such as a blanket, cushion,
cover, or similar item. This may
cause the seat heater to
(Continued)
Warning (Continued)
overheat. An overheated seat
heater may cause a burn or may
damage the seat.
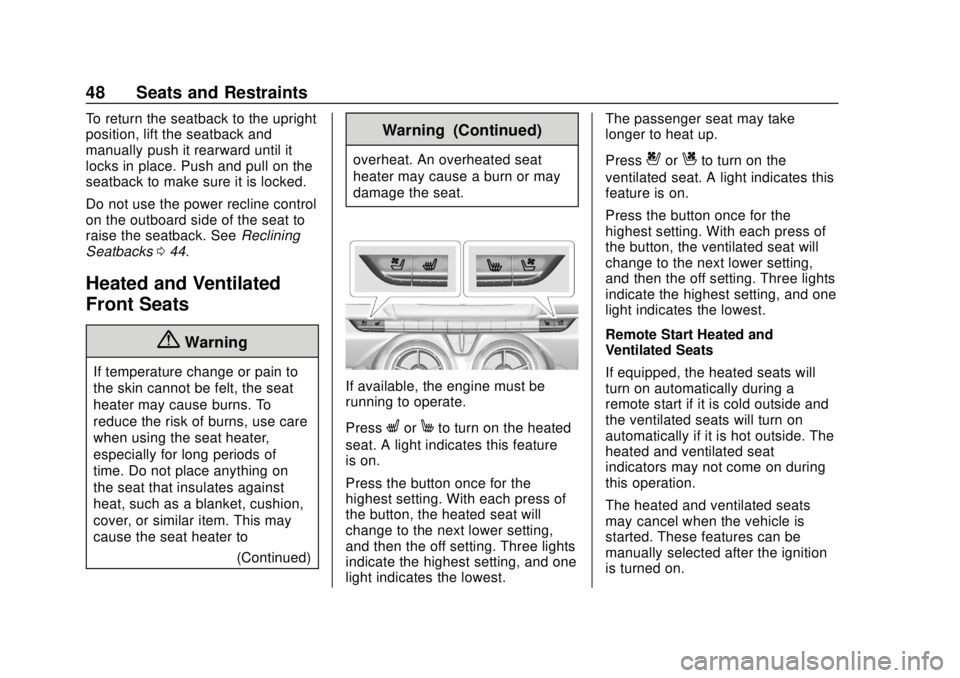
If available, the engine must be
running to operate.
Press
LorMto turn on the heated
seat. A light indicates this feature
is on.
Press the button once for the
highest setting. With each press of
the button, the heated seat will
change to the next lower setting,
and then the off setting. Three lights
indicate the highest setting, and one
light indicates the lowest. The passenger seat may take
longer to heat up.
Press
{orCto turn on the
ventilated seat. A light indicates this
feature is on.
Press the button once for the
highest setting. With each press of
the button, the ventilated seat will
change to the next lower setting,
and then the off setting. Three lights
indicate the highest setting, and one
light indicates the lowest.
Remote Start Heated and
Ventilated Seats
If equipped, the heated seats will
turn on automatically during a
remote start if it is cold outside and
the ventilated seats will turn on
automatically if it is hot outside. The
heated and ventilated seat
indicators may not come on during
this operation.
The heated and ventilated seats
may cancel when the vehicle is
started. These features can be
manually selected after the ignition
is turned on.
Page 50 of 362
Chevrolet Camaro Owner Manual (GMNA-Localizing-U.S./Canada/Mexico-
13556304) - 2020 - CRC - 5/10/19
Seats and Restraints 49
The temperature performance of an
unoccupied seat may be reduced.
This is normal.
The heated or ventilated seats will
not turn on during a remote start
unless they are enabled in the
vehicle personalization menu. See
Remote Vehicle Start016 and
Vehicle Personalization 0124.Rear Seats
If equipped, the coupe seat can be
folded for more cargo space. The
rear seat has two designated
seating positions. Fold the seat only
when the vehicle is parked.
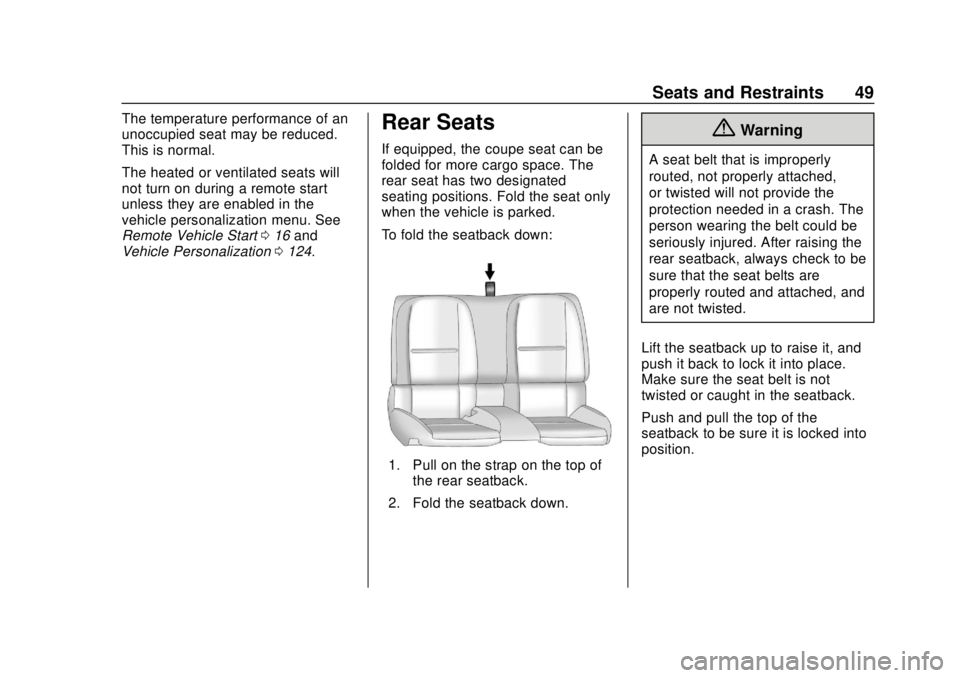
To fold the seatback down:
1. Pull on the strap on the top of
the rear seatback.
2. Fold the seatback down.
{Warning
A seat belt that is improperly
routed, not properly attached,
or twisted will not provide the
protection needed in a crash. The
person wearing the belt could be
seriously injured. After raising the
rear seatback, always check to be
sure that the seat belts are
properly routed and attached, and
are not twisted.
Lift the seatback up to raise it, and
push it back to lock it into place.
Make sure the seat belt is not
twisted or caught in the seatback.
Push and pull the top of the
seatback to be sure it is locked into
position.
Page 128 of 362

Chevrolet Camaro Owner Manual (GMNA-Localizing-U.S./Canada/Mexico-
13556304) - 2020 - CRC - 5/10/19
Instruments and Controls 127
The Link to Drive Mode option will
change the ambient lighting to
match the color being used in the
instrument cluster based on the
setting of the drive mode button.
This feature can be turned off or on.
Vehicle Locator Lights
This setting flashes the vehicle’s
headlamps when
Kis pressed on
the Remote Keyless Entry (RKE)
transmitter.
Touch Off or On.
Exit Lighting
This setting specifies how long the
headlamps stay on after the vehicle
is turned off and exited.
Touch Off, 30 Seconds, 60 Seconds,
or 120 Seconds.
Power Door Locks
Touch and the following may
display:
. Open Door Anti Lock Out
. Auto Door Unlock
. Delayed Door Lock Open Door Anti Lock Out
This setting prevents the driver door
from locking when the door is open.
If this setting is on, the Delayed
Door Lock menu will not be
available.
Touch Off or On.
Auto Door Unlock
This allows selection of which of the
doors will automatically unlock when
the vehicle is shifted into P (Park)
with an automatic transmission or
when the vehicle is turned off with a
manual transmission.
Select Off, All Doors, or Driver Door.
Delayed Door Lock
When on, this feature will delay the
locking of the doors. To override the
delay, press the power door lock
switch on the door.
Touch Off or On.
Remote Lock, Unlock, Start
Touch and the following may
display:
.
Remote Unlock Light Feedback .
Remote Lock Feedback
. Remote Door Unlock
. Remote Start Auto Cool Seats
. Remote Start Auto Heat Seats
. Remote Window Operation
. Passive Door Unlock
. Passive Door Lock
. Remote Left in Vehicle Alert
Remote Unlock Light Feedback
This setting flashes the exterior
lamps when the vehicle is unlocked
with the RKE transmitter.
Touch Off or Flash Lights.
Remote Lock Feedback
This setting specifies how the
vehicle responds when the vehicle
is locked with the RKE transmitter.
Touch Off, Lights and Horn, Lights
Only, or Horn Only.
Page 129 of 362

Chevrolet Camaro Owner Manual (GMNA-Localizing-U.S./Canada/Mexico-
13556304) - 2020 - CRC - 5/10/19
128 Instruments and Controls
Remote Door Unlock
This setting specifies whether all
doors, or just the driver door, unlock
when pressing
Kon the RKE
transmitter.
Touch All Doors or Driver Door.
Remote Start Auto Cool Seats
If equipped and turned on, this
feature will turn the ventilated seats
on when using remote start on
warm days.
Touch Off, On-Driver and
Passenger, or On-Driver.
Remote Start Auto Heat Seats
This setting automatically turns on
the heated seats when using the
remote start function on cold days.
See Heated and Ventilated Front
Seats 048 and
Remote Vehicle Start 016.
Touch Off, On-Driver and
Passenger, or On-Driver. Remote Window Operation
If equipped, this feature enables
remote operation of the windows
with the RKE transmitter. See
Remote Keyless Entry (RKE)
System Operation
08.
Touch Off or On.
Passive Door Unlock
This setting specifies which doors
unlock when using the button on the
driver door handle to unlock the
vehicle.
Touch Off, All Doors, or Driver
Door Only.
Passive Door Lock
This setting specifies if the vehicle
will automatically lock, or lock and
provide an alert after all the doors
are closed, and you walk away from
the vehicle with the RKE transmitter.
See Remote Keyless Entry (RKE)
System Operation 08.
Touch Off, On with Horn
Chirp, or On. Remote Left in Vehicle Alert
This feature sounds an alert when
the RKE transmitter is left in the
vehicle. This menu also enables
Remote No Longer in Vehicle Alert.
Touch Off or On.
Seating Position
Touch and the following may
display:
.
Seat Entry Memory
. Seat Exit Memory
Seat Entry Memory
This feature automatically recalls
the previously stored 1 or 2 button
positions when the ignition is
changed from off to on or ACC/
ACCESSORY. See Memory Seats
0 44.
Touch Off or On.
Seat Exit Memory
This feature automatically recalls
the previously stored exit button
positions when the ignition is
changed from on or ACC/
Page 147 of 362
Chevrolet Camaro Owner Manual (GMNA-Localizing-U.S./Canada/Mexico-
13556304) - 2020 - CRC - 5/10/19
146 Climate Controls
Caution
Do not use a razor blade or sharp
object to clear the inside rear
window. Do not adhere anything
to the defogger grid lines in the
rear glass. These actions may
damage the rear defogger.
Repairs would not be covered by
the vehicle warranty.
Remote Start Climate Control
Operation, If Equipped : The
climate control system may run
when the vehicle is started remotely,
depending on the outside
temperature. See Remote Vehicle
Start 016. The rear defog may
come on during remote start based
on cold ambient conditions. The
rear defog indicator light does not
come on during a remote start.
When enabled, the front heated
seats, if equipped, will turn on
automatically if it is cold outside.
See Vehicle Personalization 0124.
The heated seat indicator lights do
not come on during a remote start.
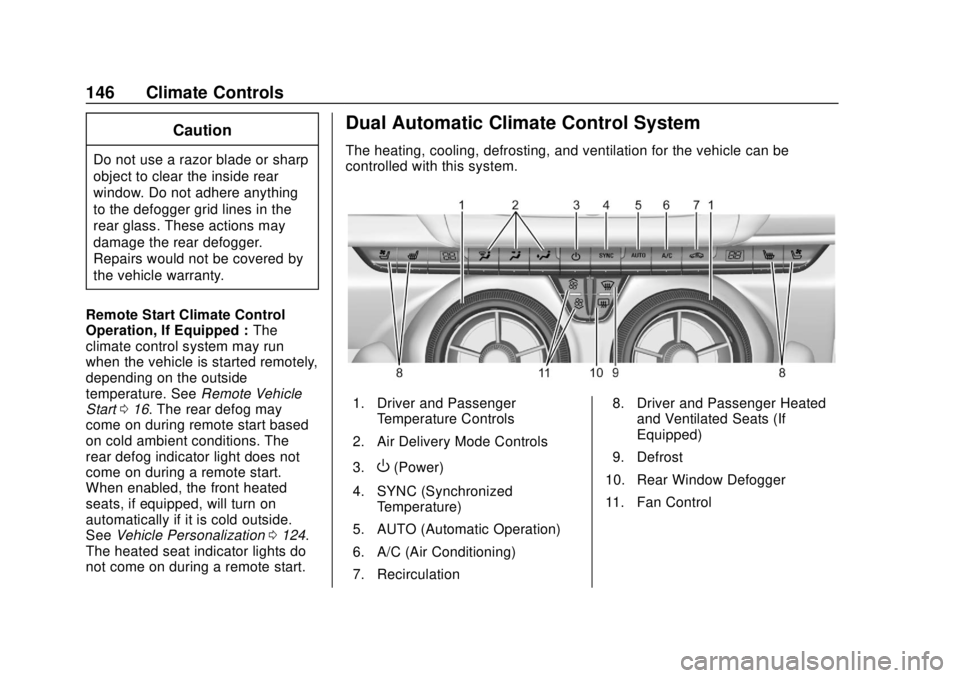
Dual Automatic Climate Control System
The heating, cooling, defrosting, and ventilation for the vehicle can be
controlled with this system.
1. Driver and Passenger Temperature Controls
2. Air Delivery Mode Controls
3.
O(Power)
4. SYNC (Synchronized Temperature)
5. AUTO (Automatic Operation)
6. A/C (Air Conditioning)
7. Recirculation 8. Driver and Passenger Heated
and Ventilated Seats (If
Equipped)
9. Defrost
10. Rear Window Defogger
11. Fan Control
Page 150 of 362

Chevrolet Camaro Owner Manual (GMNA-Localizing-U.S./Canada/Mexico-
13556304) - 2020 - CRC - 5/10/19
Climate Controls 149
light will not come on. Press@to
select recirculation; press it again to
select outside air.
Rear Window Defogger
1: Press to turn the rear window
defogger on or off. An indicator light
on the button comes on to show that
the rear window defogger is on. The
defogger turns off if the ignition is
turned off or to ACC/ACCESSORY.
The rear window defogger can be
set to automatic operation. See
“Climate and Air Quality” under
Vehicle Personalization 0124.
When Auto Rear Defog is selected,
the rear window defogger turns on
automatically when the interior
temperature is cold and the outside
temperature is about 7 °C (44 °F)
and below.
The heated outside mirrors turn on
when the rear window defogger
button is on and help to clear fog or
frost from the surface of the mirrors.
Do not drive the vehicle until all
windows are clear.
Caution
Do not use a razor blade or sharp
object to clear the inside rear
window. Do not adhere anything
to the defogger grid lines in the
rear glass. These actions may
damage the rear defogger.
Repairs would not be covered by
the vehicle warranty.
LorM(If Equipped) : PressLor
Mto heat the driver or
passenger seat.
Press
{orC, if equipped, to
ventilate the driver or passenger
seat. See Heated and Ventilated
Front Seats 048.
Remote Start Climate Control
Operation, If Equipped : The
climate control system may run
when the vehicle is started remotely,
depending on the outside
temperature. See Remote Vehicle
Start 016. The rear defog may
come on during remote start based on cold ambient conditions. The
rear defog indicator light does not
come on during a remote start.
When enabled, the front heated
seats, if equipped, will turn on
automatically if it is cold outside.
See
Vehicle Personalization 0124.
The heated seat indicator lights do
not come on during a remote start.